Hello Blogging Friends! Today, is going to have to busy another quick blog post. Maybe when I get back home I can do another post with more details on this project.
This is a Goddess wall hanging that I designed using one of the New Releases from Spellbinders, LF-013 Jewel Goddess.
I also added a few jewelery findings, rhinestones, glitter and mica flakes.
Thank you so much for stopping by! I am sorry about the short and quick blog posts but things have been a little crazy with CHA the past couple of days--crazy in a good way--LOL!! I love being able to see friends and enjoy our time together.
Hugs & Smiles, Heidi
Supplies Stamps: Crafty Secrets Artsy Banner Paper: Discount Cardstock Really Red; Royal & Langnickel Engraving Art Silver Foil Ink: Clearsnap Frost White ColorBox; Ranger Distress Ink Fired Brick Dies: SpellbindersLF-013 Jewel Goddess, S4-363 Jewel Fantisies, S5-086 Bitty Blossoms, Foil Accessories: Embossing Powder Brilliant Red Sparkle; Jewelery Findings; The Rubber Cafe Scrap Happy Sheer Glue, Patriot Red, Terrifically Teal, Diamond Clear You're So Fine Glitter; Red Rhinestones; Tulle; Hot Glue Gun
Good morning blogging friends!Today is the first day of CHA!! If I can get an pictures of the event I will try but most of my time is spent working in the Spellbinders booth so I don't have much of an opportunity to get out there and take pictures.
For the background I very lightly inked the tag with Distress Inks and then I applied Liquid Laminate and added gold mica flakes. All of the coloring on the tag was done with inks.
Sorry for such a quick post but thank you so much for stopping by today! I hope you have a wonderful and creative day!!
Good morning blogging friends! Today, I have a quick and easy Valentine's card to share with you.
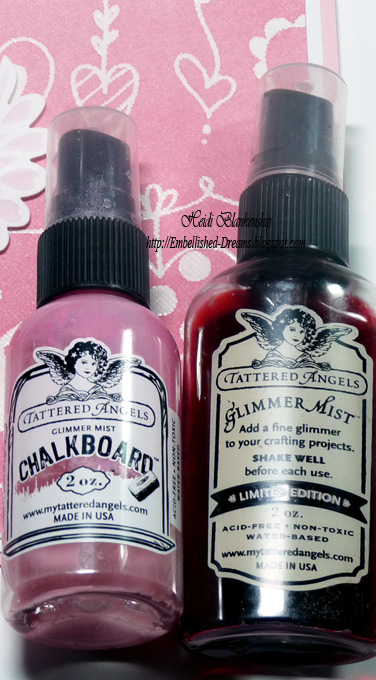
I started with the String of Hearts paper from Discount Cardstock and then added Tattered Angels Glimmer Mist Tutti Fruitti, Chalkboard Cotton Candy to add the color to the paper.
The paper started out white with the embossed pattern of the hearts and when I applied the glimmer mist the embossed is like a resist and doesn't pick up the color.
Good morning blogging friends! Today, I have a quick post to share a layout with you. I am taking off today for California--headed to CHA!! I am excited to see friends and all of the fantastic new products!!
Here is a close up of the M-Bossabilities. I lightly inked over the embossed area and it really makes it pop!
Here is a close up of the lighthouse. First I die cut the image then I airbrushed it using a Copic marker, added a piece of Kraft paper to the back and to finish it off I lightly inked around the edges.
I printed the journaling and then inked the inside edges of the die cut. I also added Jellie Dots around the picture and some paper flowers and leaves.
Thank you so much for stopping by today!! If you are going to be at CHA please stop by the Spellbinders booth and say hello! I would love to meet you!!! I hope you have a wonderful and creative day!!
Hello blogging friends! Today, I have a card to share with you using a new technique, Bisque Pottery. The technique is from the Try A New Technique Challenge - TLC361 - over at Splitcoaststampers. I don't do challenges very often but after I saw a beautiful card by my sweet friends Debbie Seyer I knew I had to try this technique! Click HERE to check out Debbie's card.
Here is the card that I did with the Bisque Pottery technique. This technique is so easy to do and I LOVE the results!! One of my favorite color combos is White & Ivory. Click HERE to check out all of the details about this technique.
Here is a close up of the background paper. I used Old Paper Distress Ink from Ranger to do the technique. Just simply use your brayer and a light brown or grey color (other colors can be used) to ink on the flat side of an embossing folder, place your paper down on the side of the folder without ink and then emboss as usual. I used the New EL-002 Regal (B side) M-Bossabilities Folder from Spellbinders to emboss my paper.
Thank you so much for stopping by today! Now it's time to go clean off my desk and get back to creating--I am trying to finish up CHA projects. Can't wait to share some of the New products with you!! I hope you have a wonderful and creative day!!
Hello blogging friends! Sorry it has been a few days since my last post, I have been busy working on projects for CHA. I will be at CHA demoing and doing make-n-take in the Spellbinders booth. If you are going to be at CHA please stop by and say hello--I would love to meet you!!
Today, I have a quit post with a Valentine's Day card to share with you.
I embossed the bottom half of the card using EL-007 Elegance (B side) M-Bossabilities Folder from Spellbinders and I took the Festive Berries Distress Ink pad and rubbed it across the embossed area giving it a look of faux letterpress. Then I inked the bottom edges.
Next I stamped the heart image three times creating a border across the top of the card. The stamped image is from I-1135 Lace Set (Heart) from The Rubber Cafe. This set includes four images--Lacy Love, Heart, Butterfly and a Fan.
I added some Pearl Jellie Dots to the centers of the embossed flowers.
I added the pink envelope and the little girl paper doll from the Family Fun Paper Kit. I stamped Be Mine on a lacy die cut using CR-02250 Winter Words, Lady Bug (red) ink and S4-354 Splendid Circles from Spellbinders and tucked it inside the envelope and added a sparkling heart covered in mica flakes and glitter and added a paper rose to the center of the heart and edged the rose in glitter too. To create the heart and rose I used S4-351 Spiral Blossom One and S4-137 Classic Scalloped Heart from Spellbinders. Then I added a little more glitter to the stamped note and the little girl.
I added a Double Ruffles Bright Pink ribbon trim from Really Reasonable Ribbon to the top of the Bingo card and also added some tulle and vintage buttons. I added You're So Fine Glitter to add a little sparkle. **Tip I used Copic markers to change the color of the ruffle ribbon trim and the little girls dress for a perfect match.
To see more picture and find out other details please click HERE to see my post on the Vintage Street Market Blog. Thanks so much for stopping by today!!
Hello blogging friends! Hopefully I will actually be able to get this post up today--I am not sure if blogger is having issues or what but it seems to be acting crazy today!! I spent almost an hour and a half trying to upload my photos and now things are jumping all over the place--LOL! I have noticed several people on FB commenting about issues with blogger over the past couple of weeks. Well, whatever it is I hope it gets worked out soon!!
Today, I have a card to share with you that I thought was just perfect timing with CHA right around the corner.
I know several friends (designers) who getting into the crunch time with creating CHA projects, myself included and I thought the sentiment was perfect! ;-) I used JustRite StampersCR-0225 Just Keep Calm Clear Stamp Set and some of the New Spellbinders Releases. Are you LOVING all of the New Releases? I know I am loving seeing all of the new products!!
To start I used three of the die template from S5-098 Jewel Stones, this is one of the New Releases from the Positively Me Collection by Julianna Hudgins from Spellbinders. You can click HERE to see some of the New Releases from the Positively Me Collection by Julianna Hudgins from the Spellbinders Blog Frenzy. I die cut the jewel shapes using the Grand Calibur and shrink plastic. Then I punched a hole in the top of each piece and used my heating tool to shrink the plastic and an acrylic block to flatten them. Then I used Copic markers and airbrushed the color onto the plastic jewel pieces.
Then I used glitter, jellie dots and mica (see the supply list for all of the links) to embellish each piece and I added Glossy Accents for a beautiful smooth and shiny finish.
Here is a close up of the jewel pieces. I love all of the sparkle!!
This is the scrap paper from when I did the airbrushing. I thought it looked to pretty to just throw away.
I used the hand die template from S5-097 Jewel Treasures to cut/emboss the center of the S5-077 Labels Twenty-Five and then I added the piece of scrap paper with the airbrushing behind the hand. I also added a little glitter to the colored part of the hand.
Like I said I think this is a prefect sentiment for all of us who are busy creating CHA artwork. I love CR-0225 Just Keep Calm New Stamp Set from JustRite Stampers --it is such a fun set!! I also airbrushed the label and added some glitter to the outer edge.
I used the jewel pieces and some beads and jewelry findings to create a charm for the card front.
The entry window for the Spellbinders Paper Arts contest on this blog has ended. Don't forget that you still have time to enter at the blogs listed on the Spellbinders blog. Thank you!
Welcome to the fifth day of the Spellbinders Abilities and Beyond Blog Frenzy!
Spellbinders™ Paper Arts is absolutely thrilled to bring you our largest product releases ever! These new collections are some of the most innovative and beautiful die cutting and embossing templates in the world! The Spellbinders Abilities and Beyond Blog Frenzy allows you a sneak peek of our introductions for the 2012 Winter Craft and Hobby Association trade show later this month.
Win today’s new Spellbinders products!
Be eligible to win the Grand Prize by entering each day, see the schedule below!
Enter my Blog Frenzy from 12:00 am Eastern Standard Time (EST) January 16, 2012 until 11:59 pm January 17, 2012.
See the Spellbinders Blog for the complete schedule of designers and contest rules.
Thank you Spellbinders Paper Arts for sponsoring this contest!
Here are the new products I am introducing:
Sku Name EL-007 Elegance MSRP: $9.99 PRODUCT SIZES: 5" x 7"
Sku Name S5-113 Floral Burst MSRP: $29.99 DIE SIZES: 1: 1 ¼''
2: 2''
3: 4''
I am very excited to be sharing Spellbinders M-Bossabilities™ folder EL-007 Elegance and S5-113 Floral Burst a Cut • Fold • Tuck die templates with you today. I am so excited to feature the new and innovative Spellbinders M-Bossabilities folders! These are unique reversible folders, with 2 separate yet coordinated embossing patterns for twice the designs and double the value! The folders simply flip over, so easy to use! There are 20 new folders, each with 2 designs, and they come in 2 sizes, 5 x 7” and 4 ¼ x 5 ½” for all your paper crafting needs!
Watch this introductory video!
See how to use the new Spellbinders M-Bossabilities in this video!
I am honored to be introducing the new Cut Fold Tuck dies from Spellbinders! These European inspired designs create beautifully layered geometric designs in one pass through your die cutting machine! Simply fold the pieces, tuck them under and watch as the amazing designs develop! With multiple dies in each set, you can easily and quickly create different sized Cut Fold Tuck die cuts, or layer them for wonderful dimensional effects!
Watch this introductory video!
See this how-to video on the new Cut Fold Tuck dies:
To start I used the two larger die templates in the S5-113 Floral Burst set and Racy Raspberry DoubleMates cardstock. The paper is double sided with a light color on one side and a darker color on the other side which is perfect for creating die cuts with the Cut, Fold and Tuck die templates. I used the Grand Calibur® machine to cut/emboss the die cut shapes.
The next step is to lift up and fold the paper on all of the cut lines.
Once all the pieces are folded over then tuck the cut lines behind the previous fold, it's super easy! This is what the die cut will look like once all of the cut lines are folded and tucked in.
Then cut/emboss the largest shape using S5-113 Floral Burst die template and the Grand Calibur with Simply Smooth Ivory cardstock from Discount Cardstock. I inked the entire die cut with Antique Linen Distress Ink before folding and tucking.
Next fold and tuck the die cut. Inking the die cut before folding it will give you a two tone look.
I used EL-007 Elegance M-Bossabilities folder to emboss a piece of Bronze Metallic cardstock from Discount Cardstock. I love the crisp and deep embossing you can achieve using the M-Bossabilities folders!
I lightly sanded the cardstock to reveal the black core.
Before adding the die cuts I adhered a piece of Antique Gold Satin Wrinkle Ribbon from Really Reasonable Ribbon.
Here you can see the dimension from layering the die cuts. I added LeCreme pearls from Want2Scrap to the die cuts and some hand made trinket pins for embellishments.
The back side of the foil is silver so the foil also works great to achieve the two tone look. I used Scrap Happy Sheer Glue from The Rubber Cafe to adhere all of the foil pieces. There is a fine tip on the applicator on the glue bottle which makes it really easy to apply the glue in all of the small areas. I added black rhinestones from Want2Scrap in the center of the die cuts and along the edge of the plate.
Here is a close up of one of the candles. I used Simply Smooth Ivory cardstock and embossed it with EL-007 Elegance M-Bossablitities folder. Then to add the color I used Distress Inks. I added one of the small foil die cuts to the center of each candle and then added black rhinestones.
By entering the Spellbinders Abilities and Beyond Blog Frenzy you agree to the Official Rules. For questions on the Spellbinders Abilities and Beyond Blog Frenzy, send an email to contestquestions@spellbinders.us; no entries will be accepted at this email address.
TO ENTER: My blog is open for entries from 12:00 am, January16, 2012, until 11:59 pm, January 17, 2012, EST.
1) Send your Blog Frenzy email entry to: Reaveal14@spellbinders.us 2) The subject must be EL-007 Elegance and S5-113 Floral Burst
3) Send!
Be sure to visit all the Designers on their Blog Frenzy dates! Daily winners will receive an email within 24 hours of the blog frenzy’s closing. The winners will have 72 hours to reply to that email to claim prize. If a winner fails to respond within 72 hours, a new winner will be drawn.
To be eligible for the Grand Prize, enter each and every Blog Frenzy within its designated time period, send your entries from the email address for each entry. The Grand Prize has a retail value of over $1900 and includes the complete Spellbinders line of die cutting and embossing templates released at the 2012 Winter CHA show, and a Spellbinders Grand Calibur® Die Cutting and Embossing Machine!
I love your comments! Unfortunately your comment does not count as an entry, so be sure to enter as stated above, and then leave a comment!
Spellbinders and M-Bossabilities are trademarks of Spellbinders Paper Arts, llc. Grand Calibur is a registered trademark of Spellbinders Paper Arts, llc.