Happy New Year!!! I want to wish you all the best in 2010!!! Whatever path life takes you on over the next year I hope your journey has many blessings!! I also want to say "Thank You" from the bottom of my Heart for all of your friendships, creative inspiration, love, encouragement and support---it really truly means more to me than you will ever know!!! You are all the BEST!!!!
Be safe & stay warm ;-)
Love and (((Hugs))) to you all!!!!! HAPPY NEW YEAR!!!!!!!! 2010!!!!!!!!!
Smiles,
Heidi

Showing posts with label Friends. Show all posts
Showing posts with label Friends. Show all posts
Friday, January 1, 2010

Tuesday, December 22, 2009
I'm still here!!
Sorry for being MIA! We had some major computer problems again and that's why I haven't been around for a while. The power supply went out and in the process it fried the motherboard. Eric built the computer and the hard drive was configured the motherboard which they no longer make so he had to do some searching to find a new motherboard that would work. Too much technical stuff for me but I can't even begin to tell you how HAPPY and THRILLED I am to have the computer back!!! I hope you are all enjoying the holiday season and not getting too stressed out! Today was the last day of school for the boys and they are so excited for Christmas! We still have some stuff to do and the clock it ticking. The next couple of days are going to be busy. I will be back to my regular posting very soon! I just wanted to say hello to all of you---I sure have missed you!! If I don't get a chance to get back on here before Christmas I want to wish you all a VERY MERRY CHRISTMAS!!!! I hope that you will all have a wonderful Christmas with family and friends and safe travels!!!
Take care & hugs to you all!
Heidi
Take care & hugs to you all!
Heidi
Thursday, November 26, 2009
Happy Thanksgiving!!
Good Morning and Happy Thanksgiving to everyone!! I hope that you all have a Relaxing, Wonderful and Blessed Thanksgiving Holiday with your family and friends. I am very thankful for so many things in my life from the very small everyday things to great big things. Please know I am very thankful for each and everyone of you---Your inspiration, support and friendships mean the world to me!! I hope that you will all have a little time today to be able to reflect on all the things in your life that you are thankful for. Many blessings to you all!!
Happy Thanksgiving!!
Smiles!
Heidi
Happy Thanksgiving!!
Smiles!
Heidi
Friday, November 6, 2009
Vicki Chrisman's Sketch Challenge - Nature - JustRite Autumn Blessings
Good morning and Happy Friday! A few days back my dear sweet friend, Vicki Chrisman, asked if I would like to join her and some friends in a sketch challenge. I happily said, YES!! I have a link list at the bottom of this post for other ladies who joined in Vicki's Sketch Challenge so be sure to check them out! Vicki designed a Fantastic sketch and said we could create a LO, card, altered or whatever we would like. I decided to create a LO. I have a beautiful close up picture that I took of some leaves and it has just been screaming at me to be put on a LO! *wink*
Here is the sketch that Vicki Chrisman designed. Here is the LO that I designed using the sketch.
 I am so happy with how the LO turned out! I have been wanting to use this photo for a long time but I just wasn't sure exactly what to do with it and the sketch gave me a push in the right direction.
I started out by digging through my stash to see what I had that could be used on the LO and trying to match up colors. For the background I used designer paper from My Mind's Eye, the Bella Bella Collections--this is some of my favorite paper! Then I found a JustRite stamp set, some ribbon, a brad and chipboard so it was time to get started.
 I first I started with the raw chipboard. I used three different colors of Glimmer Mist, Honey Dew Mist, Coffee Shop and Vintage Pink on the chipboard.
  Usually I spray the glimmer mist over a non-stick mat for easy clean up but I had an idea for some leaves and I didn't want any of the Glimmer Mist to go to waste so I put down a piece of white cardstock and then the chipboard letters. After I had the Glimmer Mist on the letters I heat set them. Then I used a Glimmer Screen and ran the screen and chipboard letters through the Wizard from Spellbinders™ to emboss them. After I had the embossing done then I applied Memento Rick Cocoa ink over top of the letters to pick up the embossed detail. Also to add a little more depth to the letters I went around the edges with a black Copic marker. Here is a close-up of the letters.
 I took that piece of cardstock that started out white and was covered with Glimmer Mist and set it aside to dry.
 Next I wanted to add a stamped sentiment and I thought the Enjoy the Days of Autumn stamp from the JustRite Stampers, Autumn Blessings stamp set would match with the LO perfectly.
  I started with a piece of ivory cardstock and lightly misted the same three colors of Glimmer Mist as mentioned above. I heat set it to dry and then I stamped the image/sentiment with Memento Rich Cocoa ink and used the Labels Nine S4-233 die template along with the Wizard from Spellbinders™ to cut out the die shape.
  After I had the diecut shape then I added some Memento Rich Cocoa ink to the edges and touches of gold using a Metallic Gold Gelly Roll pen from Sakura.
The last part I worked on was making some leaves for embellishments. Remember the piece of white cardstock that I placed down to add the Glimmer Mist to the chipboard letters? Like I said I didn't want to waste a drop of it and the colors blend so beautifully together I thought it would be a great piece of paper for creating the leaves. To create the leaves I used Harvest Leaves Two S4-011 die templates from Spellbinders™. After I had the diecuts made I added a little Ranger Distress Ink, Peeled Paint (Green) and Worn Lipstick (Pink) to the leaves and then I also added Memento Rich Cocoa all over to pick up the embossed detail.
  I also added a strip of Chatter Box Artsylicious Fine Flocked Paper in Willow along the side. I distressed the edges and also added some ink. I added ribbon and lace trim, a trinket pin, a bird brad and some twig punch outs.
Supplies~
Stamps~JustRite Stampers-Autumn Blessings Stamp Set, 2-1/4'' x 3-1/16'' Wood Stamper
Paper~My Mind's Eye-Bella Bella Collection, Chatter Box-Artsylicious Fine Flocked Paper in Willow, WorldWin-DoubleMates Rich Chocolate Malt, The Paper Company-White, Ivory
Ink~Tsukineko-Memento Rich Cocoa, Ranger-Distress Ink Peeled Paint, Worn Lipstick
Other~Spellbinders™-Wizard, Labels Nine S4-233, Harvest Leaves Two S4-011 die templates, Tattered Angels-Glimmer Mist Honey Dew Mist, Coffee Shop, Vintage Pink, Glimmer Screens Garden Blossom, Sakrua-Metallic Gold Gelly Roll Pen, Martha Stweart-Twig Punch, Copic-Black 100, Oriental trading Company-Bird Brad, Advantus Corp.-Tim Holtz idea-ology Trinket Pins, Beacon-3-in-1 Advanced Craft Glue. Chipboard Letters, Ribbon and Lace Trim, Foam Tape and Cotton Balls
I want to say a special Thanks to Vicki for inviting me to join in the fun!! Fabulous Sketch, Vicki!!
Thank you so much for stopping by today and I hope you have a wonderful weekend!!
Smiles!
Heidi
Here is the sketch that Vicki Chrisman designed.
 Here is the LO that I designed using the sketch.
 I am so happy with how the LO turned out! I have been wanting to use this photo for a long time but I just wasn't sure exactly what to do with it and the sketch gave me a push in the right direction.
 I started out by digging through my stash to see what I had that could be used on the LO and trying to match up colors. For the background I used designer paper from My Mind's Eye, the Bella Bella Collections--this is some of my favorite paper! Then I found a JustRite stamp set, some ribbon, a brad and chipboard so it was time to get started.
 I first I started with the raw chipboard. I used three different colors of Glimmer Mist, Honey Dew Mist, Coffee Shop and Vintage Pink on the chipboard.
  Usually I spray the glimmer mist over a non-stick mat for easy clean up but I had an idea for some leaves and I didn't want any of the Glimmer Mist to go to waste so I put down a piece of white cardstock and then the chipboard letters. After I had the Glimmer Mist on the letters I heat set them. Then I used a Glimmer Screen and ran the screen and chipboard letters through the Wizard from Spellbinders™ to emboss them. After I had the embossing done then I applied Memento Rick Cocoa ink over top of the letters to pick up the embossed detail. Also to add a little more depth to the letters I went around the edges with a black Copic marker. Here is a close-up of the letters.
 I took that piece of cardstock that started out white and was covered with Glimmer Mist and set it aside to dry.
 Next I wanted to add a stamped sentiment and I thought the Enjoy the Days of Autumn stamp from the JustRite Stampers, Autumn Blessings stamp set would match with the LO perfectly.
  I started with a piece of ivory cardstock and lightly misted the same three colors of Glimmer Mist as mentioned above. I heat set it to dry and then I stamped the image/sentiment with Memento Rich Cocoa ink and used the Labels Nine S4-233 die template along with the Wizard from Spellbinders™ to cut out the die shape.
  After I had the diecut shape then I added some Memento Rich Cocoa ink to the edges and touches of gold using a Metallic Gold Gelly Roll pen from Sakura.
 The last part I worked on was making some leaves for embellishments. Remember the piece of white cardstock that I placed down to add the Glimmer Mist to the chipboard letters? Like I said I didn't want to waste a drop of it and the colors blend so beautifully together I thought it would be a great piece of paper for creating the leaves. To create the leaves I used Harvest Leaves Two S4-011 die templates from Spellbinders™.
 After I had the diecuts made I added a little Ranger Distress Ink, Peeled Paint (Green) and Worn Lipstick (Pink) to the leaves and then I also added Memento Rich Cocoa all over to pick up the embossed detail.
  I also added a strip of Chatter Box Artsylicious Fine Flocked Paper in Willow along the side. I distressed the edges and also added some ink. I added ribbon and lace trim, a trinket pin, a bird brad and some twig punch outs.
Supplies~
Stamps~JustRite Stampers-Autumn Blessings Stamp Set, 2-1/4'' x 3-1/16'' Wood Stamper
Paper~My Mind's Eye-Bella Bella Collection, Chatter Box-Artsylicious Fine Flocked Paper in Willow, WorldWin-DoubleMates Rich Chocolate Malt, The Paper Company-White, Ivory
Ink~Tsukineko-Memento Rich Cocoa, Ranger-Distress Ink Peeled Paint, Worn Lipstick
Other~Spellbinders™-Wizard, Labels Nine S4-233, Harvest Leaves Two S4-011 die templates, Tattered Angels-Glimmer Mist Honey Dew Mist, Coffee Shop, Vintage Pink, Glimmer Screens Garden Blossom, Sakrua-Metallic Gold Gelly Roll Pen, Martha Stweart-Twig Punch, Copic-Black 100, Oriental trading Company-Bird Brad, Advantus Corp.-Tim Holtz idea-ology Trinket Pins, Beacon-3-in-1 Advanced Craft Glue. Chipboard Letters, Ribbon and Lace Trim, Foam Tape and Cotton Balls
Here's a link list for the other ladies who played along for the Sketch Challenge.
I want to say a special Thanks to Vicki for inviting me to join in the fun!! Fabulous Sketch, Vicki!!
Thank you so much for stopping by today and I hope you have a wonderful weekend!!
Smiles!
Heidi
Sunday, June 14, 2009
Stampscapes Thinking of You Card
It's going to be a short and quick post for today. We have a lot going on this weekend with family here and this weekend is Eddie Cochran weekend. Eddie Cochran was born right here in the small town of Albert Lea. He was a musician in the late 1950's and early 1960's, he was best know for his most famous hit, "Summertime Blues". There are several events planned throughout the weekend so it should be a fun one!
The card I am sharing with you today is one that I made a while back for one of my husbands co-workers. The co-worker was in the hospital and several of the employees wanted to send him their well wishes so my husband asked if I could make a card. The stamped images on the card are all from Stampscapes. I haven't used my Stampscapes stamps in a while but they are still one of my favorites and they are wonderful for making masculine cards. I used the large Oak Branch-203G stamp for the background on the light brown colored mat. For the main image I used the Oak Branch-203G, Cloud with Sun-108G, and then third one the name has come off of the wooden block so I am not sure but it looks like a pathway. All of the coloring was done with chalks and then I cut out the image using the Wizard and the Labels Two S4-162 die template from Spellbinders. The sentiment was stamped and then I also made a diecut using the Wizard and the Double Ended Tags S3-149 die template. I also added some ribbon, brads and twig punches to finish off the front of the card.
  For the inside of the card I added several pages, scoring them first and then adding the brads to hold them in place. This is something that is really quick and easy to do and a nice way to give more room for special messages when you have several co-worker signing a card.
Thank you so much for stopping by today and I hope you are all having a wonderful weekend!! The sun is shinning here and it looks like it's going to be another beautiful day!
Smiles!
Heidi
The card I am sharing with you today is one that I made a while back for one of my husbands co-workers. The co-worker was in the hospital and several of the employees wanted to send him their well wishes so my husband asked if I could make a card.
 The stamped images on the card are all from Stampscapes. I haven't used my Stampscapes stamps in a while but they are still one of my favorites and they are wonderful for making masculine cards. I used the large Oak Branch-203G stamp for the background on the light brown colored mat. For the main image I used the Oak Branch-203G, Cloud with Sun-108G, and then third one the name has come off of the wooden block so I am not sure but it looks like a pathway. All of the coloring was done with chalks and then I cut out the image using the Wizard and the Labels Two S4-162 die template from Spellbinders. The sentiment was stamped and then I also made a diecut using the Wizard and the Double Ended Tags S3-149 die template. I also added some ribbon, brads and twig punches to finish off the front of the card.
  For the inside of the card I added several pages, scoring them first and then adding the brads to hold them in place. This is something that is really quick and easy to do and a nice way to give more room for special messages when you have several co-worker signing a card.
 Thank you so much for stopping by today and I hope you are all having a wonderful weekend!! The sun is shinning here and it looks like it's going to be another beautiful day!
Smiles!
Heidi
Wednesday, June 10, 2009
His Stand
I just have a really quick post for today, the card I am sharing with you is one that I made for our neighbor's son. He is in the service and a couple of months ago they had a going away party for him, he will be gone for at least a year and maybe up to a year and a half. He is so young (just in his early 20's) and so brave! The cardstock I used for the base and the mat are both from WorldWin and the designer paper is from the My Minds Eye, Bohemia Collection. I found the poem online, the author is unknown and I changed it up a little and then printed it onto white cardstock. If you click on the picture it will enlarge so you can read the poem. I used the Wizard and the Curved Rectangles S5-006 die templates from Spellbinders for die cutting around the poem. I left the cardstock in the die template and inked the inside edges with Not Quite Navy ink from SU. I also used the largest size of the Curved Rectangles along with designer paper from My Minds Eye to make another diecut and a mat behind the poem. For the title I made a diecut using one of the die templates from Ribbon Tags Trio S3-150 and I left the cardstock in the die template to be able to stencil the inside edges of the tag with Vintage Photo Distress Ink from Ranger. I also added some ribbon and brads. The card is pretty simple but I think the poem says it all!
Thank you so much for stopping by today and please remember to keep all of the men and women in the service, at home and away in your thoughts and prayers. They are all so brave and I know I am thankful everyday for all they do!!!
Smiles!
Heidi
 The cardstock I used for the base and the mat are both from WorldWin and the designer paper is from the My Minds Eye, Bohemia Collection. I found the poem online, the author is unknown and I changed it up a little and then printed it onto white cardstock. If you click on the picture it will enlarge so you can read the poem. I used the Wizard and the Curved Rectangles S5-006 die templates from Spellbinders for die cutting around the poem. I left the cardstock in the die template and inked the inside edges with Not Quite Navy ink from SU. I also used the largest size of the Curved Rectangles along with designer paper from My Minds Eye to make another diecut and a mat behind the poem. For the title I made a diecut using one of the die templates from Ribbon Tags Trio S3-150 and I left the cardstock in the die template to be able to stencil the inside edges of the tag with Vintage Photo Distress Ink from Ranger. I also added some ribbon and brads. The card is pretty simple but I think the poem says it all!
Thank you so much for stopping by today and please remember to keep all of the men and women in the service, at home and away in your thoughts and prayers. They are all so brave and I know I am thankful everyday for all they do!!!
Smiles!
Heidi
Thursday, January 1, 2009
Happy New Year!!! 2009
Happy New Year and Best Wishes to you all in 2009!!
I just had to share this little video that a dear friend sent to me in am email--I thought it was so cute & funny too!! *wink*
Once the little video is done you can click on it to find out how you can send one.
Once again HAPPY NEW YEAR!!!!
Smiles!
Heidi
I just had to share this little video that a dear friend sent to me in am email--I thought it was so cute & funny too!! *wink*
Once the little video is done you can click on it to find out how you can send one.
Once again HAPPY NEW YEAR!!!!
Smiles!
Heidi
Thursday, November 27, 2008
Happy Thanksgiving!!
This is just a really quick post to wish all of you a very Happy Thanksgiving!! I don't have any art to share with you today but I will have some tomorrow. ;) I made a few Thanksgiving Day cards but I wanted to wait with posting them until after they were given out so I will share those with you tomorrow.
There are so many things I am thankful for in my life!! Family and friends are at the top of the list!! I am thankful for the many wonderful people I have met through my blog, online forums and DT's. You are all so creative, talented & inspiring and I cherish our online friendships!!
I hope that however you spent your day that you were surrounded by the people you love and took a little time to think about all the things you are thankful for in your life!!
Many Blessings to you all!!
Heidi
There are so many things I am thankful for in my life!! Family and friends are at the top of the list!! I am thankful for the many wonderful people I have met through my blog, online forums and DT's. You are all so creative, talented & inspiring and I cherish our online friendships!!
I hope that however you spent your day that you were surrounded by the people you love and took a little time to think about all the things you are thankful for in your life!!
Many Blessings to you all!!
Heidi
Wednesday, October 8, 2008
Birthday Wishes
Happy Birthday wishes to my dear friend Miriam!! I have know Miriam since I was little and she is one of the nicest and sweetest ladies I know. One thing that we both absolutely love is anything with a vintage style, all the pretty lacey, frilly and girly-girl stuff. One of Miriam's other friends had asked me if I could make a card for her to give to Miriam for her birthday and I knew exactly what to reach for when making this card! I'm sorry I can't show you just yet what I made for Miriam because she hasn't seen it yet but once she has I'll be sure to share it with all of you. So for today I am going to share with you the card that I made for her friend to give to her.
Here is Miriam's Birthday card.~ I think the image of the vase with the roses is Absolutely Gorgeous!! Would you believe that's a sticker!? It's from one of the Crafty Secrets Heartwarming Vintage Sticker sheet, Greetings & Sentiments. I added just a touch of Ranger, Diamond Stickles to the frame and the vase on the sticker. Behind the sticker I used a frame from the new Frameabilities die from Spellbinders. For the frame on this card I only wanted the shape so I used the Wizard and the Frameabilites die to cut the shape. One of the great things about the dies from Spellbinders is that they are so versatile! You can cut, emboss & stencil, it's your choice--you get to pick and chose what you want! You've gotta LOVE that!!
  For the butterfly I used one of the images from the Crafty Secrets Little Dolls Images & Journal Notes. I love these little booklets!! They are packed full of so many wonderful vintage images and they also have journal notes that you can use with your scrapbooking or on the insides of your cards or however you would like to use them with your papercrafting. I cut out the image and then added some Ranger, Diamond Stickles to the edges & body of the butterfly. Then I used the Crafty Secrets Altered Art stamp set for the butterfly wings on the top. I stamped the image in gold onto vellum and then embossed it. Then I colored in the backside using Copic markers, cut out the wings and used glue dots to adhere them to the other butterfly and slightly popped the wings up. For the background paper I used a flourish image from the Crafty Secrets Cherubs stamp set. I used gold pigment ink and then I used a sponge to gently rub the ink into the paper which gave it a softer look. Then I sponged the edges of the cardstock using Ranger Distress Ink, Vintage Photo. All of the CS is from WorldWin and I also added a pretty peach satin ribbon and some pearls.
Here is another view of the card .~ Miriam, I hope you had a wonderful Birthday and I hope to see you soon! Hugs to you!!
Thank you so much for stopping by today!! I hope you are having a Wonderful Week!!
Smiles!
Heidi
Here is Miriam's Birthday card.~
 I think the image of the vase with the roses is Absolutely Gorgeous!! Would you believe that's a sticker!? It's from one of the Crafty Secrets Heartwarming Vintage Sticker sheet, Greetings & Sentiments. I added just a touch of Ranger, Diamond Stickles to the frame and the vase on the sticker. Behind the sticker I used a frame from the new Frameabilities die from Spellbinders. For the frame on this card I only wanted the shape so I used the Wizard and the Frameabilites die to cut the shape. One of the great things about the dies from Spellbinders is that they are so versatile! You can cut, emboss & stencil, it's your choice--you get to pick and chose what you want! You've gotta LOVE that!!
  For the butterfly I used one of the images from the Crafty Secrets Little Dolls Images & Journal Notes. I love these little booklets!! They are packed full of so many wonderful vintage images and they also have journal notes that you can use with your scrapbooking or on the insides of your cards or however you would like to use them with your papercrafting. I cut out the image and then added some Ranger, Diamond Stickles to the edges & body of the butterfly. Then I used the Crafty Secrets Altered Art stamp set for the butterfly wings on the top. I stamped the image in gold onto vellum and then embossed it. Then I colored in the backside using Copic markers, cut out the wings and used glue dots to adhere them to the other butterfly and slightly popped the wings up. For the background paper I used a flourish image from the Crafty Secrets Cherubs stamp set. I used gold pigment ink and then I used a sponge to gently rub the ink into the paper which gave it a softer look. Then I sponged the edges of the cardstock using Ranger Distress Ink, Vintage Photo. All of the CS is from WorldWin and I also added a pretty peach satin ribbon and some pearls.
Here is another view of the card .~
 Miriam, I hope you had a wonderful Birthday and I hope to see you soon! Hugs to you!!
Thank you so much for stopping by today!! I hope you are having a Wonderful Week!!
Smiles!
Heidi
Thursday, September 25, 2008
Crafty Secrets Day at Fountain of Memories
This past Saturday I was at Fountain of Memories for a Special Crafty Secrets Day. I was there in the afternoon doing demos and make-n-takes and I had such a blast with all of those ladies!! Some of the ladies were long time stampers and some of them have just found a new hobby and are very excited about Crafty Secrets products and learning all about stamping.
Here are a few pictures from our day.
This is Nancy who is the store owner and her daughter Dayna who also works at Fountain of Memories and takes care of all the ordering. Dayna also has a blog & you can see some of her design work HERE. Some of the ladies doing one of the make-n-takes.
 Here's one of the make-n-takes the ladies were able to do. Since Fountain of Memories has Srappers and Stampers I wanted to have projects for each of them. The first one is a card and the second one is a tag that could be used as a scrapbook element with a smaller hidden tag on the inside for journaling. Both the card and the tag were done using three of the Crafty Secrets stamp sets: Journaling (the script writing), Cherubs (flourish) and Bird Notes (birds).
 This cute little kitchen towel was part of the demo. I showed the ladies how fun, quick and easy it is to work with the Cotton Scraps from Crafty Secrets. Cotton Scraps are images printed on cotton twill. They have a paper backing but no glue or adhesive so you can either sew them onto something or you can glue them on. You can also use tape runners, buttons and brads to hold them in place. The towel was done using one of the images from the Cooking Cotton Scraps.
 Here is the display at Fountain of Memories with all of the Wonderful Crafty Secrets products they are carrying in their store.
 This is another card that I did during the demo. It is kind of hard to see in the picture, but the light green velum has flourishes stamped on it in gold. I used a gold pigment ink and then instead of heatsetting the pigment ink I lightly buffed it (using a kleenex), doing this tones down the gold and leave a very soft (kind of dreamy looking) image. The flourish is from the Mini Memories stamp set. The sentiment, birds and the corner elements are all stickers from Greetings and Sentiments sticker sheet.
 Here is the second make-n-take that the ladies could make. The first one is a card and the second one is a matchbook. The matchbook open and there is a tri-fold on the inside with room for pictures and journaling. Both the card and the matchbook were done using the Flourishes stamp set and the Artsy Alphabet stamp set for the monogram. On the inside of the matchbook I also used Frame It stamp set to add lines for the journaling.

 This next project was also a demo and I was showing the ladies how you can have a few little items and make up a quick little gift. I also did a demo using the Copic markers on the tea bag. The tea bag is from the Coffee & Tea stamp set.
 The Christmas card was also a demo using the Vintage cuts. The image is from the Christmas Time Vintage Cuts. The Vintage Cuts are so beautifully done and they work great to make quick and easy focal point for cards and so many other projects.
  A couple more of the ladies looking at all of the wonderful Crafty Secrets products & trying to decide what to order!
  Here is another project from the demo. Using the Cotton Scraps, Baby Girl and a little bit of pink velvet ribbon I made this cute little onesie. These are so quick and easy to make and they would make a perfect little gift.
 I hope you enjoyed all of the picture and different designs! I have a ton more pictures but I'm saving some of them for another post. I also wanted to mention for all of the local people I will be back at Fountain of Memories on Oct. 4th from 12-3 pm teaching a class using Crafty Secrets products. The class will be a Halloween theme and we will be using the NEW Crafty Secrets Halloween Fun Stamp Set. If you are interested stop by Fountain of Memories to sign up or give them a call @ 507-373-1996.
Thanks so much for stopping by today and I hope you are having a Wonderful Week!!
Smiles!
Heidi
PS>>>I also wanted to add a little Thank You to Carol in Manitoba, Canada--your comment was so sweet!! *wink*
Here are a few pictures from our day.
This is Nancy who is the store owner and her daughter Dayna who also works at Fountain of Memories and takes care of all the ordering. Dayna also has a blog & you can see some of her design work HERE.
 Some of the ladies doing one of the make-n-takes.
 Here's one of the make-n-takes the ladies were able to do. Since Fountain of Memories has Srappers and Stampers I wanted to have projects for each of them. The first one is a card and the second one is a tag that could be used as a scrapbook element with a smaller hidden tag on the inside for journaling. Both the card and the tag were done using three of the Crafty Secrets stamp sets: Journaling (the script writing), Cherubs (flourish) and Bird Notes (birds).
 This cute little kitchen towel was part of the demo. I showed the ladies how fun, quick and easy it is to work with the Cotton Scraps from Crafty Secrets. Cotton Scraps are images printed on cotton twill. They have a paper backing but no glue or adhesive so you can either sew them onto something or you can glue them on. You can also use tape runners, buttons and brads to hold them in place. The towel was done using one of the images from the Cooking Cotton Scraps.
 Here is the display at Fountain of Memories with all of the Wonderful Crafty Secrets products they are carrying in their store.
 This is another card that I did during the demo. It is kind of hard to see in the picture, but the light green velum has flourishes stamped on it in gold. I used a gold pigment ink and then instead of heatsetting the pigment ink I lightly buffed it (using a kleenex), doing this tones down the gold and leave a very soft (kind of dreamy looking) image. The flourish is from the Mini Memories stamp set. The sentiment, birds and the corner elements are all stickers from Greetings and Sentiments sticker sheet.
 Here is the second make-n-take that the ladies could make. The first one is a card and the second one is a matchbook. The matchbook open and there is a tri-fold on the inside with room for pictures and journaling. Both the card and the matchbook were done using the Flourishes stamp set and the Artsy Alphabet stamp set for the monogram. On the inside of the matchbook I also used Frame It stamp set to add lines for the journaling.
 This next project was also a demo and I was showing the ladies how you can have a few little items and make up a quick little gift. I also did a demo using the Copic markers on the tea bag. The tea bag is from the Coffee & Tea stamp set.
 The Christmas card was also a demo using the Vintage cuts. The image is from the Christmas Time Vintage Cuts. The Vintage Cuts are so beautifully done and they work great to make quick and easy focal point for cards and so many other projects.
  A couple more of the ladies looking at all of the wonderful Crafty Secrets products & trying to decide what to order!
  Here is another project from the demo. Using the Cotton Scraps, Baby Girl and a little bit of pink velvet ribbon I made this cute little onesie. These are so quick and easy to make and they would make a perfect little gift.
 I hope you enjoyed all of the picture and different designs! I have a ton more pictures but I'm saving some of them for another post. I also wanted to mention for all of the local people I will be back at Fountain of Memories on Oct. 4th from 12-3 pm teaching a class using Crafty Secrets products. The class will be a Halloween theme and we will be using the NEW Crafty Secrets Halloween Fun Stamp Set. If you are interested stop by Fountain of Memories to sign up or give them a call @ 507-373-1996.
Thanks so much for stopping by today and I hope you are having a Wonderful Week!!
Smiles!
Heidi
PS>>>I also wanted to add a little Thank You to Carol in Manitoba, Canada--your comment was so sweet!! *wink*
Tuesday, August 19, 2008
We are back home
Hello to everyone out in blog land! We were on vacation in West Virginia for the past week and we got home late Saturday. We all had a wonderful time, it was a nice and relaxing vacation! We really enjoyed our visit with Eric's mom and Amanda, Chase (my step-son), Ben and other family and friends. We took so many pictures (over 500!), West Virginia is very Beautiful! I wanted to share some of the pictures with you so I created a slide show for those of you that would like to take a look. The boys really loved the trip & it was very exciting for them as it was their first time flying! Some of the places we visited...East River lookout, The famous Tree in the Rock (it's the largest living thing growing out of a rock!), New River Gorge, Endless Wall trail, Babcock State Park, Babcock Mill, WV Visitor Center, WV Memorial Fountain.
I hope you enjoy the pictures! Please check back soon, I am working on some new projects to share with you. *wink*
Also THANK YOU so much for all the wonderful comments & personal emails & congrats for the Crafty Secrets Design Team!! I have to tell you I received my Crafty Secrets DT package from Sandy and there are sooooo many fun goodies I can't wait to show you some of the things I'm working on!
Smiles!
Heidi


I hope you enjoy the pictures! Please check back soon, I am working on some new projects to share with you. *wink*
Also THANK YOU so much for all the wonderful comments & personal emails & congrats for the Crafty Secrets Design Team!! I have to tell you I received my Crafty Secrets DT package from Sandy and there are sooooo many fun goodies I can't wait to show you some of the things I'm working on!
Smiles!
Heidi
Sunday, August 3, 2008
CHA Kids Craft Creations
Awhile back I made a really fun project for Spellbinders and now I can finally share it with you! One of my projects was chosen for the Kids Craft Creations and was on display at CHA. Everyone who participated had to make a craft that kids between the ages of 7-12 could recreate.
The project I did was using Spellbinders dies, fun foam and a whole lot of glue dots along with a few other supplies. The project was called "Beach Bum" and here is a picture of it on display at CHA.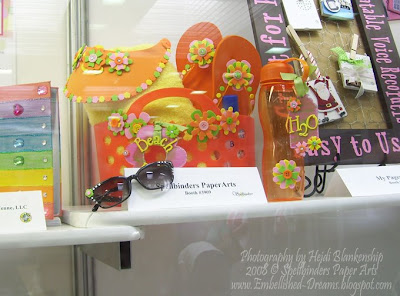 Here another one with me...my sweet friend and fellow Spellbinders DT member Holly Craft took the pictures.
 The "Beach Bum" project is also being featured online at Today's Creative Home Arts. If you would like to see more close up pictures of each item and find out all of the details you can click HERE or above on Today's Creative Home Arts.
Thank you so much for stopping by!! I know since I have been back from CHA I haven't been able to post much but thanks for hanging in there with me!! Please check back soon as I have some very Exciting News to share with you all!!!
Smiles!
Heidi
The project I did was using Spellbinders dies, fun foam and a whole lot of glue dots along with a few other supplies. The project was called "Beach Bum" and here is a picture of it on display at CHA.
 Here another one with me...my sweet friend and fellow Spellbinders DT member Holly Craft took the pictures.
 The "Beach Bum" project is also being featured online at Today's Creative Home Arts. If you would like to see more close up pictures of each item and find out all of the details you can click HERE or above on Today's Creative Home Arts.
Thank you so much for stopping by!! I know since I have been back from CHA I haven't been able to post much but thanks for hanging in there with me!! Please check back soon as I have some very Exciting News to share with you all!!!
Smiles!
Heidi
Saturday, July 26, 2008
CHA-S 2008 with Spellbinders!!


What a Fantastic and Amazing time at CHA-S!!! We were hopping at the Spellbinders booth!! I was so happy to see and spend time with fellow Design Team members, they are truly an extraordinary group of ladies!! I also missed seeing some of the Design Team members that weren't able to be at CHA!!! Here are a few of my favorite pictures from downtown Chicago. On the first night Holly and I took the train into downtown Chicago. Holly's been to Chicago several times and she gave me a wonderful tour of the city!! Thanks again Holly...it was a Blast!!!


Here are some pictures of art and the Spellbinders Ladies during the show from the Spellbinders booth.


After a long but very fun week we spent out last night together and went out for pizza at Ginos. It was soooooo Yummy!!


It has taken me a little longer to recoup from the trip than what I thought it would! LOL! I promise to have some new artwork up very soon! I hope you have a wonderful weekend and thanks so much for stopping by!!
Smiles!
Heidi
Subscribe to:
Posts (Atom)
LinkWithin
