Showing posts with label Tangerine Die Cutting Machine. Show all posts

Wednesday, November 22, 2017

Quick DIY Fall Jar Candle Holder - Tonic Studios

Hello everyone!  I have very quick DIY Fall home decor project to share with you.  This project is fast, inexpensive and would also make a great gift if you are going to someone else's house to celebrate Thanksgiving.  I also have a great tip to share with you over on the Tonic Studios Blog. :) 


If you would like to find out all of the details and see a step-by-step tutorial on how to create this Fall jar candle holder you can click HERE to visit the Tonic Studios Blog.

Thanks so much for stopping by today!

Happy Crafting!
Heidi

Supplies
Ball Mason Jar (or you could use a recycled jar) 
Ranger Cut-N-Dry Sponge 
Post-It Tape 
Post-It Notes (full adhesive) 
Twine 
Battery Operated Candle 


Thursday, May 26, 2016

Tonic Studios - Cherish the Moment Shape Card

Hello everyone!  I don't know about you, but I love dies that can be used to create shape cards.  Today I will share with you how to create a shape card using the 1228E Sew Pretty Cherish the Moment Rectangle Frame die set.


To create the base of the shape card I used white cardstock and the largest die template in the 1228E Sew Pretty Cherish the Moment Rectangle Frame die set.  I wanted to create a top folding card so I cut a piece of white cardstock to 4-1/4 x 11 and scored the paper at 5-1/2.  Then I taped the die template in place so the cut edge of the die was over the fold of the card base.  I used the 147E Tangerine Machine die cut the shape.  Then I used the largest die and the decorative filigree piece and die cut that from white pearl cardstock.  I used 419E Craft Tacky 120ml to adhere the card base and the decorative pieces together.  I die cut the sentiment from gold mirror cardstock and added that to the center of the card.


Next I used green pearl cardstock and the center die from the 1163E Floral Fancy Decorative Mini Die Set to create the decorative flourish piece.  Then I fussy cut the ends of the die cut to used the flourishes as small accent pieces.  To create the butterflies I used blue pearl cardstock and 530E Layering Butterflies Set 1 - Papillon Pair.  In the photo you can also see all of the decorative details from the pinhole pattern on the die cut.


I used pink pearl cardstock and the 770E Entwinning Trellis Radiant Roselily Die Set to create the flowers.  For each flower I die cut two flower shapes from the three smallest flowers in the die set.  To shape the flowers I misted the front and back of the paper with water.  Doing this will help to break down the fibers in the paper and soften it so it is a lot easier to shape. Then I used the Floral Crafters Tool Set 380 - 266E to shape and curve the flowers.  You can let the flowers air dry or use a heat tool to speed up the process.  Once the flowers are dry I layered them using the 419E Craft Tacky 120ml glue and offset the petals.


Once the flowers were done I added them to the card front and then added the butterflies.  Here you can see the dimension the flowers and butterflies add to the card.  I used 675N US Crystal Drops - Ivory Seashell to create faux pearls on the flourishes and then I also used it for the body of the butterflies and the flower centers.


Thanks so much for joining me today!  I hope you enjoyed the card I shared.  Take a look at your dies and see what kind of fun shape cards you can create.

Hugs & Smiles,
Heidi


Supplies
Tonic Studios USA
Dies:  1228E Sew Pretty Cherish the Moment Rectangle Frame, 1163E Floral Fancy Decorative Mini Die Set, 770E Entwinning Trellis Radiant Roselily Die Set, 530E Layering Butterflies Set 1 - Papillon Pair
NUVO: 675N US Crystal Drops - Ivory Seashell
Adhesive:  419E Craft Tacky 120ml
Tools:  147E Tangerine Machine and Bag Set160E Tim Holtz - 8" Comfort Guillotine/Trimmer819 - 107E Time Holtz Titanium ShearFloral Crafters Tool Set 380 - 266E
Other Supplies
Paper:  Cardstock - White, White Pearl, Pink Pearl, Green Pearl, Blue Pearl, Gold Mirror 
Accessories:  Hot Glue

Tuesday, May 24, 2016

Tonic Studios - Dreams, Wishes & Fairy Kisses Card and Tutorial

Hello blogging friends!  Today, I have a pretty Springtime and glittery fairy card to share with you.  I am loving all the pretty little fairies in the Fairy Reflections Die and Stamp Collection.  As an added bonus there is also a coordinating paper pack.


Here is a look at the card I designed using the fairy 1306E Aurora Reflections Stamp and 1206E Aurora Reflections Die Set.  I also used 483E Scalloped Circles Layering Die Set524E Pinhole Circle Die Set,112 0E Filigree Flourish Die Set, and 1055E Fairy Wishes Illustrated Paper Pack.


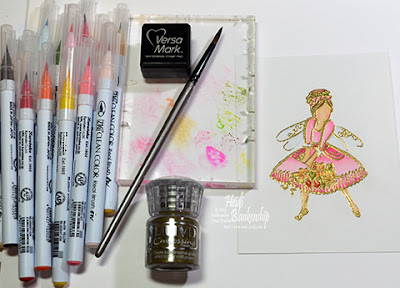
To start I stamped the 1306E Aurora Reflections Stamp using VersaMark ink on to Strathmore mixed media paper.  Then I added 600N Embossing Powder - Classic Gold and used my heat to to melt and heat set the powders.  I used Zig Clean Color Real Brush Pens to watercolor the image.  The colors are listed below in the supplies.


Next I die cut the fairy shape using the silhouette die from the 1206E Aurora Reflections Die Set.  No fussy cutting!  The die cuts that fairy shape perfectly.


I used one of the sentiments from the 1055E Fairy Wishes Illustrated Paper Pack.  To die cut and add some details to the dies cut shape I used the 483E Scalloped Circles Layering Die Set and 524E Pinhole Circle Die Set.  When using these dies you will want to die cut the scalloped circle first and then you can match up the pinhole circle die to add the detail.  For all of the die cutting I used the  147E Tangerine Machine and Bag Set and I also used the 160E Tim Holtz - 8" Comfort Guillotine/Trimmer to cut all of my paper pieces.


I used the NUVO 203N Glue Pen Medium and 705N US Pure Sheen Diamond Glitter to add some sparkle to the fairy and the flowers in the die cut sentiment.


For some finishing touches on the fairy and sentiment die cuts I added some 651N Crystal Drops Gloss - White to look like some white pearls.


I also used the 112 0E Filigree Flourish Die Set to cut a couple of floral flourished to add on the bottom and right side of the card.  I used the same Strathmore mixed media paper and  Zig Clean Color Real Brush Pens to color the die cuts.  I used a sheet of pattern paper from the Simple Stories Color Vibe 6 x 6 Paper Pad and added that to a pink cardstock base.  I also added some green May Arts ribbon and sequins from Cartwright Sequins & Beads.


I love all the sparkle from the glitter and sequins.


Thanks so much for joining me today and I hope you enjoyed the card tutorial.

Hugs & Smiles,
Heidi


Supplies
Tonic Studios USA
Stamps:  1306E Aurora Reflections Stamp
Dies:  1206E Aurora Reflections Die Set, 483E Scalloped Circles Layering Die Set, 524E Pinhole Circle Die Set,112 0E Filigree Flourish Die Set
NUVO:  600N Embossing Powder - Classic Gold, 651N Crystal Drops Gloss - White, 705N US Pure Sheen Diamond Glitter
Paper Range:  1055E Fairy Wishes Illustrated Paper Pack
Adhesive:  NUVO 203N Glue Pen Medium, 419E Craft Tacky 120ml
Tools:  147E Tangerine Machine and Bag Set160E Tim Holtz - 8" Comfort Guillotine/Trimmer819 - 107E Time Holtz Titanium Shear
Other Supplies
Paper:  Strathmore Mixed Media Paper, Simple Stories Color Vibe 6 x 6 Paper Pad, Cardstock - Pink
Ink/Markers:  Versa Mark Ink, Zig Clean Color Real Brush Pens - Flesh Color, Mustard, Pale Pink, Light Pink, Light Carmine, Wine Red, Geranium Red, Orange, Yellow, Light Green, Olive Green, Oatmeal, Middle Brown, Haze Blue (All colors in set of 60 markers except Haze Blue)
Ribbon:  May Arts Ribbon Sampler - Spring Green
Accessories:  Foam Squares, Cartwright Sequins & Beads - 4mm Medium Pink, 3mm Gold Flower, 3mm Moonshine

Sunday, May 22, 2016

Tonic Studios - Have a Beautiful Day Card

Hello everyone!  Earlier this week we celebrated my mom's birthday and this is the card I made for her.  This was also my first card using the New NUVO Creative Pen Collection.  The Creative Pens are a blendable alcohol based pen from Tonic Studios.


Here is a look at the card I designed.  For the dies I used 1120E Filigree Flourish Die Set, 1227E Have a Beautiful Day Circle Frame530E Layering Butterflies Set 1 - Papillion Pair524E Pinhole Circles Layering Die Set, and 483E Scalloped Circles Layering Die Set.


To create the circle die cuts I used pink cardstock with the 1227E Have a Beautiful Day Circle Frame to die cut the larger scalloped circle.  For the smaller circle I used both the 483E Scalloped Circles Layering Die Set and 524E Pinhole Circles Layering Die Set.  When using these dies you will need to die cut the scalloped circle first and then use the pinhole circle die to add the details.  The Have a Beautiful Day sentiment is also from the 1227E Have a Beautiful Day Circle Frame.  I used white cardstock to die cut the sentiment and then colored it with the NUVO Creative Pen Collection - Supreme Metallics 506 (gold).


For the butterfly I die cut white cardstock using the 530E Layering Butterflies Set 1 - Papillion Pair die set and then I used the NUVO Creative Pen Collection - Rosey Pinks 453, 451, 449 pens to color the butterfly.  I die cut a couple of flourished using white cardstock and the 1120E Filigree Flourish Die Set.  Then I colored the die cuts with the NUVO Creative Pen Collection - Rosey Pinks 453, 451, 449, and Woodland Greens 417, 413.  I wanted to add some sparkly to the butterfly and flourishes so I used the 203N NUVO Glue Pen Medium and added some Pure Sheen Glitter - 705N US Diamond.


For some finishing touches I added Crystal Drops - 675N US Ivory Shell around the scalloped circle die cut, flower centers, and the body of the butterfly.  I also added some tiny white acrylic flowers and for the centers I added Crystal Drops - 682N US Bottle Green.  I fussy cut one of the flowers from the flourish die cut and then added that above the sentiment.  I also added a few sequins from Cartwright Sequins & Beads.


I added some foam tape in between the layers to add a little more dimension to the card.  For all of the die cutting I used the 147E Tangerine Machine and Bag Set and I used the 160E Tim Holtz - 8" Comfort Guillotine/Trimmer for all the paper cutting.

Thanks so much for joining me today!
I hope you enjoyed the card I shared and I hope you have a creative day!

Hugs & Smiles,
Heidi


Supplies:

Tonic Studios USA
Dies:  1120E Filigree Flourish Die Set, 1227E Have a Beautiful Day Circle Frame, 530E Layering Butterflies Set 1 - Papillion Pair, 524E Pinhole Circles Layering Die Set, 483E Scalloped Circles Layering Die Set
NUVO:  Creative Pen Collection - Rosey Pinks 453, 451, 449, Woodland Greens 417, 413, Supreme Metallics 506 (gold), Pure Sheen Glitter - 705N US Diamond, Crystal Drops - 675N US Ivory Shell, 682N US Bottle Green
Adhesive:  419E Craft Tacky 120ml, 203N NUVO Glue Pen Medium
Tools:  147E Tangerine Machine and Bag Set160E Tim Holtz - 8" Comfort Guillotine/Trimmer819 - 107E Tim Holtz Titanium Shear
Other Supplies
Paper:  Cardstock - White, Pink
Accessories:  White Pearl Acrylic Flowers, Cartwright's Sequin & Beads - 6mm Light Chartreuse Satin, 6mm Light Pink Satin, 4mm Gold

Tuesday, April 12, 2016

Toby's Flower Window Sill Card - Tonic Studios

Hello everyone!  Today, I have a card to share with you using some of the dies from the New Pampered Pets collection from Tonic Studios.  I also used one of the Entwining Trellis dies and crepe paper so create some pretty flowers to cascade around the window sill.


Here is the card I designed.  To start I used white and kraft cardstock along with 1197E Toby's Sill Die Set and 1198E Harvey's Ledge Die Set (flowers) to die cut the window sill, curtains, vase of flowers and the kitty cat.  I used 419E Craft Tacky Glue 120 ml to adhere the white decorative part of the window sill and the kraft piece together.  Then I added Foam Squares to the window sill pieces to add some dimension.  I also added vintage lace behind the die cut curtains.


Here is a picture to show you how I lined up the dies on the paper.  I put each of the smaller dies in the corners and used a piece of painters tape to hold the dies in place.  By doing this it will create equal space for the die cut lines in the window sill.  Then I used the Tangerine Die Cutting Machine to die cut the images.


To finish off the window sill I die cut the curtain a second time.  In this picture you can see the equal space for the lines in the window sill as I mentioned earlier.


Here is a close up of the curtains where I added the vintage lace.  For the background rectangle die cut piece I used some paper from Graphic 45 Mon Amour 6 x 6 Paper Pad.


I used Copic markers to color the kitty cat and the flowers in the vase.  I added some adhesive from the 204 NUVO Glue Pen Large to the vase and let it sit for a couple of minutes.  Then I applied 850N Gilding Flakes - Radiant Gold to the vase.  I used 419E Craft Tacky Glue 120 ml to adhere the vase and kitty cat inside the window sill.


For the foliage I used the 1187E Rococo Love Cats Die along with green cardstock to create the leaves.  I die cut the image a couple of times and then just sniped off the leaves I needed to create the cascade along the side of the window.  To create the flowers I used pink crepe paper and 769E Entwining Trellis Plush Peony Die Set.  To lightly color the tips of the flowers I used a makeup brush and Distress Ink Picked Raspberry.  Then I squeezed out some of the 758N US Glitter Drops - White Blizzard and used the makeup brush to lightly apply the glitter drops to the flowers for a bit of sparkle.  I also scattered a few white 4mm flat back pearls in with the cascade of flowers.


I adhered all of the die cut pieces to a light blue A2 top folding card base.

Thanks so much for stopping by!
I hope you have a beautiful and creative day!


Tonic Studios Supplies
Dies:  1197E Toby's Sill Die Set, 1198E Harvey's Ledge Die Set (flowers), 1187E Rococo Love Cats Dies (leaves), 769E Entwining Trellis Plush Peony Die Set
Accessories:  NUVO - 850N Gilding Flakes - Radiant Gold, 758N US Glitter Drops - White Blizzard
Adhesive:  NUVO - 204 NUVO Glue Pen Large, 419E Craft Tacky Glue 120 ml
Tools:  Tangerine Die Cutting Machine, 604E  153 US Super Trimmer, 550E 114E US Kushgrip Decoupage Scissors,

Other Supplies Used
Paper:  Graphic 45 Mon Amour 6 x 6 Paper Pad, Cardstock - White, Kraft, Green, Blue, Crepe Paper - Light Pink
Inks/Markers:  Distress Ink Picked Raspberry, Copic Markers - R83, R85, G21, G24, E15, G29
Ribbon/Trims:  Vintage Ivory Lace
Accessories:  White 4mm Flat Back Pearls, Brushes, Foam Squares

Saturday, March 26, 2016

Pretty In Pink Sparkling Kensington Hand Bad with Tutorial - Tonic Studios

Hello everyone!  Today, I have a sparkling and pretty Kensington Hand Bag  from Tonic Studios to share with you.  These little hand bags are so fun to make and with all the different dies that come in the set you will have a variety of styles you can create.  The hand bags are a perfect size to add a gift card, jewelry or some sweet treats.


Here is a look at the hand bag I designed.  Now I have to tell you I am a total girly girl and I love all the glitz and sparkle with the glitter and pearls being added to the hand bag.  I have a tutorial to share with you how I added all of the glitter to the decorative front panels of the hand bag.  If you would like to see a video on how to assemble the hand bag you can click HERE for a link.  Jodie Johnson, from the UK Tonic Studios has a fantastic video showing how to assemble the hand bag.


The great thing about the Kensington Hand Bag is that you can really create it to your own liking and style.  To start I die cut the base of the hang bag with Recollections - Spring Decorate It paper.  You will need to cut two (2) of each piece base piece and if you are wanting your handbag to look the same on both sides with will need to cut two (2) of each piece.  To create the front panels I covered a sheet of pink carsdstock with Stick It! adhesives sheets and then I die cut two (2) of each of the front panels--both the large and small.


Peel away the release paper from the adhesive sheet but save at least one of the pieces of release paper.  For the lacy decorative panel I used a white pearl paper.  Line up both of the die cuts and then use the piece of release paper to press the two papers together.  Doing this allows you to adhere both pieces without having the touch the sticky adhesive.


With your fingers rub over top of the release paper to adhere the two panels together.


Next pour some of the 705 US Pure Sheen Glitter Diamond on top of the panel.


Using your fingers rub or burnish the glitter over the areas with adhesive.  Then tap off the excess glitter.


Die cut three (3) of each size of the flowers from the 757E Entwining Trellis - Bellus Buttercup Die Set from the white pearl paper.  Lightly mist the paper with water and use the styluses from the 380 - 266E Floral Crafters Tool Set to shape each flower and set aside to dry.


Once the flower is assembled I used an old makeup brush to apply the ink to the tips of the flower.  Then I added pearl stamens to the center and edged the flower with 758N Glitter Drops - White Blizzard.


Here is a close up of the flower and you can see all of the sparkle from the glitter.  I also added mini pearls hearts to the top of the hand band and for the handles I added Melissa Frances White Pearls.


Thank you so much for stopping by the blog today!  I hope you enjoyed the project and tutorial.   
All supplies will be listed below.  :)

Happy crafting!


Tonic Studios Supplies
Dies:  763E Kensington Hand Bag Gift Box Die Set, 757E Entwining Trellis - Bellus Buttercup Die Set
NUVO:  705 US Pure Sheen Glitter Diamond, 758N Glitter Drops - White Blizzard, 669N Crystal Drops Gloss - Apple Green
Adhesive:  419E Crafty Tacky Glue 120ml
Tools:  Tangerine Die Cutting Machine, 550E US Decoupage Scissors, 160E US Tim Holtz Trimmer, 380 - 266E Floral Crafters Tool Set

Other Supplies Used
Paper:  Cardstock - White Pearl, Pink; Recollections - Spring Decorate It
Ink:  Distress Ink Picked Raspberry
Accessories:  Ken Oliver - Stick It! Adhesive Sheets, Melissa Frances White Pearls, Mini Pearl Hearts, Wild Orchid Craft -White Leaves, Pearl Stamens, Foam Squares, Scor-Tape, Fine Mist Spray Bottle w/ Water, Makeup Brush, Hot Glue

Wednesday, March 23, 2016

DIY Plush Peony and Bunny Spring Wall Hanging - Tonic Studios

Hello everyone!  Heidi, here and today I have a fun Spring DIY  home decor project to share with you using the Entwining Trellis Plush Peony Die Set from Tonic Studios and also some of the NUVO products.


Here is a picture of the plush peony and bunny wall hanging I created for Spring.  Since there is no Easter sentiment on the wall hanging you could have this piece hanging up in your home all throughout the Spring season.  I started with a small 6 x 6 wood frame.  I used a combination of white gesso, Gathered Twigs Distress Ink and NUVO Indian Gold Embellishment Mousse to paint the frame.  Then I rubbed a little more of the NUVO Indian Gold Embellishment Mousse on the frame.  I also added some water to the mousse to create gold paint splatters on the frame.  To finish the frame I applied Gathered Twigs Distress Ink around the outer and inside edges of the frame.  Next I die cut the large Entwining  Trellis border with one of the decorative edges using kraft cardstock.  I inked the edges of the cardstock using Gathered Twigs Distress Ink,  I placed the die cut in the upper corner of the frame and used some low tack tape to hold the die cut in place and trimmed the excess.  Then I used Crafty Tacky Glue to adhere the die cuts to the frame.  I did the same thing in the bottom corner of the frame.  


Here is a close up of the upper corner where you can see one of the peonies I created.  I used old book pages (without print) to die cut several of the flower shapes.  Then I shaped all of the flower petals and layered the flowers by off setting each layer to create a fuller flower.  I used Crafty Tacky Glue to adhere the flowers.  Then I used Worn Lipstick and Old Paper Distress Inks to color the flowers and I added pearl stamens to the center of each flower.


Here is a close up of the bottom corner.  I also added some NUVO Golden Sunset Glitter Drops to the Entwining Trellis border.  I just dabbed the glitter drops on with my finger to is would just leave a hint of sparkle.  I also added a couple pieces of some vintage tatting lace to the top and bottom of the frame and placed an ivory flat back pearl in the center of each lace scallop.  To finish off the flower clusters I added a couple of AB ivory and pink resin roses.


Here is a close up of the paint splatters using the NUVO Indian Gold Embellishment Mousse.


I added this sweet bunny image from ArtCult to the center of the frame.  To create the hanger I added baby pink, leather tan, and rose beige seam binding.  I frayed the edges of the seam binding to give it a more aged look.

Thank you so much for stopping by the blog today and I hope you enjoyed the project!  All supplies will be listed below.  :)

Happy crafting!


Tonic Studios Supplies:

Other Supplies Used:
Paper:  Kraft Cardstock, Vintage Book Paper; Ink:  Distress Inks - Worn Lipstick, Old Paper, Gathered Twigs; Ribbon/Trims:  Vintage Tatted Lace Trim; Accessories:  Ranger - White Gesso, Pearl Stamens, Fine Mist Water Bottle, Old Makeup Brush, 4mm Ivory Flat Back Pearls, Resin Roses - AB Ivory, Pink, ArtCult - Bunny Image, Seam Binding - Baby Pink, Leather Tan, Rose Beige, 6 x 6 Wood Frame, Paint Brush


LinkWithin

Related Posts Plugin for WordPress, Blogger...