Showing posts with label Canvas. Show all posts

Tuesday, June 26, 2018

Blue Paradise Geode and Resin Canvas with Art Resin

Hello everyone!  Today. I am coming to you with something a little different.  As many of you know who have been following my blog for some time I love to create jewelry using resin, specifically ICE Resin and I have been doing that for many years now.  A few months back I started exploring different forms of art including abstract resin, acrylic, alcohol ink, and geode art.  I have shown a couple of little sneak peek pictures here on my blog.  I used to do a lot of detailed painting but now due to having fibromyalgia and RA my hand is just not that steady anymore so I'm not able to do the very detailed painting anymore. I missed painting!  But I am so thrilled to have found some new styles of painting and art that I can do and I absolutely LOVE IT!!!  I am having so much fun creating and I wanted to start sharing it with you.  I have made several pieces and canvases are starting to take over every little bit of free space lol.  I am going to be having a booth at Chapel Con which is a local event in July.  I will be having my abstract art and jewelry for sale at this event.  Last week I worked on one of my geode and resin art pieces and I love how it turned out!  So are you ready to see some art?


Here is my Blue Paradise Geode and Resin art piece.  For this piece I started out with a 12" x 16" premium gallery canvas.  The resin I have been using for my abstract art is Art Resin.  It is a wonderful resin to work with.  You can mix all kinds of products in the resin to color/tint it from alcohol inks to paints, and glitter, pigment powders and pastes and it cures crystal clear.  Everyone has their own way of creating art and I know some people like to do all of the layers of the resin for the geode art at one time (or one pour) start to finish.  But for myself I prefer to create the geode in layers.  So some of the pieces I create take a few days to several days to finish depending on how many layers I add.  Having multiple layers creates more depth in the pieces.


Here is a close up of one of the corners on the canvas.  I used a variety of products on this canvas including Art Resin, Pinata Inks, Alcohol Inks, ICE Resin Tints, crushed glass, crushed crystals, colored pebbles, Nuvo glitter, Perfect Pearls, and mica flakes.


Since I have worked with ICE Resin for so many years I feel like I had an advantage when it came to creating abstract art with resin.  I already know a lot of different techniques that can be done with resin and how the resin will react with different products added in.  It's kind of like when I create the jewelry but on a much larger scale.


I love how the center part of this geode turned out!  Plus I can add a light behind this area on the back of the canvas and it makes the geode look like it's glowing.


I LOVE, LOVE, LOVE how the metallic gold is floating on top!!  


The white, blue, aqua, and gold all blend so beautifully in the layers.  If you click on the image to enlarge it you can see bits of sparkle from the bottom layers too.


If you would like to see more pictures of the process and layers of the resin follow me on Instagram and Facebook.  I love using Instagram to share pictures of the process.  It's so quick and easy and then from there I can share it to Facebook too.  My plan is as I share more of my art I will be posting more to Instagram with pictures (and sharing on FB) and then doing a blog post once the pieces are finished.  You can click HERE to follow me on Instagram and click HERE to follow me on Facebook.  


I hope you enjoyed today's project share!  As always, you can click on all of the images to enlarge them and see all of the details.  I will be sharing more of my abstract art pieces soon.  Thanks so much for stopping by today and I hope you have a wonderful and creative day!

Much love, hugs, and blessings,
Heidi

Monday, January 2, 2017

Tonic Studios - Sneak Peek - Let It Snow 7 x 14 Mixed Media Canvas


Hello everyone!  Here is a little sneak peek of a Let It Snow 7 x 14 mixed media canvas that I designed for Tonic Studios.  I used dies, embellishment mousse, stencils, glimmer paste New script brush pens, crystal drops and glitter to create this fun and whimsical winter canvas,

I hope you will hop on over to the Tonic Studios USA Blog and check out the tutorial.  I have a full step-by-step tutorial with instructions and photos.  You can click HERE to see the blog post.  I hope you enjoy the project and I would love to hear your thoughts.

Thanks so much for stopping by today!

I hope the New Year is off to a great start for all of you!!

Hugs & Smiles,
Heidi

Thursday, May 7, 2015

Mixed Media Sing Out Loud Canvas - JustRite Papercraft May Release Day Three

Hello everyone!  Today, is the third and finally day of the JustRite Papercraft May New Release and I have a fun mixed media canvas to share with you.


How fun is this bright, bold and playful canvas?  Now I will admit using the bright and bold colors for me is a little out of my comfort zone but what the heck--I just had fun with it.  Check out the cute little birdie--love it!!  I used the CL-02157 Script Background Cling Stamp kind of randomly in the background and for the main focal point I used the New CR-02183 Sing Out Loud Clear Stamps.  Lots of fun layers with Ken Oliver Crafts-Color Burst , Stamping, Gesso, and paper piecing.


I don't have a full tutorial for the canvas but I did snap a couple of pictures of the background from when I started working on it.  I actually used a piece of Strathmore Mixed Media paper and then the finished piece was adhered to a hard canvas board.  I misted the paper with water and then I sprinkled on some of the Pthalo Green and Ultramarine Blue Ken Oliver Crafts-Color Burst .  I let the colors and the water kind of do their magic on their own.  I misted a little more water and then just moved the paper around a little.  Then I used a heat tool to dry the paper and set the colors.  Next I misted more water on to the craft mat where there was still color burst and then I gently tapped the paper into the mix picking up more color.  I did this a few times until I was happy with the look and then I heat set and dried the paper again.  Doing this will add layers and depth to your paper.


Next I did a combination of lightly misting the paper and also spraying some water in to my hands and letting it drop on the paper.  I let the water sit on the paper for a minute or so and then I put a paper towel on top of the paper and blotted to remove the water.  Doing this also removes some of the watercolor wherever the water was.  It creates a fun textured look.


Once I had all of the color added to the background then I sprayed a couple layers of Krylon Clear Satin Sealer on to the paper.  Doing this will seal the colors so you can add layers of other paints, mediums or whatever you would like on top of the background without messing up the background.  Next I used Stazon Jet Black ink and randomly stamped the CL-02157 Script Background Cling Stamp.  When the ink was dry I dry brushed over most of the paper with white gesso.  The gesso does help to tone the colors down just a bit and it covers up some of the script stamping in the background.  Once the gesso was dry then I applied some Golden Glass Bead Gel.  I mixed some of the Ultramarine Blue Color Burst in with the gel.  You can see the beaded gel at the top of this picture (you can click to enlarge the picture for more detail).


The gel does take a little time to dry so while I was waiting on that I stamped and fussy cut the little bird, wing, and flowers,  For the banner I used a EK Success punch.  Once the gel was dry then I started stamping on to the paper.  I stamped all of the images using StazOn Jet Black ink.  Then I wanted to add some shading so I went over the bird and flowers with a Spectrum Aqua Marker Black working in just small areas and then I rubbed and blended out the color with my finger.  Once the shading was done then I added all of the paper piecing.


All of the pattern paper is from the Simple Stories I AM 6 x 6 Paper Pad Collection.  I added 3D Foam Squares to all of the pattern paper pieces except for the body of the bird.


To finish off the piece I added a few pearls.


The Sing Out Loud Clear Stamps is perfect for mixed media, art journaling and card making.  I had a lot of fun playing with the new set and creating the canvas.

Please be sure to visit all of the Design Team Members in the link list below to see all of the fun projects they have created to share with you.


Thanks so much for stopping by today!

Hugs & Smiles,
Heidi

Supplies
Stamps:  JustRite Papercraft CR-02183 Sing Out Loud Clear Stamps, CL-02157 Script Background Cling Stamp
Paper:  Strathmore Mixed Media Paper, Simple Stories I AM 6 x 6 Paper Pad
Ink/Paint:  StazOn Jet Black Ink, Spectrum Aqua Marker Black, Ken Oliver Crafts-Color Burst Pthalo Green, Ultramarine Blue
Punch:  EK Success Banner Punch
Accessories:  Gesso, Krylon Clear Satin Sealer, Golden Glass Bead Gel, Ranger Multi Medium Matte, White Pearls, Gray Twine, Scrapbook Adhesives by 3L 3D Foam Squares, Mini Canvas Board

Tuesday, March 24, 2015

JustRite Papercraft Tutorial Tuesday - Spectrum Aqua Markers

Hello everyone!  Today, is my day to post for the Tuesday Tutorial for JustRite Papercraft.  I have a fun watercolor You Tube video tutorial and step-by-step tutorial to share with you over on the JustRite Inspiration Blog using the new  Spectrum Aqua Markers.


If you like the look of watercolor the  Spectrum Aqua Markers are very easy to use and create projects with.  Here is a close of the floral image from the CL-02138 Sweet Posies Cling Stamps from  JustRite Papercraft.


After I was done watercoloring the image then I used Ranger Multi Medium Matte to adhere the paper to the frame and then the frame and paper to the 6 x 6 canvas to create a fun DIY home decor piece.


Starting today and going through midnight (EST) March 31st, 2015 the Spectrum Aqua Markers are on sale for 25% Off at JustRite Papercraft.

Click HERE to hop on over to the JustRite Inspiration Blog and check out the tutorial.  You can also clich HERE to watch the YouTube video.  There is a Fantastic Giveaway this week too!  A $50.00 Gift Certificate!!

Thanks so much for stopping by today!

Hugs & Smiles,
Heidi


Supplies
Stamps:  JustRite Papercraft CL-02138 Sweet Posies Cling Stamps
Paper:  Strathmore Watercolor Paper
Ink:  Imagine Crafts/Tsukineko StazOn Jet Black Ink
Markers:  Spectrum Aqua Markers - Wildflower, Purple, Sunflower Moss, Aquamarine, Teal, Peacock Blue, Black
Accessories:  6 x 6 Canvas, White Gesso or Acrylic Paint, Wood Frame, Black Acrylic or Spray Paint, Paint Brushes, Ranger Multi Medium Matte

Sunday, March 22, 2015

Day One Stencil Girl and Ken Oliver Crafts Blog Hop


Hello everyone!  Today, is the first day of the Stencil Girl and Ken Oliver Crafts Blog Hop.  Designers and Style Contributors from both teams have come together to create some fabulous projects using products from both companies.  We hope to inspire you!


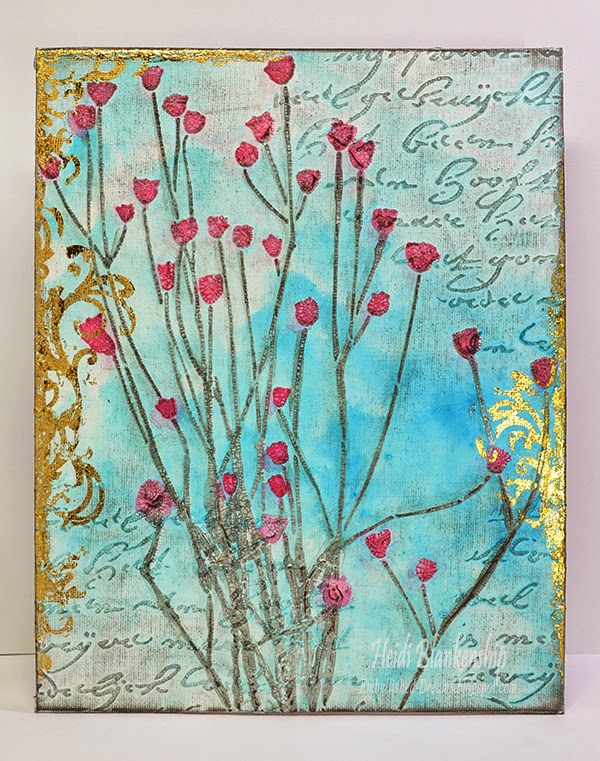
For my project I designed a 8 x 10 mixed media canvas board and I have a tutorial to share with you.


First I applied a layer of white gesso to the canvas.  Once that was dry then I used the 6 x 6 Rembrandt's Words Small Stencil and added a layer of the crackle texture paste.


Once the crackle texture paste was dry then I misted the entire canvas with water and sprinkled a little bit of the Ultramarine Blue Color Burst on to the canvas.  Here you can see the Color Burst already starting to activate with the water.


I used a large watercolor brush and kept adding more water to move the Color Burst around the canvas until I achieved a look I liked.  If you get more than you would like in one spot you can use a paper towel to lift up a little of the color.  Set this aside to dry or you can use a heat tool.


Sorry, I know it's a little hard to see exactly what I am doing in this picture from all of the texture paste lol.  Here I am using the 9 x 12 Nosegay Stencil and adding a layer of the crackle texture paste.


After the crackle texture paste was dry then I started to watercolor the flowers using Color Burst.  I used Alizarin Crimson for the flowers.  Here you can see a close up of the Color Burst as soon as I applied it to the crackle texture paste.  I love how it fills in all the little cracks and makes the flowers really pop.  I mixed a few colors of the Color Burst to create a darker green.  I used Pthalo Green, Alizarin Crimson, Ultramarine Blue, and Lemon Yellow.


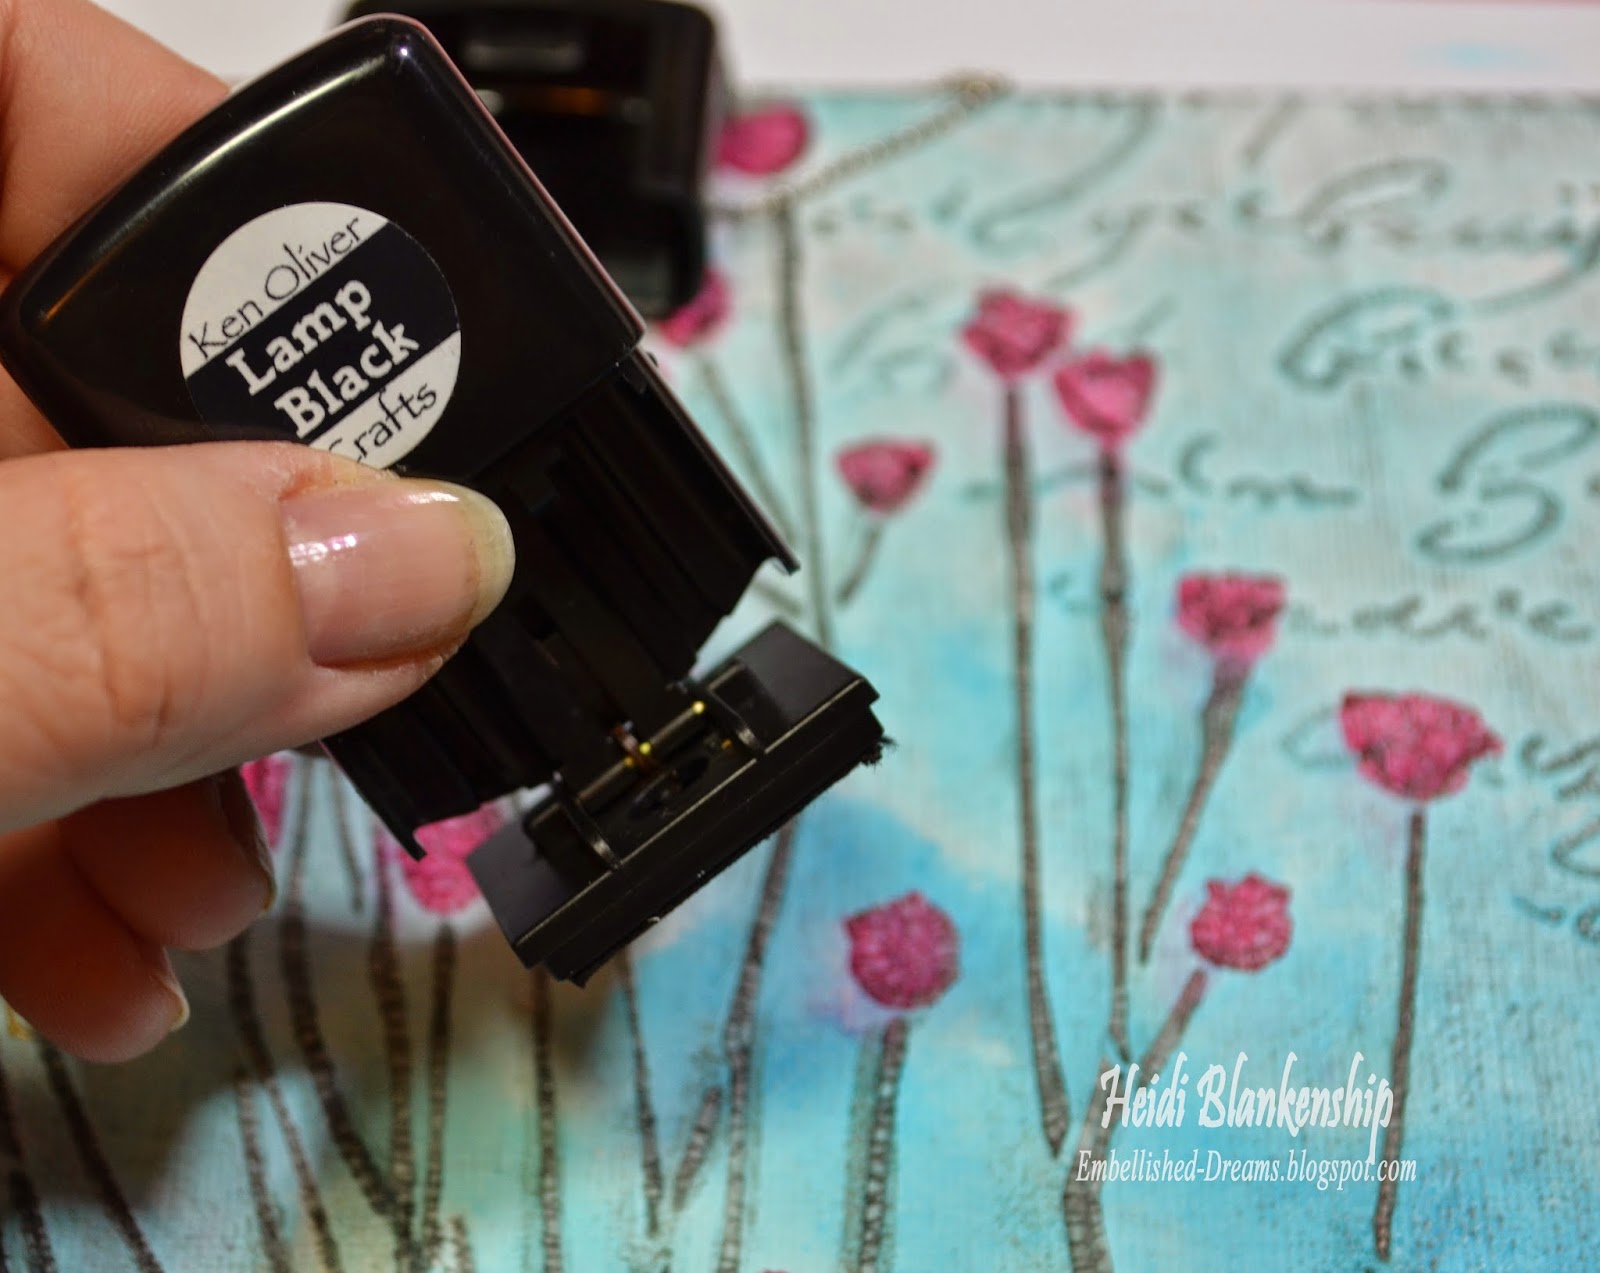
Next I used the Lamp Black Click It Ink to go over the entire canvas board.  Doing this really adds a lot of depth and dimension to the canvas and it picks up all of the little cracks in the texture paste.


To finish off the canvas I created some die cuts using Stick It and the die template from Tonic Studios.  I removed the backing on the Stick It and applied it to the canvas.  Then I added the gold foil on top of the adhesive and rubbed it to to transfer the foil.  I thought this would add a nice decorative element and gold foil it very hot right now.


Here is a close up of some of the flowers with the gold foil along the edge.


I added a few bits of the gold foil along the edges of the canvas.


I hope you enjoyed the tutorial.  Please be sure to visit the blogs listed below to see what the Designers and Style Contributors have created to share with you.

Heidi Blankenship-You are here :)

Thank you so much for visiting our blogs today and I hope that you'll be inspired to create something with Stencil Girl Products and Ken Oliver Crafts! We have a crafty haul of prizes from Ken Oliver up for grabs, just leave a comment below and you'll be eligible to win!

Winners will be randomly selected from our blogs, just leave a comment to become eligible for a prize. It's that easy!

We'll list the daily winners in the comments sections of our respective blogs so watch for the winners names.  

Here's what we're giving away!
12 Daily Prizes - 1 Pack Ken Oliver Crafts 6x6 Papers(24 pieces).
2 Grand Prizes on Friday- 1 Complete Set of Color Burst (6 Colors); 1 Complete Set of Click It Ink Pads (6 Colors); 1 Set Pegz Alphabet Stamp Set;
Leave a comment on each StencilGirl Talk post and the team members posts to be entered to win a $50 gift certificate from Stencil Girl!
Join us every day this week, you can enter every day...

Thank you again and

GOOD LUCK!  

Hugs & Smiles,
Heidi


Monday, January 5, 2015

CHA Sneak Peek from Ken Oliver Crafts! 8 x 8 Canvas

Hello everyone!  I have to say I am excited to share this post with all of you.  With a New Year comes new beginnings and new opportunities--and CHA with lots of new products.  
So I have a CHA Sneak Peek from Ken Oliver Crafts to share with you.


This is a 8 x 8 canvas that I designed using papers from Ken Oliver Crafts Watercolor Memories Collection.  This canvas will be at CHA with all of the other beautiful projects created by some amazing designers.  This is such a beautiful watercolor floral collections.  One of the things I really love is that one side of the paper has soft muted colors and the other side is bright and bold.  For the canvas I used the 12 x 12 and 6 x 6 Watercolor Rose paper.  For the background of the canvas I used 12 x 12 paper with the softer colors and for the focal point I used the 6 x 6 paper with the brighter colors.


I also used a Prima stencil and applied Liquitex Modeling Paste to create the flourishes.  Then I used  Ranger Tim Holtz Distress Spray Stains-Spun Sugar and Tarnished Brass to highlight the textured areas.  


Here is a side view so you can see some of the dimension.  For the focal point in the canter I used some fun foam to pop up the center part.  Then I used a whole sheet of the 6 x 6 size paper and applied that to the fun foam and used more of the modeling past to cover up the foam.  Then I used a second 6 x 6 piece and fussy cut the roses.  I used a stylus to make the paper more pliable and shape it.  Then I more foam to the back to also pop up the image.


I applied Golden Glass Bead Gel to the image of the roses.  Doing this adds more texture and dimension to the roses.  The Glass Bead Gel is white but as it dries it becomes clear and it is filled with clear micro beads.  You can leave it as is or add color to it.  I used a paint brush and added Tarnished Brass Distress Spray Stain on the Glass bead Gel once it was dry.


I printed out the sentiment with the computer and cut them in to word blocks.  I used another fantastic new product from Ken and that is his new inks.  I used the Walnut ink on the word blocks.


Now I know this isn't the prettiest picture but I just wanted you to see the dimension. 


I had so much fun just playing and creating this canvas!  


I also wanted to let you know I am excited to announce that I am one of the Style Contributor for 
Ken Oliver Crafts!  I am so honored and excited to be working with Ken--he is simply amazing and a great friend!  I am also excited to be working alongside several other amazing Style Contributors.  Are you wondering who they might be?  Well, you will have to check out Ken's Blog as he has been sharing lots of CHA Sneak Peeks and projects from some very talented crafty peeps.  :)

Ok, I guess that's it for today.  Don't forget you can click on all of the pictures to enlarge them and see all the details.  
Thanks so much for stopping by today and I hope your New Year is off to a great start!

Hugs & Smiles,
Heidi


Supplies
Paper:  Ken Oliver Crafts 12 x 12 and 6 x 6 Watercolor Rose-Watercolor Memories Collection
Ink:  Ken Oliver Crafts Walnut Ink
Accessories:  8 x 8 Canvas, Gesso, Liquitex Modeling Paste, Golden Glass Bead Gel, Mod Podge Matte, Ranger Tim Holtz Distress Spray Stains-Spun Sugar, Tarnished Brass, Fun Foam, Scrapbook Adhesives by 3L 3D Foam Squares, Hot Glue, Prima Flourish Stencil

Saturday, November 15, 2014

ButterBeeScraps Enjoy the Journey Vintage/Shabby 8 x 10 Altered Canvas

Hello everyone!  Today, I have an altered 8 x 10 canvas to share with you.  


I used several metal filigree pieces from ButterBeeScraps to embellish the canvas.  I started by painting the edges of the canvas with ivory acrylic paint and then I added some Faded Jeans Tim Holtz Distress Spray Stain.  The Faded Jeans color was the perfect match for the flowers in the DCWV The Primrose pattern paper.  Next, I added a piece of the pattern paper to the background on the canvas.  I used a tiny dot stencil and a doily stencil with some homemade texture paste to add some interest and dimension to the background paper.  After the texture paste was dry I added some ivory acrylic paint and Antique Linen Tim Holtz Distress Spray Stain on top of the stencils.  Next, I fussy cut the postcards, ticket and banner pieces.  I distressed the edges on the postcards and ticket and added them to the center of the canvas.


I added Bronze Chain (Item #CH779-B) across the top of the canvas and then I added the banner pieces.  To decorate the banner pieces I added lace, Bronze Filigree 409-B, flat back pearls, and Pink Resin Roses.


Here is a close up of the banner.


On each side of the banner I left the chain longer to add some pearl dangles.  I used Bronze Ball End Head PinsBronze Filigree Bead Caps (Item #CAP052-B) and pearls to create the dangles.


In the lower left corner I added a doily and then I used one of the  Large Bronze Cameo Frames (Item #F623-B) with a  Large Oval Glass Cabochons (Item #CAB017) to create the sentiment.  The paper is from the same collection and I dry brushed some of the ivory paint on to the frame.  Then I added some WOC Flowers.


I create a couple more small flowers clusters on the other side of the canvas.  Then I added a Bronze Decorative Key and a Bronze Filigree Flower 124-B with a 6 mm flat back pearl on top.


I love how vintage and shabby this canvas turned out!  Don't forget you can click on all of the picture to enlarge them and see all the details.

If you love using metal filigrees and embellishments on your projects or designing jewelry please be sure to check out ButterBeeScraps online store.  Also please LIKE us on Facebook, and subscribe and follow us on The ButterBeeScraps Blog and Pinterest.

Also I wanted to let you know Monique just added some New Goodies to the store a couple of days ago and she is still having the Blow Out Sale on select items on the website--once those items are gone they are gone for good.  So don't miss out!

Thanks so much for stopping by today and I hope you have a wonderful weekend!

Hugs & Smiles,
Heidi


Supplies
ButterBeeScraps:  Bronze Filigree 409-B (top of banner/out of stock), Bronze Chain (Item #CH779-B), Bronze Filigree Bead Caps (Item #CAP052-B), Bronze Decorative Key (out of stock), Large Oval Glass Cabochons (Item #CAB017)Large Bronze Cameo Frames (Item #F623-B), Bronze Filigree Flower 124-B (on top of key/out of stock), Bronze Ball End Head Pins
Paper:  DCWV The Primrose 12 x 12 Collection
Accessories:  Ranger Tim Holtz Distress Spray Stains-Antique Linen, Faded Jeans; Homemade Texture Paste, Stencils, WOC Flowers, Pearl Beads, Em's Empourium-Flat Back Pearls 4mm, 6mm, Pink Resin Roses, Ivory Acrylic Paint, Lace trim, Doily

LinkWithin

Related Posts Plugin for WordPress, Blogger...