Showing posts with label Melissa Frances. Show all posts

Friday, December 15, 2017

The Stamp Simply Ribbon Store - Poinsettia Tea Cup Card

Hello everyone and happy Friday!  Today, I have a card to share with you using the NEW Stamp Simply Clear Stamp - Coffee or Tea? SS-023.  You might have seen a sneak peek of this card on the Stamp Simply Blog when Sharon announced the new releases.


Here is the card I designed.  This card could be used for Christmas or just as a thinking of you card through the winter months.  The stamp set is filled with several sentiments and verses.  The die set is a really fun one because it allows you to be able to build you cup.  There are two different sizes of the cups with matching handles, two little steam swirls, the words coffee and tea, and a tiny tag.  Some of the sentiments in the stamp set fit perfectly with the tiny tag.


To create the cup I die cut the cup two times.  Once using Wild Rose Studios - Birds & Berries and for the second one I used Gold Mirror Cardstock.  I also die cut the handle with the gold mirror cardstock.


I have a beautiful tea cup collection that was my Great Grandma's.  Several of the cups are edged in gold and I wanted to create the same look for my cup.  I cut the top and bottom of the gold die cut piece and then offset them and adhered them to the back of the pattern paper.


Here is a look at the cup once it was assembled.  I just love the gold accents and it reminds me of my Great Grandma's tea cup collection.


I die cut three of the little steam swirls from Vellum.  I adhered two to the back of the cup and then added the third swirl at the top.  I used glossy accents to adhere the steam swirls.  Since almost all adhesives show through vellum I added some Wink of Stella Clear Glitter Brush Pen on top of the swirls and then added White Pearls to each of them to help cover up where the adhesive was showing.


Here is a close up of the cup.  I also added some of the Wink of Stella Clear Glitter Brush Pen to the flowers on the pattern paper.  I added more white pearls along the top of the cup.  I die cut one of the tiny tags using white cardstock and then stamped the sentiment using Tuxedo Black Ink.  I used a piece of May Arts Gold Metallic String to attach the tag to the handle on the cup.


The card is a white A2 top folding card base.  I used a couple more pieces of the pattern paper from the same collection to layer in the background.  Then I used Foam Tape to attach the cup to the front of the card.

Thanks so much for stopping by today and I hope you enjoyed the card share.  If you would like to see more card inspiration I encourage you to check out the Stamp Simply Blog.  All of the supplies to create the card are listed and linked below and can be found at The Stamp Simply Ribbon Store.

I hope you have a wonderful weekend and Happy Holidays!

Heidi


Supplies
Stamps:  Stamp Simply Clear Stamp - Coffee or Tea? SS-023
Paper:  Wild Rose Studios - Birds & Berries, Gold Mirror Cardstock, Vellum, Cardstock - White
Ink:  Tuxedo Black Ink
Dies:  Stamp Simply Steel Dies - Coffee or Tea? SS-DIE011
Ribbon:  May Arts Gold Metallic String
Accessories:  Melissa Frances White Pearls, Wink of Stella Clear Glitter Brush Pen, Scrapbook Adhesives by 3L EZ Runner, Foam Tape

Friday, March 10, 2017

The Stamp Simply Ribbon Store - Create In Me A Clean Heart

Hello everyone and happy Friday!  Today, is my day to post for The Stamp Simply Ribbon Store.  But before I get to my project I want to apologize for my post last Saturday.  I am not sure what happened but I typed the post up a few different times and it just kept disappearing.  I know some of you were able to see it because comments were left.  So I thought I would just post a quick picture of the card and you can click HERE to see the post on the Stamp Simply Blog with the supply list.


Ok, now for today's card share.


I designed a CAS (Clean And Simple) card using the New Thinking of You Rose SS-015 and Words of Encouragement SS-017 Stamp Simply Clear Stamps.  I started with a piece of black cardstock and I randomly stamped the image of the rose with Delicata White Shimmer ink.  Then, I used a heat tool to dry the ink.  Next, I used my finger to rub around each of the roses.  A tiny bit of the shimmer from the ink will lift up and move around on the paper leaving a very soft shimmer in the background.


Next, I added some shimmer to the roses on the black cardstock using a Zig Wink of Stella Clear Glitter Brush Pen.  I stamped the rose on to a piece of white cardstock using Tuxedo Black ink.  Then, I used the Stamp Simply Steel Dies - Rose SS-DIE002 to die cut the rose.  I also added Wink of Stella to the rose on the white cardstock.


The sentiment is from the Words of Encouragement SS-017 stamp set.  I used Tuxedo Black ink to stamp the sentiment on to a piece of white cardstock.  Next, I used Spellbinders - Labels Thirty-Six to die cut the sentiment and another layer of cardstock.  I used Luxury Pearlescent Metallic 105# for the second layer.  I added 3D Foam Squares to the back of the label with the sentiment and also to the rose die cut.  I added a layer of Luxury Pearlescent Metallic 105# behind the black cardstock and then I assembled the card.


The card front was added to a white A2 top folding card base.  To finish the card I added a few gray pearls.  This was a very quick and easy card to make and you could use the same layout and switch out the sentiments for all different occasions.

Please be sure to visit the Stamp Simply Blog for lots of inspiration from the design team.  You can also visit The Stamp Simply Ribbon Store for all your paper crafting needs. 

Thank you so much for stopping by today!  I hope you have a wonderful and creative weekend!

Hugs & Smiles,
Heidi


Stamps:  Stamp Simply Clear Stamps - Thinking of You Rose SS-015, Words of Encouragement SS-017
Paper:  Luxury Pearlescent Metallic 105#, Cardstock - White, Black
Ink:  Delicata White Shimmer, Tuxedo Black 
Dies:  Stamp Simply Steel Dies - Rose SS-DIE002, Spellbinders - Labels Thirty-Six
Accessories:  Zig Wink of Stella Clear Glitter Brush Pen, Melissa Frances Gray Pearls, Scrapbook Adhesives by 3L E-Z Runner, 3D Foam Squares

Friday, March 3, 2017

Stamp Simply Spring Release Blog Hop

Hello everyone and happy Friday!  Today, all of the designers from The Stamp Simply Ribbon Store are participating in a Stamp Simply Spring Release Blog Hop.  I'm excited to share one of the New Stamp Simply Spring Release Stamp Sets and a Coordinating Die Set.  But before I get to my projects I want to share a video by Darsie Bruno.  Darsie, has a wonderful video showing all of the New Stamp Sets and Die Sets. She also shares some beautiful projects she created with the new stamp sets and dies.


So what do you think?  I love all of the projects Darsie shared!  Especially the lavender rose card and the tulip box card--those two are my favorites.  I love all of the new stamp sets!  They are filled with so many wonderful sentiments and verses.  Love the rose and tulips images too and the coordinating dies.  I think its fantastic how all of the stamp sets mix and match too.


Here is the card I designed using the New Thinking of You Rose SS-015 stamp set and the Rose SS-DIE002 coordinating die.  I stamped all of the roses onto a piece of Ranger Watercolor paper using VersaMark Ink and then I heat embossed all of the image with Ranger Super Fine White Embossing Powder.  I stamped and embossed another rose image on a separate piece of watercolor paper.  I did a very light watercolor using Tim Holtz Distress Ink.  For the rosebuds I used Worn Lipstick and Mustard Seed.  For the stem and leaves I used Cracked Pistachio.


I let some of the watercolor go outside of the embossing and then I add more water to have the colors fade out to white.


I used the coordinating die to die cut the rose that was on the separate piece of paper.  I stamped the sentiment on to a piece of Vellum using VersaMark Ink and then I heat embossed the sentiment using Ranger Super Fine Detail Gold Embossing Powder.  I wrapped the vellum around the center of the watercolor piece and I taped it on the backside.  Then, I added  3D Foam Squares to the die cut rose and added that to the card front.  Next, I added a bow with some  May Arts - Metallic Gold String and a few Melissa Frances White Pearls.  For a little added sparkle and shine I added Zig Wink of Stella Clear Glitter Brush Pen and Ranger Glossy Accents to the die cut rose.


Here is a close up of the bottom half of the card.  You can click on all of the images to enlarge them and see more detail.


I added a white panel of paper on the inside of the card and I stamped the rose image with Spun Sugar Distress ink and then I heat embossed the sentiment in gold.


To finish off the card I added the watercolor panel to a pink A2 top folding card base.

Please be sure to visit all of the blogs in the link list below for more inspiration and to see more projects made using the Stamp Simply Spring Releases.


Thanks so much for stopping by today and I hope you enjoy the blog hop!

Hugs & Smiles,
Heidi


Supplies
Stamps:  Stamp Simply Clear Stamps - Thinking of You Rose SS-015
Paper:  Ranger Watercolor, Vellum, Cardstock - White, Pink
Ink:  VersaMark Ink, Tim Holtz Distress Ink - Spun Sugar, Worn Lipstick, Mustard Seed, Cracked Pistachio
Dies:  Stamp Simply Steel Dies - Rose SS-DIE002
Ribbon:  May Arts - Metallic Gold String
Accessories:  Ranger Super Fine Detail Gold Embossing Powder, Ranger Super Fine White Embossing Powder, Melissa Frances White Pearls, Zig Wink of Stella Clear Glitter Brush Pen, Ranger Glossy Accents, Scrapbook Adhesives by 3L E-Z Runner, 3D Foam Squares, Heat Tool, Paint Brush

Saturday, January 14, 2017

The Stamp Simply Ribbon Store - Hello Gorgeous I Love You Valentine Card

Hello everyone!  Today, is my day to post for The Stamp Simply Ribbon Store and I have a CAS (Clean And Simple) Valentine card to share with you.


Here is the card I designed.  I used some of the pretty papers from the My Mind's Eye - Hello Gorgeous paper collection.  Whenever I am using pattern paper I usually pick two or three different patterns--a bold print, a smaller print, and another print that is close to a solid color or a has a very subtle print.


I used white cardstock and Floral Affair die from Spellbinders to die cut the floral heart.  Then, I applied Delicata Golden Glitz ink to the die cut using a sponge.  Next, I added Ranger Super Fine Clear Embossing Powder and used a heat tool to melt the embossing powders.  I repeated adding the ink and embossing powders two more times.  Doing this adds more dimension to the die cut.


Here is a close up.  The added layers from from the embossing powder give the die cut a faux metal look or a chipboard look depending on the color of embossing powder that is used.  To embellish the wreath I added some Melissa Frances White Pearls to the center of several flowers.  I also added small bits of Foam Squares to the back of the wreath for some extra dimension.


For the sentiment I used stamps from the Altenew - Painted Rose clear stamp set.  I used the same  Delicata Golden Glitz and stamped the sentiment on to a piece of  Vellum but I used a different embossing powder.  For the sentiment I used Ranger Super Fine Detail Gold Embossing Powder.  You can see the difference in how the gold looks using different embossing powders.  The clear embossing powder show the true color of the Delicata ink which is more of a golden yellow.  I thought that would bring out the yellow in the flowers on the pattern paper.  Also when you are heat embossing on vellum make sure that your heat tool is good and hot before bringing it to the vellum.  Doing this will help to keep the vellum from warping a lot.  I wrapped the vellum around the bottom half of the paper and taped it in the back.  I also added a few more Melissa Frances White Pearls by the sentiment.


Thank you so much for joining me today and I hope you like the Valentine card I shared.  Please be sure to visit The Stamp Simply Ribbon Store for all of your paper crafting goodies.  Also check out the Stamp Simply Blog to see more inspiration from the design team.

I hope you have a wonderful day and a fantastic weekend!

Hugs & Smiles,
Heidi


Supplies
Stamps:  Altenew - Painted Rose (sentiment)
Paper:  My Mind's Eye - Hello Gorgeous, Vellum, Cardstock - White
Ink:  Delicata Golden Glitz
Dies:  Spellbinders Floral Affair
Accessories:  Ranger Super Fine Clear Embossing Powder, Ranger Super Fine Detail Gold Embossing Powder, Melissa Frances White Pearls,Scrapbook Adhesives by 3L EZ Runner, Therm-O-Web Foam Squares

Friday, January 6, 2017

The Stamp Simply Ribbon Store - CAS Birthday Wishes Card

Hello everyone!  Today is my day to post for The Stamp Simply Ribbon Store and I have a CAS (Clean And Simple) birthday card to share with you.


Check out this gorgeous pattern paper!  It is so pretty and reminds me of watercolor.  The paper is from the Harvest Meadow Paper Pack from Wild Rose Studio.  But don't let the name fool you.  This paper pack is filled with beautiful prints that could be used all year round.  I layered a couple pieces of paper from the pack and used Therm-O-Web Foam Squares in between the layers for some dimension.  Then, I added the layers to an A2 top folding white card base.


Here is another close up of those beautiful flowers.


The sentiment is from the SS-Sent003 Birthday Blessing stamp set from Stamp Simply Clear Stamps.  I stamped the sentiment on to white cardstock using Tuxedo black ink.  Then I used the  Spellbinders Labels Twenty-Five to die cut the label shape.  I used a few more foam square and added the label to the card front.


I hope you enjoyed today's CAS card share.  Please be sure to check out The Stamp Simply Ribbon Store for all of your paper crafting needs.  Also check out the Stamp Simply Blog for more inspiration from the design team.

Thanks so much for stopping by today!  Stay warm and I hope you have a fantastic Friday!

Hugs & Smiles,
Heidi


Supplies
Stamps:  Stamp Simply Clear Stamps - SS-Sent003 Birthday Blessing
Paper:  Wild Rose Studio - Harvest Meadow Paper Pack, Cardstock - White
Dies:  Spellbinders Labels Twenty-Five
Accessories:  Melissa Frances White Pearls, Petaloo Botanica Collection Coral Minis Flowers, Therm-O-Web Foam Squares, Scrapbook Adhesives by 3L E-Z Runner

Friday, December 30, 2016

The Stamp Simply Ribbon Store - Graphic 45 Mon Amour - Love More Valentine Card

Hello everyone!  I hope you all had a very Merry Christmas and you were able to spend time with your loved ones.  Today. is my day to post for The Stamp Simply Ribbon Store and I have a CAS (Clean And Simple) Valentine's Day card to share with you.  I know we aren't even into the New Year yet but in the crafting world it's on to the next holiday lol.


Here is the card I designed using the  Graphic 45 Mon Amour Collection 8 x 8 Paper Pad.  All of the paper except for the black cardstock is from the paper collection.  I fussy cut a couple of the beautiful images and a sentiment and then layered them with black cardstock.  The card base is a black top folding 5.5 x 5.5 and I added a couple layers of the pattern paper from the collection.


Here is a close up of the images.  I added some Prima Flowers Interlude Black/Gray and KaiserCraft Fairy Floss Mini Paper Blooms for embellishments.  The Prima flowers are so pretty and they come with a light dusting of glitter on them.  I also added a few Melissa Frances White Pearls around the images and the sentiment.


Like I have mentioned many times in other posts Graphic 45 paper has such beautiful images and you can create a lot of CAS cards just by letting the paper do the work for you.  If you don't have the Graphic 45 Mon Amour Collection 8 x 8 Paper Pad I encourage you to check it out.  The paper pad has so many beautiful images and you would be able to use the papers to create Valentine, Anniversary, Birthday, and Thinking of You cards.

Be sure to check out The Stamp Simply Ribbon Store for all of your paper crafting needs.  Also check out the Stamp Simply Blog for more inspiration from the design team.

Thank you so much for stopping by today!
I hope you have a very Happy and Safe New Year's Eve!!

Hugs & Smiles,
Heidi


Supplies
Paper:  Graphic 45 Mon Amour Collection 8 x 8 Paper Pad, Cardstock - Black
Accessories:  Prima Flowers Interlude Black/Gray, KaiserCraft Fairy Floss Mini Paper Blooms, Melissa Frances White Pearls, Scrapbook Adhesives by 3L E-Z Runner, Therm-O-Web Foam Squares

Friday, December 23, 2016

The Stamp Simply Ribbon Store - Birds & Berries Peace Christmas Card

Hello everyone and happy Friday!  Today, is my day to post for The Stamp Simply Ribbon Store.  I have a CAS (Clean And Simple) Christmas card to share with you.  I know Christmas is just a couple days away but if you are needing any all occasion winter cards this one is perfect.  Quick, easy, and can be used for all occasions and done with so many kinds of pattern papers.


For my card I used some of the beautiful papers from the Wild Rose Studio - Birds & Berries collection.


I love this paper and the floral pattern is so pretty.  But when I laid the peace die cut on top of the paper it just kind of got lost due to the busy pattern.  So I used a cotton ball to dab some white pigment ink into the center of the paper.  Doing this toned the pattern down and gives the paper a softer look.  Now the die cut won't get lost in the image anymore.  Pigment ink is a little stickier that dye based ink so you might want to use a heat tool to dry the ink.


Here is a close up of the sentiment and die cut.  Unfortunately when I designed the card I didn't realize the Peace die was sold out in the store and has been retired.  However, Sharon has a wonderful selection of dies that could be used in place of this die.  You could also use this same technique of adding the white pigment ink to any off your pattern papers and create cards for all occasions.  To create the die cut I used Bazzill Silver Mirror Paper.  I die cut the word peace a second time with some of the other paper from the collection.  Then I added some Tim Holtz Fired Brick Distress Ink along the bottom of the word to create and ombre look.  Next, I added one of the flowers from the Prima Flowers - Miss Godivas Caramel collection.  I also added some Marion Smith - Pearl White Stamens and Melissa Frances White Pearls.


I added another piece of pattern paper for a layer behind the floral print.  Then I added the card front to an A2 top folding white card base.

I hope you enjoyed today's card share.  Please be sure to check out The Stamp Simply Ribbon Store for lots of paper crafting goodies.  Also check out the Stamp Simply Blog for more inspiration from the design team.

I hope you all have a very Merry Christmas!!!

Thanks so much for stopping by today!

Hugs & Smiles,
Heidi


Supplies
Paper:  Wild Rose Studio - Birds & Berries, Bazzill Silver Mirror Paper, Cardstock - White
Ink:  Tim Holtz Fired Brick Distress Ink, White Pigment Ink
Dies:  Spellbinders Peace Die (retired)
Accessories:  Prima Flowers - Miss Godivas Caramel, Marion Smith - Pearl White Stamens, Melissa Frances White Pearls, Ranger Glossy Accents, Scrapbook Adhesives by 3L E-Z Runner

Friday, November 25, 2016

The Stamp Simply Ribbon Store - Silver Snowflakes & Happy Holidays CAS Card

Hello everyone!  I hope you all had a very Happy Thanksgiving.  We had a very nice and relaxing day with family.  Lots of yummy food and some leftovers too.  Today, is my day to post for The Stamp Simply Ribbon Store but before I get to my card I want to share a Special with you.

~~~Current Special~~~

We are welcoming the holidays with FREE RIBBON for you!
Each order over $25 (product value) placed during the remainder of November will receive 10% BACK in FREE RIBBON. We’ll match the ribbon to items in your order (paper, stamp styles, etc). It’s as easy as that. A fun way to treat yourself to a little surprise!


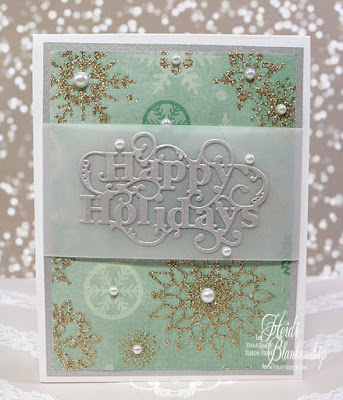
Here is the card that I desgined, it is very CAS (Clean And Simple) but I love how it turned out and I love the colors too.  I cut a piece of the My Mind's Eye Sugar Plum pattern paper to fit the card front and then I cut a piece of the Luxury Pearlescent Metallic Silver Cardstock to layer behind the pattern paper.  The metallic silver looks so pretty with the silver glitter snowflakes on the pattern paper.


I wrapped a piece of Vellum around the card front pieces and tape it in place on the back side.  Then I used the Spellbinders Die D-Lites - Happy Holidays Sentiment and the Luxury Pearlescent Metallic Silver Cardstock to die cut the sentiment.  I used Ranger Glossy Accents to adhere the sentiment.
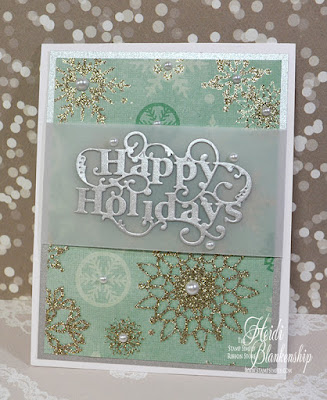

Here is a close up of the sentiment.  To finiah off the card I added a few Melissa Frances White Pearls to the center of the snowflakes and around the sentiment.


I used Scrapbook Adhesives by 3L E-Z Runner to adhere the card front panel to the white A2 top folding card base and the card was done.  Easy peasy!  This card would be great to make for Christmas cards because it comes together so quick and easy.

Thank you so much for stopping by today!  Please be sure to check out The Stamp Simply Ribbon Store for all of your paper crafting goodies and also the Stamp Simply Blog for more inspiration from the design team.  Don't forget about the ribbon special too!

If you are venturing out for the Black Friday shopping and sales I wish you luck and I hope you find some great deal!  Happy Holidays and Merry Christmas!!
Hugs & Smiles,
Heidi


Supplies
Paper:  My Mind's Eye Sugar Plum, Luxury Pearlescent Metallic Silver Cardstock, Vellum, Cardstock - White
Dies: Spellbinders Die D-Lites - Happy Holidays Sentiment
Accessories:  Melissa Frances White Pearls, Scrapbook Adhesives by 3L E-Z Runner, Ranger Glossy Accents

Friday, October 21, 2016

The Stamp Simply Ribbon Store - The Twelve Days of Christmas - Day 12

Hello everyone!  
Welcome, to day 12 of the The Twelve Days of Christmas for The Stamp Simply Ribbon Store.  There is still a little bit of time to enter the Blog Candy and the details will be listed below.  If you would like to check out all of the beautiful cards for The Twelve Days of Christmas you can click HERE to visit The Stamp Simply Blog.


Here is the Christmas cards I designed.  
This card is a wonderful combination of metallic copper and gold with some cream.  


To create the background piece I used the Darice Embossing Folder - Pine Branches in Corner and inked the embossing folder with Delicata Celestial Copper ink.  I used a heavier hand when inking the top and bottom of the embossing folder so the middle of the folder had very little ink.  The Delicata inks are great to use for this technique because they leave a very soft shimmer and don't tend to leave harsh lines.  Then I carefully added my cardstock and ran the embossing folder through the die cutting machine.  As you can see from the photo doing this technique leaves the flatter areas with ink and the embossed areas are still the cream colored cardstock.


Here is a close up of the top part of the card.


Here you can see the middle and bottom of the card.  I used one of the stamps from the Stamp Simply Clear Stamps - SS-013 Jesus stamp set.  I used Delicata Celestial Copper ink and Ranger -  Copper Supper Fine Detail Embossing Powder to stamp and emboss the sentiment.  Then I went over the word Savior with a Zig Wink of Stella Gold pen and I also added some splatter droplets on the paper using the Wink of Stella pen.  Next I added some Glossy Accents on top of the word Savior for some added dimension.


To finish off the card I added some May Arts Metallic Wired Iridescent Cord - Copper around the bottom half of the card and I curled the ends.  I also added a few Melissa Frances Cream Pearls.  I layered the background piece on to a piece of Bazzill Luxury Pearlescent Metallic 105# Copper and then added that to an A2 top folding cream card base.

As I mentioned above there is still some time to get your name in 
for a chance at winning some blog candy.

Blog Candy
*Please Read*

The 12 Days of Christmas runs for 12 consecutive days. There is a total of 6 designers participating, so each designer has 2 days.  Each designer will offer BLOG CANDY on ONE of her days, her choice.  So be sure to visit all of the blogs.  I am doing my BLOG CANDY starting today (10/14/16).  You will have until 11:59 PM (CST) Friday, October 21st, 2016 click HERE to leave a comment on the blog post from last week and the winner will be announced Saturday, October 22nd, 2016

Leave a comment and let me know if you make Christmas cards and if you do how many do you send or give to family and friends OR tell me if your family has any Christmas traditions--it's your choice.

What will you win?
Your choice of one of the NEW Christmas Stamp Simply Clear Stamp Sets.
*If you have already purchased the Christmas sets, you are then welcome to choose from ANY of the Stamp Simply Clear Stamp Sets.


Please be sure to visit The Stamp Simply Ribbon Store for all of your paper crafting goodies and also the Stamp Simply Blog for lots of inspiration from the design team.

Thanks so much for stopping by today! 

Hugs & Smiles,
Heidi


Supplies
Stamps:  Stamp Simply Clear Stamps - SS-013 Jesus
Paper:  Bazzill Luxury Pearlescent Metallic 105# Copper, Cardstock - Ivory
Ink:  Delicata Celestial Copper
Ribbon:  May Arts Metallic Wired Iridescent Cord - Copper 
Accessories:  Darice Embossing Folder - Pine Branches in Corner, Ranger -  Copper Supper Fine Detail Embossing Powder, Glossy Accents, Melissa Frances Cream Pearls, Zig Wink of Stella Gold, Scor-Tape, Heat Tool

LinkWithin

Related Posts Plugin for WordPress, Blogger...