Saturday, November 30, 2013

Vintage Style Jewel Flower Embellishment – Joyeux Noel Christmas Card

Hello everyone!  Today is my day to post over on the Positively Me Blog and I have a quick and easy Christmas card to share with you.

JoyeuxNoel-1

I created a vintage style flower for an embellishment using the S5-143 Jewel Flowers & Flourishes die template from  Julianna Hudgins Positively Me Collection from Spellbinders Creative Arts®.  I used old book pages for the flower and I inked the edges with Vintage Photo Distress Ink.  Then I fluffed up the flower and added some silver Stickles on the edges of the flower and leaves for a little sparkle.  I added a Kaiser Craft Sparklets-Crystal to the center of the flower and attached the flower to the top of the ornament die cut.

To see more pictures and find out all of the details please hop on over to the Positively Me Blog and check it out! Thanks so much for stopping by the  today!

Hugs & Smiles.
Heidi 

Supplies
Paper:  Really Read, Kraft, Old Book Pages 
Ink:  Mixed Media Inx Jasmine; Ranger Distress Ink Vintage Photo

Friday, November 29, 2013

Thinking of You Sympathy Card

Hello blogging friends!  I hope everyone had a wonderful Thanksgiving and if you went out shopping for Black Friday I hope you found some great deals!  I have been off and away from the computer for a couple of days.  My husband has been on vacation this past week and with the holidays we had some family from out of town so it was nice to get a little break.  The past few days we have had a lot of really great family time, relaxing and yummy food.  But now I guess it's time to get back to reality lol.

Since I have been away for a couple of days I haven't done any creating.  But I do have a card to share that I made a while back.  I make all of the cards for different co-workers of my husband's and not too long ago I had to make a sympathy card so I thought I would share it today.


I know this is a sympathy card but I love the simplicity of the layout and I think it could be used for several different cards just by changing the sentiment.  I used  S6-001 5x7 Matting Basics A and E3D-004 Basket Weave with Metallic Bronze cardstock to create the embossed background.  Then I lightly sanded the metallic paper to reveal the black core of the paper.  Next I used S6-006 Branching Out and a smaller die template from the S6-001 5x7 Matting Basics A to create a couple of layers and the sentiment on the card.


To finish off the card I added some WOC flowers, pearls and metal corner accents.

Just a quick little post today.  
Thank you so much for stopping by and I hope you have a wonderful weekend!

Hugs & Smiles,
Heidi

Supplies
Stamps:  JustRite Papercraft CR-03570 With Sympathy Clear Stamp Set
Paper:  Simply Smooth Ivory, Metallic Bronze
Ink:  Imagine Crafts/Tsukineko Memento Rich Cocoa, Ranger Distress Ink Vintage Photo
Dies:  Spellbinders Creative Arts® Grand Calibur® Machine, S6-001 5x7 Matting Basics A, E3D-004 Basket Weave, S6-006 Branching Out
Accessories:  WOC Flowers, Metal Corner Pieces, Ivory Pearls, Scrapbook Adhesives By 3L® 3D Foam Squares, EZ Runner Permanent Strips-Refillable Dispenser 49'

Monday, November 25, 2013

The Stamp Simply Ribbon Store - Christmas Ensemble with Webster's Pages - A Christmas Story Collection

Hello and Happy Monday!  Wow--I can't believe how fast this month has gone by--Thanksgiving is only a few days away!  We don't have much snow on the ground but it has gotten very cold here in MN.  

Today, I have a little Christmas ensemble and a tutorial that I designed for The Stamp Simply Ribbon Store to share with you.


Look at the beautiful pattern paper from Webster's Pages A Christmas Story 6 x 6 Paper Pad Collection.  I love the red and green with a touch of pink.  I created a card, a double pocket candy holder and used a mini craft bag to for a gift card holder.  


Here is the card that I designed.  I used the same pattern paper from the Webster's Pages A Christmas Story 6 x 6 Paper Pad Collection on all of the projects.  I also used some pink and green cardstock.  For the card I used the S2-057 Holly WreathS5-131 A2 Matting Basics A and  S5-132 A2 Matting Basics B die templates from  Spellbinders Creative Arts®.  I created the two mats and then added the wreath on top of the pattern paper.  I used 3D Foam Squares for a little added dimension on the wreath. Then I layered  Cluny Lace 1/8" - Antique White, the green lace trim from the  Webster's Pages A Christmas Story Designer Trims and May Arts 1/8'' Red Velvet ribbon.  I added a Maya Road Velvet Pleats Red with two of the Prima Flowers Abbey-Pink in the center.  To add a little sparkle to the flowers I used Tombow Mono Multi Liquid Glue and Tim Holtz Distress Glitter - Clear Rock Candy.  To finish off the card I added a few Kaiser Craft Light Pink Rhinestones.


To create the gift card holder I used one of the Webster's Pages Mini Craft Bags.  I used the same ribbons, trims and flowers as the card.  I added a bow to the top and a few rhinestones.


For the double pocket candy holder I used the Webster's Pages A Christmas Story 6 x 6 Paper Pad CollectionWebster's Pages A Christmas Story Designer TrimsMay Arts 1/8'' Red Velvet and added another velvet pleat with flowers to the center.

I have a tutorial to share with you on how I created the double pocket holder.  This is not my original design idea and unfortunately I can't remember where I first saw this but I think it was a few years back from 
Stampin' Up.  This is also know as the double tea bag holder.


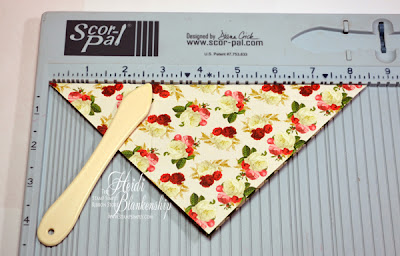
Start with a piece of 6 x 6 pattern paper.  Double sided paper is the best for prettier results but not a must.  Fold the paper so two points meet to create a triangle.   Then on the long side score at 1/2'', turn the paper over and score again at 1/2''.


Now place the long side of the paper at the top of the score board.  Score at 2-3/4'' and then turn over and score at 2-3/4'' again.


Now open the paper.  Then fold one of the sides with the score marks towards the center as shown in the photo.


Take the other side and fold over.  Your paper should look like the photo above.


Now turn the paper over.  Then fold on the center score line.  Next fold backwards on the two outer score lines to create a W shape.  


Bring the two outer points together.


Here is a side view of what this should look like and there will be two little pockets--one on each side.  Punch a hole at the top and add some ribbon to hold in place.  I also like to add a little bit of hot glue to the bottom and where the papers cross to make the pockets.  Doing this helps hold everything together and makes it a little more sturdy.  Like I said this is also known as the double tea bag hold but you can put several different things into the little pockets--tea bags, candy (the individual Ghiradelli Chocolates work great), a pair of earring on a card and gift cards just to name a few things.  I think these are great for the holidays--when you need a little something.  


Please be sure to check out The Stamp Simply Ribbon Store for all of the fantastic products and the Blog for inspiration from the Design Team.

Thank you so much for stopping by today!  I hope you like the Christmas ensemble and the tutorial for the double pocket holder.

I hope you have a creative day!

Hugs & Smiles,
Heidi

Supplies
Paper:  Webster's Pages A Christmas Story 6 x 6 Paper Pad Collection - The Stamp Simply Ribbon Store; Cardstock Pink, Green
Dies:  Spellbinders Creative Arts® Grand Calibur® Machine, S5-131 A2 Matting Basics A, S5-132 A2 Matting Basics B, S2-057 Holly Wreath
NOTE:  You can also find Spellbinders® products at The Stamp Simply Ribbon Store
Ribbon/Lace:  Webster's Pages A Christmas Story Designer Trims, May Arts 1/8'' Red Velvet, Cluny Lace 1/8" - Antique White - 3 yard Bundle - The Stamp Simply Ribbon Store
Accessories:  Webster's Pages Mini Craft Bags, Maya Road Velvet Pleats Red, Prima Flowers Abbey-Pink, Prima Leaves Florella Light GreenKaiser Craft Light Pink Rhinestones,  Tombow Mono Multi Liquid GlueTim Holtz Distress Glitter - Clear Rock CandyScrapbook Adhesives by 3L® 3D Foam SquaresEZ Runner® Permanent Strips-Refillable Dispensers 49', - The Stamp Simply Ribbon Store;  Ghiradelli Chocolates
NOTE:  You can also find Scrapbook Adhesives by 3L® products at The Stamp Simply Ribbon Store

Friday, November 22, 2013

Earrings - ButterBeeScraps

Hello Blogging Friends!  It's that time of the year again with the holidays and CHA right around the corner.  I have been busy working on some Christmas presents, CHA artwork and catalog design work for a couple of companies.  So I have several things in the works but I just can't share them yet.  ;-)  But I will tell you this--you are going to LOVE the New Releases that will be coming up in the New Year!!

This past weekend I was busy making some jewelry and I made over 30 pairs of earrings.  Today, I am going to share some of the earrings with you.  All of the bead caps, jump rings and rhondell spacer beads and the large green beads are from ButterBeeScraps.  I have all of them listed and linked below.  If you have never visited ButterBeeScraps I hope you will hop on over there and check it out!  Monique, owner of ButterBeeScraps has so many beautiful metal filigree pieces, beads, bead caps, spacers, crystal and charms and her prices are fabulous!!  


Here are a couple collage pictures of the earrings.  All of the beads except for the large round beads pictured above are from my stash including--Jesse James Beads, Blue Moon Beads, Michael's, JoAnn's and Hobby Lobby.  I just absolutely love the filigree bead caps--they make the earrings look so elegant.


I love this aqua color with the silver.


These sparkle so much when the light hits them.  Love the soft golden pink color.


These are the large round green beads from ButterBeeScraps.  I love the crackle look in the beads.


Love the soft jade color.


This is another pair that really sparkles.


These are my favorite--so shabby!   Love it!

Ok, that's it for me today!  I would love to hear what you think about the earrings.  

Don't forget to check out ButterBeeScraps.

Happy Friday and I hope you have a Wonderful Weekend!

Hugs & Smiles,
Heidi


Supplies
ButterBeeScraps:  Bronze Filigree Bead Caps (Item #CAP046-B)Bronze Filigree Bead Caps (Item #CAP052-B)Bronze Filigree Bead Caps (Item #CAP038-B)Silver Plated Filigree Bead Caps (Item #CAP057-S)Silver Plated Filigree Bead Caps (Item #CAP047-S)Green Round Spray-Painted Glass Beads (Item #BD077-GN)Rhinestone Rondelle Spacer Beads (Item #BD010-P/CL)Bronze Jump Rings
Other Supplies:
Beads from my stash--Jesse James Beads, Blue Moon Beads, Michael's, JoAnn's and Hobby Lobby; Head Pins, French Hooks
Tools:  Loop Tool; Beadalon--Flush Cutters, Round Nose Pliers

Monday, November 18, 2013

The Stamp Simply Ribbon Store - Burlap Santa Bag Christmas Ornament

Hello blogging friends!  I have been busy, busy and I have some exciting things going on but I can't share just yet.  ;-)  I hope everyone had a wonderful weekend!  Today, is my day to post for The Stamp Simply Ribbon Store and today I have something a little different to share--it's not a card LOL.  


I used one of the Maya Road Vintage Linen Burlap Treasure Bags-Cream to create a Christmas ornament.  These would be perfect for gift giving if you need just a little something or you could also attach it to a gift bag.  I took some of the May Arts Metallic Gold Net 3"  and I cut about 1'' off across the bottom.  Then I attached it to the Linen Burlap Treasure Bag with hot glue. Next I added some of the Melissa Frances 2 Layer Silk Ribbon -White.  This ribbon is so pretty and shabby looking.  I took about four cotton balls and pulled them apart and then I put them inside the bag to fluff it up.  


I added Christmas greens, berries and a image from the KaiserCraft St Nicholas 6-1/2'' Paper Pad.  The image is one of the die cuts from the paper pad.  I used Tombow Mono Multi Liquid Glue to add some Tim Holtz Distress Glitter - Clear Rock Candy  to the image.  I took the 1'' strip I had left from the May Arts Metallic Gold Net 3" and made some bow loops to tuck in with the greens.  For a little sparkle I added Sequins Gold Stars, Kaiser Craft Silver Rhinestones and Prima Holiday Celebration Poinsettia.  


To create a hanger I tied the pull strings together on the backside.


I love the little Maya Road Vintage Linen Burlap Treasure Bags and they are perfect for making little Christmas ornaments.  You could also decorate the outside of the bag and use it for a gift card holder.

Please be sure to check out all of the fabulous paper crafting supplies at The Stamp Simply Ribbon Store.  Also don't forget to hop on over to the Blog and check out all of the wonderful inspiration 
from the Design Team!

Thank so much for stopping by today!

Hugs & Smiles,
Heidi


Supplies
Paper:  KaiserCraft St Nicholas 6-1/2'' Paper Pad (die cut)-The Stamp Simply Ribbon Store
Ribbon:  May Arts Metallic Gold Net 3" - By the Yard, Melissa Frances 2 Layer Silk Ribbon -White-The Stamp Simply Ribbon Store
Adhesive:  Tombow Mono Multi Liquid Glue-The Stamp Simply Ribbon Store
Accessories:  Maya Road Vintage Linen Burlap Treasure Bags-Cream, Prima Holiday Celebration Poinsettia, Tim Holtz Distress Glitter - Clear Rock Candy, Sequins Gold Star, Kaiser Craft Silver Rhinestones-The Stamp Simply Ribbon Store
Other: Cotton Balls, Christmas Greens, Hot Glue

Thursday, November 14, 2013

ButterBeeScraps' Design Team Call!!

Hello everyone! 
Just a quick post today to let you know about the ButterBeeScraps' Design Team Call.  


The call is being extended until November 30th!

This is an open call to all US and *International Designers.

We are looking for designers who love to create mixed media, jewelry, card making/paper crafting, scrapbooking and home decor.  

 Do you like working with metal filigree pieces, charms, beads and crystals?

Click HERE to hop on over to the ButterBeeScraps' Shop and check it out!  
You can also find us on Facebook by clicking HERE.

  YouTube and Bloggers are both welcome to tryout!

For all of the details please click on the links to the two YT videos below.

*Please note the DT call is now open to International Designers.  Look for the detail in the video.

Please send your Design Team submission to Monique--click HERE for the email.
Please put DT Tryout in the subject line. 

Thank You and Good Luck to Everyone!!

Hugs & Smiles,
Heidi


Monday, November 11, 2013

The Stamp Simply Ribbon Store - Golden Season's Greetings Christmas Card

Hello everyone!  I hope you all had a wonderful weekend.  Today, I have a project to share with you using products from The Stamp Simply Ribbon Store and a quick tutorial.


Here is the card that I designed for The Stamp Simply Ribbon Store.  I love how this card turned out!  I love using Delicata Golden Glitz ink with metallic paper.  The results are always so beautiful.


The technique I did for this card is called letterpress.  I used a brayer to ink up the E3D-007 Rustic Wreath folder.  Make sure to have a good coverage of ink over the entire folder.  Then I misted the paper front and back with a little water and a couple of drops of dish soap.  The dish soap helps to condition the paper and soften the fibers.   Then embossed the paper.


Here is a look at the results after doing the letterpress.


Here is another close up look.  I think it looks so beautiful and it's quick and easy to do.


To embellish the card I added some clusters of Kaiser Craft Rhinestones-Lippy Red for the holly berries.  I stamped a sentiment from JustRite Papercraft CR-475810 Christmas Vintage Labels One with Delicata Golden Glitz ink and heat embossed using Ranger Super Fine Gold Embossing Powder.  Then I used the S4-401 2013 Heirloom Ornaments die template to die cut the shape.  I added May Arts 3/8'' Metallic Velvet Red and May Arts Metallic String Gold


Here is a close up of the tag.


I hope you like today's card and the technique.

Please be sure to check out all of the fabulous paper crafting supplies at The Stamp Simply Ribbon Store.  Also don't forget to hop on over to the Blog and check out all of the wonderful inspiration 
from the Design Team!

Thank you for stopping by today!

Hugs & Smiles,
Heidi

Supplies
Stamps:  JustRite Papercraft CR-475810 Christmas Vintage Labels One-The Stamp Simply Ribbon Store
Paper:  Metallic Ivory, Ivory
Ink/Embossing Powder:  Delicata Golden Glitz; Ranger Super Fine Gold Embossing Powder-The Stamp Simply Ribbon Store
Dies:  Spellbinders Creative Arts® S6-001 5 x 7 Matting Basics A, E3D-007 Rustic Wreath, S4-401 2013 Heirloom Ornaments
NOTE:  You can also find Spellbinders® products at The Stamp Simply Ribbon Store
Ribbon:  May Arts 3/8'' Metallic Velvet Red, May Arts Metallic String Gold-The Stamp Simply Ribbon Store
Accessories:  Kaiser Craft Rhinestones-Lippy Red; Scrapbook Adhesives By 3L® 3D Foam Squares, EZ Runner Permanent Strips-Refillable Dispenser 49'
NOTE:  You can also find Scrapbook Adhesive By 3L® products at The Stamp Simply Ribbon Store

Sunday, November 10, 2013

Pinterest Party At Michaels - Spellbinders - Rochester, MN

Hello blogging friends!  
I have a quick post with a few pictures to share with you from the Pinterest Party at  Michaels today.  


I had a wonderful time.  I was at the store from 1-4 pm demoing the Grand Calibur® and showing different projects you can create with the die templates from Spellbinders Creative Arts®.  


Here are some samples of the CAS (Clean And Simple) cards that I was demoing for the event.


I want to say a HUGE Thank You to Ron, Susan and all of the Staff at the Michaels in Rochester, MN!!
They were all so fantastic to work with!!  Also, thank you to all of the people who stopped in to watch a demo and see me today!  It was great to see some friends!

Thanks so much for stopping by today!

Hugs & Smiles,
Heidi


Friday, November 8, 2013

Pinterest Party at Michaels with Spellbinders!

Hello everyone!  I have a quick announcement to make.  This coming Sunday, November 10th I will be at Michaels in Rochester, MN from 1-4 pm at the Pinterest Party.  Michaels will have displays with Pinterest inspired projects and the supplies to purchase--then you can join in the fun in the classroom to create the make-n-takes.  I will be demoing the Grand Calibur® and showing different projects you can create with the die templates from Spellbinders Creative Arts® during the event.  If you are in the area I hope you will stop in and say hello!

Thanks for stopping by today!

Hugs & Smiles,
Heidi

Sweet Heart Clear Stamps - JustRite Papercraft November New Release - Just For You Card

Hello everyone and welcome to day five of the JustRite® Papercraft November New Release!


Before I share the New Release I want to let you know that JustRite® Papercraft is very excited to announce that the log in issue with the new website has been fixed.  Thank you to everyone who helped trouble shoot the issue. In celebration JustRite® Papercraft is have a Grand Opening Coupon Code for you to use in the store - simply type RESET (all caps)  in the coupon code box at check out and you will receive 25% off your entire purchase!  If this is your first time shopping in the new website - you will need to reset your password. You may use your password from the old website or you can create a new password. 
Have fun shopping!


Here is the new SW-04840 Sweet Heart Clear Stamps set designed by Samantha Walker for JustRite® Papercraft.  This is a really great stamp set--not only can it be used for Valentine but you can also use it for cards for mom and dad and friendship cards.  It has several sentiments that will work for many different occasions.  This stamp set also coordinates with Spellbinders Die Templates: S5-204 Lace Hearts Dies designed by Samantha Walker for Spellbinders.


Here is the card that I designed using the SW-04840 Sweet Heart Clear Stamps from JustRite® Papercraft and S5-204 Lace Hearts from Spellbinders.  For the pattern paper I used Kaiser Crafts Lady Rose 6 1/2'' paper pad from The Stamp Simply Ribbon Store.


I used the stamps and Brilliance Crimson Copper ink and heat embossed.  Then I die cut two of the heart shaped and layered them.  I created a flower cluster using Prima Abbey-Chocolate Cream Flowers, Prima Leaves-Florella Light GreenPrima Lil Missy-Very Vintage Colored Flowers flowers and leaves from Prima.  Then I added some Melissa Frances Pearls-Cream around one of the hearts.


I used the S5-199 Font One Lowercase die templates to cut out the word love and added that to the top of the card.  Then I added some diamond stickles for a little sparkle and a few Prima Sugar Dots-Allstar.  To adhere all of the layers I used 3D Foam Squares and EZ Runner Permanent Strips-Refillable Dispenser  from Scrapbook Adhesives by 3L®.  

Please be sure to visit all of the designers in the link list below.


Thank you so much for stopping by today and I hope you have a Happy Friday!

Hugs & Smiles,
Heidi

Supplies
Stamps:  JustRite® Papercraft SW-04840 Sweet Heart Clear Stamps
Paper:  The Stamp Simply Ribbon Store-Kaiser Crafts Lady Rose 6 1/2'' paper pad; DiscountCardstock.com Simly Smooth Ivory, Posh Milk Chocolate
Ink:  Imagine Crafts/Tsukineko Brilliance Crimson Copper
Dies:  Spellbinders Paper Arts® S5-131 A2 Matting Basics A, S5-204 Lace Hearts, S5-199 Font One Lowercase
Accessories:  The Stamp Simply Ribbon Store-Prima Abbey-Chocolate Cream Flowers, Prima Leaves-Florella Light Green, Prima Lil Missy-Very Vintage Colored Flowers, Melissa Frances Pearls-Cream, Prima Sugar Dots-Allstar; Ranger Diamond Stickles; Scrapbook Adhesives by 3L® 3D Foam Squares, EZ Runner Permanent Strips-Refillable Dispenser 

Thursday, November 7, 2013

Coffee & Friends Background Cling Stamp - JustRite Papercraft November Release - Coffee & Friends Card

Hello everyone!  Welcome to day four of the  JustRite® Papercraft November New Release.  Today, I have a new background stamp to share with you.


Here is CL-04860 Coffee & Friends Background Cling Stamp from   JustRite® Papercraft.  This is a great background stamp--it could be used for several different occasions and also for DIY home decor pieces.  


Here is the card that I designed using CL-04860 Coffee & Friends Background Cling Stamp.  I went for more of a rustic country look with my card adding the touches of burlap.


To color the background I stamped the image using Tuxedo Black ink.  Then I added Rhubarb Stalk ink around the oval frame and coming in towards the center of the image.  To finish it up I added Vintage Photo ink on the outer edges for the wood grain.


For the roses/leaves I used burlap and S5-086 Bitty Blossoms to die cut the flowers.  I rolled the roses and used hot got on the bottoms to glue the flowers together.  Then I airbrushed them with Copic markers for a little added color.  I also used S2-049 Corner Sprigs and black cardstock to die cut some little sprigs and tucked them in around the roses.


I added more burlap to the back of the main image.  Then I used LF-132 Grand Rectangles and LF-168 Grand Large Labels die templates to create a mat and base for the card with black and really red cardstock.

Please be sure to visit each of the designers in the link list below to see what they have to share with you.


Thank you so much for stopping by today!

Hugs & Smiles,
Heidi

Supplies
Stamps:  JustRite® Papercraft CL-04860 Coffee & Friends Background Cling Stamp
Paper:  Discountcardstock.com Really Red, Black, Kraft
Ink:  Imagine Craft/Tsukineko Memento Tuxedo Black, Rhubarb Stalk; Ranger Vintage Photo Distress Ink; Copic Markers R89 Dark Red, YG61 Pale Moss
Dies:  Spellbinder Creative Arts® LF-132 Grand Rectangles, LF-168 Grand Large Labels, S5-086 Bitty Blossoms, S2-049 Corner Sprigs
Accessories:  Burlap; Scrapbook Adhesives by 3L® EZ Runner® Permanent Strips-Refillable Dispenser 49'; Hot Glue

LinkWithin

Related Posts Plugin for WordPress, Blogger...