Monday, November 30, 2009

JustRite Stampers - A Merry Little Christmas Gift Box

Good afternoon! Wow, it's only Monday and it's already a crazy week! The kids are back in school after the holiday and I have been busy creating. ;-) I hope your week is off to a fantastic start!

Today I have an altered project to share with you. I altered this cute little gift box from Taylored Expressions. It is the small box from the Perfect Package Line. These little boxes are so fun, quick and easy to alter! The box has a magnetic closure on the front and it can also fold flat for easy storage.

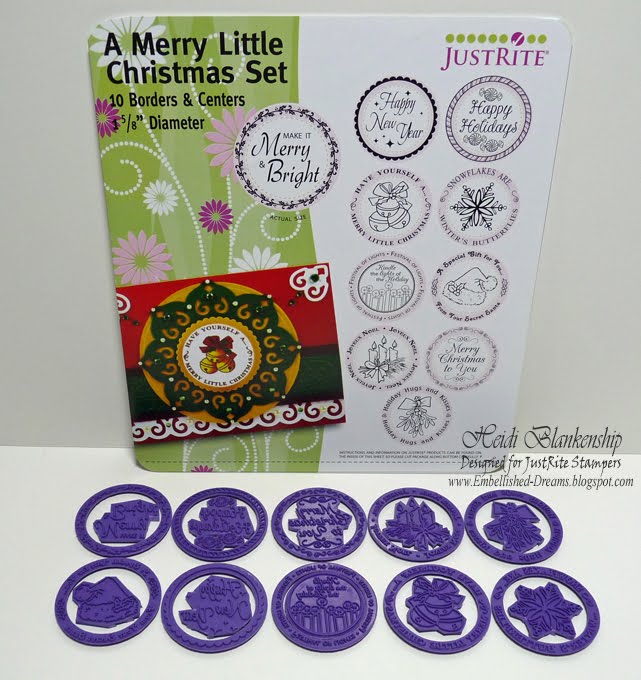
The designer paper I used to cover the box is from The Merry Days of Christmas collection from My Mind's Eye. The stamps that I used are from A Merry Little Christmas set from JustRite Stampers. I wanted to use the image of the Santa hat and I thought the stamp and the paper would go together perfectly.

Here is a picture of the stamp set A Merry Little Christmas.Here is a close-up picture of the image and sentiment that I used to create a tag for the box. The sentiment is: Have yourself a Merry Little Christmas.
To create the tag I stamped the sentiment and image twice. I colored in the images using Copic markers for the hat and for the fur on the hat I used a white glaze pen from Sakura. Then I cut out one of the images of the hat and I put foam dots on the back to add some dimension to the tag. I used the Standard Circles Large S4-114 die template from Spellbinders™ to cut/emboss the circle. Leaving the paper in the die template I inked the inside edges with Ranger-Distress Ink Peeled Paint (Green). Then I also used Labels Three S4-189 die template from Spellbinders™ to cut/emboss the label shape for a mat. Once I had the image and the circle and label diecuts made I layered as shown. I also added a few multi-colored twinkles from Taylored Expressions and some deep red colored ribbon and a bow to the front.
Supplies~
Stamps~JustRite Stampers-A Merry Little Christmas Set, 1-5/8'' Wood Stamper
Paper~My Mind's Eye-The Merry Days of Christmas, Georgia Pacific-White
Ink~Tsukineko-Memeto Rich Cocoa, Ranger-Distress Ink Peeled Paint (Green)
Misc.~Spellbinders™-Wizard™, Standard Circles Large S4-114, Labels Three S4-189, Copic-R27, R29, YG25, YG63, Sakura-White Glaze Pen, Taylored Expressions-Box, Multi-color Twinkles, 3L Scrapbook Adhesives-Black 3D Foam Squares, Beacon Adhesives-Gem-Tac, 3-in-1 Advanced Craft GlueThank you so much for stopping by today! I hope you enjoyed today's project as much as I enjoyed creating it! I am going to have to get a few more of these little boxes!! Now I just need to find the perfect little gift to fit inside. *wink* Don't forget to check out JustRite Stampers Website and Blog for lots of Christmas inspiration! Another reminder**don't forget all of the Christmas stamp sets from JustRite are 20% Off while supplies last and they ship in 48 hours!!

Smiles!
Heidi

Sunday, November 29, 2009

Just For Fun Rubber Stamps - Angel in Flight

Good morning! I hope you have all had a wonderful holiday weekend, your fill of yummy foods, spending time with family and friends and maybe a little shopping thrown in along the way. We have had a really nice and relaxing weekend.

For today I have a Christmas card to share with you. I love these soft aqua colors and I was really happy with how the card turned out. The stamped images are from Just for Fun Rubber Stamps. I started with stamping the image of the Angel in Flight G2504 and then coloring with Copics. Once I had the coloring done then I cut out the image. Then I added glitter to the hair and dress of the angel. The next piece I worked on was the sheet music. I stamped the image of the sheet music Glorious Song H2503 and then used distress inks Antique Linen, Vintage Photo, Broken China (Blue), Milled Lavender on my craft mat along with some water to create the color in the background. Then I distressed the edges.After I had the two stamped images done I set them aside and worked on the snowflake background and the snowflake frame. To achieve the look of the snowflake background I took a piece of white cardstock and ran it through the Wizard™ with the Snowflake Impressabilites I2-1003 from Spellbinders™ and then I used the side with the embossed snowflakes and added ink to get the snowflakes to pop and distressing on the edges. For the frame I used a piece of light aqua colored craft paper from 3M. The paper is Post-it Craft Paper and it is available in 20 different colors all with a white core (with the exception of the black). The other things I really like about the craft paper is that it has an adhesive backing which makes it perfect for using in the Wizard™ and die cutting! I used the Snowflake Frame S5-017 die template from Spellbinders™ and sanded over the embossed areas to reveal the white core. I also made a little Christmas bouquet for the angel using the Martha Stewart twig punch, Ivory Flower Soft and tiny rhinestones. I assembled the card as shown and then I also added some ivory lace and pom-pom trim at the bottom of the card. To finish off the card I created a snowflake embellishment using the Create a Flake Two S4-223 die template from Spellbinders™ and a snowflake brad. I also added coarse crystal glitter around the edges.

Supplies~
Stamps~Just For Fun Rubber Stamps-Angel in Flight G2504, Glorious Song H2503
Paper~3M Post-It Craft Paper Pastel, WorldWin-Medium Terrific Teal, The Paper Company-Ivory, White
Ink~Tsukineko-Memento Rich Cocoa, Ranger-Antique Linen, Vintage Photo, Broken China (Blue), Milled Lavender
Misc.~Spellbinders™-Wizard™, Create a Flake Two S4-223, Snowflake Frame S5-017, Snowflake Impressabilities™ I2-1003, Copic- B00, BG10, BG45, BV000, R20, E00, E74, Y38, YR21, YR24, Sparkle-N-Sprinkle-Waterfall, Sparkling Snow Glitter, Martha Stewart-Crystal Coarse Glitter, Twig Punch, Flower Soft-Glue, Ivory Flower Soft, Taylored Expressions-Tiny Rhinestones, Nunn Designs-Snowflake Brad, Beacon Adhesives-3-in-1 Advanced Craft Glue, Gem-Tac, Silver Cord, Lace, Pom-Pom Trim, Foam Tape, Sanding Block

Thank you so much for stopping by today and I hope you have a Beautiful Sunday day!

Smiles!
Heidi

Friday, November 27, 2009

JustRite Pretty in Pink Christmas Card

Good Morning! I hope you all had a Wonderful Thanksgiving with family and friends and I hope you had your fill of yummy foods!

Today I have a snowman card with non-traditional Christmas colors to share with you. The red and green colors are always pretty but I also like to do the non-traditional Christmas colors and now days it seems that people are using all different color combinations for the holidays. The image/sentiment I used to create this card is from the Old Fashion Christmas Stamp Set from JustRite Stampers. I love the images in this set and I think these two little snowmen are so adorable. I started by stamping the image onto white cardstock and coloring with Copic markers. Then I cut/embossed the image using Standard Circles Lg. S4-114 die templates from Spellbinders™ and applied foam squares to the back. The sentiment was also stamped onto white cardstock and cut/embossed using Petite Scalloped Circles Lg. S4-124 die templates from Spellbinders™. I also added some glitter to the image and around the sentiment. For the card base I used lavender cardstock and ran it through the Wizard™ with the Snowflake Impressabilities I2-1003. Then I inked the entire piece with Almost Amethyst ink from Stampin' Up. I also cut/embossed the frame using the Snowflake Frame S5-017 die template from Spellbinders™. The bright pink paper I used is NEW Post-It Craft Paper from 3M--the same great company that makes the Post-it Notes that we all use and love! Currently the Craft Paper is available in 20 different colors and it has a white core (with the exception of the black). Also the New Craft Paper has an adhesive backing which makes it wonderful for die cutting and embossing! The adhesive is also initially re-positionable and once you have it in place press the paper down firmly for a lasting hold. I sanded the frame to reveal the white core and I also cut/embossed and sanded some little snowflakes to add as embellishments. I added some tiny pink rhinestones and some coarse crystal glitter to the edges of the card.Supplies~
Stamps~JustRite Stampers-Old Fashion Christmas Set, 3-1/4'' Wood Stamper
Paper~3M Post-It Craft Paper-Brights & Pastel, The Paper Company-White, Lavender
Ink~Tsukineko-Memento Rich Cocoa, Stampin' Up-Almost Amethyst
Misc.~Spellbinders™-Snowflake Frame S5-017, Standard Circles Lg. S4-114, Petite Scalloped Circles Lg. S4-124, Snowflake Impressabilities I2-1003, Copic-R29, R81, Rv17, Rv02, BV000, V12, B23, B66, YR04, YR24, E74, YG25, YG63, Taylored Expressions-Tiny Rhinestones, Martha Stewart-Crystal Coarse Glitter, Beacon Adhesives-3-in-1 Advanced Craft Glue, Diamond Glitter, Sakura-Quickie Glue Pen, 3L-3D Foam Squares

Thank you so much for stopping by today! If you were out and about doing some Black Friday shopping I hope you found some great deals! Also don't forget to check out all of the online deals and give-a-ways from several great companies--click HERE to check out the details! I hope you have a fantastic day!

Smiles!
Heidi

Thursday, November 26, 2009

Happy Thanksgiving!!

Good Morning and Happy Thanksgiving to everyone!! I hope that you all have a Relaxing, Wonderful and Blessed Thanksgiving Holiday with your family and friends. I am very thankful for so many things in my life from the very small everyday things to great big things. Please know I am very thankful for each and everyone of you---Your inspiration, support and friendships mean the world to me!! I hope that you will all have a little time today to be able to reflect on all the things in your life that you are thankful for. Many blessings to you all!!

Happy Thanksgiving!!

Smiles!
Heidi

Tuesday, November 24, 2009

JustRite Autumn Blessings Coaster Set with a Tutorial

Hello! OMGosh I just can't believe how fast this last month has flown by!! Thanksgiving is just a couple of days away and then it will be all about getting ready for the Christmas holiday. I have one more Fall/Autumn project to share with you this season. I made a set of four coasters and a matching container for storing the coasters using the Autumn Blessings stamp set from JustRite Stampers. Even though I am using the Autumn Blessings stamp set you could also do coasters with a Christmas theme or with all of the wonderful images JustRite Stampers has to offer you could make a set of coasters for everyday use too!

Here is a picture of the finished set of coasters and another picture of the container that I decorated to hold the coasters.To start I purchased some tiles from the local hardware store. Before I started working on them I wiped them down to remove all of the dust. Then I stamped the images from Autumn Blessings stamp set from JustRite Stampers onto the tiles using StazOn Timber Brown Ink and heat set the ink. Here's a couple of pictures of the stamp set and close-ups of the stamps.All of the coloring was done with Copic markers (listed below). Now I know normally you can't use StazOn ink with the Copic markers but I think because of the texture of the tiles the ink is absorbed more and then I also heat set the ink. I didn't have any problems with the ink smearing or being picked up on the tip of my markers.After I had the coloring done I used one of the oval die templates from the Classic Ovals Large S4-110 die templates from Spellbinders™ along with the Copic airbrush system and I airbrushed around the inside edges of the oval.Next I used the Floral and Stone Impressabilities™ from Spellbinders™ and placed it on top of the tile. I used the Impressabilities™ as a stencil to airbrush with. First I used the Copic Sketch markers E74 Cocoa Brown.Then I added some golden tones using Y38 Honey.Here is a picture after airbrushing both E74 Cocoa Brown and Y38 Honey.I really liked the look but I wanted to tone it down just a bit and blend the colors so I used a wide Copic marker to go over the entire coaster. Here's a couple of close-up pictures once the coasters were finished.Next I altered a container that I had and the coasters fit in there nicely. I misted the entire container with Coffee Shop Glimmer Mist from Tattered Angels and let it sit to dry completely. Next I used one of the borders and centers from the Autumn Blessings stamp set from JustRite Stampers to stamp the sentiment with the images of leaves. I used the Classic Ovals Large S4-110 die template from Spellbinder™ to make the oval diecut and then I colored the images with Copic markers. I also made a couple of leaf diecuts using the Assorted Leaves S4-076 die template from Spellbinders™. I used inks and pastels to colors the leaves and adhered them with 3-in-1 Advanced Craft Glue from Beacon Adhesives.Supplies~
Stamps~JustRite Stampers-Autumn Blessings, 2-1/2'' x 3-1/16'' Wood Stamper
Paper~The Paper Company-Ivory
Ink~Tsukineko-StazOn Timber Brown, Memento Rich Cocoa, ClearSnap-ColorBox Chalk Ink Chestnut Roan, Mango Tango, Citrine
Misc.~Copic-Airbrush System, Markers-R17, R27, R29, Y38, YR04, YG00, Y15, Y19, YR21, YG25, YG63, YG95, B23, B39, E31, E74, YR24, Spellbinders™-Classic Ovals Large S4-110, Assorted Leaves S4-076 die templates, Floral and Stone Impressabilities™ 12-1006, Tattered Angels-Glimmer Mist Coffee Shop, Iridescent Gold, Beacon Adhesives-3-in-1 Advanced Craft GlueSo are you all ready for Thanksgiving? We are still getting ready. This year is just going to be a small gathering at my parents but I am looking forward to all the yummy food!! Thank you so much for stopping by today and for your comments--I really do appreciate all of the comments and hearing from all of you!! Don't forget to check out the JustRite Gallery and Blog for more inspiration that's JustRite!

Smiles!
Heidi

Monday, November 23, 2009

Crafty Secrets Design Team Challenge-Christmas

Good morning! Today is Crafty Secrets Design Team Challenge and for today's challenge Vicki Chrisman, our wonderful design team leader gave us a challenge to create something with a Christmas theme. I love Christmas and I am looking forward to getting the tree up and decorating! The weather has been so nice here so a couple of weeks ago Eric put the lights up outside. We usually try to get all of the inside decorating done right after Thanksgiving, I want to be able to enjoy it for as long as I can! *wink* You will have to be sure to check out all of the Design Team Members blogs today--I can't wait to see what they have been creating!! I have a link list at the bottom of this post for all of the designers.

For my challenge project I made a Christmas wall hanging using the Crafty Secrets Christmas Vintage Postcard Kit and the Christmas Joy Clear Art Stamp Set. I found the blank wall hanging at the $ store--gotta love that! I bought several of them with different wall hanging projects in mind. To start out I traced the shape of the wall hanging onto some light green designer paper from My Mind's Eye, The Merry Days of Christmas Collection and cut it out. To adhere the paper I used 3-in-1 Advanced Craft Glue from Beacon Adhesives. I love using this liquid for all kinds of projects and it works great with paper, it doesn't wrinkle at all! Once the glue was dry then I sanded the edges. Then I used three colors of Glimmer Mist Honey Dew Mist, Marshmallow, Winter Pine along with Glimmer Screens from the Winter Crystal Set from Tattered Angels to create the snowflake background. After the Glimmer Mist was dry then I stamped the holly leaves and berries from the Christmas Joy Clear Art Stamps set going around the entire wall hanging using Tsukineko, Memento Rich Cocoa Ink. Then I colored the holly leaves and berries with Copic markers and I added red Stickles to the berries. I also added a lace border and a paper lace border. For the paper lace border I used the Classic Lace Border Grand S7-014 from Spellbinders to make the diecut. Next I used one of the images and a piece of ivory chipboard from the Christmas Vintage Postcard Kit, from Crafty Secrets. I cut out the image and used 3-in-1 Advanced Craft Glue to adhere the image and then I sanded the edges for a nice smooth finish. I added Flower Soft to the snow and the holly on the image to give it a little more dimension. Then I added diamond stickles to the word JOY and on the candy cane and red Stickles to the berries and candy cane. I also added some snowflakes with button centers for embellishments and added the red ribbon with bows for a hanger.

Supplies~
Stamps~Crafty Secrets-Christmas Joy Clear Art Stamps (Holly)
Paper~My Mind's Eye-The Merry Days of Christmas
Ink~Tsukineko-Memento Rich Cocoa
Misc.~Crafty Secrets-Christmas Vintage Postcard Kit, Spellbinders-Wizard, Classic Lace Border Grand S7-014, Tattered Angels-Glimmer Mist Honey Dew Mist, Marshmallow, Winter Pine, Glimmer Screens Winter Crystals, Copic-YG63, G28, E74, R22, Flower Soft-Glue, Ivory, Christmas Green, Shamrock Green, Ranger-Stickles Red, Diamond, Martha Stewart-Snowflake Punch, Beacon Adhesives-3-in-1 Advanced Craft Glue, Lace, Buttons, Thread, Finishing FilesPlease be sure to check out all of the Crafty Secrets Designers--I am sure you will be inspired!! Also please give a Warm Welcome to Darlene Pavlick, she is the Crafty Secrets Guest Designer for November!!


Thank you so much for stopping by today!! I hope you enjoy all of the Crafty Secrets projects and I hope you have a Wonderful Monday!

Smiles!
Heidi

Saturday, November 21, 2009

Just For Fun Rubber Stamps - Drama Queen

Good morning and Happy Saturday! Today I have two cards to share with you. Both of the cards use the same stamps from Just for Fun Rubber Stamps and have the same layout but different colors of ink. Just by using different colors of ink you can achieve a totally different look! Before I show you the cards lets take a look at the stamps I used. Here is a list of the stamps I used from Just for Fun, Drama Queen E3042, Beauty Pageant C3218, Eiffel Tower D2361, French Script F1849, Paris IX AA2353, Bracket A3260. I love the vintage style stamps!

Ok, are you ready to take a look at the cards I created? *wink*For the first card I used several tones of brown creating a monochromatic card. The second card is multi-colored and several elements have been distressed giving it more of an artsy look. As you can see I used the same layout for the stamps on each card. I started by using the Beauty Pageant C3218 stamp to create the background. I just eyeballed the placement of the stamps but if you have a tool that will help line up the stamps for you that might be very helpful for creating the background.

Let's take a look at the monochromatic card.Here is a close up of the images and you can see all the stamps. For the background stamp I used Vintage Photo ink and for all of the other images I used Rich Cocoa which is a darker brown. After I stamped the images then I misted the stamped panel with Iridescent Glimmer Mist, distressed and inked the edges. The flourish is a piece of grungeboard and I started by inking it with Vintage Photo then I misted it with Coffee Shop Glimmer Mist, heat set, added Rock Candy and Gold Stickles and then heat set again. Normally you would just let the stickles air dry but I wanted to see what kind of effect I would get by heat setting. It kind of baked into the grungeboard, but I really like the look and texture of it. Also on the light tan mat I used Coffee Shop Glimmer Mist along with the Garden Blossom Glimmer Screen to create the background.Supplies~for Monochromatic Card
Stamps~Just for Fun Rubber Stamps-Drama Queen E3042, Beauty Pageant C3218, Eiffel Tower D2361, French Script F1849, Paris IX AA2353, Bracket A3260
Paper~World Win-Deep Brown, The Paper Company-White, Light Brown
Ink~Ranger-Vintage Photo, Tsukineko-Rich Cocoa
Misc.~Tattered Angels-Glimmer Mist Iridescent Gold, Coffee Shop, Glimmer Screen Garden Blossom, Advantus-Tim Holtz Grungeboard Elements Swirls, Ranger-Gold Stickles, Distress Stickles Rock Candy, Ribbon, Buttons, Pearls

For the multi-colored card I followed all the same steps for the stamping but I used different colors of ink for the background, Peeled Paint (green), Worn Lipstick (pink), Broken China (blue). After I had the stamping done I took all three colors of ink and Vintage Photo (brown) and put them on a craft mat, misted with water and then moved my background piece around in the ink to achieve the finished look. After the background piece was dry I distressed the edges and added some silver ink. What do you think of my distressed butterflies? That almost sounds funny--the poor little things. The butterflies actually started out a light blue and I misted them with Frozen Lake and Marshmallow Glimmer Mist and then carefully heat set them until they started to take on a distressed look. If you do this you really have to watch it, once the fibers start to melt it goes pretty fast! I let the butterflies cool and then I added rhinestones and silver stickles around the edge.For the background paper I misted it with Frozen Lake Glimmer Mist, added some silver ink and distressed it in several spots. I also added some velvet ribbon, keys and a flower for embellishments.

Supplies~for Multi-Colored Card
Stamps~Just for Fun Rubber Stamps-Drama Queen E3042, Beauty Pageant C3218, Eiffel Tower D2361, French Script F1849, Paris IX AA2353, Bracket A3260
Paper~Prism-Island Mist, The Paper Company-Black, White
Ink~Ranger-Distress Ink Vintage Photo (brown), Peeled Paint (green), Worn Lipstick (pink), Broken China (blue), Tsukineko-Tuxedo Black, Brilliance Starlite Silver
Misc.~Tattered Angels-Glimmer Mist Frozen Lake, Marshmallow, Heidi Swapp-Blue Felt Butterflies, Ranger-Silver Stickles, Maya Road-Pewter Keys, Nunn Designs-Metal Flower Embellishment, Beacon Adhesives-3-in-1 Advanced Craft Glue, Gem Tac, Ribbon, Rhinestones

Here is a close up look at the stamped images.Thank you so much for stopping by today! I hope the cards I have shared with you will inspire your creativity! Be sure to hop on over to Just for Fun Rubber Stamps and check out all of the wonderful images they have available. I hope you all have a Wonderful Weekend!

Smiles!
Heidi

Tuesday, November 17, 2009

JustRite It is Hip to be Square Blog Hop

Good morning! Today is the JustRite--It is Hip to be Square Blog Hop and I am so excited about the NEW Releases from JustRite Stampers! I have a link list at the bottom so be sure to visit all of the JustRite Design Team Members and see what they have been busy creating! Have you seen the NEW 2'' Square Wood Stamper? Love it!! For today's Blog Hop I have two projects to share with you. I created an altered notebook and a card using three of the New Releases, Deluxe Square Monogram Kit (Square 2''), Decorative Frames Borders-Square, Just a Note Center & Borders Round 1-5/8''.For the Altered Notebook I used the NEW Deluxe Square Monogram Kit (Square 2''). The Special Occasions Font is included in this set along with the 2'' Square Wood Stamper and four Borders. I love all of the beautiful details in the borders! Here is a close-up picture of the 2''Wood Stamp with the Border and Font.I covered the notebook with black cardstock and added a brad down in the right corner (not seen in the picture). Then I added some black velvet trim and a border using the Lattice Boarderabilities Petite S4-218 from Spellbinders. I added some Vintage Photo ink to the border and Rock Candy Stickles. I also used the drop out pieces from the border and added them to the top of the notebook for little accent pieces. I stamped the Border and Font from the Deluxe Square Monogram Kit (Square 2'') with brown ink and used the Classic Squares Large S4-126 die cut from Spellbinders to make the die cut. I went over the fonts with a Buttermilk, Spica Glitter pen from Copic.I also used the Flourish Impressabilities to do the background piece with Engraving Art Copper Foil. To create a closure at the bottom I added a piece of grungeboard with a magnet on the backside.

Altered Notebook
Supplies~
Stamps~JustRite Stampers-Deluxe Square Monogram Kit (Square 2''), Special Occasions Font
Paper~The Paper Company-Black, Georgia Pacific-White, Engraving Art Copper Foil
Ink~Ranger-Distress Ink Vintage Photo, Tsukineko-Memento Rich Cocoa
Other~Spellbinders-Classic Squares Large S4-126, Lattice Boarderabilities Petite S4-218, Flourish Impressabilities 12-1009, Copic-Spica Glitter Pen Buttermilk, Ranger-Distress Stickles Rock Candy, Advantus-Tim Holtz Grungeboard Elements Swirls, Beacon Adhesives-3-in1 Advanced Craft Glue, Gem-Tac, Black Velvet Trim, Sanding Block, Cotton Balls, Foam Tape, Pearls, Brad, Magnet

For the card I used the Decorative Frames Borders-Square, Wood Stamp Square 2'', Just a Note Center & Borders Round 1-5/8'' from JustRite Stampers.Here is a close-up of the stamp with the border and the center sentiment.For the card I used black cardstock for the base and made a mat using white cardstock and the Flourish Impressabilities 12-1009 from Spellbinders. After the mat was embossed I added Vintage Photo ink. I stamped the border and sentiment from the Decorative Frames Borders-Square and Just a Note Center & Borders Round 1-5/8'' with brown ink and then die cut using the Classic Squares Large S4-126 from Spellbinders. Then I made two tags using the Fancy Tags S4-235 from Spellbinders and added them behind the sentiment. I also used the Buttermilk Spica Glitter pen from Copic around the border and sentiment.Supplies~
Stamps~JustRite Stampers-Decorative Frames Borders-Square, Wood Stamp Square 2'', Just a Note Center & Borders Round 1-5/8''
Paper~The Paper Company-Black, Georgia Pacific-White, Engraving Art Copper Foil
Ink~Ranger-Distress Ink Vintage Photo, Tsukineko-Memento Rich Cocoa
Other~Spellbinders-Classic Squares Large S4-126, Fancy Tags S4-235, Flourish Impressabilities 12-1009, Copic-Spica Glitter Pen Buttermilk, Beacon Adhesives-3-in1 Advanced Craft Glue, Gem-Tac, Black Ribbon, Sanding Block, Cotton Balls, Foam Tape, Pearls

Here is a link list to the JustRite Blog and all of the JustRite Designers

JustRite Blog
Barb Schram
Becca Feeken
Debbie Olson
Heidi Blankenship
Kathy Jones
Kellie Fortin
Angela Barkhouse
Lauren Meader
Lisa Somerville
Michele Kovack
Michelle Wooderson
Sharon Harnist
Sharon Johnson

I hope you enjoyed today's projects! Thank you so much for stopping by today!!

Smiles!
Heidi

LinkWithin

Related Posts Plugin for WordPress, Blogger...