Showing posts with label Artisan X-plorer. Show all posts

Sunday, July 28, 2013

JustRite Papercraft New Release - Lacey Tiers Dies

Hello blogging friends!  Today, starts a week filled with New Releases from JustRite Papercraft and I hope you enjoy the New Releases as much as I do!


The New Release that I am sharing with you today is AG-04395 Lacey Tiers Dies this is a set that was designed by Becca Feeken for JustRite Papercraft.  This is a beautiful die template set that can be used and layered in so many ways and totally reflects Becca's elegant style.


Here is a Christmas ornament that I designed using AG-04395 Lacey Tiers Dies from JustRite Papercraft and S4-401  2013 Heirloom Ornaments die template from Spellbinders Paper Arts®.  I have a full step-by-step tutorial to share with you on how to create this Christmas ornament.


To start I applied 6'' x 12'' Adhesive Sheets from Scrapbook Adhesives by 3L® to the back of two pieces of Gold Mirror Mirri paper from DiscountCardstock.com.


Then I used the decorative circle from the AG-04395 Lacey Tiers Dies and the largest die template in the S4-401  2013 Heirloom Ornaments set.


Look how perfectly these two die templates match up!  I placed the decorative circle die template inside the ornament die template and used some tape to hold them in place.  Then I used the Artisan X-plorer™ to create the die cuts.
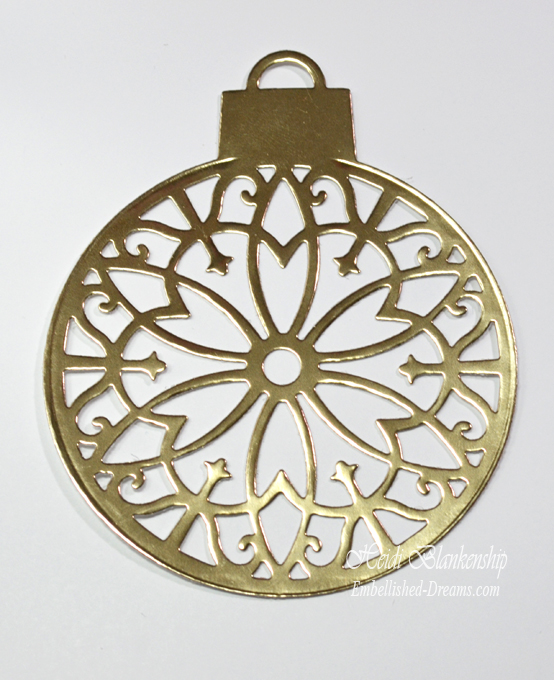

This is what the die cut shape will look like.  Be sure to cut two of these ornaments.


Next, I used the ornament die by itself to cut a piece of white lace material.  The white lace material is placed in between the two Christmas ornament die cuts.


This is what the ornament looks like once all three pieces are adhered together.  I put the piece of red paper in the background so you could see the lace.


Here is another close up where you can see the lace.  I added white and ivory pearls and an ivory rose with gold fern leaves.  I also added Pssst! Sheer Shimmer Spritz Sparkle from Imagine Crafts/Tsukineko to the rose.  I used a brush to apply the shimmer.


Here is a close up of the rose.  Check out all of the shimmer--love it!


I used a piece of 3/8" Ivory Satin with Gold Metallic Trim Ribbon from  Really Reasonable Ribbon to create a hanger for the ornament.  I hope you enjoyed the tutorial and will give these ornaments a try!

Please be sure to visit each of the Design Team Members in the link list below to see what they have created to share with you.


Thanks so much for stopping by today!

Hugs & Smiles,
Heidi

Supplies
JustRite Papercraft AG-04395 Lacey Tiers Dies (Designed by Becca Feeken)
Paper:  DiscountCardstock.com Gold Mirror Mirri
Spellbinders Paper Arts®:  Artisan X-plorer™, S4-401  2013 Heirloom Ornaments
Accessories:  Scrapbook Adhesives by 3L® 6'' x 12'' Adhesive Sheets; Really Reasonable Ribbon 3/8" Ivory Satin with Gold Metallic Trim Ribbon; Imagine Crafts/Tsukineko Pssst! Sheer Shimmer Spritz Sparkle; White Lace Material, White & Ivory Pearls, Ivory Rose, Gold Fern Leaves, Hot Glue

Tuesday, May 28, 2013

Embossed Butterfly Blank Key Ring - Media Mixáge

Hello blogging friends!  I hope everyone had a wonderful holiday weekend!  We didn't do much this past weekend since almost everyone in the house hasn't been feeling good--from really bad colds to allergies.  Plus it rained the whole weekend here in MN--so we just hung out around the house.  


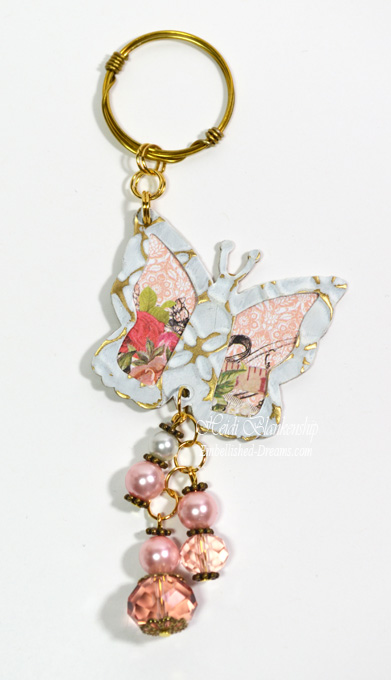
Today, I have a key ring to share with you that I made using some of the blanks from the Media Mixáge Collection from  Spellbinders Paper Arts®.  I used two of the MB6-008 Susan Lenart Kazmer for Spellbinders® Media Mixáge Butterflies One Blank--one solid and one with the cutouts.  I embossed the blank with the cutouts using ES-004 Whimsy M-Bossabilities™.  Then I brushed on a few coats of gesso and lightly sanded to make the embossing pop.  For the solid blank I used the Media Mixáge MD2-008 Butterflies One Die and Prima Lyric Collection 6 x 6 Paper Pad to die cut the butterfly shape.  I layered all of the pieces and used E6000 to adhere everything.


I used a Action Screw Hole Punch tool to make the holes in the blanks.  The Action Screw Hole Punch tool can be found in the jewelry/bead section of most big box craft stores.  Then I added jump rings and made little beady dangles and attached them to the bottom.


At the time when I made this I didn't happen to have a gold tone key ring so I just made a ring with some gold wire for the photo.  If you are new to mixed media the blanks are a great product to start out with--you can emboss them, paint, ink, layer and shape them.  You can also make jewelry out of them and incorporate them into your paper crafting too!   

Thanks so much for stopping by today!

Hugs & Smiles,
Heidi

Supplies
Paper:  Prima Lyric Collection 6 x 6 Paper Pad
Dies/Blanks/Folders:  Spellbinders Paper Arts® Artisan X-plorer™ Machine, Media Mixáge MD2-008 Butterflies One Die, MB6-008 Susan Lenart Kazmer for Spellbinders® Media Mixáge Butterflies One Blank, ES-004 Whimsy M-Bossabilities™
Accessories:  Action Screw Hole Punch; Gold Tone Wire, Jump Rings, Head Pins, Spacers, Beads; Round Nose Pliers, E6000, Gesso, Sanding Block

Sunday, April 28, 2013

Thinking of You Card & Stamping with Glue Technique

Hello blogging friends!  I hope you are all having a wonderful weekend!  Today, I have a card and another tutorial to share with you using the Stamping with Glue Technique with Scrap Happy Sheer Glue from the The Rubber Cafe`.


Here is the card that I designed using the D-498 Script Background stamp and Scrap Happy Sheer Glue along with a couple colors of You're So Fine Glitter to create the sparkling script on the pattern paper.  The pretty pattern paper is from the Bo Bunny Prairie Chic 6 x 6 Paper Pad.  


To start I apply some of the Scrap Happy Sheer Glue to the D-498 Script Background using a makeup sponge.  I make a little puddle of glue on some scrap paper, dab the sponge into the glue and apply to the stamp.  If you have never done the Stamping with Glue technique you might want to try it on a scrap piece of paper a couple of time.  You want a nice coat of glue, not too thick and clumpy because you won't get a clear image and not to thin because then your stamp might stick to the paper.  Also you need to wash your stamp/s right away.  I just use some soap and warm water with a little scrub brush.  Here's a little tip--a tooth brush is great for scrubbing stamps--it has small softer bristles and can get in to all of the little spots on the stamps. ;-)  Also, don't worry about your glue drying and not having enough time to apply the glitter.  The great thing about the Scrap Happy Sheer Glue is that it drys tacky so it is prefect for the Stamping with Glitter technique!  


This is what the pattern paper looked like after I stamped it with the glue.  Can you see the script pattern?  


Next, I applied some of the You're So Fine Glitter-Bronze Medal in a few areas.  I took a little pinch of glitter, sprinkled it on the paper and then used my fingers to rub it in.  Real technical--LOL!  When using  more then one color of glitter work in small sections, rub in the glitter and tap off the excess as you go.  This will keep the glitter from getting on all of the areas of glue.


Then I used You're So Fine Glitter-Princess Pink to apply the second layer of glitter.  


Here is a close up of the glittery script background on the pattern paper.  As a reminder you can click the images to enlarge them.


Here is a close up of the center of the card.  I used J-1095 Fabulous Phrases and B-217 Daisy Splash to stamp the sentiment and flowers.  I used Lilac Posies and Desert Sand Memento inks from Imagine Crafts/Tsukineko.  Then I used the Artisan X-Plorer™ and S3-205 Petite Labels One Die D-Lite to cut/emboss the little label.  I added some Edna Natural Crochet Lace Trim and a Sun Rose Seam Binding bow from Really Reasonable Ribbon.  The Sun Rose Seam Binding matched the Lilac Posies ink perfectly!  The butterfly is from Recollections and I spritzed it with Pssst! Sheer Shimmer Spritz Sparkle and added Diva Pink Jellie Dots.  I used my handy Stick "EM" Up Tool for perfect placement of the Jellie Dots.  It's a great little tool for picking up small embellishments.  To finish off the card I added some ivory roses and a handmade stick pin.


For the solid paper I used Simply Smooth Ivory and Kraft from DiscountCardstock.com.  To create the mats I used S5-131 A2 Matting Basics AS5-132 A2 Matting Basics B from Spellbinders Creative Arts™.  

So what do you think about the Stamping with Glue technique?  Is it something you would like to try or have you done this technique before?


 A few pictures from the Twins game yesterday and the Twins won!!  The guys had great seats and a fantastic time at the game!!

***Another reminder--if you haven't signed up for my Big Giveaway there is still time!  
Click HERE for all of the details.  

Thank you so much for stopping by today!

Hugs & Smiles,
Heidi


Supplies

Saturday, April 27, 2013

Vintage Rose Candle & Media Mixáge

Hello everyone!  How is your weekend going?  I had a pretty good day.  The weather was so beautiful--I even opened the windows.  I spent some time outside and I got in a little bit of crafting time.  I wanted to get this post up earlier today but I was searching all over for the battery charger for my old camera.  My husband and our youngest went to a Twins game today and they took my good camera.  I couldn't remember for the life of me where I put the charger for the old camera and as luck would have it the battery was totally dead--LOL!  But I finally found.  ;-)  

Today, I have a quick and easy home decor piece with a step-by-step tutorial to share with you using some of the new Media Mixáge Collections from Spellbinders Creative Arts™.  I have had several email from people who have said they would love to try out the Media Mixáge Collections but they haven't ever done anything with mixed media and they want to take it slow (baby step) until they can learn a little more about it. 


So I thought I would share a project that is quick and easy to create (baby steps) using a bezel and die template from the Media Mixáge Collections.   Here is a candle holder that I altered.  I didn't time myself while I was making it but if I had to guess I think it was probably about 20-30 minutes start to finish.  Maybe even a little less--I was taking pictures for the tutorial while I was making it. ;-)

Ok, let's get started!


This was a candle holder that I picked up at one of the big box stores for a couple of dollars.  To start I added Prima Divine Washi Tape to the top and bottom of the candle holder.


Next I used some Simply Smooth Ivory cardstock and the MD1-008 Squares Two Die Template along with the Artisan X-Plorer™ to cut the square shape.  Then I used the E3D-006 Framed Labels Eighteen folder to emboss the paper.  I lightly inked the embossed area of the paper with Memento Angel Pink ink and then I misted it with Pssst! Sheer Shimmer Spritz Gold.  Both the ink and spritz are from Imagine Crafts/Tsukineko.  


Check out all of the shimmer from the spritz!  (you can click all of the images to enlarge)  This is the piece that I am using for the background in the bezel.  


Next, I fussy cut this beautiful little rose image from the Prima Divine Collection 6 x 6 Paper Pad and I inked the edges of the paper with Memento Espresso Truffle ink from  Imagine Crafts/Tsukineko.


I glued the embossed piece inside the bezel and then I added a 3D Foam Square from Scrapbook Adhesives by 3L™ to the back of the rose image and place it in the center of the bezel.  The bezel I used for this project is MB2-005S Susan Lenart Kazmer for Spellbinders™ Media Mixáge™ Squares Two Bezels - Silver.  


I added some Pink Salmon Seam Binding from Really Reasonable Ribbon and threaded it through the backside of the bezel.  I also added some 3D Foam Squares to the back of the bezel so it can easily be attached to the candle holder.  


Once the bezel was in place I tied the seam binding in to a little bow. Then for a finishing touch I added some Kaisercraft Pewter Pearls.  So what do you think?  This is a perfect home decor piece for the Spring and Summer.  It was quick, easy and inexpensive to create.  It would also make a wonderful gift for a friend.


If you have any projects that you have created using the Media Mixáge Collection I would love to see them! Leave me a link to your blog or gallery in the comment section.  

Also don't forget to hop on over and sign up for my Big Giveaway!!  
Click HERE for all of the details.

Thanks so much for stopping by today and I hope you are having a wonderful weekend!!

Hugs & Smiles,
Heidi

Supplies
Paper:  DiscountCardstock.com Simply Smooth Ivory; Prima Divine Collection 6 x 6 Paper Pad
Ink/Spray:  Imagine Crafts/Tsukineko Memento Angel Pink, Espresso Truffle, Pssst! Sheer Shimmer Spritz Gold
Dies/Bezels/Folders:  Spellbinders Creative Arts™ Artisan X-Plorer™,  MD1-008 Squares Two Die Template, MB2-005S Susan Lenart Kazmer for Spellbinders™ Media Mixáge™ Squares Two Bezels - Silver, E3D-006 Framed Labels Eighteen
Accessories:  Really Reasonable Ribbon Pink Salmon Seam Binding, Kaisercraft Pewter Pearls; Prima Divine Washi Tape, Scrapbook Adhesives by 3L™ 3D Foam Squares; Candle, Candle Holder

Thursday, April 25, 2013

Heidi Blankenship Embellished-Dreams Designs Mixed Media Giveaway

***This Giveaway is now Closed!!***  
Thank you so much to everyone who participated and for all of your wonderful comment!! 

Hello everyone!  
I am so excited to share this post with you today!!  
Did you see the sneak peek picture I posted yesterday?  Did it make you curious?

Here is the News---
I am having a Big Giveaway and I can't wait to tell you all about it!

Heidi Blankenship Embellished-Dreams Designs Mixed Media Giveaway

Starting today, April 25th through May 4th at midnight CST you will be able to enter for the giveaways.

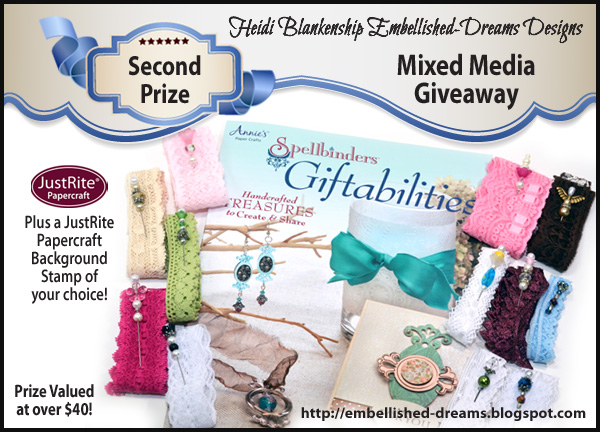
I am giving away Three Prize Packages filled with yummy crafty goodness!!
Check out what you could win!!!


This is what is included in the 1st Prize 
JustRite Papercraft® Stamp Set of Winners Choice
Vintage Sheet Music
Vintage Book Pages
Mica Flakes
2 Handmade Doilies
Tinsel Trim (1 yd)
Rosette Trim
42 Embellishments including beads, charms, gems, metal filigree...
4 metal filigree and rhinestone chain (ButterBeeScraps), 6 pearls, 3 tear drop pearls, 2 gem drops, 3 chandelier drops, 6 word charms, 2 bird cage charms, 1 bird charm, 1 crown charm, 1 clock charm, 1 Eiffel Tower charm, 6 gears, 2 wings, 1 fairy on the moon charm, 1 key, 1 lock, 1 filigree
The 1st Prize has a value over $165.00!


Ok, on to the 2nd Prize.


This is what is included in the 2nd Prize
12 Different Kinds of Lace Trims (1 yd ea)
12 Handmade Stick Pins
The 2nd Prize has a value over $40.00


Now for Prize #3


This is what is included in the 3rd Prize
Vintage Book Pages
Vintage Sheet Music
Mica Flakes, 1 yd Tinsel Trim, 12 in. Rosette & Sequin Trim, 1 yd Faux Rhinestone Chain, 3 Pearl Sprays, 3 Bead Sprays, 12 Pink Mulberry Roses, 25 Ivory Mini Mulberry Roses, 1 Large Handmade Ivory Flower, 3 Leaf Stick Pins, 10 Pearl Stick Pins, Beads, Bead Caps & Spacers to Make Stick Pins (total of 100 pieces), Embellishments including Charms, Resin Pieces, Acrylic Pieces, Wood Pieces, Garment Pins, Gems, Jellie Dots (The Rubber Cafe'), Metal Filigree (ButterBeeScraps)--total of 107 pieces.
The 3rd Prize has a value over $20.00


So what do you think?  Would you LOVE to Win one of these Prizes?

All of the Details and Rules
***Please read carefully!

1.  Contest is open from 8 AM (CST) April 25th and goes through May 4th at Midnight (CST).
2.  The Contest is Only Open in the US
3.  Subscribe to My Blog with an email subscription (this is found in my side bar--it's Feedblitz).  ***I moved this all the way to the top of the side bar so it's quick and easy to find. ;-)
4.  Answer this question in the comments:  What is your favorite go-to crafty product in your studio?  In your comment you have to leave a Link Back To Your Blog or an Email---there has to be some way for me to  reach you if you win.  
Not required for the giveaway but I would love it if you would 
Follow me on Pinterest or Facebook or Both.  :)

Winners will be announced May 5th.

I wanted to add I am really sorry to all of my International Followers and Subscribers but with the shipping costs being so high it would cost more to send then the value of the prize.  But please know I appreciate each of you and I am so very thankful for your support and wonderful comments!!!

I want to say a HUGE Thank You to the ladies who have helped me out behind the scenes!!!  You know who you are and you all ROCK!!!!  Thank you!!!!

Thank you to JustRite Papercraft® for the Fabulous donation of Stamps!!! ♥

Thank you so much for stopping by today!  I can't wait to read all of your comments.  I hope you have a Fantastic Day and Good Luck!!!!

Hugs & Smiles,
Heidi

Friday, March 8, 2013

Cowgirl Silver Turquoise Necklace - Spellbinders Media Mixáge - ICE Resin

Hello blogging friends!  Today, I have another necklace to share with you using some of the Media Mixáge™ Collection from Spellbinders Creative Arts™.  


Here is the necklace that I designed using the Artisan X-plorer™ machine, MB1-002S Squares One - Silver bezel and the matching die template MD1-002 Squares One.


Inside the bezel I used a vintage digital image of a little cowgirl on her horse, a metal filigree piece, rhinestones, Relique Glitz Powder Silver Sparkle and ICE Resin® 1oz Syringe Single.  


To create the necklace I used a combination of Chains, Pearls Chain, Rhinestone Chain, Filigree Spacer Chain, Turquoise Beads, Bead Caps, Head Pins and a Clasp.

Remember you can click on all of the images to see enlarged pictures and all of the detail.

Thank you so much for stopping by today and I hope you have a Fantastic Friday!!

Hugs & Smiles,
Heidi

Supplies
Spellbinders Creative Arts™  Media Mixáge™ Artisan X-plorer™, MB1-002S Squares One - Silver (bezel), MD1-002 Squares One (matching die template)
Accessories:  ICE Resin® 1oz Syringe Single, Relique Glitz Powder Silver Sparkle; Chains, Pearls Chain, Rhinestone Chain, Filigree Spacer Chain, Turquoise Beads, Bead Caps, Metal Filigree, Head Pins, Clasp, Digital Image

Monday, January 28, 2013

Spellbinders Media Mixage - Romantic Steampunk Corset Pin

Hello blogging friends! Do you ever have one of those days that just doesn't go as planned?  Well, today was that day for me--LOL!  As a result of the ice storm our power went out for awhile today and it just kind of threw the whole day off.  So needless to say I have been working (off and on) on this blog post and editing pictures for most of the day and now I can finally share it with you.  ;-) 

I am so excited about the New  Media Mixage™ line from Spellbinders Creative Arts™ that was introduced at CHA!!  All of us designers have been working behind the scenes on projects for the past several months and now we can finally share about it on our blogs.  Several of the projects we worked on were picked up for different publications so some of that stuff we can't share just yet but I have a new project to share with you today using products from the Media Mixage™ line.


Here is the Romantic Steampunk Corset pin that I designed using MD2-007 Dresses Two (die template), MB6-007 Dresses Two (blank) and MB6-004 Flowers One (blank) from the Media Mixage™ line.  I also used the New Artisan X-plorer™ for the die cutting.


I started with the MD2-007 Dresses Two die template and the Prima Romance Novel  pattern paper and then I used the Artisan X-plorer™ to die cut the shape.  Then I used Beacon ZipDry Adhesive to adhere the pattern paper to the MB6-007 Dresses Two blank.  Once the adhesive was dry I lightly sanded the edges of the paper.


Next using my finger I edged the paper with white acrylic paint.  Then I used an Action Screw Hole Punch to punch the little holes in the blank.  The Action Screw Hole Punch is a great little tool for punching holes in the blanks and it is so easy to use!  All you do is slide the blank in place under the screw and then turn the handle to tighten down and it punches a hole.  This one can do two different size holes.  I picked this up at Hobby Lobby and it was under $10.  I think most of the big box craft stores carry these in the jewelry and beading area.  You can click on the pictures to enlarge them.


After I punched the holes then I lightly added Diamond Stickles on the entire piece.  I added the MB6-004 Flowers One blank to the top, this is one of the small flowers in the set.  I used a round nose pliers to curl the petals on the flower.  Then I added a metal gear to the center with some pearls.


On the bottom half I added some small pieces of chain, metal gears, pearls and jump rings with acrylic crystal drops.


*EDIT--I'm sorry, I totally forgot to add this photo last night!  Here is a picture of the pin back that I used. I used E6000 to adhere the pin back to the back of the blank.


I had so much fun creating this little pin! 

Spellbinders is challenging everyone to Explore Beyond with their own creativity.  Don't be afraid to try new things and make it all your own style!!  There is no right or wrong--it's all about you and whatever you like.  Have Fun and CREATE!! ;-) 

Hugs & Smiles,
Heidi

Supplies
Spellbinders Creative Arts™:  Media Mixage™ Artisan X-plorer™, MD2-007 Dresses Two (die template), MB6-007 Dresses Two (blank), MB6-004 Flowers One (blank)
Paper:  Prima Romance Novel 6 x 6 pad
Accessories:  Beacon ZipDry Adhesive; Ranger Glossy Accents, Diamond Stickles; Round Nose Pliers, Action Screw Hole Punch, White Acrylic Paint, Sanding Block, Chains, Pearls, Metal Gears, Jump Rings, Acrylic Crystal Drops, Pin Back, E6000

LinkWithin

Related Posts Plugin for WordPress, Blogger...