Monday, April 30, 2012

Paw Prints Scrapbook Layout

Hello blogging friends!  Today I have a quick post with an 8 x 8 scrapbook layout to share with you. 


Check out these little cuties!  Mama and her babies enjoying the warmth of a sunny Spring day.  The kittens were so adorable, they were experiencing the grass and leaves for the first time.  


The Mama started coming around last Fall and she is so funny she follows my dad around just like if she was a dog.  She is right by his side keeping him company while he is working in the gardens.  ;-)  He's a softy with a big heart and loves animals so he took her in and then much to the surprise of my parents she had kittens this Spring! 


 I wanted the layout to be simply and focus on the Mama and her babies.  Last Friday my dad took the kittens to the humane society so they could help to find homes for all of the kittens.  I know he would have loved to kept them all.  So I thought I would make a simple layout to give him so he can have pictures of them all.

Thank you so much for stopping by today!

Hugs & Smiles
Heidi

Supplies
Paper:  Discount Cardstock Simply Smooth Ivory, Kraft, Soot, Terra Cotta DoubleMates
Ink:  Ranger Distress Inks Antique Linen, Vintage Photo
Dies:  Spellbinders Grand Calibur, LF-003 Donna's Alphas, S5-089 Home Sweet Home, S4-359 Office Supplies
Accessories:  Brads, Scrapbook Adhesives by 3L™ 3D Foam Squares

 ~Spellbinders Blog~

Sunday, April 29, 2012

Dreaming of Paris Card

Hello blogging friends!  Do you dream of going to Paris?  Or maybe you have already been there.  I know I would LOVE to go to Paris one day.  ;-)


Here is a card I designed dreaming of Paris--LOL!  I used I-985 Paris Nights Background and F-609 Take Time to Dream sentiment from The Rubber Cafe'.  For the background I stamped part of the image (it's a lot bigger) on to Simply Smooth Ivory paper from Discount Cardstock using Rich Cocoa ink.  Then I added Antique Linen, Old Paper and Vintage Photo Distress Ink, distressed the edges with the Distrezz-it-All and added Walnut Stain Distress Ink around the edges.  For the sentiment I used the Simply Smooth Ivory paper and then I hand cut the words to make word blocks and inked the edges with Vintage Photo Distress Ink. 


I used 3D Foam Squares from Scrapbook Adhesives by 3L™ to add some dimension to the background image and sentiment.   To create the embossed background I used ES-005 Enchanted M-Bossabilites™ with Kraft paper and then rubber Vintage Photo Distress Ink over the entire piece to make the embossing pop.  To create the border and key I used S5-064 Moroccan Accents and S5-099 Jewel Keys die templates from Spellbinders™.  


Here is a close up of the key.  I used Gold Engraving Art Foil from Royal & Langnickle.  I love this paper--it's some of my favorite!  The paper looks black but when you lightly sand it you reveal the gold foil.  It also comes in copper and silver.  Very fun stuff to work with and great for 
embossing!!


The background paper is from the French Kiss Collection from Glitz

Thank you so much for stopping by today!  I hope you are having a wonderful weekend!  It's been cold and rainy here in MN so I have had lots of time for crafting this weekend.  ;-) 

Hugs & Smiles,
Heidi


Supplies
Stamps:  The Rubber Cafe' I-985 Paris Nights Background, F-609 Take Time to Dream
Paper:  Discount Cardstock Simply Smooth Ivory, Kraft; Glitz French Kiss Collection; Royal & Langnickle Gold Engraving Art Foil
Ink:  Tsukineko Memento Rich Cocoa; Ranger Distress Inks Antique Linen, Old Paper, Vintage Photo, Walnut Stain
Dies:  Spellbinders™ Grand Calibur, S5-064 Moroccan Accents, S5-099 Jewel Keys, ES-005 Enchanted M-Bossabilites™
Accessories:  Zutter Distrezz-it-All; Scrapbook Adhesives by 3L™ 3D Foam Squares; Winter White Seam Binding

~Spellbinders Blog~

Saturday, April 28, 2012

The Beauty of a Woman - Jewel Goddess - Framed Home Decor'

Hello blogging friends!  I have a framed home decor' piece that would be perfect for the bedroom or a bathroom--very feminine and shabby chic.   


I used the large Goddess die templates from the LF-013 Jewel Goddess from the Julianna Hudgins Collection from Spellbinders for the main focal point.  I also used S5-086 Bitty Blossoms from Donna Salazar Collection from Spellbinders, S4-327 Floral Flourishes die template and GI-004 Fancy Flourish. 


I cut/embossed the Goddess using LF-013 Jewel Goddess die template and GI-004 Fancy Flourish with Simply Smooth Ivory paper from Discount Cardstock and then I applied Victorian Velvet Distress Ink to make the embossing pop.  Next I brushed on Liquid Laminate from Beacon Adhesives and sprinkled on the glitter. 


I used old book pages, Victorian Velvet Distress Ink and S5-086 Bitty Blossoms to create the little rose.  I brushed more of the Liquid Laminate on to the rose and sprinkled glitter.  The seam binding was Winter White and I used Victorian Velvet Distress Ink to hand tint it. 


Ivory pearls were added for a necklace and I also added some tulle at the top of the Goddess and with the bow to soften the look.   I used Hot Glue to adhere the Goddess to the frame.  


I added another little rose and a flourish with some pearls to the bottom of the frame.  I used one of the die templates from S4-327 Floral Flourishes to cut/emboss the flourish.  The frame was gold and I dry brushed it with ivory acrylic paint.  When the paint was dry I added Liquid Laminate and sprinkled glitter over the entire frame.  It is so sparkly!!  ;-)


The beautiful quote is from Audry Hepburn. You can click on the images to enlarge them.

Thank you so much for stopping by today!

Hugs & Smiles,
Heidi

Supplies
Paper:  Discount Cardstock Simply Smooth Ivory
Ink:  Ranger Distress Ink Victorian Velvet, Bundled Sage
Dies:  Spellbinders Grand Calibur, LF-013 Jewel Goddess, S4-327 Floral Flourishes, S5-086 Bitty Blossoms, GI-004 Fancy Flourish
Accessories:  Winter White Seam Binding (hand tinted with Victorian Velvet ink); Recollections Ivory Pearls; Ivory Tulle; Diamond Glitter; Beacon Adhesives Liquid Laminate; Hot Glue Gun; Ivory Paint

Friday, April 27, 2012

Just Because Floral Card - New Distress Markers

Hello blogging friends!  I am SO excited--today was a Fabulous mail day!!  (snail mail and email)  Just LOVE days like this! ;-) 


Check out these beauties!!  So thrilled to get the New Tim Holtz Distress Markers from Ranger!  I just had to try them out right away!


Here is my first card using the Distress Markers.


I stamped a floral image from the CR-02245 Botanical Butterflies stamp set from JustRite Papercraft on to Simply Smooth Ivory paper from Discount Cardstock using Rich Cocoa ink.  Then I colored the image using the Distress Markers from Ranger (colors listed below). 


Here is a close up of the image.  I don't happen to have any of the new cardstock from Ranger so I tried a couple of different papers and the markers are very juicy which is a good thing but the papers started to pill up when I was trying to blend the colors.  So I pulled out some watercolor paper and that seemed to do the trick.  The markers worked wonderfully--I was able to blend them and the paper didn't pill at all.  I think there will be a little bit of a learning curve and practice involved here but it's no different then learning to use Copics or Prismacolor Colored Pencils.  ;-)  I can't wait to color a few more images and play around with the markers more! 


I used the Grand Calibur and S4-114 Standard Circles Large to cut/emboss the stamped image and layered it with a die cut from the S4-354 Splendid Circles die templates.  I inked the outer edges with Antique Linen Distress ink and Rich Cocoa Momento ink.  I used 3D Foam Squares from Scrapbook Adhesives by 3L to layer the die cuts. 


To create the little buckle I used S4-362 Ribbon Buckles from Spellbinders with Kraft paper from Discount Cardstock.  The ribbon is Satin Rosewood from Really Reasonable Ribbon--I love this color!  I also added a pearly button to the center of the buckle.


The pattern paper is from the Glitz, French Kiss Collection.  I layered the pattern paper on to a piece of Mountain Rose Metallic from Discount Cardstock and used the Distrezz-it-All from Zutter to distress the edges. 

Thank you so much for stopping by today!  I hope you have a Fantastic Day!!

Hugs & Smiles,
Heidi


Supplies
Stamps:  JustRite Papercraft CR-02245 Botanical Butterflies
Paper:   Discount Cardstock Simply Smooth Ivory, Kraft, Mountain Rose Metallic 
Glitz French Kiss Collection
Ink:  Tsukineko Memento Rich Cocoa; Ranger Distress Ink Antique Linen, Distress Markers - Spun Sugar, Worn Lipstick, Mustard Seed, Wild Honey, Shabby Shutters, Peeled Paint, Antique Linen, Vintage Photo
Dies:  Spellbinders Grand Calibur, S4-114 Standard Circles Large, S4-354 Splendid Circles, S4-362 Ribbon Buckles
Accessories:  Really Reasonable Ribbon Satin Rosewood Ribbon; Zutter Distrezz-it-All; Scrapbook Adhesives by 3L 3D Foam Squares; Pearl Button

Spellbinders Blog

Thursday, April 26, 2012

Butterflies & Blossoms - Pro 31 Designs - JustRite Papercraft - Spellbinders

Hello blogging friends!  Today, I have a pretty butterflies and blossoms card to share with you. 


Yesterday was Administrative Professionals Day and I made this card for my husband's secretary.  She likes to garden to I thought the butterflies and flowers would be perfect.
 

I started by stamping the image with Rich Cocoa ink on to Simply Smooth White cardstock from Discount Cardstock.  The image is from the CR-02245 Botanical Butterflies stamp set from JustRite Papercraft.  I colored the butterfly using Prismacolor Colored Pencils.  


I continued to color the background on the image with more Prismacolor Colored Pencils. 


To create the background I used a few colors of Distress Inks. First I covered the entire image with Old Paper and then added some Milled Lavender.  Next I add just little touches of Faded Jeans and then I added Dusty Concord around the label at the top of the image.  I very lightly misted the stamp with water and then stamped the image on to  Simply Smooth White cardstock.  I used the Grand Calibur and LF-168 Grand Large Labels to cut/emboss the label shape and then I edged it with Rich Cocoa ink.


To create the little flower cluster I used a Circle Pearl Sprays, Small Blue Porcelain Roses and Porcelain Calla Lily from Pro 31 Designs.  **Be sure to check out the Exciting News about Pro 31 Designs at the bottom of this post!! Next I applied Scrap Happy Sheer Glue and Diamond Clear Glitter from The Rubber Cafe'  to all of the flowers.  


I also added some Scrap Happy Sheer Glue and Diamond Clear Glitter from The Rubber Cafe'  to the wings of the butterfly for a little added sparkle.


Here is a close up of the butterfly image.  I used the Grand Calibur, S4-114 Standard Circles Large and S5-064 Moroccan Accents to cut/emboss the die cut shapes.  Then I used 3D Foam Squares from Scrapbook Adhesives by 3L to layer and add dimension to the die cuts.


Here is a close up of the flower cluster.  I also added a seam binding bow.  I used Distress Inks to hand dye the seam binding bow.


Here is a close up of the Pink Rose and Sequins Trim from Pro 31 Designs.  This trim is so gorgeous and sparkly I love it!!  Rose and Sequins Trim is also available in blue. 


Ok, I told you I had some Exciting News to share about Pro 31 Designs.  Esmeralda has opened up a NEW online store with a website!!  Pro 31 Designs is now a DOT COM!!!  Click HERE to check out her new site!!  Esmeralda has added several New things to her store so please be sure to check it out!!  

Also while you are out surfing around in blog land please be sure to check out the Spellbinders Blog and the JustRite Papercraft Blog for inspiration!

I hope you have a wonderful and creative day!!

Hugs & Smiles,
Heidi


Supplies
Stamps: JustRite Papercraft CL-03725 Fleuriste Newsprint Background Stamp, CR-02245 Botanical Butterflies, CR-03570 With Sympathy (sentiment)
Paper:  Discount Cardstock Simply Smooth White, Frosted Amethyst, Blue #67
Ink:  Tsukineko Memento Rich Cocoa; Ranger Distress Inks Faded Jeans, Dusty Concord, Milled Lavender, Old Paper; Prismacolor Colored Pencils
Dies:  Spellbinders Grand Calibur, LF-168 Grand Large Labels, S4-114 Standard Circles Large, S5-064 Moroccan Accents
Accessories:  Pro 31 Designs Pink Rose and Sequins Trim, Circle Pearl Sprays, Small Blue Porcelain Roses, Porcelain Calla Lily; The Rubber Cafe'  Scrap Happy Sheer Glue, Diamond Clear Glitter; Scrapbook Adhesives by 3L 3D Foam Squares; Winter White Seam Binding (hand dyed), Hot Glue Gun

Tuesday, April 24, 2012

Butterfly & Bauble Blossom Candle Holder - Home Decor'

Hello blogging friends!  Today, I have a pretty home decor' piece to share with you that is quick and easy to recreate.


I altered a chunky glass candle holder using paper, die cuts, ribbon and Copic markers to create a pretty Spring home decor' piece that would be perfect for a little gift.  


To start I used the Grand Calibur ® Machine and S5-101 Wings of Hope, S5-104 Bauble Blossoms Two, S4-328 Foliage die templates from Spellbinders™  with Antique Gold Parchment from Discount Cardstock to cut/emboss all of the die cut shapes.  Leaving the paper in the die templates I used Copic markers and the air brush system to stencil through the die templates adding colors to the paper.  


Next I wanted to shape and add dimension to the leaves and flower petals so I used a foam pad and a stylus in a circular motion.  As I went in a circular motion the leaves and petals start to take shape.


Once I had all of the pieces die cut, air brushed and shaped then I started to adhere everything to the candle holder.  I started by adding this beautiful Silky Crush Rose Ribbon from Really Reasonable Ribbon, I used a hot glue gun to add the ribbon and all of the die cut pieces.  Next I added the butterfly.  I applied glue to the body of the butterfly so I could bend the wings out. 


Then I hand cut three of the leaves from the cluster of leaves and glued them in place.


For the last step I added the bauble flower to the center of the butterfly and added pearl stamens for the flower center.  **Note I used a quilling tool to roll the bauble flower.


I just love how the candle holder turned out and I think I will be making a few more of these for some gift giving.  If you love the Antique Gold Parchment paper it is on sale this week at Discount Cardstock , click HERE to check out the details. 

Thank you so much for stopping by today! 

Hugs & Smiles,
Heidi

Paper: Discount Cardstock Antique Gold Parchment
Ink: Copic Markers E25, YG67, R85
Dies: Spellbinders Grand Calibur, S5-101 Wings of Hope, S5-104 Bauble Blossoms Two, S4-328 Foliage
Accessories: Really Reasonable Ribbon Silky Crush Rose Ribbon; Pearl Stamens, Candle, Glass Candle Holder, Stylus, Quilling Tool, Foam Pad, Hot Glue Gun

Spellbinders Blog

Friday, April 20, 2012

Best Wishes Card

 Hello blogging friends!  Just a quick post for today.  ;-) 


I used the New Pop-Tones Snow Cone cardstock and ES-005 Enchanted M-Bossabilities Folder
from Spellbinders to design the card front.  Then I went over the embossed area  and edges with Ranger Adirondack Snow Cap Paint Dabber and it gave the paper such a soft and dreamy look.  I think this is one of my new favorite paper colors--love the soft blue!!


The chipboard piece and rhinestones are from Recollections.  The Dot Organza Assortment Ribbon is from Really Reasonable Ribbon and the paper flowers & leaves are from I am Roses.


Thank you so much for stopping by today!

On a more personal note--Happy 10th Anniversary to my wonderful husband!!  I love you!!! ♥

I hope you have a wonderful  and creative weekend!! 

Hugs & Smiles,
Heidi


Supplies
Discount Cardstock: Pop-Tones Snow Cone, Simply Smooth White, Kraft
Stamps: JustRite CR-03640 Spring Words
Ink: StazOn Timber Brown; Copic Marker B02 Robin's Egg Blue
Spellbinders: Grand Calibur, ES-005 Enchanted M-Bossabilities Folder
Really Reasonable Ribbon: Dot Organza Assortment Ribbon
Accessories: Ranger Adirondack Snow Cap Paint Dabber; Recollections Rhinestones, Chipboard; I am Roses Paper Flowers & Leaves

Monday, April 16, 2012

Guest Designer - Pro 31 Designs - Altered Dress Form

Hello blogging friends! I have been keeping a secret for awhile and today I can finally share it with all of you!! I am SO Excited to announce that I am a Guest Designer for Pro 31 Designs and I have my first project to share with you today!!

Smaller P31 Designs

I was thrilled when I received an email from Esmeralda (aka TwinsMoms) asking me to be a Guest Designer!! Esmeralda is the owner of Pro 31 Designs, an Etsy shop filled with SO many wonderful embellishments such as crystal flowers, flowers spays, pearls, lace and trims. She also carries papers, markers and stamps just to name a few.


There is SO Much crafty goodness I know you will want to check it out!!
Etsy: www.etsy.com/shop/Pro31Designs
YouTube: www.youtube.com/user/twinsmoms
YouTube: www.youtube.com/user/pro31designs
Facebook: www.facebook.com/Pro31Designs

Before I get started with my project I want to show you all of the goodies that I received in my DT package. ;-)


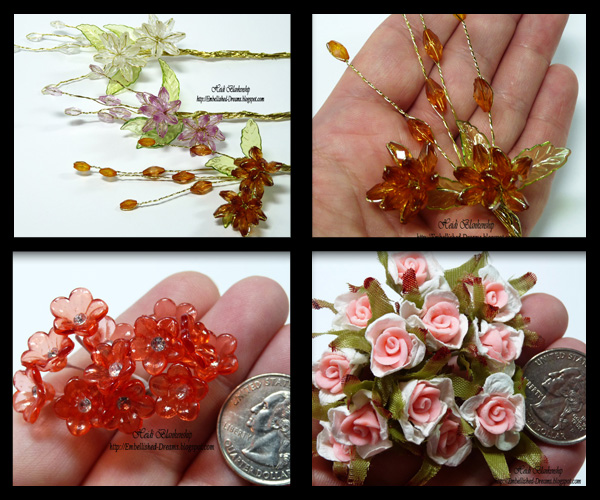
Look at these beauties!! The first picture is crystal flowers and the second one is a close up. I love these flowers--they are so Gorgeous! The next picture is 3 Tone Acrylic Wheat Sprays in pink, green, brown and clear. Love these sweet little 2 Tone Porcelain Roses!


The first picture is Beaded Sprays with leaves in clear, lavender and brown. The second picture is a close up of the brown Beaded Spray. Next is tiny Acrylic Flowers with a rhinestone center. Love this yummy melon color! The last picture is Mulberry and Porcelain Roses in a 2 tone pink.


Pretty Blue Porcelain Roses are in the first picture and tiny little white doves are in the second picture. Next is a pretty Ivory Doily. I love the thread used to create this doily, it's pearly so it has a little shimmer to it. There are also a couple of Bling Ribbon Sliders and a Beautiful Green Bling Button--oh it is SO pretty!! The last picture is little Porcelain Calla Lilies--can't wait to use theses!


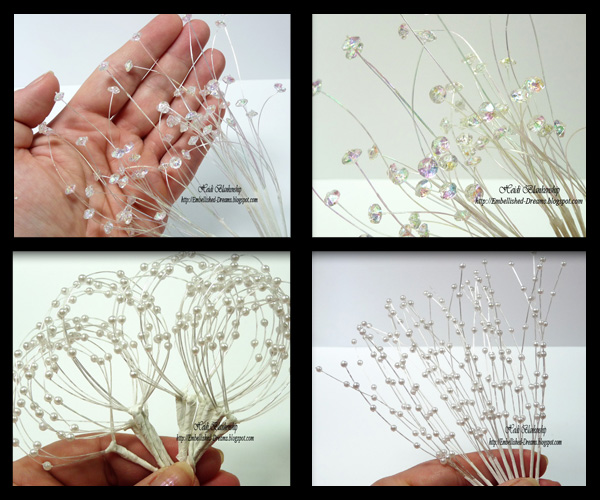
Look at all of these Gorgeous Sprays!! The first two are crystal sprays and they are so sparkly! The next two are pearl sprays. I love having the pearl sprays in white because you can use them as is or you can color them with inks and Copic markers.


Now if you are looking for the ultimate in sparkle you will LOVE this Bling Bingy Flexible Mesh. I received green and silver mesh. This stuff is fantastic because you can cut it to exactly the size you need! If you want you can use one little piece or a whole row. Gotta Love that! Ok, I have to be honest I was totally drooling over this Sequin and Rosette trim!! It's so Beautiful! The last two pictures are Black and Silver Bling Out Chain in 6mm and 4mm. So SO Sparkly!!


Are you hanging in there with me? A couple more pictures to go and then I can share my project with you!! The first two pictures are Flat Back Pearls in Shiny White (it has an iridescent look) and White in 6mm and 4mm. Next is Pink & White Pleated Trim--this trim is so soft! In the last picture is Brown & Black Double Ruffle Trim in Satin and Organza.


I LOVE this Rosette Ribbon Trim!! I received it in Brown, Pink and White and it is SO fun to work with! In the last picture is White and Pink Double Ruffle Trim in Satin and Organza.

So what do you think? Some Gorgeous Crafty Goodness going on here!!

Thank you so much Esmeralda, I LOVE it ALL!!!

Ok, are you ready to see my first project?


I altered a dress form and I had SO much fun!! My crafty area is brown and pink and this pretty dress form fits in just prefect!


Here is a before picture of the dress form.


To start I wanted to cover parts of the dress form with 4mm flat back pearls so I cut the pearls to the different length that I needed. The pearls were white and I wanted to soften them up a bit so I air brushed them with Copic markers E31. I place the 4mm flat back pearls on to an Adhesive Sheet from Scrapbook Adhesives by 3L to hold them in place while I air brushed them. The adhesive sheets work great for this! Then I brushed over the pearls with Ranger Perfect Pearls.


I did the same technique with the Copic marker and Perfect Pearls on the Circle Pearl Sprays and I hot glued the pearl sprays to the back of a XXLarge 3D Brown Crystal Dimensional Flowers.


Here is a picture of the dress form once I had the pearls and flower glued in place.


Here is a close up of the gorgeous brown crystal flower. Love these!!


Next I wrapped and glued the Brown Rosette Ribbon and Brown Double Ruffle Ribbon Trim Satin and Organza (1-1/2 in wide) around the dress form to create a skirt and ruffle trim.


I wanted to add another brown crystal flower and a couple of Wheat 3 Tone Brown Acrylic Spray Stems to the mid section of the dress form. So I threaded the wires from the sprays through the metal finding on the back of the flower, twisted the wire and glued it to the front of the dress form.


I just love how this turned out!!


Thank you so much for stopping by today! I hope you enjoyed all of the crafty goodies I shared and the dress form tutorial. Please be sure to visit Pro 31 Designs, the Pro 31 Designs YouTube Channel and the Pro 31 Designs Facebook Page. I know you will be inspired!!

I hope you have a wonderful and creative day!!

Hugs & Smiles,
Heidi

Supplies
Pro 31 Designs: XXLarge 3D Brown Crystal Dimensional Flowers, 4mm White Flat Back Pearls, Wheat 3 Tone Brown Acrylic Spray Stems, Brown Rosette Ribbon (4 in wide), Brown Double Ruffle Ribbon Trim Satin and Organza (1-1/2 in wide), White Circle Pearl Sprays
Ink: Copic Marker E31 and Air Brush System
Accessories: Ranger Perfect Pearls; Scrapbook Adhesives by 3L Adhesive Sheets; Hot Glue Gun, Dress Foam

LinkWithin

Related Posts Plugin for WordPress, Blogger...