Showing posts with label Tattered Angels. Show all posts

Thursday, September 20, 2012

Flower Mesh Necklace

Hello!  Today, I have a necklace to share with you using Positively Me - Julianna Hudgins Jewel Flowers & Flourishes Nestaboard (S5-143) from Want2Scrap and some beautiful 18 mm Silver Mesh from Artistic Wire.  This was my first time playing with the Silver Mesh and I had so much fun!  You can twist it, stretch it, fill it with beads--so many possibilities with the mesh!


Here is the necklace I designed.  I used Amber Shell Coins, Shell Beads, Champagne Pearls and 18 mm Silver Mesh.  The Shell Coins and Shell Beads have a look of pearl when the light hits them so the colors work perfectly with the Champagne Pearls and Silver Mesh.  The flower picks up both the dark tones in the Shell Coins, Shell Beads and the Pearls.


Here are a couple of close up pictures of the necklace.  To find all of the details and see more pictures please click HERE to check out my post on the Positively Me by Julianna C. Hudgins Blog.  I have a full step-by-step tutorial with several pictures to share with you on how I designed this necklace.


Thanks so much for stopping by today!  I hope you have a wonderful and creative day!

Hugs & Smiles
Heidi

 Supplies
Want2Scrap:  Positively Me - Julianna Hudgins Jewel Flowers & Flourishes Nestaboard (S5-143) Beadalon:  Semi-Flush Cutter, Round Nose Pliers, Flat Nose Pliers
Artistic Wire:  24 Ga. Silver Wire, 18 mm Silver Mesh, 18 mm Silver Plated Mesh Clasp 
Other Supplies Halcraft Bliss Beads Amber Shell Coins 20mm; Blue Moon Shell Beads, Silver Jump Rings, Head Pins; Champagne Pearls 8mm, 6mm; Tattered Angels Suede Glimmer Mist, Pearl Glimmer Mist; ICE Resin; E6000 Adhesive

Tuesday, November 15, 2011

Sweet & Sassy Birthday

Good morning blogging friends! Today I have a fun, bright and cheery birthday card to share with you.


Personal, I am not usually one for the brighter colors but I had so much fun coloring this CR-02230 Toppsy Turvy Cake image from JustRite and adding all of the pretty and colorful bling from Want2Scrap®.


I used Copic markers to color the image and then used Spellbinders™ Grand Calibur Die Cutting Machine and S4- Labels Fourteen to cut/emboss the shape. Then I layered the die cut, Nestaboard Labels Fourteen and Nestabling Labels Fourteen Hot Pink Rhinestones. I colored the paper doily with glimmer mist and added some die cut accent pieces from S5-071 Twisted Metal Tags & Accents.


For the rose I used S4-352 Spiral Blossom Two from Spellbinders. Once the rose was rolled I added glimmer mist and glitter to match the Nestabling and Ribbon. The ribbon is from the Shimmer Satin Bright Assortment from Really Reasonable Ribbon. I also added some Baby Bling Turquoise Rhinestones to the cake and corners of the card and Baby Bling White Pearls to the swirl die cut accents.

Thank you so much for stopping by today! I hope you have a wonderful and creative day!!

Hugs & Smiles,
Heidi


Want2Scrap
Nestabling Labels Fourteen Hot Pink Rhinestones
Nestaboard Labels Fourteen
Baby Bling Turquoise Rhinestones
Baby Bling White Pearls

Spellbinders Grand Calibur
S4- Labels Fourteen
S4-352 Spiral Blossom Two
S5-071 Twisted Metal Tags & Accents
Beacon Adhesives 3-in-1 Advanced Craft Glue

Paper: Discount Cardstock Simply Smooth White, Bazzill Swiss Dot Salt, Frosted Pink Prismatic, Frosted Teal Prismatic, Lime Denim
Stamps: JustRite Stampers Clear CR-02230 Topsy Turvy Cakes
Ink: Tsukineko Memento Tuxedo Black, Ranger Antique Linen, Copic Markers
Accessories: Really Reasonable Ribbon Shimmer Satin Bright Assortment; Clearsnap Pralines & Cream Fairy Dust Glitter, Glue Gloss, Pink Chalk Ink; Tattered Angels Caribbean Blue, Timeless Lilac, S.W.A.K. Glimmer Mist; Flower Stamens; Paper Doily; Scrapbook Adhesives by 3L 3D Foam Squares

Tuesday, November 8, 2011

JustRite Stampers - New Release - Scrolled Vine Background Stamp & Vintage Wallpaper Background Stamp

Good morning blogging friends! Today, I have two New Release Background Stamps from JustRite Stampers to share with you. Both of these background stamps are so Beautiful!! But before I get started I wanted to let you know that JustRite Stampers is having a Christmas Sale - 25% off Every Christmas Stamp- Cling, Clear, Original. It's a web sale -- no coupon code required!! So be sure to check it out!


Here is the first card I designed using CL-03555 Scrolled Vine Background Stamp and CL-02150 Deck the Halls. I love the beautiful scrolling vines!


To start I stamped the image using Frost White pigment ink from Clearsnap and heat set it to dry. I also inked the edges of the cardstock to give the edges a nice soft look.


I used S5-055 Layered Poinsettia to create the die cuts, shaped the flowers and leaf with a stylus and then layered the flowers.


To add a little sparkle I added Pralines & Cream Glitter to the scrolling vines and the poinsettia.


Here is a close up of the glitter.


Supplies
Scrolled Vine Background Card~
Stamps: JustRite Stampers CL-03555 Scrolled Vine Background Stamp, CL-02150 Deck the Halls
Paper: Discount Cardstock Really Red, Kraft, Posh Hemlock Felt
Ink: Clearsnap Frost White Pigment Ink; Tsukineko Memento Rich Cocoa
Dies: Spellbinders Grand Calibur, S5-055 Layered Poinsettia
Accessories: Want2Scrap™ 72 Count White Pearls; Clearsnap Pralines & Cream Fairy Dust Glitter, Glue Gloss


For my second card I used CL-03550 Vintage Wallpaper Background Stamp and CL-02150 Deck the Halls. I was so happy with how the background turned out! The colors are so soft with a touch of glimmer.


To create the background I used three colors of Distress Ink--Victorian Velvet, Antique Linen and Walnut Stain and inked up the stamp starting with the lightest color, then the medium and then the darkest. Instead of adding water to blend the inks I lightly misted the stamp with Tattered Rose Glimmer Mist. I laid the paper on top of the stamp and used a brayer to go over the paper and transfer the ink.


Here is a close up of the background stamp and the glimmer mist.


The sentiment is from CL-02150 Deck the Halls. I used the Standard Circles Small and S5- Fancy Tags Three from Spellbinders to create the die cuts. Then I added Nestabling Fancy Tags Three White Pearls.


I used S4-340 Create-A-Flake Three for the snowflake and then added some white pearls.


Supplies
Vintage Wallpaper Background Card~
Stamps: JustRite Stampers CL-03550 Vintage Wallpaper Background Stamp, CL-02150 Deck the Halls
Paper: Discount Cardstock Simply Smooth Ivory, Pearl Metallic
Ink: Tsukineko Memento Rich Cocoa, Ranger Victorian Velvet, Antique Linen, Walnut Stain Distress Inks
Dies: Spellbinders Grand Calibur, S5- Fancy Tags Three, S4- Small Standard Circles, S4-340 Create-A-Flake Three
Accessories: Want2Scrap™ Nestabling Fancy Tags 3 White Pearls, 72 Count White Pearls; Tattered Angels Tattered Rose Glimmer Mist, Seam Binding

Please be sure to visit each of the JustRite Design Team Members listed below for some great inspiration using the New CL-03555 Scrolled Vine Background Stamp and CL-03550 Vintage Wallpaper Background Stamp.


Thank you so much for stopping by today!!

Hugs & Smiles,
Heidi

Tuesday, July 5, 2011

JustRite Stampers - New Realeases for July - Rejoice!

Good morning! I hope you all had a wonderful 4th of July!! We had a fantastic weekend with family and friends.

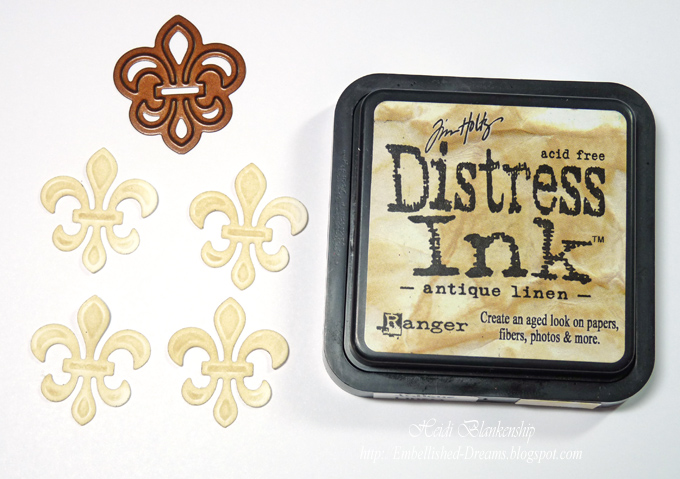
Last week JustRite Stampers started to introduced some of the new stamp sets for Christmas and Fall with blog hops and I wasn't able to participate because of some computer problems but please be sure to visit the JustRite Blog to see all of the new stamp sets and artwork by the JustRite Design Team Members. Today's New Release is called Rejoice. The stamp set includes 4 Designer Centers and 4 Interchangeable Borders.Here is my project for today using the New Rejoice stamp set. The wooden cross is a perfect match to this stamp set. The cross started out as raw wood and I misted the entire piece with Suede Glimmer Mist and set aside to dry. After the Glimmer Mist was dry I applied Espresso Bean Glimmer Glam to the smaller cross.Next I stamped the image three times. For the first image I used S4-314 Lacey Ovals and the Grand Calibur™ to cut/emboss the shape. Then I used S4-110 Classic Ovals Large #3 for the second image and I hand cut the third image of the cross. I colored the cross with a Copic marker.Then I inked all of the edges with Antique Linen Distress Ink.Next I added the Nestabling™ Lacey Ovals Black Rhinestones from Want2Scrap™. I added glitter to the adhesive strips. Doing this really makes the rhinestones pop!Here is a close up. I layered all of the pieces using 3D Foam Squares and then added to the front of the cross. To accent the ends of the cross I used S5-042 Fleur de Lis Accent and the Grand Calibur™ to cut/emboss the shapes. Then I inked each piece with Antique Linen.I added the Fleur de Lis accents and then added a Black Rhinestone to the center of each.

Supplies
Stamps: JustRite Stampers JB-09935 Rejoice
Paper: Discount Cardstock Simply Smooth Ivory
Ink: Tsukineko Memento Rich Cocoa; Ranger Antique Linen Distress Ink
Dies: Spellbinders™ Grand Calibur™, S4-314 Lacey Ovals, S4-110 Classic Ovals, S5-042 Fleur de Lis Accent
Accessories: Want2Scrap™ Nestabling™ Lacey Ovals Black Rhinestones, 72 Count Black Rhinestones; Local Discount Store Wooden Cross; Tattered Angels Suede Glimmer Mist, Espresso Bean Glam; Glitter; Scrapbook Adhesives by 3L™ 3D Foam Squares

Please be sure to visit each of the JustRite Design Team Members listed in the link list below to see what they have created to share with you.

JustRite Inspiration

Becca Feeken

Debbie Olson

Mona Pendleton

Kellie Fortin

Angela Barkhouse

Heidi Blankenship **That's me ;-)


Thank you so much for stopping by today and I hope you have a wonderful day!!

Hugs & Smiles,

Heidi

Monday, June 6, 2011

Boardwalk Beauties & Bling

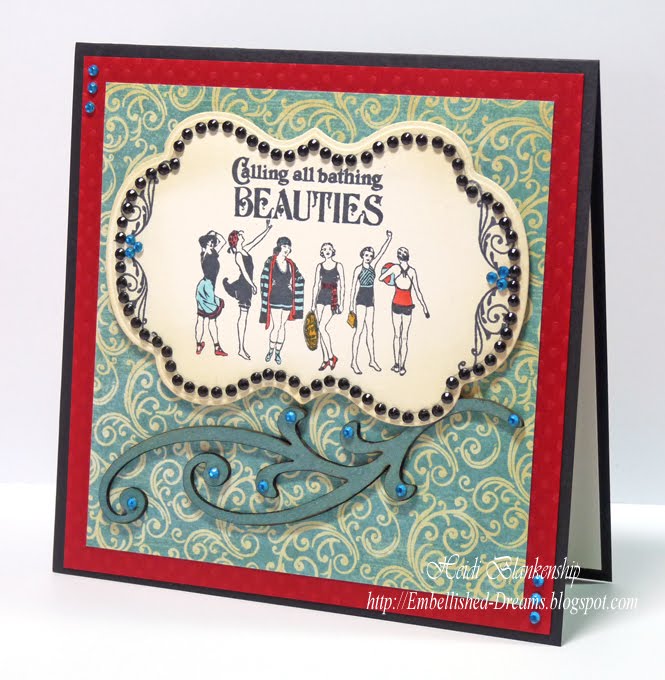
Good morning! Wow I can't believe we are already into the second week in June!! Where is the time going? With warm temperature I thought this would be a perfect time for a beach themed card.For the stamped image I used a couple of stamps from Crafty Secrets, Bathing Beauties stamp set. I add a little bit of color using Copic markers. Then I taped S4-290 Labels Fourteen die template for perfect placement and cut/embossed the shape using the Grand Calibur from Spellbinders.Then I inked the edges from Antique Linen Distress Ink and added Nestabling™ Labels Fourteen Black Rhinestones from Want2Scrap™. I also added a few Baby Turquoise Rhinestones to the inside of the label.I used Tattered Angels Glimmer Mist Caribbean Blue to color the Chipboard Embellishments - Pack of 5 - Style C. Once the chipboard was dry I added a few Baby Turquoise Rhinestones and used Beacon Adhesives 3-in-1 Advanced Craft Glue to adhere the chipboard to the card.For the card base I used Soot cardstock, layered with Dotted Swiss Phoenix from Discount Cardstock. The patterned paper is from Graphic45-On the Boardwalk collection.
Want2Scrap™ Products Used:
Nestabling™ Labels Fourteen Black Rhinestones
Baby Turquoise Rhinestones
Chipboard Embellishments - Pack of 5 - Style C

Cross Promotional Partner Products Used:
Spellbinders: Grand Calibur, S4-290 Labels Fourteen
Graphic45-On the Boardwalk collection
Beacon Adhesives 3-in-1 Advanced Craft Glue

Other Materials:
Stamps: Crafty Secrets Bathing Beauties
Paper: Discount Cardstock Dotted Swiss Phoenix, Soot, Simply Smooth Ivory
Ink: Tsukineko Memento Tuxedo Black; Ranger Distress Ink Antique Linen; Copic Markers R17, BG53, YR24
Accessories: Tattered Angels Glimmer Mist Caribbean Blue; Scrapbook Adhesives by 3L 3D Foam Squares

*+*+*Bling Alert*+*+*
Please join us next Monday, June 13th for the Let Summer Begin Blog Hop with Want2Scrap™ and PSA Essentials!!


Exciting News to Share!!
I meant to put this in my last Want2Scrap™ post, I have some exciting news to share with all of you--I am one of the Design Team Coordinators for Want2Scrap™!! I have been on the Design Team for a few month and then this opportunity came up so I jumped on it! ;-)
I have been a DT Coordinator for a little over a month now and I love it!! Michelle Parrish, Owner and Michele Ciola, Marketing Director and Mimi Leinbach, Co-Coordinator are wonderful to work with and we have an amazing a very talented team of ladies!! I am so honored to be part of Want2Scrap™!!

Thank you so much for stopping by today!! Remember to add a little bling to your designs and make someones day sparkle!!

Hugs & Smiles,

Friday, April 29, 2011

Bling Is A Girls Best Friend!

Good morning blogging friends! It seems like once Spring rolls around the wedding bells start ringing so I thought I would get a head start on wedding cards and I have one to share with you today. My card is also featured on the Want2Scrap Blog today!I think I am in love with the Black Rhinestone Nestabling™!! How gorgeous is that? I know sometimes people are afraid to use the color black in their card designs, afraid it might make the card too dark but I think using black for accents gives it just the right touch of richness and elegance. I used Nestabling™ Beaded Square Black Rhinestone, Nestabling™ Fancy Tags Two Black Rhinestone and Silver Baby Bling on the wedding card. The beautiful designer paper is from Graphic 45 Le' Romantique Collection.To start I wanted to do the Reverse Stencil Technique on the S4-315 Beaded Squares die template from Spellbinders™. I used Black Color Box Chalk Ink and inked directly on the inside of the die template and then used the Grand Calibur™ to cut/emboss.Next I used a stamp from the Faith stamp set from JustRite Stampers, Tuxedo Black ink and stamped the sentiment on to Simply Smooth Ivory cardstock. I used S5-030 Fancy Tags Two and the Grand Calibur™ to cut/emboss the tag.Before removing the cardstock from S4-315 Beaded Squares I used the die template as a stencil and inked the diecut with Antique Linen Distress Ink. The black edging on the diecut is the results from the Reverse Stenciling Technique. For the image of the Groom and Bride I used S4-126 Classic Squares Large #6 to cut/emboss the square. I also used the die template as a stencil for the tag and inked the inside edges with Antique Linen.I used Nestabling™ Beaded Square Black Rhinestone to edge the diecut. Next I tried something a little different--I very carefully used a heat tool on the exposed adhesive part on the Nestabling™ and it created a wavy ribbon look to the adhesive and made it tacky to apply and hold glitter. Here is a close up. I think it's kind of neat looking and it adds just a little more texture and dimension. I used Autumn Medley Glitter from Sparkle N Sprinkle. Now, if you are going to try this please be very careful and don't hold the heat tool on the adhesive part for too long or it will melt. It only takes a few seconds to get this effect. Here is a close up of the finished piece. I also added one little Silver Baby Bling for the ring. ;-)Next I added Nestabling™ Fancy Tags Two Black Rhinestone and a couple Silver Baby Bling to the tag and then I added some of the same glitter as mentioned above.Here is a close up of the tag.I didn't have any ribbon to match the Graphic 45 paper so I hand tinted and crinkled some seam binding using three shades of Glimmer Mist from Tattered Angels. To adhere the diecut and the bow I used 3-in1 Advanced Craft Glue from Beacon Adhesives.Here is a close up of the bow and the Trinket Pins from Maya Road.

Want2Scrap Supplies Used:

Nestabling™ Beaded Square Black Rhinestone
Nestabling™ Fancy Tags Two Black Rhinestone
Silver Baby Bling

Other Supplies:
Stamps: JustRite Stampers Cling CL-02130 Faith
Paper: Graphic 45 Le' Romantique Collection; Discount Cardstock Simply Smooth Ivory
Ink: Clearsnap Color Box Chalk Black; Tuskineko Memento Tuxedo Black; Ranger Antique Linen Distress Ink
Dies: SpellbindersGrand Calibur™, S4-315 Beaded Squares, S4-126 Classic Squares Large #6,S5-030 Fancy Tags Two
Accessories: Sparkle N Sprinkle Autumn Medley Glitter; Hug Snug Seam Binding; Tattered Angels Tutti Fruitti, Tiger Lily, Suede Glimmer Mist; Maya Road Trinket Pins; Beacon Adhesives™ 3-in-1 Advanced Craft Glue™; Scrapbook Adhesives by 3L™ 3 D Foam Squares; Heat Tool


Thank you so much for stopping by today!! Don't forget to check out the Want2Scrap Blog and I hope you have a creative day!!

Hugs & Smiles,
Heidi

LinkWithin

Related Posts Plugin for WordPress, Blogger...