Showing posts with label A Gilded Life. Show all posts

Monday, November 24, 2014

Heart and Rose Bezel Necklace

Hello everyone!  Today, I have a quick post and a jewelry piece to share with you.  I have been busy creating and getting ready for a show this weekend.  I will be posting all the details tomorrow for the Small Business Saturday show that I will be attending.


This is one of the bezel pieces that I recently created.  The bezel is GLLB-001G Large Heart Bezel-Bronze that is part of the Gilded Life Collection with Spellbinders Paper Arts®.  I added a die cut piece with an image of a rose.  To create the die cut I used the matching die, GLD-001 Heart Dies.  I used Mod Podge to seal the image and adhere it to the bezel. 


Next I added some diamond stickles to the image.  You can see a little bit of the sparkle in this photo.  For embellishments I added a pink resin rose, a couple of pearls and some rhinestone chain.


To finish off the necklace I added a jump ring and then added the bezel to a piece of silk.

Thanks so much for stopping by today!  Don't forget to stop back tomorrow to find out all of the details about the upcoming Small Business Saturday event!

Hugs & Smiles,
Heidi


Supplies
Spellbinders Paper Arts® GLLB-001G Large Heart Bezel-Bronze, GLD-001 Heart Dies
Accessories:  Silk, Pink Resin Rose, 4 mm Ivory Pearls, Mod Podge, Glossy Accents, E6000, Rhinestone Chain, Diamond Stickles, Rose Image

Thursday, September 25, 2014

Spellbinders & A Gilded Life Crown Bezel Necklace

Hello everyone!  Today, I have a jewelry piece to share with you using one of A Gilded Life bezels from  Spellbinders Paper Arts®.  These little bezels are so fun to work with because you can create a little mini collage on the inside.  The bezels come with a clear plexiglass cover so you can fill the bezels with some fun little bits and add the cover or you could leave it off too.  You could also fill the bezels with resin.  


I used the GLLB-003G Large Crown Bezel-Bronze along with the coordinating die template GLD-003 Crown Circle Die (Lg).  I die cut a piece from a vintage book page, inked the edges with Ranger Tim Holtz Distress Ink Vintage Photo.  Next, I used Mod Podge to glue the die cut inside the bezels.  I added a piece of vintage lace and then glued a tiny pearl heart in place.  Once the Mod Podge was dry then I added some tiny pearl beads and a few sequins.  


I used Ranger Glossy Accents to glue the clear plexiglass cover in place.  


To finish off the bezel I added ivory flat back pearls from Em's Emporium, a large jump ring from Butterbeescraps and some Sari Silk Ribbon from Hippie Chix Fiber Art.  This was such a fun and easy necklace to create and I can't wait to wear it!

Thanks so much for stopping by today!

Hugs & Smiles,
Heidi


Supplies
Paper:  Vintage Book Page
Ink:  Ranger Tim Holtz Distress Ink Vintage Photo-The Stamp Simply Ribbon Store
Dies/Bezel:  Spellbinders Paper Arts® GLD-003 Crown Circle Die (Lg), GLLB-003G Large Crown Bezel-Bronze by A Gilded Life
Accessories:  Mod Podge, Vintage Lace, Tiny Pearl Heart, Pearl Beads, Sequins, Ivory Flat Back Pearls-Em's Emporium, Ranger Glossy Accents-The Stamp Simply Ribbon Store, Jump Ring-Butterbeescraps, Sari Silk Ribbon-Hippie Chix Fiber Art

Saturday, September 13, 2014

B'sue Boutique Creative Group on Facebook - Work Table Wednesday & Finished Up Friday

Hello blogging friends!  Today, I have something a little different to share with you.  Awhile back I was looking around on YouTube and I happened to come across a YT channel with fantastic videos all about jewelry--from coloring metals to assemblage.  As a lot of you know I have been making jewelry for several years, probably close to twenty years now.  I started out making earrings and made brooches with Friendly Plastic and then I moved on to Clay.  I can remember some of the first clay pieces I made I wanted certain colors that weren't even available at that time so I was painting the clay jewelry with fingernail polish LOL!  So I have dabbled in several things over the years.  Even though I don't post a ton of jewelry here on my blog I love to make jewelry.  I am pretty much self taught.  I have only taken one beading class and for the most part I make what I like or what looks good to me.  So I was thrilled to find B'sue Boutiques on YT.  The videos are amazing and they are like a private little class right in the comfort of your own home.  You could even watch the videos in your PJ's if you want LOL!  Not only are the videos great and filled with so much information but Brenda Sue is so funny too!  She is amazingly talented and so willing to share what she knows with jewelry design and she keeps it real--gotta love that!  I found out that B'sue Boutiques has a wonderful Facebook group--B'sue Boutiques Creative Group.  It's a closed group so you have to request an invite.  The group is FILLED with talent that is OUT OF THIS WORLD!!!!  Everyone is so very talented and the best part they are all so nice and helpful.  You can click HERE for a link to the FB Group and click HERE for the Online Store and one more--click HERE for the YT Channel. 

A couple of weeks ago some of the ladies started a challenge in the FB group--Work Table Wednesday--Finished Up Friday.  So here is the deal on Wednesday you take a picture of what is on your work table or unfinished projects that you need to work on and you post the picture to the group.  Then you have from Wednesday to Friday to get your projects done.  When you have your projects done then you post pictures of your finished pieces to the group.  it is a great challenge to get you jump started and finishing up some projects.  PLUS everyone who finishes their projects gets put into a drawing for the online store--how cool is that!

So now that I have rambled on would you like to see what was on my Work Table Wednesday?


I don't have a very big work table so these haven't just been laying out on my table but I do have a container full of unfinished jewelry pieces.  This is a mix of several things--pieces from B'sue Boutiques, ButterBeeScraps, Spellbinders--A Gilded Life and Media Mixáge with ICE Resin, and some vintage keys.  Some of these pieces have only been done for a few days while others have been sitting around unfinished for several months.  This is just the challenge I need LOL!!


This piece here would be one that I started a few months ago.  


I have also had these tulip bead caps for several months!

So my goal was to finish up the filigree piece with the little bird and flowers and turn it into a necklace and I wanted to make earring with the tulip bead caps.

I had until Friday to complete the projects.

READY SET GO!!

Ok, jump ahead to Friday and WOW I actually finished both pieces!!  I was sliding in at the last minute but I finished them!!  :)

So here are a few pictures from my Finished Up Friday.


The little charm with the bird and flowers is from B'sue Boutiques.  The flower filigree pieces and the Spectra (pink) beads are also from B'sue.  The blue oval shape filigree, bronze ball headpins, chain, jump rings, and AB flat back crystals are all from Butterbeescraps. The white flat back pearls are from Em's Emporium.  Last but not least the pink crystal beads, white pearls, and clasp are from my stash.  Before assembling the filigree pieces and the bird charm I spray each piece with a flat white paint.  Then I painted the pieces with acrylic pain, buffed with steel wool and sealed them with Crystal Clear Krylon Semi-Gloss spray.  I used E6000 to assemble the pieces.  This is a technique that I learned from watching one of the B'sue Boutiques videos.  You can click HERE for the video.  I just changed it up a bit and used some different colors.


I have to say I LOVE how these earrings turned out!  For the earrings I used tulip bead caps and Spectra (aqua) beads from B'sue Boutiques.  The two bronze bead caps and bronze ball headpins are from Butterbeescraps. The clear crystal beads, frosted acrylic flower bead caps, bronze flower spacers, and french hooks are from my stash.  I used Patina Rub-n-Buff on the tulip bead caps and then I used steel wool to buff them until I achieved the look I wanted. 

~~~~~~~~~~~~~~~~~~~~~~~~~~~~~~~~~~~~~~~~~~~~~~~~~~~~~~~~~~~~~~~~~~~~~~~~~~~

ANNOUNCEMENT!!  

Once last thing before I go today.  I want to let all of you know that I am going to be opening an online store very soon.  Well, I actually have the store already I just need to fill it with goodies.  :)  I will be selling a variety of my handmade items such as cards, jewelry, small home decor pieces, stickpins and embellishments.  As soon as I have everything ready to go I will post here and on Facebook.  It's a lot of work but I am excited to get it up and going!

~~~~~~~~~~~~~~~~~~~~~~~~~~~~~~~~~~~~~~~~~~~~~~~~~~~~~~~~~~~~~~~~~~~~~~~~~~~

Thanks so much for stopping by today!  I hope you have a wonderful weekend!

Hugs & Smiles,
Heidi

Monday, August 25, 2014

Spellbinders - A Gilded Life - Heart Angel Pin

Hello blogging friends!  I hope everyone had a great weekend.  Summer is coming to an end and that means school is just around the corner.  I know in different areas some of the kids are already back in school.  So went went school shopping this weekend.  Something totally different for us--in the past it was just uniforms.  This will be Evan's first year in public school and the first year at the Jr High.  The private school he went to only went up to sixth grade.  So this will be a year with a lot of new experiences.  

For today, I have a decorative pin/brooch to share with you.  I used one of the Spellbinders® pendants GL2-001 Heart Angel-Gold by A Gilded Life.


I painted the pendant white and then I added some details with pink and blue paints.  Next, I buffed the pendant with steel wool until some of the paint was removed and the gold metal was revealed.  I absolutely love this look--is so pretty and shabby!  


I added the pendant to a very large safety pin.  I used gesso on the pin to tone down the silver and give it a more shabby look.  Then I added some charms, crystal dangles, ribbon, tulle and lace.


I also added some AB crystals to the heart on the pendant.  This is such a quick and easy project and would make a lovely gift.

Thanks so much for stopping by today!

Hugs & Smiles,
Heidi

Other:  Large Safety Pin, Gesso, Charms, AB Crystals, Crystal Dangles, Ribbon, Tulle, Lace


Thursday, July 24, 2014

Royal Rose Bezel - Spellbinders - A Gilded Life Collection

Hello blogging friends!  Today, I have a jewelry piece to share with you using one of the bezels for A Gilded Life Collection from Spellbinders Paper Arts®.


I designed a beautiful necklace using the GL2-005 Rose Medallion-Gold bezel by A Gilded Life.  This is one of those pieces that I had so much fun creating and I love how it turned out!  I think A Gilded Life collection is one of my favorites.  All of the pieces in the collection are so beautiful.


I painted the the entire piece with white spray paint.  Then I added pink and blue paint and lightly buffed the piece with steel wool until some of the paint was removed to reveal the metal.  Then I sealed the pieces with a clear spray.  Next I added all of the crystals.  I used clear and AB crystals.


I die cut the digital image using GLD-003 Crown Circle Die.  Then I glued the image in place and added a glossy top coat.


I added the bezel to some pink silk ribbon for a quick and easy necklace.

I hope you enjoyed the jewelry project and I inspired you to try some of the bezels and create your own unique jewelry pieces.

Thanks so much for stopping by today!

Hugs & Smiles,
Heidi

Supplies
Accessories:  Paint, Crystals, Gloss, Steel Wool


Monday, June 23, 2014

Royal Medallion Necklace - Spellbinders and A Gilded Life

Hello everyone!  Today, I have a jewelry piece to share with you using one of A Gilded Life medallions from Spellbinders Paper Arts®.


Here is the necklace that I designed using the GL2-008 Royal Medallion by:  A Gilded Life and I just love how this turned out.  The colors are so soft, pretty and very girly.  ;-)


I spray painted the medallion with a flat white paint.  Then I painted the crown and filigree part using light blue and baby pink acrylic paints.  Next I used steel wool to buff the medallion until some of the gold metal was showing.  Then I added a few AB Swarovski crystals.  For the center piece I added a 12 mm AB White Rose from Em's Emporium.  


I added the medallion to some pearl chain and then added a clasp for the necklace.


I hope you like this pretty little jewelry project.  I had so much fun designing it! 

Thanks so much for stopping by today!

Hugs & Smiles,
Heidi

Supplies
Spellbinders Paper Arts® GL2-008 Royal Medallion by:  A Gilded Life
Accessories:  White Spray Paint, Baby Pink and Light Blue Acrylic Paints, Semi Glossy Clear Spray, Steel Wool, AB Swarovski Crystals, Glossy Accents, Em's Emporium 12 mm AB White Rose, Pearl Chain, Clasp, Jump Rings

Sunday, May 25, 2014

Guest Designer on the Spellbinders Blog and a Sweet Giveaway!

Hello everyone!  I am very excited to tell you I am the Guest Designer over on the Spellbinder Blog today!  I have a card with a full step-by-step tutorial to share with you.  When you are done checking out the tutorial I hope you will hop on over to the Spellbinders Blog and check out the post--you will have a chance to Win all of the die templates I used to create my project!  Be sure to click on the contest link at the bottom of their blog post.  There is even a little Q & A interview!


Here is the card that I designed using some of the die templates, an M-bossailities folder, and one of the gorgeous metal pieces from A Gilded Life by Spellbinder Paper Arts®.


To start I carefully applied Versa Mark™ ink to the heart shape on the GL2-010 Love Wings – Gold metal piece.  Then I added Stampendous Fran-tage Shabby Pink Pastel Embossing Powder and heat set with a heat tool.  I love this embossing powder for this technique because it has a few different colors, fine and very chunky embossing powders and glitter.  Once the metal piece was completely cooled I applied glossy accents.


Here is a close up.  I also added some Clear SS8 Pointy Back Crystal Rhinestones and  Pink Flat Back Rhinestones from ButterBeeScraps.  I used glossy accents to adhere the rhinestones.  I also added a word block (not shown in this picture) that I typed up using an old typewriter font and then fussy cut and added more glossy accents on top.


Next I created the mat that will be embossed for the background of the card.  I used S6-001 5 x 7 Matting Basics A die template to cut the shape and then I lightly misted the front and back of the paper with water.  Doing this will break down the fibers in the paper and result in a very crisp embossed image.


I used Spun Sugar Distress ink and applied it to the flat surface of the folder.  Then place the die cut mat piece inside the folder and embossing using the Grand Calibur® Machine.  Doing this technique will result in a letterpress effect.


Here is the paper after it was embossed.  I also lightly inked around the edges with the Spun Sugar ink.


Next I used one of the die templates from the S5-218 A2 Devine Eloquence to create a die cut with simply smooth white cardstock.  Before removing the paper I used the Spun Sugar in to stencil through the die template.


These are the two die cuts I created using S4-425 Elegant Ovals and S5-218 A2 Devine Eloquence die templates.


To remove all of the little paper bits I used the New T-001 Tool N’ One.  This is a handy little tool for removing all of the tiny paper bits from the die templates.


Once the mat and all of the die cuts were complete I assembled the card using pink lemonade cardstock for the base of the card.  Then I layered the die cuts.  I used 3D Foam SquaresE-Z Runner® Permanent Strips-Refillable Dispenser 49' from Scrapbook Adhesives by 3L™ to adhere all of the pieces.  I used the Zig Wink of Stella Clear Glitter Brush Pen to add some sparkle to the embossed areas on the mat.


Here is a close up of the of the beautiful embossed metal piece once it was added to the card front.  I also tied on a small piece of Pink Seam Binding from  The Stamp Simply Ribbon Store.  I love the aged, shabby, vintage look of the metal piece with the embossing powder and the rhinestones!


Here is another look at the finished card.  I hope you enjoyed the tutorial and the techniques.

Don't forget to hop on over the the Spellbinders Blog and enter the giveaway!

Thanks so much for stopping by today and I hope you have a wonderful holiday weekend!

Hugs & Smiles,
Heidi

Supplies
Spellbinders Paper Arts®: Grand Calibur® Machine, S6-001 5 x 7 Matting Basics A, S4-425 Elegant Ovals, S5-218 A2 Devine Eloquence, E3D-018 European Tapestry M-bossabilities, GL2-010 Love Wings – Gold, T-001 Tool N’ One
Paper:  Simply Smooth White, Pink Lemonade, Small Paper with Blessed Word--Old Typewriter Font
Ink:  Ranger Distress Ink Spun Sugar, Imagine Crafts/Tsukineko Versa Mark™
Ribbon:  The Stamp Simply Ribbon Store Pink Seam Binding
Accessories:  ButterBeeScraps Clear SS8 Pointy Back Crystal Rhinestones, Pink Flat Back Rhinestones, The Rubber Cafe-Stampendous Fran-tage Shabby Pink Pastel Embossing Powder, Ranger-Glossy Accents, Pearls,Wink of Stella-Zig Wink of Stella Clear Glitter Brush Pen , Scrapbook Adhesives by 3L™ 3D Foam Squares, E-Z Runner® Permanent Strips-Refillable Dispenser 49', Heat Tool, Glue Gun


Wednesday, April 16, 2014

Spellbinders Design-abilities Blog Hop - Chandelier Pearl and Crystal Necklace

It’s that time again, for the Spellbinders® Blog Team to do the Design-abilites Blog Hop.  We want to share some fun, and creative projects with you. Our blog hop is every other month on the 16th and we will provide a link list to each of the Blog Team Design Members.  Before we get started, we want to let you know this blog hop is just for creative inspiration; we are not sponsored by Spellbinders Paper Arts®.  Sometimes we might not all be able to participate, but we would still encourage you to visit all of the Blog Team Design Members and check out their blogs.


I have to tell you I am loving the New A Gilded Life Collections from Spellbinders Paper Arts®!  I love to make jewelry and chunky charms and the bezels from this collections are so beautiful.  If you don't make jewelry these bezels would still be great embellishments on your cards, scrapbook layouts or to add on to your DIY home decor projects--so many possibilities!  Here is a necklace that I designed using the GLLB-004G Large Chandelier Bezel - Bronze by:  A Gilded Life.  One of the things I love about these bezels is that they come with a clear plexiglass cover so you can fill the bezels with beads, glitter, charms, found objects, ephemera paper, bling and fabrics just to name a few.  This allows you to create your very own unique and personalized bezel.  


On the outside of the bezel I applied some Patina Rub-N-Buff to give it more of a vintage look.  For the inside of the bezel I die cut a piece of printed burlap using GLD-004 Chandelier Die.  Then I used some liquid adhesive to adhere the burlap inside the bezel.  Next I added some Silver German Glass Glitter, Swarovski AB Flat Back Crystals, Pearls and a Key to the inside of the bezel.  I used more liquid adhesive to add the clear plexiglass cover and then set it aside to dry.


Here is a close up of all the little goodies inside the bezel.  I also added a few more of the Swarovski AB Flat Back Crystals to the outside of the bezel.


I created some bead dangles to hang from the bottom of the bezel.  I used Bead Cap CAP114-BBead Cap CAP052-BBronze Jump Rings from ButterBeeScraps and for the beads I used Pearls, Crystal Teardrop Bead, Round Crystal Bead, Aqua/Brown AB Round Bead.


Once the bezel was done then I added it to Bronze Chain CH206-B from ButterBeeScraps.  

Please be sure to visit all of the Spellbinders Blog Team Design Members in the link list below to see what they have created to share with you.  Just as a reminder not all of the designers are able to participate in the Blog Hop but I would still encourage you to check out their blogs--they are filled with creative inspiration!


Thanks so much for stopping by today!

Hugs & Smiles,
Heidi

Supplies
Tools:  Beadalon® Round Nose Pliers, Flush Cutter; Bead Buddy Loop Tool
Accessories:  ButterBeeScraps Bronze Chain CH206-B, Bead Cap CAP114-B, Bead Cap CAP052-B, Bronze Jump Rings, Key; Silver German Glass Glitter, Swarovski AB Flat Back Crystals, Printed Burlap, Pearls, Crystal Teardrop Bead, Round Crystal Bead, Aqua/Brown AB Round Bead, Head Pins, Patina Rub-N-Buff

Saturday, March 29, 2014

Today - Retirement Card

Hello everyone!  Today, I have a card to share with you that I made for one of my husband's coworkers who recently retired.


I used milk chocolate cardstock for the base of the card and then I added a black mat with distressed edges.  I took a 5x7 piece of the milk chocolate and embossed it with the E3D-017 Oval Accent M-bossabilities Folder.  Then I rubbed Imagine Crafts/Tuskineko Versa Mark Ink around the outer edges and applied Stampendous Aged Ivory Embossing Enamel and heat set it with a heat tool.  I love using this embossing enamel--it has a great texture and gives projects that aged and distressed look.  I found the sentiment on the internet, typed it up and printed it.  Then I used S4-110 Classic Ovals LG to die cut the sentiment.  I used Ranger Distress Ink Antique Linen to ink the outer edges of the die cut.  I also die cut another shape using one of the die templates from the S5-216 A2 Tranquil Moments set.  You can see it peeking out behind the sentiment.  I popped the sentiment up using 3D Foam Squares and then I added some handmade enamel dots using Glossy Accents.  


Here is a close up of the sentiment.


To create the decorative bezel I used an image from The Paper Studio Vintage Bottle Cap Sticker Pack and die cut it using the GLD-005 Iron Cross Dies.  I placed the die cut inside the GLSB-005 Iron Cross Bezel and added a clear acrylic circle sticker to the center.  Then I used some brown jute to attach the bezel to the card.

Thanks so much for stopping by today!

Hugs & Smiles,
Heidi


Paper:  Simply Smooth Ivory, Milk Chocolate, Black
Ink:  Ranger Distress Ink Antique Linen; Imagine Crafts/Tuskineko Versa Mark
Dies/Folders:  Spellbinders Paper Arts® E3D-017 Oval Accent M-bossabilities Folder, GLD-005 Iron Cross Dies, GLSB-005 Iron Cross Bezel, S5-216 A2 Tranquil Moments, S4-110 Classic Ovals LG
Accessories:  The Rubber Cafe`-Stampendous Aged Ivory Embossing Enamel, Brown Jute, The Paper Studio Vintage Bottle Cap Sticker Pack (image in bezel), Handmade Enamel Dots, Scrapbook Adhesives by 3L™ 3D Foam Squares, E-Z Runner® Permanent Strips-Refillable Dispenser, Heat Tool, Glossy Accents

Wednesday, January 29, 2014

Spellbinders - A Gilded Life - Vintage Rosette Birthday Card

Hello blogging friends!  Today, I have a card to share with you using some of the New  A Gilded Life die templates from Spellbinders Paper Arts®.  I am loving the New product line from A Gilded Life!  It's so romantic, vintage and shabby--so be prepared to see a lot of projects--LOL!


Here is the card that I designed using GLLD-006 Belgian Lace and GLLD-002 Imperial Border.  These are two of the long dies--almost 8'' long--but they can be trimmed down too.  For this card 6x6 I trimmed the die cuts a little.  I used the GLLD-006 Belgian Lace die template to create layered die cuts for the background on the card.  I used Simply Smooth Ivory and Oatmeal colored cardstock and then I lightly inked over the die cut with Antique Linen ink to make the embossed detail really pop.  I used the GLLD-002 Imperial Border die template to make the rosette.  I used vintage sheet music and die cut four of the borders.  Then I lightly inked the outer edges with Antique Linen ink. I cut off the rounded ends on the die cuts, glued them into one long strip, did the fan fold and glued into place to create the rosette.


Here is a close up of the rosette.  I added some vintage lace trim to the front and back of the rosette, a few WOC flower and then I edged the rosette with Silver Stickles.


I added some vintage lace trim and WOC Flowers to the corners, a vintage style image, White Seam Binding from The Stamp Simply Ribbon Store and a handmade stick pin.  For the stick pin I used some beads from my stash and a few Bead Caps and Rondelles from ButterBeeScraps.

This card was on display at CHA in the Spellbinders Paper Arts® booth for the new A Gilded Life product line.  At the time when I was designing the card I forgot to take step-shot pictures so I don't have any photos for creating the rosette.  But if you would like to see a tutorial on it leave a comment and let me know.  If I have some requests for it then I will do a tutorial.  ;-)

Thanks so much for stopping by today!
I hope you are having a wonderful week!

Hugs & Smiles,
Heidi

Supplies
Paper:  Simply Smooth Ivory, Oatmeal, Pink Lemonade, Vintage Sheet Music, Vintage Style Image
Ink:  Ranger-Antique Linen Distress Ink
Dies:  Spellbinders Paper Arts® Grand Calibur® Machine, A Gilded Life--GLLD-006 Belgian Lace, GLLD-002 Imperial Border
Accessories:  The Stamp Simply Ribbon Store-White Seam Binding; WOC Flowers; Vintage Lace Trim; Ranger-Diamond Stickles, Silver Stickles; Handmade Stick Pin-ButterBeeScraps-Bead Caps, RondellesScrapbook Adhesives by 3L® E-Z Runner® Permanent Strips-Refillable Dispenser 49' 

Wednesday, January 15, 2014

Albert Lea Magazine Winners!! Spellbinders - A Gilded Life Relics Vintage Button Bracelet

Hello blogging friends!  Have you been checking out all of the pictures online from CHA?  What about all of the new products--do you have a favorite or something that is at the top of your wish list?  I know I saw a few things I can't wait to get me hands on.  It's always a fun time of the year when all of the new products are released.  Besides the companies I am currently working with these are some of my favorites--
Graphic 45, May Arts printed ribbon, Prima, Spectrum Noir Blendable Pencils and many more LOL!

I have a project to share with you today but before I get to that I have to announce the Winners of the 
Albert Lea Magazine.  


My printer isn't working at the moment so I used Random.org and I picked 5 Winners.

True Random Number Generator

 Result:
17
Powered by RANDOM.ORG
Margie H said...


WOW! Look at that spread - what a great article full of inspiration!! SO PROUD OF YOU, sweet & TALENTED friend xo

 Result:
34
Powered by RANDOM.ORG


Jean Bullock said...
Very cool! You look great too.

 Result:
12
Powered by RANDOM.ORG
Conniecrafter said...


Very cool, Congrats!!

 Result:
47
Powered by RANDOM.ORG


Sandie Luck said...
How exciting for you, Heidi!! I look forward to reading the article when you provide the link online to learn more about the depth of your creativity. Best wishes on your continued journey in the new year ahead.....~Sandie (Minnesota)

 Result:
25
Powered by RANDOM.ORG


Congratulations to all of the Winners!!!  
If you could please send me an email at Floralfantasy@charter(dot)net with your contact information I will get the magazine in the mail and sent off to you.  

Thank you so much for all of your wonderful comments and emails about the article in the Albert Lea Magazine!  I feel truly blessed!!  I received several emails from people wondering if I would share more pictures from my studio space and yes I would be happy to do that--so look for that in an upcoming blog post.  If you would like to read the article you can click HERE for the online issue.

Ok, now for my project.  


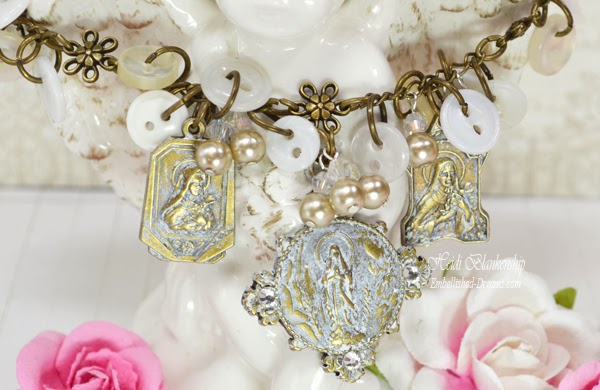
I created a bracelet using the NEW--A Gilded Life GLR-001 Relics A from Spellbinders.  I used some floral link chain for the base of the bracelet and then I added white and cream vintage buttons with jump rings from ButterBeeScraps, champagne colored pearls, and AB glass crystals.


I used mixed metals of bronze and silver with the jump rings and head pins.  I love the look of the mixed metals.  The Antique Bronze Toggle Clasp is from ButterBeeScraps.


Here you can see the before and after on the relics.  To give the relic pieces more of an aged look I added Antique White Rub'n Buff to each piece.  I think the Rub'n Buff brings out more of the details in the pieces.  I also added some SS12 Clear Flat Back Crystals from ButterBeeScraps to the larger piece.  


A couple of close ups.


I am so happy with how the bracelet turned out and I just love the vintage look and feel!

Have you had a chance to check out the beautiful New A Gilded Life products from Spellbinders?  I think this whole new product line is fabulous!!  Totally my style! 

Thanks so much for stopping by today!

Hugs & Smiles,
Heidi

Supplies
Other Supplies
Tools:  Flush Cutters, Round Nose Pliers, Loop Tool
Floral Link Chain, Champagne Colored Pearls, AB Glass Crystals, Vintage Buttons 


LinkWithin

Related Posts Plugin for WordPress, Blogger...