Showing posts with label Modeling/Texture Paste. Show all posts

Friday, December 12, 2014

The Stamp Simply Ribbon Store - Have a Merry Christmas Watercolor and Texture Paste Card

Hello everyone!  Today, is my day to post for The Stamp Simply Ribbon Store and I have another Christmas card to share with you.  Last week I did a Christmas card with detailed watercolor, you can click HERE if you missed it.  This week I did another watercolor but this is a very quick and easy watercolor wash.


Here is the card that I designed.  To start I used a piece of Ranger Watercolor Paper and stamped a sentiment from the  JustRite Papercraft CR-02133 Extra Grand Holiday Sentiments Clear Stamps.  I used VersaMark Ink and Stampendous Super Fine Embossing Powder - Detail White and a heat tool to heat set the sentiment.  Then to do the watercolor wash I used a larger flat brush to wet the entire sheet of paper.  I used an acrylic block and added ink from the Tim Holtz Distress Inks pads on to the acrylic block.  If you don't have a larger acrylic block you can use a craft mat or a sheet of wax paper or freezer wrap paper will work too.  Take the paint brush and add water to the inks to create the watercolor.  Go back and forth over the paper with long wide strokes adding in the color until you get the look you like.  You don't have to cover the entire piece of paper, actually leaving a little white space with this technique looks the best.  
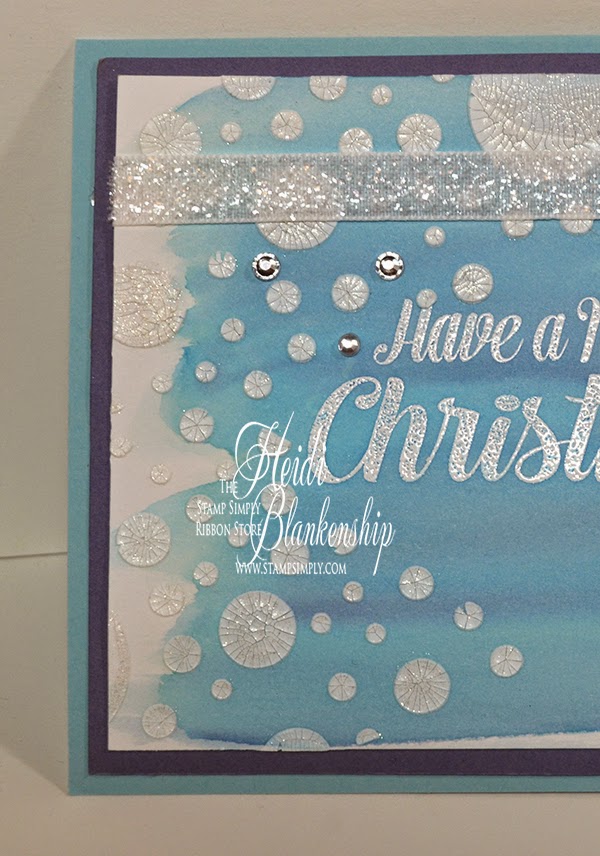

Once the watercolor was dry then I used a Prima Elementals Stencil 6.5 x 10.25 - Bubbles and some Studio 490 Embossing Paste - Crackled Texture to create the crackles circles.  This kind of reminds me of snow crystals with the crackles.  Once the texture paste was dry then I went over each circle with the Wink of Stella Clear Glitter Brush Pen to add a little bit of sparkle.  It's hard to pick up the shimmer with the camera but I think you can see it on a few of the circles in this picture.  


To embellish the card I used some May Arts 3/8" Metallic Velvet across the top of the card and then I cut two of the May Arts Satin Jumbo Silver Snowflakes and layered them using  3D Foam Squares.  To finish off the card I used a few KaiserCraft Silver Rhinestones.

Please be sure to check out The Stamp Simply Ribbon Store for all of the fantastic paper crafting products and the Blog for inspiration from the Design Team.

Thanks so much for stopping by today! 

Hugs & Smiles,
Heidi


Supplies
Stamps:  JustRite Papercraft CR-02133 Extra Grand Holiday Sentiments Clear Stamps
Paper:  Ranger Watercolor Paper; Cardstock Lavender, Light Blue
Ink:  VersaMark Ink; Tim Holtz Distress Inks-Salty Ocean, Broken China, Chipped Sapphire; Wink of Stella Clear Glitter Brush Pen
Ribbon:  May Arts 3/8" Metallic VelvetMay Arts Satin Jumbo Silver Snowflakes
Accessories:  Stampendous Super Fine Embossing Powder - Detail White, Studio 490 Embossing Paste - Crackled Texture, Prima Elementals Stencil 6.5 x 10.25 - Bubbles, KaiserCraft Silver Rhinestones, Scrapbook Adhesives by 3L 3D Foam Squares, E-Z Runner Permanent Strips-Refillable Dispenseer 49', Heat Tool

Monday, November 3, 2014

8 x 8 Mixed Media Canvas with Hometown Craft Papers by Ken Oliver

Hello everyone!  I hope you all had a Happy Halloween and a wonderful weekend.  Our youngest son (12 yrs old) was really on the fence about going trick-or-treating this year.  He decided he wasn't going to go and then at the last minute (which I figured would happen) he changed his mind LOL.  So he threw a costume together really quick with some part from other costumes we have used in the past.  


Here is a picture collage I shared on FB over the weekend.  I think through the years this chopped off arm has been a favorite with my husband and the boys--they have all used it at one point in time.  My husband made this a few years ago after going to a Halloween party and seeing one the a friend had made.  It is fun but kinda creepy and freaks people out when you move your fingers but it's all in good fun LOL!

This weekend I also had a little bit of fun creative time just for me--I have to remind myself to just play and have fun sometimes just for the sake of doing it.  Love getting my fingers all inky!


If you follow me on Facebook then you saw the little sneak peek of this canvas that I shared yesterday.  This is a 8 x 8 canvas and I had SO much fun creating it!!  


Here is a quick look at the original sheet of paper.


To start I sprayed the sides and edges of the canvas with  Distress Spray Stain-Vintage Photo, Peacock Feathers, and Picket Fence until I achieved a look I liked.  Then I added the main image from the paper.  I cut the lower left portion of the paper to a 7.5 x 7.5 square.  I inked the edges with Tim Holtz Distress Ink Walnut Stain and then I used Plaid® Mod Podge® Matte to adhere that paper to the canvas and I added a layer of Plaid® Mod Podge® Matte on top of the paper.  


Then I used a stencil with some Liquitex® Light Modeling Paste to add some interest and texture to the canvas.  After the modeling paste was dry I went over it with Mod Podge.  Next I went over the textures areas with Folk Art Vintage White Acrylic Paint just rubbing it on with my fingers.  


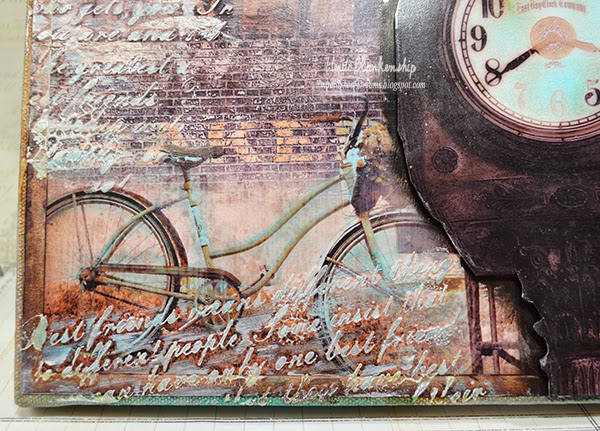
Next I added some color to the script texture and the bike using  Faber-Castell PITT Big Brush Pens-Light Cobalt Blue Turquoise.  For the bike I colored directly on the image (in small sections) and rubbed with my fingers to blend the ink before it dried.  On the script texture I added some of the color to my finger and then gently rubber over the top of the text.  I wanted to add a little shimmer too so I used some of the Brushed Pewter Distress Spray Stain and rubbed that on top of the text too.


Here you can see a close up of some of the shimmer.


I fussy cut the image of the clock and added a little color using Tim Holtz Distress Inks-Peacock FeathersWalnut Stain.  Then I laid the clock on top of the canvas and traced around it with a sharpie marker.  I went around the outline for the clock using Faber-Castell PITT Big Brush Pen in Black and blended the color with my fingers before the ink was dry.


I added some dimension to the clock by adding 3D Foam Squares and then since this is a home decor piece I added some hot glue to the foam just to make sure it wouldn't pop off of the canvas.


I love working with the Hometown Craft Papers by Ken Oliver.  They are great for mixed media because inks blend really well and they hold up to the sprays, mod podge and texture paste!

Thanks so much for stopping by today!

Hugs & Smiles,
Heidi


Paper:  Hometown Craft Papers by Ken Oliver
Inks/Sprays/Markers:  Tim Holtz Distress Inks-Peacock Feathers, Walnut Stain, Distress Spray Stain-Vintage Photo, Peacock Feathers, Picket Fence, Brushed Pewter; Faber-Castell PITT Big Brush Pens-Light Cobalt Blue Turquoise, Black
Accessories:  Folk Art Vintage White Acrylic Paint, Plaid® Mod Podge® Matte, Krylon® Clear Satin Spray, Liquitex® Light Modeling Paste, Friendship Stencil, 8 x 8 Canvas, Heat Tool, Scrapbook Adhesives by 3L™ 3D Foam Squares, Hot Glue

LinkWithin

Related Posts Plugin for WordPress, Blogger...