Thursday, December 31, 2015

Seasons Givings Blog Hop Year 4


Hello everyone and Happy New Year!

Welcome to the Seasons Giving Blog Hop 
Year 4!

I want to say a HUGE Thank You to all of my loyal blog readers/followers!  Thank you so much for your support, friendship, and wonderful comments throughout the year!!  I truly appreciate all of you! 

This Blog Hop is for YOU!

Every single blog listed is hosting a Giveaway!  All you have to do is leave a comment--it's that easy.  :)

The entire link list for the blogs is listed below.

This year I have a bunch of Tonic Studios goodies for my giveaway and I also have a handmade piece of jewelry that I designed.


These are the Tonic Studio goodies you will receive:

Assortment of Nuvo Pure Sheen Glitter - 6 Bottles
Assortment of Nuvo Crystal Drops - 6 Bottles
Nuvo Glue Pen
Craft Tacky Glue with Extra Fine Precision Tip
Funky Glue Stick - Goes on Purple Dries Clear
It's Your Big Day Indulgence Chalkboard Die & Stamp Set 1099E
Tim Holtz Mini Rotary Cutter
Tim Holtz Mini Rotary Perforator


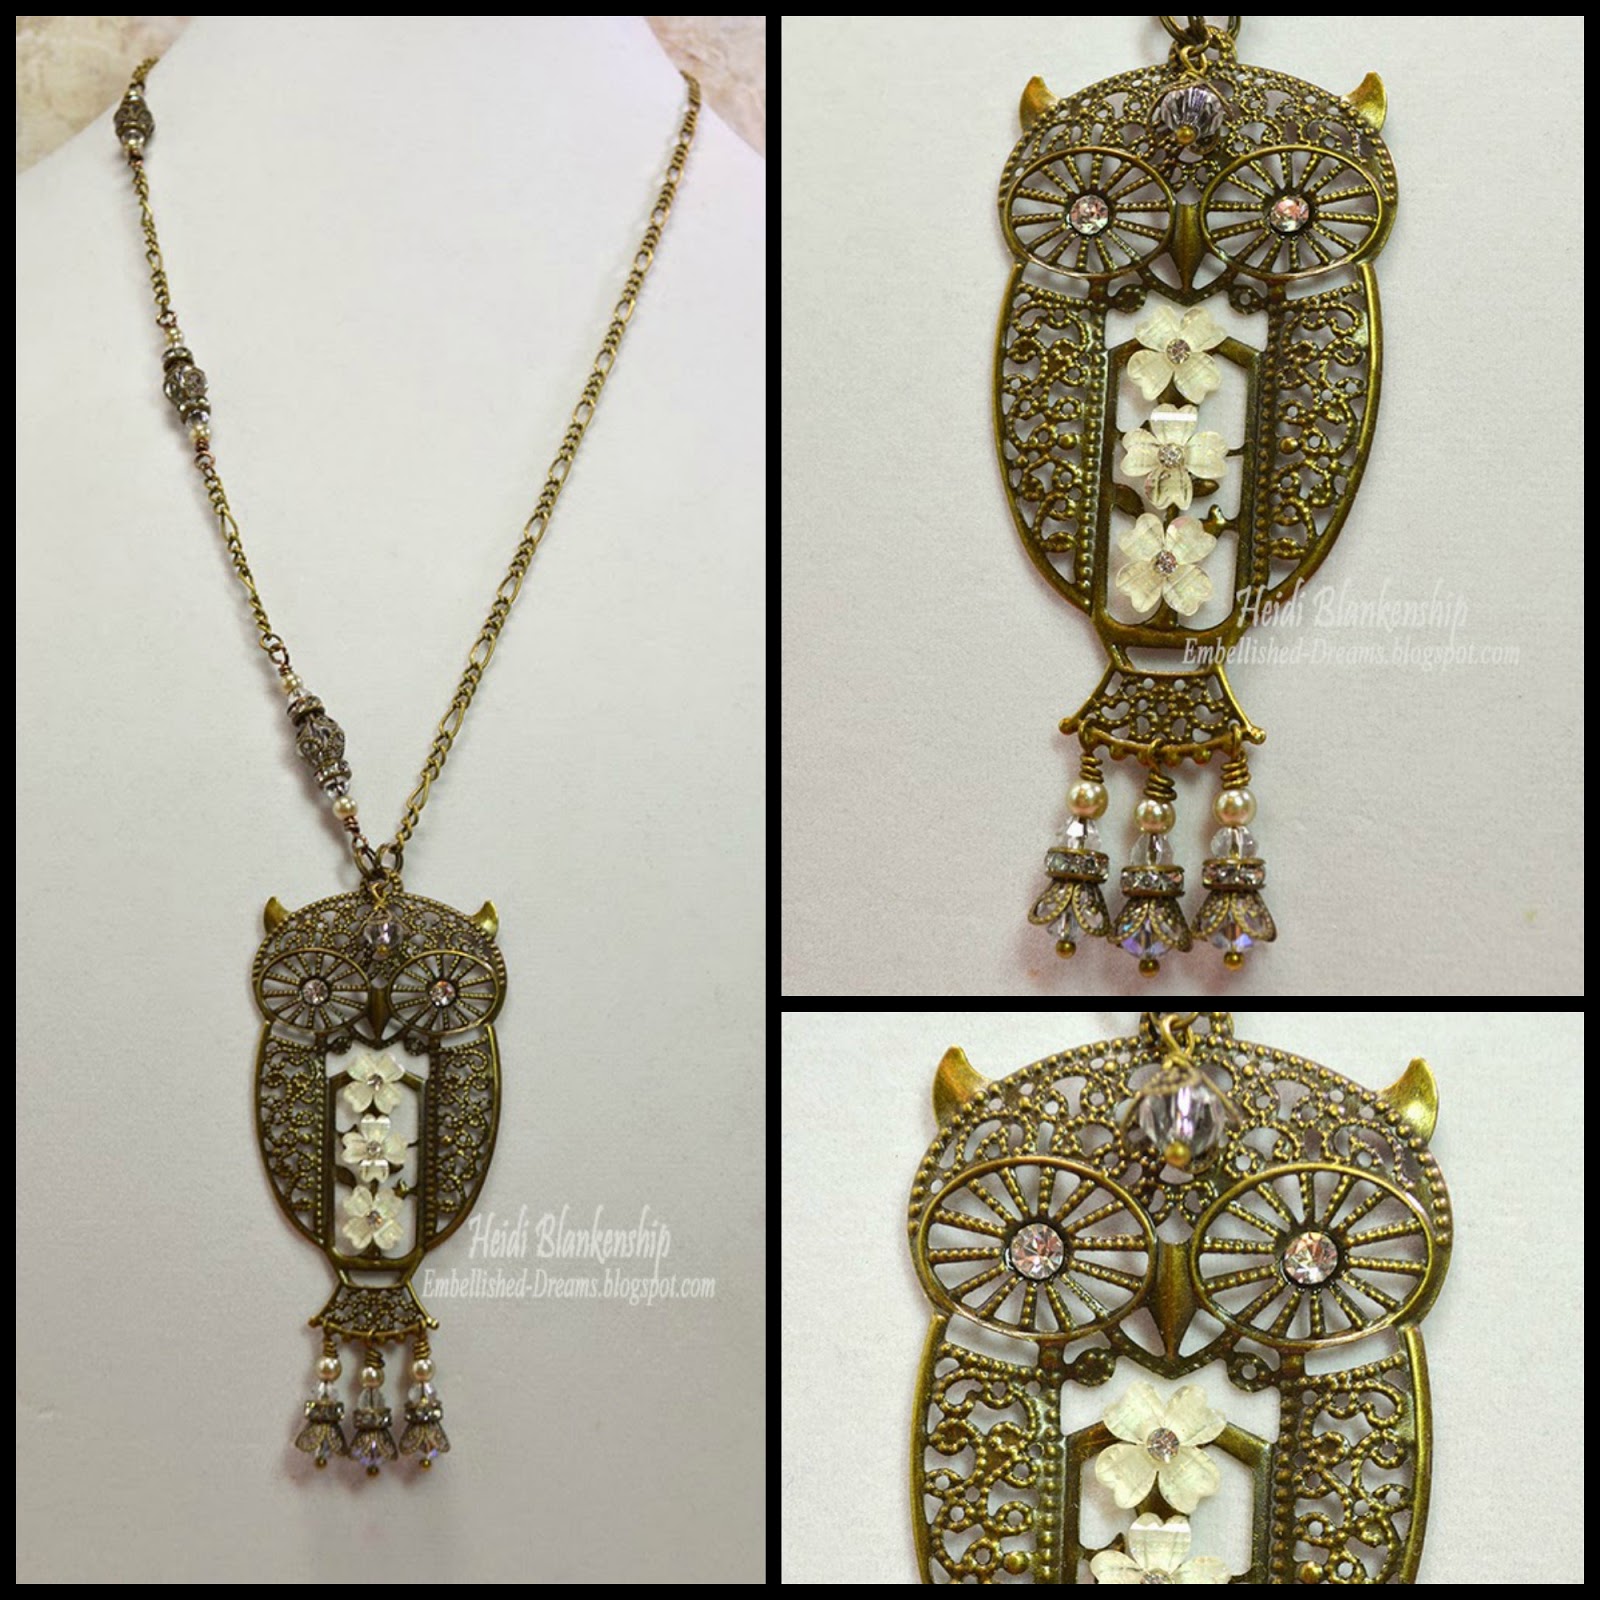
Here is the Athena Owl Necklace.  
This is a beautiful bronze filigree owl with clear flat back crystals for the eyes, tiny white resin flowers down the center and champagne pearls with crystal bead dangles.  

The giveaway will be open until January 5th at midnight (CST).  I will use Random.org to pick the winner and I will post the winner on January 6th.  Please make sure I will have a way to contact you--a link back to a blog, email, Google+, Facebook--just some way to contact you if you win.  The winner will have 48 hrs to reply or another winner will be chosen.

Although it is not required for the giveaway I would love it if you would like to subscribe to my blog (there are a few options in the sidebar), or follow me on 

Have fun on the Blog Hop!!  Remember each blog is hosting a giveaway so be sure to visit them all!!

Happy New Years!!!


Sunday, December 27, 2015

The Stamp Simply Ribbon Store - Kaisercraft Provincial -Thinking of You Card

Hello blogging friends!  Today, is my day to post for The Stamp Simply Ribbon Store.  I have a CAS (Clean And Simple) card to share with you using some of the new papers from the KaiserCraft - Provincial collection.  KaiserCraft always has such beautiful paper collection and this one is also sure to please.  I love the gorgeous images and the lovely colors.  Plus as an added bonus KaiserCraft always has a few pages in the paper pad with coordinating die cuts which are wonderful for CAS cards--it makes creating so quick and easy!


Here is the card I designed.  Check out that gorgeous paper!  Love the floral images and the mix of soft and deep colors.  This paper also has a bit of texture--the images of the hydrangeas has a gloss finish and the paper I used for the label shape is embossed.  I layered the pattern paper to a piece of pink cardstock and then layered that on to a charcoal gray card base.  The base of the card is an A2 top folding card.


Here is a close up of the die cut from the paper pad and the die cut label shape.  The die cut from the paper pad is a perfect match to the sheet of paper.  I used Spelbinders - Labels Thirty-Nine to create the die cut label shape.  Then I added Therm-O-Web Foam Squares in between the layered to add some dimension.  I also added a bow using Baby Pink and Dark Slate  Seam Binding.  Both of those colors are a perfect match with the paper.  To finish off the card I added a couple of Petaloo Botanical Collection Pink Minis flowers.


Thank you so much for stopping by!  I hope you all had a wonderful and very blessed Christmas!!

Please be sure to check out The Stamp Simply Ribbon Store for all of the fantastic paper crafting products and the Blog for inspiration from the Design Team.

I hope you have a wonderful weekend!

Hugs & Smiles,
Heidi


Supplies
Paper:  KaiserCraft - Provincial, Cardstock - Charcoal Gray, Pink
Dies:  Spelbinders - Labels Thirty-Nine
Ribbon:  Seam Binding - Baby Pink, Dark Slate
Accessories:  Petaloo Botanical Collection Pink Minis, Scor-Tape, Therm-O-Web Foam Squares

Friday, December 25, 2015

Merry Christmas!!

From our house to yours we wish you a very 
Merry Christmas!!!


Love, Peace, Joy, and Many Blessing to you all!!!

Hugs & Smiles,
Heidi

Friday, December 18, 2015

The Stamp Simply Ribbon Store - Penny Black Snow Dust and Warm Wishes Card

Hello blogging friends!  Today, is my day to post for The Stamp Simply Ribbon Store.  I have a beautiful winter card that is packed full of lots of sparkle.  


This card could also be used for a Christmas card, birthday or thinking of you simply by changing out the sentiment.  For the focal image I used a stamp from Penny Black - Snow Dust.  This is such a simple but yet beautiful image.  I used VersaMark ink to stamp the image and then heat embossed using Ranger Super Fine Detailed Gold Embossing Powder on to white cardstock.  Then I stamped and embossed the sentiment.  For the sentiment I used JustRite Papercraft - Extra Grand Holiday Sentiments.  Then I added a thin strip of the Bazzill - Gold Mirror Cardstock to the bottom of the card.  I used a Sakura Quickie Glue Pen to add the Stampendous Crystal Glitter in and around the trees.  I have a couple of close up pictures to show how sparkly the trees really are.  Beautiful like glistening snow.


In this picture you can see some of the sparkle from the glitter.


Here is another picture where you can see even more of the sparkle from the glitter.


To finish off the card I added some May Arts Metallic String Ribbon - White to the bottom of the card and tied it in a simple knot.  I also added a few My Mind's Eye - Record It! Charmed Enamel Dots.  To add some dimension to the card I used Therm-O-Web Foam Squares on the top layer and then added that to a white cardstock base.

Thank you so much for stopping by!  I hope you are enjoying this Christmas holiday season!  I can't believe Christmas is next week!! I still have so much to do LOL! :)

Please be sure to check out The Stamp Simply Ribbon Store for all of the fantastic paper crafting products and the Blog for inspiration from the Design Team.

I hope you have a wonderful weekend!

Hugs & Smiles,
Heidi


Supplies
Stamps:  Penny Black - Snow Dust, JustRite Papercraft - Extra Grand Holiday Sentiments
Paper:  Bazzill - Gold Mirror Cardstock, Cardstock - White
Ink:  VersaMark
Ribbons:  May Arts Metallic String Ribbon - White
Accessories:  My Mind's Eye - Record It! Charmed Enamel Dots, Ranger Super Fine Detailed Gold Embossing Powder, Stampendous Crystal Glitter, Therm-O-Web Foam Squares, Scor-TapeSakura Quickie Glue Pen

Saturday, December 12, 2015

Exciting News To Share!! Tonic Studios USA Blog Ambassador and Christmas Star Shaker Tag

Hello blogging friends!  Today, I have some exciting news that I can finally share!  If you follow me on Facebook then you already know but I also wanted to share the news here on my blog.  I am so very excited to share that I am a Tonic Studios USA Blog Ambassador!!  I am so honored to be able to design for Tonic Studios!  They are a fantastic company and have so many beautiful products including--dies, punches, tools and cutters (the Tim Holtz tools!), glitters, paints and so much more!!

You can click HERE to check out the official announcement.  :)


I also have a project to share with you using some of the fabulous Tonic Studio dies.  I designed a star shaker tag using the 643E Star Bauble Die Set .  You might have seen this posted on the Tonic Gold Blog but I also wanted to share it here.  I know this tag might look like a lot of work but honestly the dies do most of the work for you lol.  It just a matter of making the die cuts and then layering the pieces together.

1.  Die cut the large fancy star with the center inset star die from gold foil paper.
2.  Die cut the straight edge star with acetate.
3.  Die cut the star ornament piece twice–once from gold foil paper and once from white craft foam.        Then fussy cut and make a couple of snips to remove the center stars from the ornament pieces             leaving just the frame of the largest star.
4.  To assemble use Craft-Tacky Glue–start by gluing the acetate to the back of the gold ornament             piece.  Then adhere the white craft foam ornament piece.  Set aside and let glue dry.
5.  Add sequins.  Use the star die cut that was the drop out piece from the fancy star (gold foil star),          flip to the backside (white) and adhere to the back of the shaker.  Set aside and let glue dry before      shaking the sequins.
6.  To finish adhere fancy star die cut to the front.
7.  Add red seam binding and gold metallic string to attach to gift bag.  This could also be used as a          Christmas ornament!


Here is a look at the shaker tag on the gift bag.  It really dresses up a simple kraft paper gift bag!  I also added some Lipstick Red Seam Binding and May Arts - Metallic Gold String.  I used the 419E Craft Tacky Glue 120ml to adhere all of the pieces together.  I have to tell you on the bottle of glue it says--extra fine precision tip--it really truly is!  There is a tiny pin hole in the tip and it is prefect for adding glue to very detailed die cuts.  Also, I have been using this glue for a while now and I haven't had any problems with the tip getting clogged up so that is another plus!  I used a mix of sequins from Cartwright Sequins to fill the star shaker.  One key thing to making shaker tags or cards -- don't overfill with sequins.  If you add too many sequins they won't be able to move around and when you go to shake the tag or card you won't have any movement.  Sometimes less is more.  :)


Thanks so much for stopping by today!  I hope you have a fantastic weekend!

Hugs & Smiles,
Heidi

Supplies:
Paper:  DCWV - Gold Foil Paper
Accessories: Tonic Studios - 419E Craft Tacky Glue 120ml, Craft Foam, Acetate, Cartwright Sequins, Kraft Gift Bag


Friday, December 11, 2015

The Stamp Simply Ribbon Store - Simple Stories Claus & Co - Happy Holidays Card

Hello blogging friends!  Today, is my day to post for The Stamp Simply Ribbon Store.  I have another Christmas card to share with you and I will say I am not sure if this falls under the CAS (Clean And Simple) category for cards but it did come together pretty quickly.


I used the Simple Stories - Claus & Co. 6 x 6 paper pad for this card.  This paper pad is for sure another favorite!  It is fantastic for quick card making and it is filled with so many great images for fussy cutting.  It also has several block style cut outs.  I used a deep red cardstock for the base and the die cut.  The base of the card is an A2 side folding card.


I layered a couple of pieces of pattern paper--the holly and jingle bells sheet music.  Then I added one of the block cut out and popped it up with some Therm-O-Web Foam Squares.  To create the die cut I used Spellbinders - Happy Holidays die.  Then I fussy cut the Santa and added Therm-O-Web Foam Squares for some dimension.


Here is a close up of the Santa.  I added some Kaisercraft Rhinestones - Lippy Red on the hat to look like berries.  Love this image of Santa!


Here is a close up of the sentiment.  I made a bow using some of the ribbon from the May Arts 5/8" Burlap Center Stitch - Christmas Sampler and then I added a flower from the Petaloo Botanica Minis - Red.  I also added a few more Kaisercraft Rhinestones - Lippy Red for berries down by the number 25 on the jingle bells sheet music paper.


Thank you so much for stopping by!  I hope you are enjoying this Christmas holiday season!

Please be sure to check out The Stamp Simply Ribbon Store for all of the fantastic paper crafting products and the Blog for inspiration from the Design Team.

I hope you have a wonderful weekend!

Hugs & Smiles,
Heidi


Supplies
Paper:  Simple Stories - Claus & Co., Cardstock - Red
Dies:  Spellbinders - Happy Holidays die
Ribbon:  May Arts 5/8" Burlap Center Stitch - Christmas Sampler
Accessories:  Petaloo Botanica Minis - Red, Kaisercraft Rhinestones - Lippy Red, Therm-O-Web Foam Squares, Scor-Tape

Sunday, December 6, 2015

Tonic Studios Chalkboard Die & Stamp Sets - Card Share

Hello blogging friends!  Today, I have two cards to share with you using a couple of the New Chalkboard Die and Stamp Sets from Tonic Studios.  There are three sets in this collection -- Birthday Wishes, It’s Your Big Day, and Special Occasion.  These sets are prefect for card making and all of your DIY projects.


Here is a look at the first card I designed.  I used the 1099E It's Your Big Day Indulgence Chalkboard Die & Stamp Set and 485E Mixed Oval Layering from Tonic Studios.  The card base in an A2 top folding card.  I die cut the sentiment and decorative oval using white pearl shimmer paper and then I die cut the label and oval shape using black cardstock.  


I rubbed a little White Pigment Ink on to the black label and then buffed off the excess ink with a paper towel.  Doing this gives the black paper a chalkboard look.  I used the Nuvo 203N Nuvo Glue Pen Medium to adhere the sentiment to the label shape.  Then I used a couple of pieces of craft foam as backing for the label and decorative oval shape.  I used the Nuvo 650N Crystal Drops Gloss - Ebony Black to embellish around the edges of the card.  The crystal drops look similar to pearls or enamel dots.


To finish off the card I added a few Wild Orchid Craft Flowers.


It's Your Big Day Card
Tonic Studios:
1099E It's Your Big Day Indulgence Chalkboard Die & Stamp Set485E Mixed Oval LayeringNuvo 650N Crystal Drops Gloss - Ebony Black, Nuvo 203N Nuvo Glue Pen Medium422E Funky Tape Runner
Other Supplies:
Paper:  Cardstock - White, White Pearl Shimmer, Black
Ink:  White Pigment Ink
Accessories:  Craft Foam, Wild Orchid Craft Flowers


Here is a look at the second card I designed.  For this card I used 1098E Special Occasion Indulgence Chalkboard Die & Stamp Set and 484E Mixed Rectangles Layering Die Set.  To start I stamped the sentiments twice on to white paper with VersaMark Ink and then heat embossed with Ranger Super Fine Detail Gold Embossing Powder.  


I fussy cut one set of the sentiments--the top and bottom pieces of the sentiment.  Then I layered the pieces using Foam Squares.  To add a bit of color I used Zig Clean Color Real Brush Pens to do a light watercolor wash and color the tiny images--heart, flower and butterfly.  I layered the label shape on to the decorative vine label.  I also used the Zig Clean Color Real Brush Pens on the tiny vines.  To embellish the card I added pink and aqua rhinestones.


I used the 484E Mixed Rectangles Layering Die Set to die cut a couple of layers of white, and aqua cardstock and then layered everything on to an A2 top folding card.

This week Create & Craft USA will be featuring Tonic Studios Chalkboard Die & Stamp Sets so be sure to check it out!

Thanks so much for stopping by today!

Hugs & Smiles,
Heidi


Special Occasion Card
Tonic Studios:
1098E Special Occasion Indulgence Chalkboard Die & Stamp Set, 484E Mixed Rectangles Layering Die Set, 422E Funky Tape Runner
Other Supplies:
Paper:  Cardstock - White, Green, Aqua, Pink
Ink/Markers:  VersaMark Ink, Zig Clean Color Real Brush Pens - Light Pink, Cobalt Blue, Persian Blue, Pale Green, Light Green
Accessories:  Ranger Super Fine Detail Gold Embossing Powder, Pink and Aqua Rhinestones, Craft Foam, Foam Squares, Watercolor Brush, Heat Tool


Friday, December 4, 2015

The Stamp Simply Ribbon Store - Love, Peace & Joy Christmas Card

Hello blogging friends!  Today, is my day to post for The Stamp Simply Ribbon Store.  Christmas is just a few short weeks away and I know a lot of us are still busy creating projects for Christmas--cards, presents big and small and maybe some Christmas ornaments too.  So today, I have another quick and easy Christmas card to share with you.


Here is a card I designed using the some of the beautiful papers and die cuts from the Kaisercraft Silver Bells 6-1/2'' Paper Pad.  I think this is my favorite paper pad this year.  I just love all the papers and gorgeous images and it even has some touches of silver foil--gotta love that!  With the cut outs and die cut pieces projects come together so easily.


The card base is a A2 top folding white card.  I layered it with a piece of the pattern paper that is a light blueish aqua color and it has silver foil snowflakes.  Then I added one of the beautiful cut out images of Santa and the reindeer.  Along the bottom I used one of the die cut borders and it has a white lace pattern on it.  Next, I added a thin strip of the Bazzill Silver Mirror Cardstock, I though that would go nicely with the silver foil snowflakes.  I added one of the die cuts with a sentiment and used Therm-O-Web Foam Squares to pop it up a little and add some dimension.  For some embellishments I added a simple bow using May Arts Silver Metallic String and then I added some Prima Serenade Turquoise Flowers.


I wanted to add even more sparkle to the card so I went over all of the background paper, the border and the sky in the image of Santa with the Zig Wink of Stella Clear Glitter Brush Pen.  You can see some of the sparkle in the sky.  I just love how this card turned out and IRL it is very sparkly.


Thank you so much for stopping by!  I hope you are enjoying this Christmas holiday season--just remember--try not to get too stressed during the holiday and really enjoy it! :)

Please be sure to check out The Stamp Simply Ribbon Store for all of the fantastic paper crafting products and the Blog for inspiration from the Design Team.

I hope you have a wonderful weekend!

Hugs & Smiles,
Heidi


Supplies
Paper:  Kaisercraft Silver Bells 6-1/2'' Paper Pad, Bazzill Silver Mirror Cardstock, Cardstock - White
Ribbon:  May Arts Silver Metallic String
Accessories:  Prima Serenade Turquoise Flowers, Zig Wink of Stella Clear Glitter Brush Pen, Therm-O-Web Foam Squares, Scor-Tape

Monday, November 30, 2015

ButterBeeScraps - Jewelry Share - Quick and Easy Earrings - ICE Resin - ArtCult Digital Images

Hello everyone!  Today, I have a couple of jewelry pieces to share with you--a necklace and a pair of earrings. If you are looking for any jewelry projects for Christmas gifts the earring I am sharing today are very quick and easy to make.


Here is the necklace that I designed.  I love this sweet image of the girl with the butterfly.  I used a digital image from ArtCult on Etsy.  I absolutely love the images from this shop!  There are so many to choose from and they come in a variety of sizes.  The best part--there is an instant download and what you see is what you get.  I am not affiliated with her shop but I do highly recommend it. :)  I added the image to a Hobnail Long Rectangle Bezel and then filled it with ICE Resin.  Then I used different little bits and pieces form ButterBeeScraps to embellish the bezel and create the beaded dangle.  I used one of the Bronze Metal Filigree Embellishments (#550-B) on the bezel and then I added some copper micro beads and Light Colorado Topaz Flat Backs SS12.  I thought the copper and topaz would bring out the colors in the butterfly.  To create the beaded dangle I used a Bronze Ball End HeadpinBronze Filigree Bead Caps (#CAP052-B)Clear Rhinestone and Bronze Rondelle Spacer Beads – 6mm (#BD006-B/CL), and a couple of beads from my own stash.


Here is another photo of the necklace.


These are the earrings I designed.  Like I said if you are looking for some quick and easy Christmas presents these earrings would be perfect.  I used the pretty Silver Shepard Hook Earring Wires w/ Rhinestones (#J594-S).  For the wings I used the Stainless Steel Wings Metal Filigree Embellishments (#686-ST) and added Clear AB Flat Backs SS20, SS16SS12.  Easy peasy--done in 5 minutes or less!

Thanks so much for stopping by!

Please be sure to visit ButterBeeScraps!  Monique, adds new filigrees, jewelry findings and embellishments to the store every month.


Butterfly Beauty Bezel Necklace
Bronze Metal Filigree Embellishments (#550-B)
Light Colorado Topaz Flat Backs SS12
Bronze Filigree Bead Caps (#CAP052-B)
Clear Rhinestone and Bronze Rondelle Spacer Beads – 6mm (#BD006-B/CL)
Bronze Ball End Headpin
Other:  Digital Image from ArtCult on EtsyHobnail Long Rectangle Bezel, ICE Resin, Image, Copper Micro Beads

Silver Sparkle Wing Earrings
Stainless Steel Wings Metal Filigree Embellishments (#686-ST)
Silver Shepard Hook Earring Wires w/ Rhinestones (#J594-S)
Clear AB Flat Backs SS20, SS16, SS12

Friday, November 27, 2015

The Stamp Simply Ribbon Store - Graphic 45 Mon Amour - Thinking Of You Card

Hello blogging friends!  Today, is my day to post for The Stamp Simply Ribbon Store.  I have another CAS (Clean And Simple) card to share with you using some of the gorgeous papers from the Graphic 45 - Mon Amour 8 x 8 Paper Pad and 6 x 6 Paper Pad.


These two paper pads are so beautiful and could be used for a variety of occasions such as --everyday and think of you, love, anniversary and weddings and after the first of the year Valentine's Day.  The paper pad is filled with beautiful images and patterns and also several cut out pieces that are great for CAS cards.  The base fo my card is a A2 top folding and I used some of the dark gray floral print to add a mat.  Then I layered a piece of the pretty rose floral paper on top.  The main image is one of the cut out and so is the sentiment.  I layered both pieces with the same dark gray floral paper.  I added a few Therm-O-Web Foam Squares to add some dimension.  To finish off the card I added a couple of embellishments -- Petaloo Botanica Mums & Butterflies Pink and Melissa Frances White Pearls.


Here is a close up of the main image, sentiment and butterfly.


I love this butterfly and how perfectly it matches the paper.  Can you see the pink little butterflies on the paper?


Thank you so much for stopping by!  I hope you all had a Happy and Blessed Thanksgiving!  If you are going our Black Friday shopping be safe! :) 

Please be sure to check out The Stamp Simply Ribbon Store for all of the fantastic paper crafting products and the Blog for inspiration from the Design Team.

I hope you have a wonderful weekend!

Hugs & Smiles,
Heidi


Supplies
Paper:  Graphic 45 - Mon Amour 8 x 8 Paper Pad and 6 x 6 Paper Pad, Cardstock - Ivory
Accessories:  Petaloo Botanica Mums & Butterflies Pink, Melissa Frances White Pearls, Scor-tape, Therm-O-Web Foam Squares

LinkWithin

Related Posts Plugin for WordPress, Blogger...