Showing posts with label Challenges. Show all posts

Monday, September 19, 2011

Crafty Secrets DT Challenge "Retro Inspiration"

Good morning blogging friends! Today, is the Crafty Secrets Design Team Challenge. Each month our DT Coordinator, Vicki Chrisman picks a theme for us to work with and this month the theme is Retro Inspiration. Here is the card that I designed for the challenge. The fun image of the lady is from the Girlfriends Creative Scraps. The floral background paper was printed from the Creating With Vintage Patterns CD. I simply hand cut the image around the black frame and added an die cut to the side as an accent piece. I used S5-071 Twisted Metal Tags and Accents from Spellbinders™. Here is a close up of the designer paper. The Creating With Vintage Patterns CD has over 70 Color Pattern Papers. In the lower right corner I made a flower with leaves to match the designer paper using Frosted Pink Prismatic, Herbal Garden Medium Prismatic, S5-067 Anemone Flower Topper and S4-327 Floral Flourishes. For the flower center I stamped one of the images from Lacey Patterns Stamp Set on to Ivory paper and then placed a 1/2 Clear Epoxy Circles on top of the image and hand cut. I added the flower center, curled the petals and then added Pralines & Cream Fairy Dust Glitter.For a finishing touch I added a few Baby LeCreme Pearls from Want2Scrap™ to the card.

Please be sure to visit each of the Crafty Secrets Design Team Members so you can see what they have been busy creating.


Thank you for stopping by today! I hope you enjoy the blog hop and have a creative day!!

Hugs & Smiles,
Heidi


Supplies
Crafty Secrets: Creating With Vintage Patterns CD (designer paper), Girlfriends Creative Scraps, Lacey Patterns Stamp Set, 1/2 Clear Epoxy Circles
Paper: Discount Cardstock Simply Smooth Ivory, Frosted Pink Prismatic, Herbal Garden Medium Prismatic
Ink: Tsukineko Memento Tuxedo Black; Ranger Antique Linen Distress Ink
Dies: Spellbinders™ Grand Calibur™, S5-071 Twisted Metal Tags and Accents, S5-067 Anemone Flower Topper, S4-327 Floral Flourishes
Accessories: Want2Scrap™ Baby LeCreme Pearls; Clearsnap Glue Gloss, Pralines & Cream Fairy Dust Glitter; Scrapbook Adhesives by 3L™ 3D Foam Squares

Sunday, February 20, 2011

Simply Sunday - Our Challenge - Change Can Be Beautiful Card

Simply Sunday

What is Simply Sunday? Simply Sunday is a day for a little bit of simplicity in our lives and our journey as designers. No chit chat, no tutorials, no fancy techniques and only one or two photos.

How did Simply Sunday come to be? While talking with a couple of friends we decided we wanted to do something different this year, something that would challenge us. We each create and design with a LOVE for embellishments and lots of them I might add--LOL! So we thought why not challenge ourselves to create simple cards. Now, I know you might be thinking that doesn't sound like much of a challenge but sometimes creating the simplest of things can be one of the hardest things to do.

If you would like to join us in our journey of finding simplicity in our lives and our creative designs please leave a link on one of our blogs--we would love to see what you create!

Hugs & Smiles,
Heidi, Karen & Terre


Supplies
Stamps: Skipping Stones Design Always Here stamp set
Paper: Echo Park Paper Fresh Flowers Springtime Collection
Ink: Tsukineko Memento Tuxedo Black
Dies: Spellbinders™ Grand Calibur™, S5-050 Rose Creations, S5-034 Parisian Accents, S4-328 Foliage
Accessories: Vintage Button, White Thread; SCRAPBOOK ADHESIVES By 3L™ MyStik™ Permanent Strips Dispenser ; Beacon Adhesives ZipDry; Corner Round Punch


We would love to have you visit each of our blogs.

Heidi Blankenship
Karen Taylor
Terre Fry

Thank you so much for stopping by today! I hope you have a wonderful day!

Hugs & Smiles,
Heidi

Monday, December 20, 2010

Crafty Secrets Design Team Calendar Challenge

Good Morning! Today is the Crafty Secrets monthly Design Team Challenge and for December our challenge was to create something with a calendar or a calendar theme. I decided to create a calendar for January and what better way to start off the year with something I love--ART! I had so much fun creating the January calendar! I used three stamp sets from Crafty Secrets Artsy Banner, Art Studio and Calendar. I know there is just a little pop of pink for the color but my favorite combination is the ivory, browns and black. To start I made a label diecut using the Grand Calibur™ from Spellbinders™ and LF-190 Grand Labels Four die #5. I used Artsy Banner and Art Studio stamp sets from Crafty Secrets to create a background collage. I used Simply Smooth Ivory cardstock with Tuxedo Black, Rich Cocoa, Vintage Photo and Brushed Corduroy inks.Next using the Calendar stamp set from Crafty Secrets I created the calendar for the month of January. The great thing about the Calendar stamp set is that the numbers are all individual stamps so you can custom create your calendars. I used S4-295 Lacey Squares die #5 from Spellbinders™ to create the diecut. I also created an ART banner using stamps from the Artsy Banner stamp set.Here is a close up of the calendar. For the numbers I used Rich Cocoa ink and I used Vintage Photo to ink around the edges for the lacey square diecut. I added a fancy corner accent, buttons, a crochet flower and pearls. To add a little dimension I used 3D Foam Squares on the calendar.Here is a close up of the ART banner.I added wings, brushed with gold glitter to the ART banner. To create the wings I used the Grand Calibur™ from Spellbinders™ and S4-299 Fallen Angel. I also added a ribbon rose (click HERE for the tutorial) and pearls.I added some swirly pearls. I love this quote and the stamp fits perfectly on the label for the tube of paint!
Supplies
Stamps: Crafty Secrets Artsy Banner, Art Studio, Calendar
Paper: DCS Simply Smooth Ivory; WorldWin Black
Ink: Tsukineko Memento Tuxedo Black, Rich Cocoa; Ranger Vintage Photo, Brushed Corduroy
Dies: Spellbinders™ Grand Calibur™, LF-190 Grand Labels Four die #5, #6, S4-295 Lacey Squares die #5, S4-299 Fallen Angel wings
Accessories: Joann's Buttons, Pearls; Karen Foster Corner Accents; Crochet Flower Aunt Gail; Ribbon Rose Me (click HERE for a tutorial); Ranger Gold Stickles; Zva Swirly Pearls; SCRAPBOOK ADHESIVES By 3L™ White 3D Foam Squares, My Stik™ Permanent Strips Dispenser ; Beacon Adhesives 3-in-1 Advanced Craft Glue

Please be sure to check out the other Crafty Secrets Design Team Members and see what they have been busy creating!

Crafty Secrets
Heartwarming Vintage Blog

Thank you so much for stopping by today and I hope you enjoy the challenge for this month. Have a Fantastic Day and stay warm! It's snowing again in MN!!

Hugs & Smiles,
Heidi

Friday, October 15, 2010

JustRite & Flowersoft Friday Challenge

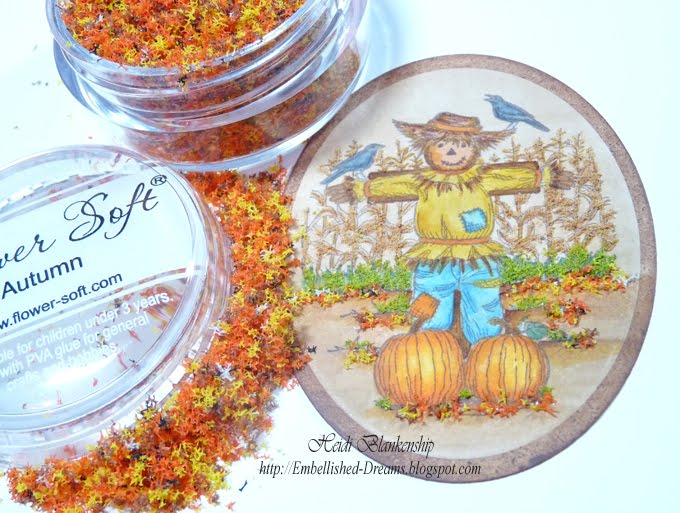
Good morning! Today, is the Friday Challenge on the JustRite Blog and the challenge is to create a Fall project using the Fall colors from Flowersoft. I really like using Flower Soft , it really adds a lot of texture and detail to your projects. Have you tried the NEW Ultra Fine Flower Soft? I am loving the Ultra Fine!!

I created a couple of projects for today's Fall colors from Flowersoft Challenge. I love creating fun little shape cards and the S4-227 Pumpkins die template from Spellbinders™ is perfect for making a shape card. Then once I colored and added the image from CL-02000 Hangin' Around from JustRite Stampers and the Fall colors from Flowersoft I was able to create a fun little Fall pumpkin shape card. I also created a pumpkin to use as part of a Fall table-scape. Once the pumpkin was made I added some Flowersoft and a tag with a JustRite sentiment for a perfect finishing touch.

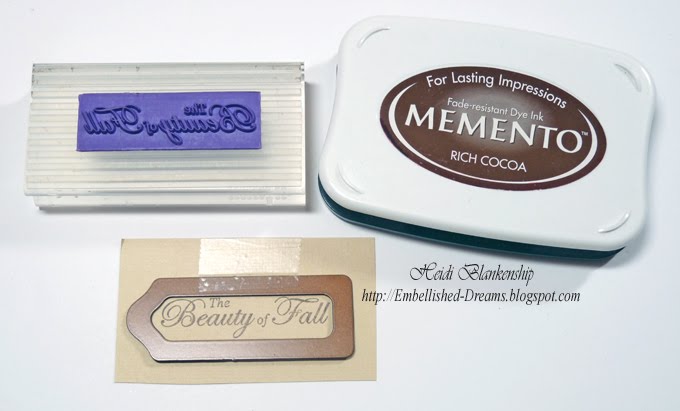
Here's the details on how I created the card. I started by stamping the scarecrow image from the NEW CL-02000 Hangin' Around stamp set from JustRite Stampers with Rich Cocoa ink. Then I colored the image with Copic markers. Next I added Chestnut Roan ink to the inside of the S4-112 Classic Ovals Small die template to create a reverse stencil around the outer edge to the diecut. Then I started to add the different Fall colors of Flowersoft to the image. I used Ultra Fine Toffee on the corn stalks.Next I added Ultra Fine Sage for the grass.I also wanted to give the look of fallen leaves so I added Autumn Flowersoft in a few places. I think the Autumn Flowersoft really finishes the Fall look!Here is a close up of the pumpkin shape card. To create a shape card leave the die template just slightly off the fold and tape to hold in place. I used Core'dinations cardstock and sanded the edges to make the embossing pop. I added Ultra Fine Toffee Flowersoft to the stem of the pumpkin, added a bow with some twill and popped up the image using 3D Foam Squares from SCRAPBOOK ADHESIVES By 3L™.On the inside of the card I stamped a sentiment from JB-09800 Nature Nested Sentiments & Verse with Rich Cocoa ink and added a few pearls.Here is a close up look at the Flowersoft on the scarecrow image. I love the added texture!

Supplies for Card:
Stamps: JustRite Stampers CL-02000 Hangin' Around, JB-09800 Nature Nested Sentiments & Verse, JB-09520 Clear Horizontal Stamper (1-3/8'' x 2-1/2'')
Dies & Punches: SpellbindersGrand Calibur™, S4-112 Classic Ovals Small die # 5, S4-227 Pumpkins die #5
Paper: Core'dinations Orange; Neenah Classic Crest Solar White
Inks: Tsukineko Memento Rich Cocoa; Clearsanp Chestnut Roan; Copic Markers
Accessories: Flowersoft Glue, Toffee, Sage, Autumn; SCRAPBOOK ADHESIVES By 3L™ 3D Foam Squares; Twill, Pearls, Sanding Block

I also created a darling little three dimensional pumpkin to use as part of a tablescape. I used the Grand Calibur™ and LF-124 Grand Scalloped Circles die #2 from Spellbinders™ to create the pumpkin. I cut/embossed and sanded five scalloped circles and adhered each of them together. Then I added the stem and vines. I used Glimmer Glam Chandelier on the vines and then added Iridescent Gold Glimmer Mist from Tattered Angels to the entire piece. I added Toffee Flowersoft to the Stem and Sage to the vine. I also took one of the Flowersoft wires, cut it in thirds, added glue and Sage Flowersoft and set aside to dry. Once the wires were dry I made curly vines and glues them in place. I also created a tag to go with the pumpkin using JB-09800 Nature Nested Sentiments & Verse and JB-09520 Clear Horizontal Stamper (1-3/8'' x 2-1/2''). I used Rich Coco ink to stamp the sentiment and inked around the edges. Then I added some twill and tied the tag to the pumpkin.

Supplies for Pumpkin:
Stamps: JustRite Stampers JB-09800 Nature Nested Sentiments & Verse, JB-09520 Clear Horizontal Stamper (1-3/8'' x 2-1/2'')
Dies & Punches: Spellbinders™ Grand Calibur™, LF-124 Grand Scalloped Circles die #2, S7-017 On The Vine Grand Border, S3-030 Tag Shape Three
Paper: Core'dinations Orange, Brown, Green
Ink: Inks: Tsukineko Memento Rich Cocoa; Ranger Shabby Shutters (green)
Accessories: Flowersoft Glue, Wire, Sage, Toffee; Tattered Angels Glimmer Glam Chandelier, Glimmer Mist Iridescent Gold; SCRAPBOOK ADHESIVES By 3L™ Crafty Power Tape, 3D Foam Squares; Twill, Sanding BlockThanks so much for stopping by today and don't forget to hop on over the JustRite Blog to check out all of the details for this weeks challenge. I hope you will play along and you also have a chance to win a great prize!! Hope you have a Wonderful Day!!!

Hugs & Smiles,
Heidi

Monday, March 29, 2010

Crafty Secrets Design Team Spring Fling Challenge

Good morning! I hope you all had a Wonderful weekend!! Today is Crafty Secrets Challenge Day. Our Design Team Coordinator, Vicki Chrisman gave us a challenge this month to create a card or project with a Spring or Easter theme. I created an Easter Card for the challenge and I can't wait to see what the other ladies on the Crafty Secrets Design Team have created! I will have a link list at the bottom of this post so you can visit each of the blogs.Here is the card I created. I absolutely love the Angel image!! It is so Beautiful and perfect for Easter. I started with the base of the card, the designer paper is from the Crafty Secrets Classic Paper Pad and I stamped flourishes on it using gold ink and gold embossing powder. The flourish stamp is from the Crafty Secrets Cherubs stamp set. The flowers that I added are actually stickers from the Crafty Secrets Heartwarming Vintage Stickers Greetings & Sentiments sticker sheet. I used a Sakura Gelly Roll Clear Star glitter pen to add some sparkle to the floral images. I wanted to add some dimension to the sticker but before doing so I needed to remove the stickiness from the backside. I used a paintbrush to dust over the stickers with baby powder. Doing this will take away to stickiness and then I added foam mounting tape to the backside. The image of the angel is from the Crafty Secrets Seasonal Images & Journal Notes booklet and I added some sparkle to the angel using the Sakura Gelly Roll Clear Star glitter pen. To diecut the angel image and the background mat I used the Wizard™ and Labels Four S4-190 die templates from Spellbinders™.I made this diecut cross for an embellishment on the card. To create the cross I used the Wizard™ and the Cross Collection S4-265 die templates from Spellbinders™. I also used Sakura Gelly Roll Clear Star glitter pen & Metallic Gold pen to accent and add sparkle to the cross. For a finishing touch I added a few rhinestones from My Mind's Eye and lavender ribbon. Supplies~
Stamps~Crafty Secrets-Cherubs (flourish)
Paper~Crafty Secrets-Classic Paper Pad; The Paper Company-White, Blue
Ink~ClearSnap-ColorBox Gold Pigment Ink
Other~Crafty Secrets-Seasonal Images & Journal Notes (Angel), Heartwarming Vintage Stickers Greetings & Sentiments; Spellbinders™-Wizard™, Labels Four S4-190, Cross Collection S4-265; My Mind's Eye-Lush Brown Rhinestones; Sakura-Gelly Roll Clear Star & Metallic Gold; Joann's-Lavender Sheer Ribbon, Gold Embossing Powder; 3M-Mounting Tape; Heating Tool

Please be sure to visit each of the Crafty Secrets Design Team Members and see what they created! Here is a link list to each of the blogs.


Thank you so much for stopping by today and I hope you have a Marvelous Monday!!

Hugs & Smiles,
Heidi

Sunday, January 17, 2010

JustRite Stampers - Friday Challenges

Something new and exciting is happening at JustRite! Every week JustRite Stampers will be hosting a JustRite Friday Challenge, the first one started this past Friday, January 15th, 2010. But there is still time to make your project for the challenge! This week the challenge is Get Creative with Font--so get out your font sets and get busy! You will need to upload your weekly project to an online blog, gallery or photo hosting website and then link to your project back to the JustRite Stampers Blog on the blog post, using the Mr. Linky box that will be provided each week on the challenge post. You will have until the following Thursday to make and enter your project. Then the winner will be chosen and announced on the JustRite blog's main page on Friday morning (one week after the challenge was issued), along with the next challenge being issued. To find out all of the details and see a full list of the challenges click HERE. Oh, one more thing--there will be some Fantastic prizes!! I hope you will join in the fun!!

Good Luck! I can't wait to see your creations!!

I will be back in just a little bit with some creative inspiration.

Hugs & Smiles,
Heidi

LinkWithin

Related Posts Plugin for WordPress, Blogger...