Hello blogging friends! It's day four of the JustRite Papercraft New March Release. Today, the designers will be sharing projects made two new stamp sets.
The first stamp set is CR-04495 Graceful Monograms. This set includes an beautiful uppercase font, three frames, four images and several flourishes. It is also designed to coordinate with Spellbinders Creative Arts™ Media Mixáge™ bezels and matching bezel die templates.
This is the second stamp and it's a gorgeous damask, CL-04500 Grand Damask Background Stamp.
Today, I have two projects to share with you using the CR-04495 Graceful Monograms stamp set and I have a step-by-step tutorial. The first project is this Raspberry Fleur de Lis Necklace.
I made a personalized key ring for my second project.
For the first step I applied ICED Enamels Medium (not shown) which is like a liquid glue adhesive to the MB1-007S Circles Three-Silver large bezel. Then I added the ICED Enamels - Raspberry Relique and Relique Glitz Powders Silver Sparkle and heat set with a heat tool. When doing this start about 5-6 inches away from the bezel and as it warms up and you see it starting to melt then come in closer with the heat tool and keep heating until it is all melted. *Be VERY Careful--the bezel will be HOT! Let is sit for a few seconds to cool before touching it.
Here is a close up once everything was melted.
Next I stamped one of the frames and Fleur de Lis from the CR-04495 Graceful Monograms stamp set on to white tissue paper using Jet Black StazOn ink from Imagine Crafts/Tsukineko.
I used MD1-012 Circles Three die template with the Artisan X-plorer™ to die cut the frame.
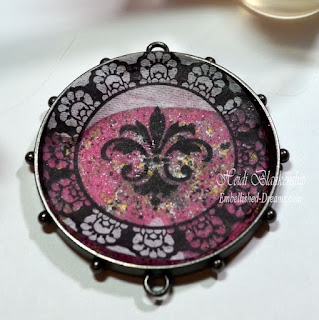
Now for the fun part! Mix the ICE Resin®, 1 oz Syringe Single according to the instructions on the packaging, let sit for five minutes and then it's time to pour. I started by added a little bit of ICE Resin on top of the ICED Enamels and then I added the die cut piece of tissue paper.
Here is a close up when I first placed the tissue paper in the bezel. You can start to see the magic happening right away--when the ICE Resin is added to the tissue paper it makes the tissue paper transparent so all you see is the stamped image. Pretty cool! I used the stir stick to push the tissue paper down in to the bezel and get just the right placement. Then check for bubbles, if you have any bubble use a toothpick to bring them up to the top and remove them. Set the bezel aside to dry for 6-8 hours. I usually let mine sit overnight, then I know the resin is fully set and I don't have to worry about touching it too soon and getting marks or fingerprints in the resin.
These are a couple of close up pictures with the bezels were still drying. I used the same steps to make the monogram bezel.
To create the necklace I wire wrapped several beads, added the dangles to a chain, added the bezel and a lobster claw closure. For the key ring I wire wrapped several bead, added the dangles to a piece of chain, added the chain to the bezel and added a key ring.
Using the beautiful stamps from JustRite Papercraft, Spellbinders Creative Arts™ Media Mixáge™ Collection and ICE Resin® you can create custom pieces of jewelry and personalized key rings.
Please be sure to visit all of the JustRite Papercraft Design Team Members in the link list below to see what they have created to share with you.
JustRite Inspiration
Margie Higuchi
Darsie Bruno
Kathy Jones
Heidi Blankenship
Barb Schram
Sheri Holt
Angela Barkhouse
Eva Dobilas
Margie Higuchi
Darsie Bruno
Kathy Jones
Heidi Blankenship
Barb Schram
Sheri Holt
Angela Barkhouse
Eva Dobilas
I hope you enjoyed the step-by-step tutorial and if you have any questions please let me know.
I hope you have a wonderful and creative day!
Hugs & Smiles,
Heidi
Supplies
Stamps: JustRite Papercraft CR-04495 Graceful Monograms
Paper: White Tissue Paper
Ink: Imagine Crafts/Tsukineko StazOn Jet Black
Dies/Bezel: Spellbinders Creative Arts™ Artisan X-plorer™, Media Mixáge™ MB1-007S Circles Three-Silver (bezels Lg and Med), MD1-012 Circles Three (dies)
Accessories: ICE Resin®, 1 oz Syringe Single, ICED Enamels Medium, ICED Enamels - Raspberry Relique, Turquoise Relique, Relique Glitz Powders Silver Sparkle; Rhinestones, Beads, Bead Caps, Jump Rings, Head Pins and Chains come from Michaels, Hobby Lobby, Joanns and Online Stores.


WONDERFUL projects and step outs, Heidi :) Like I said before...need a play date with you!! LOL! FABULOUS inspiration, my UBER TALENTED friend xo
ReplyDeleteLove both of these projects! You make it look so easy...the hard part is waiting for the resin to cure, right?
ReplyDeleteWow!!! This is stunning Heidi! I love the stamps and how you put it all together. Really beautiful. WTG! You rocked it. WOW (I said that already didn't I) WOW
ReplyDeleteWOWIE, Heidi!!!!! This is one amazing piece of art and I love the tutorial...you are such an enabler...I really need to get some of these products to play with!!! Thanks for the tutorial!!!
ReplyDeleteWow ... these 2 projects are stunning! What a fab way to use these amazing products together. Anybody who receives these lovelies is very lucky indeed!
ReplyDeleteAwesome project. Thanks for the great details.
ReplyDeleteThis is a beautiful project!! Great tutorial too!
ReplyDeleteThis is beautiful Heidi! I love it! Thanks for sharing!
ReplyDeleteThis is soooo cool!!!!!
ReplyDeleteThis is cool!
ReplyDelete