Friday, June 2, 2017

The Stamp Simply Store - You Make Me Smile Spring Daisy Card with Distress Oxide Inks

Hello everyone!  Happy Friday on this beautiful day!  It is so nice to have some warmer sunny days and see all of the beautiful flowers blooming.  Today, I have a card to share with you that is bursting with beautiful blooms.


Here is the card I designed using the Altenew Clear Stamps - Spring Daisy.  This stamp set is a layering set with the flower images and the outlines.  I thought this stamp set would be good to use with the Tim Holtz Distress Oxide Inks.  Because the ink is a fusion of dye and pigment inks it works wonderfully to get nice solid and crisp images.  I used both the large and small daisy and one of the leaf stamps in the set.  For the inks I used  Tim Holtz Distress Oxide Inks - Worn LipstickFossilized AmberSpiced MarmaladeCracked PistachioVintage Photo.  Then for the outline of the flowers I used Memento Tuxedo Black Ink.


I stamped the images on to a piece of white cardstock.  Then I lightly spritzed some water on to the flowers and leaves.  I knew I wasn't going to be using a lot of water so I just used white cardstock and not watercolor paper.  I used a paper towel to blot up the excess water and it left little water droplet marks on the flowers and leaves.  You could skip this step if you wanted to.  I just like the look and the added interest of the droplet marks.  For the sentiment I used the Altenew Clear Stamps - Halftone Smile and  Altenew - Halftone Smile Die.  I used the Tim Holtz Distress Oxide Inks - Fossilized Amber for the You Make Me part of the sentiment and the Worn Lipstick on the word Smile. I love that these inks are opaque enough to use on dark cardstock!  I die cut the word smile and then cut the other part of the sentiment into a strip and fussy cut banner ends on each side.  I added some 3D Foam Squares to the sentiment for a bit of dimension.


I added the card front to an A2 black top folding card base and that finishes off the card.

Thanks so much for joining me today!  If you would like to see more inspiration from the design team members please visit the Stamp Simply Blog.  Also don't forget to check out The Stamp Simply Ribbon Store for all of your paper crafting goodies.

Hugs & Smiles,
Heidi


Supplies
Stamps:  Altenew Clear Stamps - Spring Daisy, Halftone Smile
Paper:  Cardstock - White, Black
Ink:  Tim Holtz Distress Oxide Inks - Worn Lipstick, Fossilized Amber, Spiced Marmalade, Cracked Pistachio, Vintage Photo, Memento Tuxedo Black Ink
Dies:  Altenew - Halftone Smile Die
Accessories:  Scrapbook Adhesives By 3L - E-Z Runner, 3D Foam Squares

Friday, May 26, 2017

The Stamp Simply Ribbon Store - The Cottage Rose Live, Laugh, & Love Card

Hello everyone!  Today, is my day to post for The Stamp Simply Ribbon Store and I have a CAS (Clean And Simple) card to share with you using some of the beautiful papers from KaiserCraft.


Here is the card I designed.  I used two of the pattern papers and a cutout from the KaiserCraft - Cottage Rose paper pad.  I love using the KaiserCraft paper pads especially for creating CAS cards.  The papers are always wonderful and they also have a nice selection of cutouts with sentiments.


The paper from the top half of the card was originally a white on white with a embossed pattern from the Cottage Rose paper pad.  I wanted to add a little color to it so I apply two of the Tim Holtz Distress Oxide InkWorn Lipstick and Spiced Marmalade (not shown in the picture).  After I was done applying the ink I used a paper towel to buff off the excess in on the embossed area.


I added the embossed paper to the top half of the card and a floral print to the bottom.  I added some  May Arts Rose 1/4" Ringlet Trim and Venise Lace .50" - Katarina Ivory across the middle of the card to create a border and also cover up the seam where the two papers meet.  The framed sentiment is one of the cutouts from the Cottage Rose paper pad.  I added a few 3D Foam Squares to the back of the sentiment for a little bit of dimension.  To finish off the card I added the card front to a white A2 top folding card base and added a few KaiserCraft - Fairy Floss Mini Paper Blooms.


If you would like to see more inspiration from the design team I encourage you to check out the Stamp Simply Blog.  Also, check out The Stamp Simply Ribbon Store for a wonderful selection of paper crafting goodies.

Thanks so much for stopping by today and I hope you have a Happy Friday!

Hugs & Smiles,
Heidi


Supplies
Paper:  KaiserCraft - Cottage Rose, Cardstock - White
Ink:  Tim Holtz Distress Oxide Inks - Worn Lipstick, Spiced Marmalade
Lace:  May Arts Rose 1/4" Ringlet TrimVenise Lace .50" - Katarina Ivory
Accessories:  KaiserCraft - Fairy Floss Mini Paper Blooms, Scrapbook Adhesives By 3L 3D Foam Squares, E-Z Runner

Friday, May 19, 2017

The Stamp Simply Ribbon Store - Distress Oxide Inks Background Tutorial - The Sea is Calling G45 Voyage Beneath the Sea Card

Hello everyone and happy Friday!  Sorry I have been MIA!  I know it's been a couple of weeks since my last blog post.  Sadly, on May 4th my Mother-in-law passed away.  We went down to West Virginia for her funeral.  The service was beautiful and after we had a celebration of life with family and friends.  She loved to laugh and have fun so I am sure she was smiling down on all of us.  It was great to see family and friends and hear so many wonderful memories--just wish it was under different circumstances. 

Today, is my day to post for The Stamp Simply Ribbon Store.  I have a fun card and tutorial to share with you using some of the Tim Holtz Distress Oxide Inks and the beautiful Graphic 45 - Voyage Beneath the Sea Collection.  This is the first project I have worked on since coming back home and it was so nice to do something creative.  For me creating is always relaxing and it takes my mind off of other things.  Sometimes I can get lost in the creative process lol.


Here is the card I designed.  I love how the Tim Holtz Distress Oxide Inks match the paper so perfectly.  The Distress Oxide Inks are a lot of fun to work with and you can do a lot of techniques with them.  I really like how these inks are more opaque.


I used a piece of Ranger Watercolor Paper and added the colors using an Ink Blending Tool. I started by adding the Broken China ink first.  Then, I added the Cracked Pistachio and Spiced Marmalade.  I went over each of the colors a couple of times until I achieved the desired look.  I will say the Distress Oxide Inks blend beautifully.


Next, I added water droplets.  I let the water sit on the paper for a few seconds and then I used a paper towel to blot the paper and pick up the water.  Then, I used a heat tool to dry the paper and repeated the process a couple of times until I was happy with how the paper looked.


I wanted to added a little more pop of color so I used some of the Tim Holtz Distress Oxide Refill - Broken China and added some water to it.  I used a paint brush to flick on some of the ink.  I used a heat tool to heat set the ink and dry the paper.


I knew I was going to add this background to a white card base so I wanted to add a little bit of white to the background paper to tie everything together.  I watered down some white acrylic paint and used a paint brush to flick it onto the paper.  Then I used a heat tool to heat set and dry the paint on the paper.  I just love how this background piece turned out and it was a lot of fun to get inky and create.


I added the background to a white A2 top folding card base using Scrapbook Adhesives by 3L 3D Foam Squares.  Then, I added the layers of the image and sentiment both with a layer of white.  I also used 3D Foam Squares for both of the layers.


I used a Zig Wink of Stella - Clear Glitter Brush Pen to add a little bit of sparkle to the mermaid's hair.  Here is a close up to see some of the shimmer.


Here is a close up of the sentiment.


To finish off the card I added a few Webster's Pages - Party Time Sequins.

If you would like to see more card inspiration from the design team head on over to the Stamp Simply Blog.  If you are looking for any paper crafting goodies to add to your stash check out The Stamp Simply Ribbon Store.

Thanks so much for stopping by today!  I hope you have a wonderful weekend!

Hugs & Smiles,
Heidi


Supplies
Paper:  Graphic 45 - Voyage Beneath the Sea Collection, Ranger Watercolor Paper, Cardstock - White
Ink/Pens/Refill/Paint:  Tim Holtz Distress Oxide Inks - Broken China, Cracked Pistachio, Spiced Marmalade, Tim Holtz Distress Oxide Refill - Broken China, Zig Wink of Stella - Clear Glitter Brush Pen, White Acrylic Paint
Accessories:  Ranger Glossy Accents, Webster's Pages - Party Time Sequins, Ink Blending Tool, Scrapbook Adhesives by 3L 3D Foam Squares, Distress Sprayer, Paint Brush, Heat Tool, Paper Towel 

Friday, April 28, 2017

The Stamp Simply Ribbon Store - Altenew Painted Rose - Rock-N-Roll Technique & Tutorial

Hello everyone and happy Friday!  Today, is my day to post for The Stamp Simply Ribbon Store and I have a colorful card to share with you.  I am revisiting an older technique--Rock-N-Roll.


As you can see from the card I used the Painted Rose stamp set from Altenew.  This is a layering stamp set meaning each image is a combination of three different stamps/layers.  When I started to pull out my supplies for this card I was planning on doing the usual stamp layering and picking three different shades of ink.  But then I thought this stamp set would be a really great one for the Rock-N-Roll technique.  


If you are new to stamping the Rock-N-Roll technique is very easy to do.  First, ink the entire stamp with one color of ink (the lighter color).  Then ink around the edges of the same stamp with a darker ink,  Doing this will create a two-tone look.  You can take the ink pad and roll it around the edges of the stamp or you can lightly tap the ink pad around the outer edges of the stamp.  Either way will work--just make sure you don't have any sharp lines from the ink pads.


Here is a close up of the stamp with the two colors of ink.  Now I will say doing the Rock-N-Roll technique with the layering stamps does take a little bit longer but I think the results are worth it.  For the Roses I used Altenew 4 Cube Inks - Rose Petal (Rose Quartz, Puffy Heart, Purple Wine), Shades of Purple (Soft Lilac, Lavender Fields, Deep Iris).


Here is a close up of the sentiment.  I used one of the stamps from the Stamp Simply Clear Stamps - Birthday Blessings stamp set.  I stamped the sentiment with VersaMark ink on to a piece of Vellum.  Then, I added Ranger Super Fine Detail Gold Embossing Powder.  I used my heat tool to melt and heat set the powder.  Next, I added some May Arts Tiffany Blue Silk Ribbon and a few Prima Say It In Crystals Royal Menagerie Sequins.


Now I have to tell you I am happy with how the card turned out however it didn't turn out like my original idea.  When I was almost done with the stamping I picked up one of the ink cubes to put it back in the packaging (I keep my Altenew 4 Cube Inks in the packaging) and I dropped it!  The cover came off and the ink pad landed face down on my card front!  You can see the outline of the ink cube in this picture by the cluster of leaves.  This happened to me a few weeks ago and I had to start over.  But I didn't want to have to do all of the stamping again---So I had to rethink my card design.  Thank goodness the ink was a light color and vellum saved the day! :)


For the leaves I used  Altenew 4 Cube Inks - Sea Shore ( Mountain Mist, Volcano Lake, Lagoon), Green Fields (Frayed Leaf, Forest Green, Evergreen).  These are not inks I would normally put together but I am so happy I did.  I LOVE the combination of of colors--it just works and it was a happy surprise to see the outcome.  I also inked around the edges of the card front with Volcano Lake ink.  I think I might have to make a few more of these cards to have on hand.


To finish the card I added the card front to a white A2 card base and I added some Foam Squares in between the layers for some added dimension.

I hope you enjoyed today's card share and tutorial.  I hope you are inspired to give the Rock-N-Roll technique a try and mix and match some beautiful colors.

If you would like to see more inspiration from the design team check out the Stamp Simply Blog.  For all of your paper crafting goodies check out The Stamp Simply Ribbon Store.

Thanks so much for stopping by today and I hope you have a wonderful weekend!

Hugs & Smiles,
Heidi


Supplies
Stamps:  Stamp Simply Clear Stamps - Birthday Blessings, Altenew - Painted Rose
Paper:  Vellum, Cardstock - White
Ink:  VersaMark, Altenew 4 Cube Inks - Rose Petal (Rose Quartz, Puffy Heart, Purple Wine), Shades of Purple (Soft Lilac, Lavender Fields, Deep Iris), Sea Shore ( Mountain Mist, Volcano Lake, Lagoon), Green Fields (Frayed Leaf, Forest Green, Evergreen)
Ribbon:  May Arts Tiffany Blue Silk Ribbon
Accessories:  Prima Say It In Crystals Royal Menagerie Sequins, Ranger Super Fine Detail Gold Embossing Powder,Ranger - Glossy Accents, Scrapbook Adhesives by 3L - Foam Squares, E-Z Runner, Heat Tool

Wednesday, April 26, 2017

ICE Resin® - Ranger - Liquid Pearls Paint Skins

Hello everyone!  Today, I have a post up on the ICE Resin® blog.  


I love how all three of the projects turned out so I am excited for this post to be live.  In the tutorial I share with you how to use Ranger Liquid Pearls, Tints, ICED Enamels®, and Glitter to create Liquid Pearl Paint Skins.  Once the paint skins are dry they can be removed from the studio sheets.  You can use the bezel template to trace and cut a piece of the paint skin to fit perfectly into the bezels.  Top with ICE Resin® and create some beautiful jewelry.


I have a step-by-step tutorial with lots of pictures on the ICE Resin® blog.  If you would like to see the tutorial you can click HERE to visit the ICE Resin® blog.  I encourage you to give this technique a try--it is even one that beginners can do.


If you have any questions or comments please leave them below.  Thank you for stopping by today!  I hope you have a wonderful day and get a chance to create something beautiful!

Hugs & Smiles,
Heidi

Supplies
ICE Resin® Milan Bezels:  Antique Silver, Large Rectangle 
ICE Resin® Milan Bezels:  Antique Silver, Medium Rectangle
ICE Resin® Milan Bezels:  Antique Silver, Small Square
ICE Resin® 
ICE Resin® Mixing Cups and Stir Sticks
ICE Resin® Milan Bezel Template
ICE Resin® Squeegee 
ICE Resin® Studio Sheets
ICE Resin® Paper Sealer
ICE Resin® ICED Enamels:  Enamel Medium
ICE Enamels® Relique Powders: Turquoise, Chartreuse, Ivory
ICE Resin® German Glass Glitter Shards, Ocean
ICE Resin® Tints: Turquoise, Emerald
ICE Resin® Opals, Crystal Opal
ICE Enamels® Relique Powder, Glitz Silver
Ranger© Liquid Pearls™ White Opal
Ranger© Glossy Accents
Small Plastic Spoon
Silver Chain
Silver Jump Rings
Silver French Hooks
Silver Lobster Clasp
Silver Ball End Head Pins
Silver Peacock Rhinestone Chain
Glass Beads, Silver Bead Caps, Silver Spacer Beads
Silver 20 Ga Wire
Flush Cutter
Round Nose Pliers
Bent Nose Pliers
Heat Tool
Toothpicks

Friday, April 21, 2017

The Stamp Simply Ribbon Store - Tulip Watercolor Card with Distress Inks

Hello everyone and happy Friday!  Today, I have a watercolor card to share with you using some of the Stamp Simply Clear Stamps and Tim Holtz Distress Inks.


For my card I started out with a piece of the Ranger Watercolor paper and I stamped the image of the tulip from the Get Well Tulip SS-014 stamp set with  VersaMark ink.  Then, I added Ranger Super Fine Detail Gold Embossing Powder on top of the image and poured the excess into a coffee filter and then back into the jar.  I like to use a coffee filter when I am heat embossing or working with glitter.  I can dump all of the excess into the coffee filter and then easily add it back into the container.  Plus the coffee filter can be used many times.  Ok, back to the card -- I used my heat tool to melt and heat set the embossing powder.


When an image is heat embossed it makes it very easy to watercolor.  The raised edges of the embossing hold the watercolor in each area and allows you to very quickly watercolor.  If the image wasn't embossed you would have to color each area one at a time and you couldn't color areas right next to each other until they were dry or the color could bleed into the different areas.  I used Picked Raspberry and Wilted Violet for the tulip and for the leaves I used Cracked Pistachio and Mowed Lawn.  I did a couple of layers of the watercolor starting out light and then adding darker color for the shading.  For the background I used Cracked PistachioMowed Lawn, and Peacock Feathers Distress Inks.  I used the heat tool to dry the paper and then I lightly misted the paper with water.  I used a paper towel to blot up the excess water leaving little water droplet marks.


I trimmed the watercolor paper down to the size I needed and then I added a bow using some of the  May Arts Variegated Silk Ribbon Turquoise/Brown.  I love all of the colors of the variegated silk ribbon.  Then, I added a Prima Loraine Blue Lagoon Flower to the center of the bow.  For the sentiment I used a verse from the Fear Not SS-016 stamp set from Stamp Simply Clear Stamps.  I used VersaMark and Ranger Super Fine Detail Gold Embossing Powder to stamp and heat emboss the sentiment.  Then I used some of the Peacock Feathers ink to add little paint splatters on the background of the card.  I added some 3D Foam Squares to the back of the watercolor panel and then added that to a white A2 top folding card base.

Thank you so much for stopping by today and I hope you enjoyed the card share.  To see more inspiration from the design team hop on over to the Stamp Simply Blog.  If you are looking for some paper crafting goodies check out The Stamp Simply Ribbon Store.  I hope you have a beautiful weekend!  I know I am looking forward to it!  It has been rainy, cold, and gloomy here in Minnesota the past few days and the weather man said it's going to be nice and sunny on Saturday and Sunday.

Hugs & Smiles,
Heidi


Stamps:  Stamp Simply Clear Stamps - Get Well Tulip SS-014, Fear Not SS-016
Paper:  Ranger Watercolor, Cardstock - White
Ink:  VersaMark, Tim Holtz Distress Inks - Picked Raspberry, Wilted Violet, Cracked Pistachio, Mowed Lawn.
Ribbon:  May Arts Variegated Silk Ribbon Turquoise/Brown
Accessories:  Ranger Super Fine Detail Gold Embossing Powder, Prima Loraine Blue Lagoon Flower, Scrapbook Adhesives by 3L 3D Foam Squares, E-Z Runner, Heat Tool, Paint Brush

Tuesday, April 18, 2017

Exciting News - U-Paint Metal Crafts Creative Team Member


Hello blogging friends!  I have some exciting news to share with everyone.  I am going to be working with and designing for a new company.  The company is U-Paint Metal Crafts and they have over 300 U-Paint Metal Craft Kits to choose from.  The metal pieces are designed for all Designers, Artists, Makers, DIY Crafters/Hobbyists. The detail on the designs is so beautiful!  I have some pictures to share of the metal pieces including some of the solid brass deco trim strips and bookmarks.  The U-Paint Metal Crafts line was developed and launched last year to present to the Craft Industry at a retail level.  U-Paint Metal Crafts is under a larger company The Frank Morrow Company that has been in business since 1929!  

Now for the really great news---Everything is made in the U.S.A.!  
The products can be purchased on the U-Paint Metal Crafts website and also on Amazon.


Ok, now that we have all of the "business" out of the way lets take a look at the beautiful designs from U-Paint Metal Crafts.


Here is a look at one of the large kits.  
This is the Butterflies kit and below are the dimensions for each piece.  
Dragonfly (4 3/8″ H x 5 7/8″ W)
Butterfly (3 3/4″ H x 5 1/4″ W)
Swallowtail Moth (5 3/4″ H x 4 1/2″ W)
Art Deco Butterfly – Solid (2.875″ H x 4.75″ W)

Each kit comes in a large zipper bag which is great for storage.


Here is a look at the back side of the packaging.


The metal pieces come in large and small kits.  You can also purchase them individually.  This image includes L--to--R:  Garden Sprite, Garden Trellis, Flower Bouquet, Roses Blooming, Hummingbird.


Here is a close up of the Flower Bouquet so you can see all of the amazing detail.


 This image includes metal pieces from the Butterflies kit and the Herbs Kit.  I absolutely love all of the detail in the butterflies!


I thought the Bird house and  Tulips would be perfect for Spring.


Check out these beautiful bookmarks!  The bookmarks have vintage designs from the 1920's - 1950's. The one on the top is the Rose & Leaf Scroll and the bottom one is Swirling Leaves.  The detail on the bookmarks is amazing!


Be still my heart---Oh these decorative trims are beyond gorgeous!!  I can't wait to create with these!  So many possibilities my mind is spinning lol.  
From the top down this image includes the following.

I think working with the U-Paint Metal Crafts is going to be so much fun and this is their very first Creative Team!  You can apply paint, glitter, stains, gilding, embellishment mousse, tints and all different kind of products to make the designs uniquely yours.  You can custom design the pieces to match your home decor.  The pieces can also be used as molds for clay and you can use some of the bookmarks to emboss beautiful designs on your paper crafts.  The brass can be cut, sanded, and shaped for jewelry so I am very excited to try designing some jewelry with those pieces.

Be watching for an upcoming announcement to share links for the 
U-Paint Metal Crafts Blog, Facebook, Instagram, and Pinterest.

Thanks so much for stopping by and I hope you have a beautiful day!

Hugs & Smiles,
Heidi


Friday, April 7, 2017

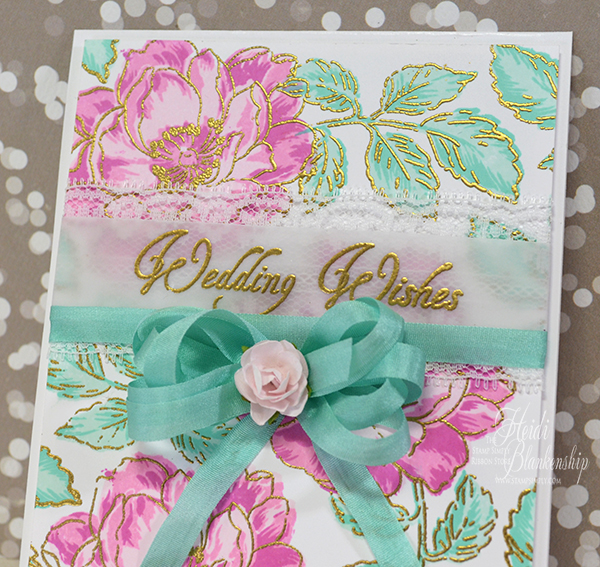
The Stamp Simply Ribbon Store - Wedding Wishes Stamp Layering Card

Hello everyone and happy Friday!  Today, I have a pretty wedding card to share with you using the Stamp Simply Clear Stamps Wedding Wishes SS-Sent 001 and  Altenew Beautiful Day Clear Stamp Set.  The wedding wishes is a wonderful stamp set with the 1 Corinthians 13: 4-8 verse.  It also includes wedding wishes, best wishes, thinking of you, just for you, and congratulations.  The sentiments will work well with several occasions.  I think the beautiful day stamp set is one of my favorites.  I just love the floral image!  It reminds of when I was younger and seeing the wild roses growing along side the country roads and smelling the sweet fragrance.


Here is a look at the card I designed.  For the stamp layering I used the  Altenew 4 Cubes Rose Petal (rose quartz, puffy heart, purple vine) for the flowers. For the leaves I used 4 Cubes Sea Shore (mountain mist, volcano lake).  When I was done with the coloring part of the stamp layering I used a heat tool to heat set the ink and make sure the paper was good and dry.  Then for the outline images I stamped with VersaMark Ink and added Ranger Super Fine Detail Gold Embossing Powder.  I used my heat tool to melt the embossing powder.


The gold embossing gives the card such an elegant look.  I stamped the sentiment from the Wedding Wishes SS-Sent 001 clear stamp set using VersaMark Ink on to a piece of  Vellum.  Then I added the Ranger Super Fine Detail Gold Embossing Powder and used my heat tool to melt the embossing powders.  I tell you I have been stamping for many years and the embossing still gets me.  It is still fun to watch the melting process and it's so pretty.


Before adding the Vellum to the card front I added some May Arts Silk Ribbon Tiffany and 1.5" Delicate Vintage Lace by May Arts around the card front.  I love how you can see the lace and hints of color through the vellum!  To finish off the card I added a bow and a Kaisercraft Fairy Floss pink flower to the center of the bow.  The Tiffany colored ribbon is a perfect match to the volcano lake ink from Altenew.


To finish off the card I added the card front to a white A2 top folding card base.

I hope you enjoyed today's card share!  If you would like to see more inspiration from the design team I encourage you to check out the Stamp Simply Blog.  Also, visit The Stamp Simply Ribbon Store for all of your paper crafting needs.

Thank you so much for stopping by today and I hope you have a wonderful weekend!

Hugs & Smiles,
Heidi


Supplies
Stamps:  Stamp Simply Clear Stamps Wedding Wishes SS-Sent 001, Altenew Beautiful Day Clear Stamp Sets
Paper:  Vellum, White Cardstock
Ink:  Altenew 4 Cubes Rose Petal (rose quartz, puffy heart, purple vine), 4 Cubes Sea Shore (mountain mist, volcano lake), VersaMark Ink
Ribbon:  May Arts Silk Ribbon Tiffany, 1.5" Delicate Vintage Lace by May Arts
Accessories:  Ranger Super Fine Detail Gold Embossing Powder, Kaisercraft Fairy Floss (pink flower), Scrapbook Adhesives by 3L , E-Z Runner

LinkWithin

Related Posts Plugin for WordPress, Blogger...