Tuesday, July 14, 2015

ButterBeeScraps - Beaded Bracelets - DIY Sneak Peeks

Hello blogging friends!  I know it has been a few days since my last post but my best friend Virginia (we've been friends for 30+ yrs) was in town this last week so we were able to hang out and have some girl time--plus it was her birthday.  A few other girlfriends were in town for the weekend and we had so much fun getting together--great food, a beautiful night, fantastic fire, drinks and LOTS of laughs.  We were up into the wee late hours but it was worth it.  It was so nice to see everyone!  Some of us hadn't seen each other in 10-27 yrs!!  We all agreed we will have to get together again--soon--not 10, 15 or 20 some yrs from now LOL! 

Today, I have a couple of bracelets to share with you.  I used beads and findings mostly from ButterBeeScraps and then also some beads from my own stash.


This first bracelet is one that I made for my friend Virginia.  She has a wedding to attend next weekend and needed a bracelet to match her dress.  
She has a pretty coral colored dress--prefect for summer.  


Here is a close up of the BRONZE TOGGLE CLASPS (#CL071-B).


To string the beads I used beading wire with crimp beads to close off each end.  I also added split rings to the ends since they are a little more secure than a jump ring.


Here is the second bracelet I designed.  I thought the black, grey and bronze combination would be good and compliment so many outfits.  


Here is a close up of the BRONZE TOGGLE CLASPS (#CL071-B).  I did the closure the same way with this bracelet using the beading wire, crimp beads, and split rings.


Both of these bracelets were fun, quick and easy to create.

Please be sure to check out ButterBeeScraps NEW website and while you are there don't forget to visit the ButterBeeScraps Blog for lots of inspiration from the Design Team.  :)

Here's a little sneak peek of some upcoming DIY projects I'll be sharing so be sure to check back.


Thanks so much for stopping by today!

Hugs & Smiles,
Heidi


Supplies
ButterBeeScraps:  6X8MM ROSE PINK PEARLIZED FACETED GLASS ABACUS BEADS,  6X8MM GREY PEARLIZED FACETED GLASS ABACUS BEADSBRONZE FILIGREE BEAD CAPS (#CAP827-B) BRONZE FILIGREE BEAD CAPS (#CAP052-B),  CLEAR RHINESTONE AND BRONZE RONDELLE SPACER BEADS – 6MM (#BD006-B/CL)BRONZE TOGGLE CLASPS (#CL071-B)
Friday, July 10, 2015

The Stamp Simply Ribbon Store - Butterfly Resist Card with Tutorial

Hello everyone! Today, is my day to post for The Stamp Simply Ribbon Store.  I have a beautiful emboss resist butterfly card to share with you, along with a step-by-step tutorial.  The emboss resist technique is very easy to achieve and I thought I would do a quick tutorial for anyone who might be new to papercrafting.


Here is a picture of the card I designed.  The butterfly image is from the JustRite Small Cling - Butterfly Kisses and the sentiment is from the JustRite Clear Stamp - Birthday Vintage Labels Four.


To start I stamped the butterfly image on to white cardstock using VersaMark Ink.  The VersaMark Ink is kind of like a clear pigment ink.  It will stay wet long enough to apply the embossing powder.  It is a great ink pad to have in your stash of craft goodies because you can use the VersaMark Ink for so many techniques.  After I stamped the image I applied Stampendous Super Fine Embossing Powder - Detail White.  This is a picture before I heat set the image.  *Note-if you don't have white embossing powder you can also use clear for this technique.


Here is a picture of the image after I used the heat tool to heat set the embossing powder.


I used four different colors of the Tim Holtz Distress Inks to color the background of my paper.  I know the Distress Inks can be kind of deep colors but for this technique I used cotton balls instead of sponges to get a very soft light color.  I actually use cotton balls almost all the time for any inking that I do.  They are inexpensive and I can just toss them when I am done.  To get the lighter color I first ink up the cotton ball and then on scratch paper I remove some of the ink (going in a circular motion) and I do this until most of the ink is rubbed off of the cotton ball as seen in the picture.  I do this will all the different colors of ink.


For the first layer of ink I used Chipped Sapphire.  Here you can see the butterfly starting to pop.  Since the embossed area has a gloss finish to it, it will resist the ink and the embossing pops through.


For the Shaded Lilac I filled in the rest of the white space on the background.


For the third color I used Broken China.  You can see the butterfly is really starting to stand out now.


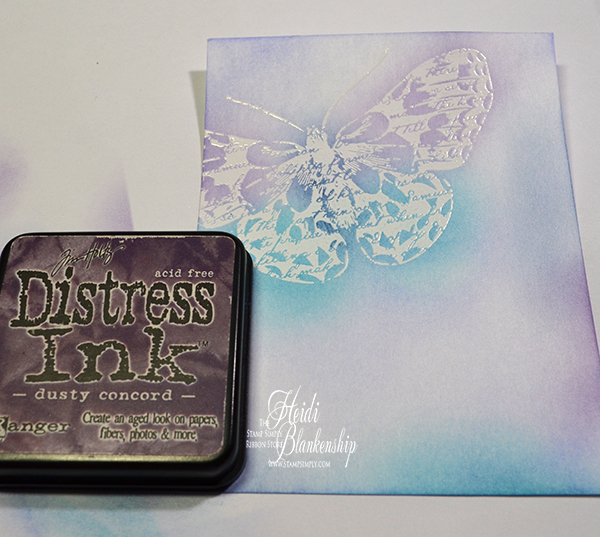
For the last color I used Dusty Concord.  I love how the colors are so soft and the butterfly is a nice crisp white.  For the most part when doing this technique I like to apply the ink in threes--meaning to add the same color of ink in three areas on the card.  Adding the layers of ink also adds depth.


Here is a close up of the butterfly.  I also added a few Melissa Frances White Pearls.


Thank you so much for stopping by today!  I hope you enjoyed the tutorial. 

Please be sure to check out The Stamp Simply Ribbon Store for all of the fantastic paper crafting products and the Blog for inspiration from the Design Team.

I hope you have a wonderful weekend!

Hugs & Smiles,
Heidi


Supplies
Stamps:  JustRite Clear Stamp - Birthday Vintage Labels FourJustRite Small Cling - Butterfly Kisses
Paper:  Cardstock White, Lavender
Ink:  Tim Holtz Distress Inks - Chipped Sapphire, Shaded Lilac, Broken China, Dusty Concord, Memento Grape Jelly, VersaMark Ink
Accessories:  Stampendous Super Fine Embossing Powder - Detail White, Melissa Frances White Pearls, Scrapbook Adhesives by 3L 3D Foam Squares, Heat Tool


Saturday, July 4, 2015

Happy 4th of July!!

Just a quick post to say
Happy 4th of July!!!


Have fun and stay safe!

Hugs & Smiles,
Heidi

Friday, July 3, 2015

The Stamp Simply Ribbon Store - Pebbles Cottage Living - Birthday Wishes Card

Hello everyone! Today, is my day to post for The Stamp Simply Ribbon Store.  I have a pretty quick and easy card to share with you using some of the beautiful pattern papers from Pebbles Cottage Living 6 x 6 paper pad.  


I used three of the pattern papers from Pebbles Cottage Living 6 x 6 paper pad and I also used ivory and a dark gray cardstock to create the layers.  I used a 5.5 x 5.5 size dark gray card base.  I used the Birthday Wishes sentiment from the JustRite Papercraft Grand Handwritten Sentiments clear stamp set and stamped it with Memento Tuxedo Black ink.


I used Spellbinders Labels Forty-seven with the ivory and dark gray cardstock to die cut the label shapes.  I used 3D Foam Squares in between the layers. Then I added a bow using the May Arts Spring 2015 Silk Ribbon - Teal.  I also added some black, gray, and ivory flowers from the Prima Flowers Laraine Black Tie.


I think this color combination is so pretty!  I love the coral with the mint/aqua and a pop of black.  The papers in the Pebbles Cottage Living 6 x 6 paper pad are beautiful and you get 36 different designs in the paper collection.

Thank you so much for stopping by today!

Please be sure to check out The Stamp Simply Ribbon Store for all of the fantastic paper crafting products and the Blog for inspiration from the Design Team.

I hope you have a wonderful weekend!

Hugs & Smiles,
Heidi


Supplies
Stamps:  JustRite Papercraft Grand Handwritten Sentiments
Paper:  Pebbles Cottage Living 6 x 6, Cardstock Ivory, Dark Gray
Ink:  Memento Tuxedo Black
Dies:  Spellbinders Labels Forty-seven
Ribbon:  May Arts Spring 2015 Silk Ribbon - Teal
Accessories:  Prima Flowers Laraine Black Tie, Scrapbook Adhesives by 3L 3D Foam Squares, E-Z Runner Permanent Strips-Refillable Dispenser 49'

Thursday, July 2, 2015

Pink Ink Stamp Co. - Super Sweet Sundae Card


Hello everyone!  I just realized I forgot to post this card last month.  I have a yummy sweet treat card to share with you using a stamp image from Pink Ink Stamp Co. you can find the entire collection on Ellen Hutson's site. You can click HERE to see the entire collection of Pink Ink Stamps and click HERE to see the entire collection of Lockhart Stamps.  How many of you love to visit the ice cream shop or the local DQ for a treat?  Or do you remember the ice cream trucks?  Unfortunately, I think the ice cream trucks are becoming a thing of the past in many places. But I am sure many of us have great memories hearing the music from the ice cream truck and seeing it turn the corner to come down the street.   Then making a mad dash into the house to get some money LOL.  


Here is the card I designed using the Super Sundae stamp.  This sundae looks so yummy with ice cream, chocolate, cool whip, and a cherry on top!  I stamped the image using Memento Tuxedo Black ink and then I colored the image with Copic markers.  


 Here is a close up of the image.  I colored the ice cream to look like vanilla and strawberry.  Then I colored the chocolate syrup and added some Glossy Accents on top.  Once the image was colored I trimmed it down and added light pink cardstock for a mat.  I added another mat with rose cardstock and a white paper doily.  Then I adhered everything to a light pink card base.  I used some baby pink seam binding for a bow and I also added a small pearl white acrylic bow on top.  To finish of the card I added some pale pink satin, medium pink, and moonshine sequins 2mm-4mm in size.  


Thanks so much for stopping by today!  

Hugs & Smiles,
Heidi

Supplies
Paper:  White, Pink, Rose Cardstock
Ink/Markers:  Memento Tuxedo Black Ink, Copic Markers R29, R39, RV00, RV10, B0000, E57, C0, 0
Accessories:  C. Cartwright Sequins Pale Pink Satin 3mm, Medium Pink 2mm, 4mm, Moonshine 3mm, 4mm, Pearl White Acrylic Bow, Glossy Accents, White Fun Foam, Scrapbook Adhesives By 3L E-Z Runner Permanent Strips-Refillable Dispenser 49'


Tuesday, June 30, 2015

ButterBeeScraps - Beach Themed Necklaces

Hello everyone!  Today, I have some fun, simple beach themed necklaces to share with you using products from ButterBeeScraps.  I designed three necklaces that are similar, they all have a charm, beaded dangles, and a mother of pearl bead and they all have nice long chains.


This is the first necklace I designed.  I love the simplicity of these necklaces.  On this one I used a beach chair charm from the  FUN IN THE SUN TIBETAN CHARMS COLLECTION and I also used SILVER BALL END HEAD PINS.  The mother of pearl bead, aqua bead and bead cap are all from my stash.


I also used a silver metal hammered link to add all the dangles.


Here is a picture so you can see the length of the chain.  I used SILVER CHAIN CH876-P for this necklace and the length is 30''.


Here is the second necklace I designed.  I used a mermaid charm from the UNDER THE SEA TIBETAN CHARMS COLLECTION .  I also used BRONZE BALL END HEAD PINSBRONZE FILIGREE BEAD CAPS (#CAP052-B), and CLEAR RHINESTONE AND BRONZE RONDELLE SPACER BEADS – 6MM (#BD006-B/CL) all from ButterBeeScraps.  The mother of pearl bead, aqua/bronze bead, and shell are all from my stash.


I didn't have a bronze link so for this necklace I used a bronze hoop earring piece instead and it worked great!


Here is a picture so you can see the length of the chain.  For this necklace I used the TEXTURED BRONZE CABLE CHAIN (#CH521-B) and this necklace is also 30'' in length.


Here is the third necklace I designed.  I used the sand bucket charm from the FUN IN THE SUN TIBETAN CHARMS COLLECTION.  I have to say I love this little charm with the bucket and shovel!  I also added a mother of pearl bead and some aqua beads from my stash.


Here is a close up.  I also used another silver metal hammered link for this necklace.


Here is a picture to see the length of the chain and this necklace is also 30'' long.

I hope you enjoyed this jewelry share.  These necklaces were quick, easy and a lot of fun to make.  Thanks so much for stopping by today!

Don't forget to check out the NEW ButterBeeScraps website and online store!

Hugs & Smiles,
Heidi


Supplies
ButterBeeScraps:  FUN IN THE SUN TIBETAN CHARMS COLLECTIONUNDER THE SEA TIBETAN CHARMS COLLECTION BRONZE BALL END HEAD PINSSILVER BALL END HEAD PINSTEXTURED BRONZE CABLE CHAIN (#CH521-B)BRONZE CABLE CHAIN (#CH926-B), SILVER CHAIN CH876-P, BRONZE FILIGREE BEAD CAPS (#CAP052-B)CLEAR RHINESTONE AND BRONZE RONDELLE SPACER BEADS – 6MM (#BD006-B/CL)

Saturday, June 27, 2015

ButterBeeScraps - Simply Elegant Flower Necklace

Hello everyone!  Today, I have a pretty little necklace to share with you using products from ButterBeeScraps.  But before I get to that I wanted to let you know Monique has been working so hard on the New Website and it is now LIVE!  You can click HERE to visit ButterBeeScraps new website and online store.  Also while you are there set up an account, sign up to follow ButterBeeScraps through email and also sign up for BEANS--it's a new rewards program!  There is a sale going on until 11:59 PM on June 28th 15% OFF Everything in the Store!!  So many fun and exciting things going on at ButterBeeScraps!  Also, help me in welcoming our newest Design Team Member, Monica who is known as Scrappin4MyBoys on YouTube.  You can click HERE to visit her YT channel and click HERE to visit her Blog.


Here is the necklace that I designed.  I just love how this necklace turned out!  It's very simple but also elegant.  I think I am going to have to make a few more of these.  I used a BRONZE FILIGREE METAL CONNECTOR 004-B for the base of the necklace.  Then I added a resin flower from the BUTTONS & BAUBLES GRAB BAG to the connector.  I also added a SS8 CLEAR POINTY BACK CRYSTAL RHINESTONES to the center of the flower.


Here is a close up.  You can see I added a beaded dangle to the connector.  I used a champagne colored glass pearl and then added it to a BRONZE BALL END HEAD PINS.  I also added a CLEAR RHINESTONE AND BRONZE RONDELLE SPACER BEADS – 6MM (#BD006-B/CL) and BRONZE FILIGREE BEAD CAPS (#CAP052-B) and then created a loop and wire wrapped the end.  I used the same pearls and created a couple of beaded wire wraps for the necklace.  For the chain I used BRONZE CURB CHAIN (#CH206-B)


On a more personal note I wanted to share a few family pictures.


These are a few pictures from last weekend.  We celebrated Father's Day at my aunt and uncle's house with all of the family.  The top picture is my husband and two boys with Elizabeth (cousin).  The next picture is my dad and grandpa opening cards and gifts.  Then there is a picture of my aunt Carol and uncle Jack who were visiting from Florida.  The last picture is my grandpa and my mom (in black) with one of her sisters and one of her bothers, my aunt Gail, and my uncle John.


This past week our youngest son turned 13!  He's finally a teenager!!  I don't know where the years went!?!  We are so proud of him and the young man he is growing up to be.  

Thanks so much for stopping by today!  Don't forget to check out ButterBeeScraps NEW Website!

Hugs & Smiles,
Heidi


Supplies
ButterBeeScraps:  BUTTONS & BAUBLES GRAB BAG (resin flower), BRONZE BALL END HEAD PINSBRONZE FILIGREE BEAD CAPS (#CAP052-B)CLEAR RHINESTONE AND BRONZE RONDELLE SPACER BEADS – 6MM (#BD006-B/CL)SS8 CLEAR POINTY BACK CRYSTAL RHINESTONES, BRONZE FILIGREE METAL CONNECTOR 004-B BRONZE CURB CHAIN (#CH206-B)
Other Supplies:  Glossy Accents, E6000, Round Nose Pliers, Bent Nose Pliers, Flush Cutter

Friday, June 26, 2015

The Stamp Simply Ribbon Store - Prima Butterfly Card

Hello everyone! Today, is my day to post for The Stamp Simply Ribbon Store and I have pretty CAS (Clean And Simple) card to share with you using some of the beautiful products from the Prima Butterfly Collection.


Here is the card that I designed.  I used the Prima 6 x 6 Butterfly Collection along with ivory cardstock and I die cut the paper using Spellbinders Baby Buntings dies.  I layered the die cut pieces and added some 3D Foam Squares from Scrapbook Adhesives by 3L in between some of the layers to add dimension.  Then I fussy cut the image of the little girl with butterfly wings and the words--sweet memories.  I used more of the 3D Foam Squares in between the layers of paper.


Next I used the Zig Wink of Stella Clear Glitter Brush Pen to add a bit of sparkle to the card.  I like using this pen because since it had an actual brush tip and it's clear there are no lines so you can go around the edges and not have a sharp line--just the light look of sparkly glitter.  Then I added some Prima Say It In Crystals Adhesive Rosette - Butterfly Collection and Melissa Frances White Pearls for embellishments.


To finish off the card I added some Baby Pink Seam Binding with a bow and then added an ivory flower from the Prima Say It In Crystals Adhesive Rosette - Butterfly Collection to the center of the bow.

Thank you so much for stopping by!

Please be sure to check out The Stamp Simply Ribbon Store for all of the fantastic paper crafting products and the Blog for inspiration from the Design Team.

I hope you have a wonderful weekend!

Hugs & Smiles,
Heidi


Paper:  Prima 6 x 6 Butterfly Collection, Cardstock - Ivory
Dies:  Spellbinders Baby Buntings
Ribbon:  Baby Pink Seam Binding
Accessories:  Prima Say It In Crystals Adhesive Rosette - Butterfly Collection, Melissa Frances White Pearls, Zig Wink of Stella Clear Glitter Brush Pens, Scrapbook Adhesives by 3L 3D Foam Squares, E-Z Runner Permanent Strips-Refillable Dispenser 49'

Friday, June 19, 2015

The Stamp Simply Ribbon Store - CAS Happy Birthday Wishes Card

Hello everyone! Today, is my day to post for The Stamp Simply Ribbon Store and I have a CAS (Clean And Simple) birthday card to share with you.


I have to say I am pretty happy with how this card turned out.  Sometimes the CAS cards are harder for me to design than the ones that are all loaded up with layers, die cuts, embellishments and lots of bling LOL!  I know that might sound kind of funny, you would think it would be the opposite way around.  I like CAS cards and I think I am getting better at creating them but for the longest time I would look at them and think they looked naked--they needed more "stuff".  But sometimes less is more and I am learning to like the CAS cards.  :)  I think this is one of those cards that you could make a stack of in no time at all.  It's fresh, crisp, and has a pop of color. 


I used one of the flowers and a leaf from the JustRite Papercraft Stitched Flowers Vintage Tags Clear Stamps.  I stamped the images on to white cardstock using Tim Holtz Distress Inks Pinked Raspberry, Mowed Lawn.  Then I added a piece of raspberry cardstock for a mat in the background and added the panel to the card front.  I used Scrapbook Adhesives by 3L E-Z Runner Permanent Strips Refillable Dispenser 49' to adhered the paper pieces.  Then I added some Melissa Frances White Pearls for the flower centers.  If you wanted to have a flat card for mailing you could leave the pearls off.


The sentiment is also from the JustRite Papercraft Stitched Flowers Vintage Tags Clear Stamps and I used the Tim Holtz Distress Ink Pinked Raspberry again.  If you were making several of this same card design you could switch out the colors and also the sentiments.


CAS and quick and easy!  I hope you like the card for today.

Thank you so much for stopping by!

Please be sure to check out The Stamp Simply Ribbon Store for all of the fantastic paper crafting products and the Blog for inspiration from the Design Team.

I hope you have a wonderful weekend!

Hugs & Smiles,
Heidi


Supplies
Stamps:  JustRite Papercraft Stitched Flowers Vintage Tags Clear Stamps
Paper:  White, Raspberry
Ink:  Tim Holtz Distress Inks Pinked raspberry, Mowed Lawn
Accessories:  Melissa Frances White Pearls, Scrapbook Adhesives by 3L E-Z Runner Permanent Strips Refillable Dispenser 49'

LinkWithin

Related Posts Plugin for WordPress, Blogger...