
Hello everyone! Today, is my day to post for The Stamp Simply Ribbon Store. I have a beautiful emboss resist butterfly card to share with you, along with a step-by-step tutorial. The emboss resist technique is very easy to achieve and I thought I would do a quick tutorial for anyone who might be new to papercrafting.

Here is a picture of the card I designed. The butterfly image is from the JustRite Small Cling - Butterfly Kisses and the sentiment is from the JustRite Clear Stamp - Birthday Vintage Labels Four.

To start I stamped the butterfly image on to white cardstock using VersaMark Ink. The VersaMark Ink is kind of like a clear pigment ink. It will stay wet long enough to apply the embossing powder. It is a great ink pad to have in your stash of craft goodies because you can use the VersaMark Ink for so many techniques. After I stamped the image I applied Stampendous Super Fine Embossing Powder - Detail White. This is a picture before I heat set the image. *Note-if you don't have white embossing powder you can also use clear for this technique.

Here is a picture of the image after I used the heat tool to heat set the embossing powder.

I used four different colors of the Tim Holtz Distress Inks to color the background of my paper. I know the Distress Inks can be kind of deep colors but for this technique I used cotton balls instead of sponges to get a very soft light color. I actually use cotton balls almost all the time for any inking that I do. They are inexpensive and I can just toss them when I am done. To get the lighter color I first ink up the cotton ball and then on scratch paper I remove some of the ink (going in a circular motion) and I do this until most of the ink is rubbed off of the cotton ball as seen in the picture. I do this will all the different colors of ink.

For the first layer of ink I used Chipped Sapphire. Here you can see the butterfly starting to pop. Since the embossed area has a gloss finish to it, it will resist the ink and the embossing pops through.

For the Shaded Lilac I filled in the rest of the white space on the background.

For the third color I used Broken China. You can see the butterfly is really starting to stand out now.
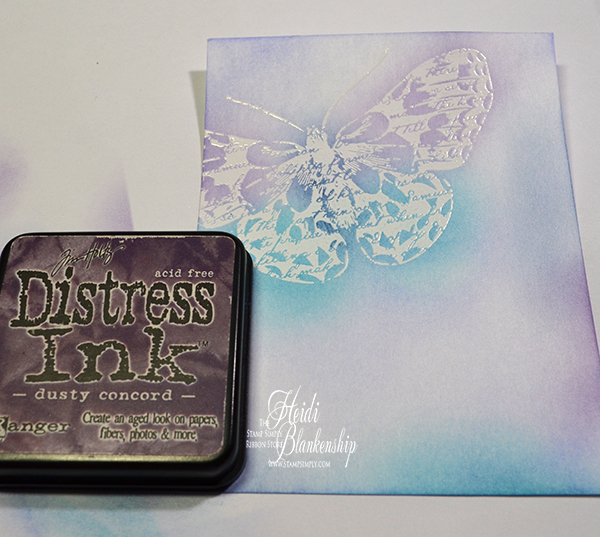
For the last color I used Dusty Concord. I love how the colors are so soft and the butterfly is a nice crisp white. For the most part when doing this technique I like to apply the ink in threes--meaning to add the same color of ink in three areas on the card. Adding the layers of ink also adds depth.

Here is a close up of the butterfly. I also added a few Melissa Frances White Pearls.

Thank you so much for stopping by today! I hope you enjoyed the tutorial.
Please be sure to check out The Stamp Simply Ribbon Store for all of the fantastic paper crafting products and the Blog for inspiration from the Design Team.
I hope you have a wonderful weekend!
Hugs & Smiles,
Heidi
Supplies
Stamps: JustRite Clear Stamp - Birthday Vintage Labels Four, JustRite Small Cling - Butterfly Kisses
Paper: Cardstock White, Lavender
Ink: Tim Holtz Distress Inks - Chipped Sapphire, Shaded Lilac, Broken China, Dusty Concord, Memento Grape Jelly, VersaMark Ink
Accessories: Stampendous Super Fine Embossing Powder - Detail White, Melissa Frances White Pearls, Scrapbook Adhesives by 3L 3D Foam Squares, Heat Tool
Thanks for the mini tutorial, such a beautiful card, love the softness of the inking. Thanks for the tip about using cotton balls, I'll try that too.
ReplyDeleteA lovely card. Simply steps and gorgeous outcome. I feel like playing a bit now. Thank you!
ReplyDeleteLove this card, as it is so beautiful and elegant. I meed to try this technique. Thanks for sharing.
ReplyDeletebeautiful, love the colors, and thanks for the tutorial. have a good week-end.
ReplyDelete