Hello blogging friends! Today, is the Really Reasonable Ribbon Blog Hop for the month of June. The RRR Design Team Members and Special Events Design Team Members will be showcasing the Monthly Ribbon Club.
This month there is a fabulous assortment of blue, yellow, green and pink ribbons included in the June Ribbon Club. This ribbon assortment is prefect for all of your fun summer projects! Click HERE for more details on how you can sign up for the Monthly Ribbon Club.
If you are following the order of the blog hop you should have just come from Judy's Blog. If not and you just happened to pop in for a visit please click HERE to start the blog hop at the Really Reasonable Ribbon's Ramblings! Blog.
Here is the card that I designed using the Really Reasonable Ribbon June Ribbon Club. I used the light blue satin ribbon with metallic silver edges and white crochet lace trim to create a shabby double loop ribbon flower and I have a tutorial to share with you on how to make the flower.
To start I cut a total of 14--2 inch long strips of ribbon. Then I folded them in half to create a loop and added a dab of hot glue to hold in place. Then I made two cuts in each piece of ribbon creating three loops.
I cut out a circle from cardstock to use as my base. Then I started adding the ribbons. As I added the ribbons I off set them to give the flower a fuller look.
Continue to add the ribbons until you have all 14 ribbon loops glued on.
Next I added some of the white crochet lace trim. For the center I used a ribbon buckle and a light blue large flat back pearl. Once the flower was done then I just fluffed it up with my fingers. Doing this loosens up the fibers in the ribbon and gives it a shabby look. I know a lot of ladies that make handmade flowers also like to use the eyelash trim and when the flowers are made this way the fibers almost give the appearance of the eyelash trim.
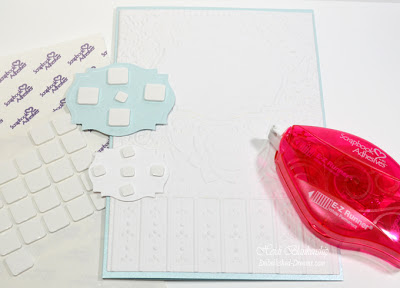
For the embossed background I used S6-001 5 x 7 Matting Basics A die template and E3D-006 Framed Labels Eighteen and the Grand Calibur® Machine from Spellbinders Creative Arts®. Then to assemble the card I used 3D Foam Squares and E-Z Runner® Permanent Strips - Refillable Dispenser - 49' from Scrapbook Adhesives by 3L®. The cardstock is Sweet Tooth and Sky Metallic from DiscountCardstock.com.
I added some of the white crochet lace trim along the border at the bottom of the card. Then I added Lt Pink Roses, leaves and pearls and I brushed Diamond Stickles on to the roses for a little sparkle.
I used CR-04350 Special Gifts Label Twenty-Nine stamp set from JustRite Papercraft for the sentiment.
I hope you enjoyed this tutorial on how to create the shabby double loop ribbon flower!
Enjoy the RRR Blog Hop--I know you will find all kinds of inspiration!
Now to continue in the Blog Hop you need to hop on over to Jenn's Blog and check out her fantastic project!
Thank you so much for stopping by today and I hope you enjoy the Really Reasonable Blog Hop!! Don't forget to visit the RRR Store and check out all of the beautiful ribbons, lace and trims!
I hope you have a wonderful and creative day!
Hugs & Smiles,
Heidi
Supplies
Paper: DiscountCardstock.com Sweet Tooth, Sky Metallic
Dies/Folders: Spellbinders Creative Arts® Grand Calibur® Machine, S6-001 5 x 7 Matting Basics A, E3D-006 Framed Labels Eighteen, S4-310 Labels Eighteen
Accessories: Scrapbook Adhesives by 3L® 3D Foam Squares, E-Z Runner® Permanent Strips - Refillable Dispenser - 49'; Recollections Pearls; Lt Pink Roses; Lt Blue Lg Flat Back Pearl, Ribbon Buckle, Leaves; Ranger Diamond Stickles


Beautiful card!Love the embossing,the ribbon flower is awesome!!!
ReplyDeleteWhat an adorable card! Great tutorial!
ReplyDeleteWhat a beautiful card Heidi. I LOVE that ribbon flower!!
ReplyDeleteBeautiful.... The texture is wonderful and your ribbon flower is so pretty. Wonderful job.
ReplyDeleteVery pretty/elegant card!
ReplyDeleteGreat flower tutorial!
i absolutely loved that flower, thanks for sharing the detailed pics.iam glad to be your follower.
ReplyDeleteabsolutely gorgeous!
ReplyDeleteYour card is SO very lovely, and I always appreciate tutorials on how to recreate lovely embellishments. Thanks for sharing with us!
ReplyDeleteVery pretty--love the flower you created.
ReplyDeleteThis is a striking card. Love the colors and thanks for the tutorial on the ribbon flower.
ReplyDeleteGorgeous! Your card is just Gorgeous! I love the sentiment, flowers, colors. Actually it is all terrific. Thanks for sharing. Edwina Brown
ReplyDeleteoh my!!!! this is so pretty. thanks for the tutorial.
ReplyDeletelovely, great bow instructions
ReplyDeleteTotally beautiful card! Thank you for the tutorial!
ReplyDeleteNow that is a bow I can make. Thanks for sharing.
ReplyDeletewow, awesome creation, I am going to try that on one of my cards... thanks for the inspiration...
ReplyDeleteas for the question:
and I am a cat person... actually... I like to look at all animals, prefer not to own any... too late, we have a turtle...LOL
This light blue ribbon flower is such a classy one! Just love it! So elegant and beautiful
ReplyDeleteBeautiful card - so romantic and feminine.
ReplyDeletePretty card and lovely flower you made. Thanks for the tutorial, I will try it sometime.
ReplyDeleteThanks for the great tutorial on that awesome bow!
ReplyDeleteBeautiful card. Great flowers. Thanks for the tutorial. TFS.
ReplyDeleteD~ dmcardmaker (AOL)
http://designsbydragonfly.blogspot.com
Heidi...that is one gorgeous card honey!! LOVE that embossing plate...got to check that out! Gorgeous shabby ribbon flower!!
ReplyDeleteHugs!!
Heather
WOW! this is stunning and i love that bloom you made :)
ReplyDeleteJUST MY STYLE!!!!!!!! SOFT & OH SO PRETTY!!!!!!!! LOVE your Ribbon flower!!!!!!! ;)GORGEOUS WORK!!!!!!:)
ReplyDeleteso beautiful! t.igo
ReplyDeleteThe card and flower are gorgeous and have such a shabby chic look to them. Thank you for sharing the gorgeous card and the awesome tutorial on how it was made. Hugs♥
ReplyDelete