Friday, December 11, 2015

The Stamp Simply Ribbon Store - Simple Stories Claus & Co - Happy Holidays Card

Hello blogging friends!  Today, is my day to post for The Stamp Simply Ribbon Store.  I have another Christmas card to share with you and I will say I am not sure if this falls under the CAS (Clean And Simple) category for cards but it did come together pretty quickly.


I used the Simple Stories - Claus & Co. 6 x 6 paper pad for this card.  This paper pad is for sure another favorite!  It is fantastic for quick card making and it is filled with so many great images for fussy cutting.  It also has several block style cut outs.  I used a deep red cardstock for the base and the die cut.  The base of the card is an A2 side folding card.


I layered a couple of pieces of pattern paper--the holly and jingle bells sheet music.  Then I added one of the block cut out and popped it up with some Therm-O-Web Foam Squares.  To create the die cut I used Spellbinders - Happy Holidays die.  Then I fussy cut the Santa and added Therm-O-Web Foam Squares for some dimension.


Here is a close up of the Santa.  I added some Kaisercraft Rhinestones - Lippy Red on the hat to look like berries.  Love this image of Santa!


Here is a close up of the sentiment.  I made a bow using some of the ribbon from the May Arts 5/8" Burlap Center Stitch - Christmas Sampler and then I added a flower from the Petaloo Botanica Minis - Red.  I also added a few more Kaisercraft Rhinestones - Lippy Red for berries down by the number 25 on the jingle bells sheet music paper.


Thank you so much for stopping by!  I hope you are enjoying this Christmas holiday season!

Please be sure to check out The Stamp Simply Ribbon Store for all of the fantastic paper crafting products and the Blog for inspiration from the Design Team.

I hope you have a wonderful weekend!

Hugs & Smiles,
Heidi


Supplies
Paper:  Simple Stories - Claus & Co., Cardstock - Red
Dies:  Spellbinders - Happy Holidays die
Ribbon:  May Arts 5/8" Burlap Center Stitch - Christmas Sampler
Accessories:  Petaloo Botanica Minis - Red, Kaisercraft Rhinestones - Lippy Red, Therm-O-Web Foam Squares, Scor-Tape

Sunday, December 6, 2015

Tonic Studios Chalkboard Die & Stamp Sets - Card Share

Hello blogging friends!  Today, I have two cards to share with you using a couple of the New Chalkboard Die and Stamp Sets from Tonic Studios.  There are three sets in this collection -- Birthday Wishes, It’s Your Big Day, and Special Occasion.  These sets are prefect for card making and all of your DIY projects.


Here is a look at the first card I designed.  I used the 1099E It's Your Big Day Indulgence Chalkboard Die & Stamp Set and 485E Mixed Oval Layering from Tonic Studios.  The card base in an A2 top folding card.  I die cut the sentiment and decorative oval using white pearl shimmer paper and then I die cut the label and oval shape using black cardstock.  


I rubbed a little White Pigment Ink on to the black label and then buffed off the excess ink with a paper towel.  Doing this gives the black paper a chalkboard look.  I used the Nuvo 203N Nuvo Glue Pen Medium to adhere the sentiment to the label shape.  Then I used a couple of pieces of craft foam as backing for the label and decorative oval shape.  I used the Nuvo 650N Crystal Drops Gloss - Ebony Black to embellish around the edges of the card.  The crystal drops look similar to pearls or enamel dots.


To finish off the card I added a few Wild Orchid Craft Flowers.


It's Your Big Day Card
Tonic Studios:
1099E It's Your Big Day Indulgence Chalkboard Die & Stamp Set485E Mixed Oval LayeringNuvo 650N Crystal Drops Gloss - Ebony Black, Nuvo 203N Nuvo Glue Pen Medium422E Funky Tape Runner
Other Supplies:
Paper:  Cardstock - White, White Pearl Shimmer, Black
Ink:  White Pigment Ink
Accessories:  Craft Foam, Wild Orchid Craft Flowers


Here is a look at the second card I designed.  For this card I used 1098E Special Occasion Indulgence Chalkboard Die & Stamp Set and 484E Mixed Rectangles Layering Die Set.  To start I stamped the sentiments twice on to white paper with VersaMark Ink and then heat embossed with Ranger Super Fine Detail Gold Embossing Powder.  


I fussy cut one set of the sentiments--the top and bottom pieces of the sentiment.  Then I layered the pieces using Foam Squares.  To add a bit of color I used Zig Clean Color Real Brush Pens to do a light watercolor wash and color the tiny images--heart, flower and butterfly.  I layered the label shape on to the decorative vine label.  I also used the Zig Clean Color Real Brush Pens on the tiny vines.  To embellish the card I added pink and aqua rhinestones.


I used the 484E Mixed Rectangles Layering Die Set to die cut a couple of layers of white, and aqua cardstock and then layered everything on to an A2 top folding card.

This week Create & Craft USA will be featuring Tonic Studios Chalkboard Die & Stamp Sets so be sure to check it out!

Thanks so much for stopping by today!

Hugs & Smiles,
Heidi


Special Occasion Card
Tonic Studios:
1098E Special Occasion Indulgence Chalkboard Die & Stamp Set, 484E Mixed Rectangles Layering Die Set, 422E Funky Tape Runner
Other Supplies:
Paper:  Cardstock - White, Green, Aqua, Pink
Ink/Markers:  VersaMark Ink, Zig Clean Color Real Brush Pens - Light Pink, Cobalt Blue, Persian Blue, Pale Green, Light Green
Accessories:  Ranger Super Fine Detail Gold Embossing Powder, Pink and Aqua Rhinestones, Craft Foam, Foam Squares, Watercolor Brush, Heat Tool


Friday, December 4, 2015

The Stamp Simply Ribbon Store - Love, Peace & Joy Christmas Card

Hello blogging friends!  Today, is my day to post for The Stamp Simply Ribbon Store.  Christmas is just a few short weeks away and I know a lot of us are still busy creating projects for Christmas--cards, presents big and small and maybe some Christmas ornaments too.  So today, I have another quick and easy Christmas card to share with you.


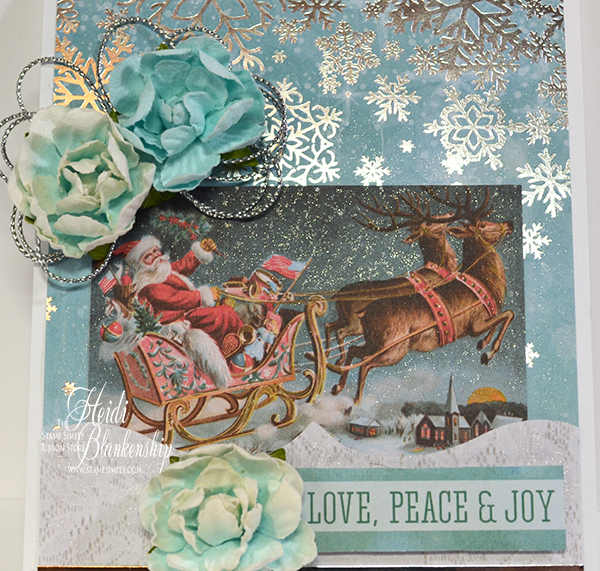
Here is a card I designed using the some of the beautiful papers and die cuts from the Kaisercraft Silver Bells 6-1/2'' Paper Pad.  I think this is my favorite paper pad this year.  I just love all the papers and gorgeous images and it even has some touches of silver foil--gotta love that!  With the cut outs and die cut pieces projects come together so easily.


The card base is a A2 top folding white card.  I layered it with a piece of the pattern paper that is a light blueish aqua color and it has silver foil snowflakes.  Then I added one of the beautiful cut out images of Santa and the reindeer.  Along the bottom I used one of the die cut borders and it has a white lace pattern on it.  Next, I added a thin strip of the Bazzill Silver Mirror Cardstock, I though that would go nicely with the silver foil snowflakes.  I added one of the die cuts with a sentiment and used Therm-O-Web Foam Squares to pop it up a little and add some dimension.  For some embellishments I added a simple bow using May Arts Silver Metallic String and then I added some Prima Serenade Turquoise Flowers.


I wanted to add even more sparkle to the card so I went over all of the background paper, the border and the sky in the image of Santa with the Zig Wink of Stella Clear Glitter Brush Pen.  You can see some of the sparkle in the sky.  I just love how this card turned out and IRL it is very sparkly.


Thank you so much for stopping by!  I hope you are enjoying this Christmas holiday season--just remember--try not to get too stressed during the holiday and really enjoy it! :)

Please be sure to check out The Stamp Simply Ribbon Store for all of the fantastic paper crafting products and the Blog for inspiration from the Design Team.

I hope you have a wonderful weekend!

Hugs & Smiles,
Heidi


Supplies
Paper:  Kaisercraft Silver Bells 6-1/2'' Paper Pad, Bazzill Silver Mirror Cardstock, Cardstock - White
Ribbon:  May Arts Silver Metallic String
Accessories:  Prima Serenade Turquoise Flowers, Zig Wink of Stella Clear Glitter Brush Pen, Therm-O-Web Foam Squares, Scor-Tape

Monday, November 30, 2015

ButterBeeScraps - Jewelry Share - Quick and Easy Earrings - ICE Resin - ArtCult Digital Images

Hello everyone!  Today, I have a couple of jewelry pieces to share with you--a necklace and a pair of earrings. If you are looking for any jewelry projects for Christmas gifts the earring I am sharing today are very quick and easy to make.


Here is the necklace that I designed.  I love this sweet image of the girl with the butterfly.  I used a digital image from ArtCult on Etsy.  I absolutely love the images from this shop!  There are so many to choose from and they come in a variety of sizes.  The best part--there is an instant download and what you see is what you get.  I am not affiliated with her shop but I do highly recommend it. :)  I added the image to a Hobnail Long Rectangle Bezel and then filled it with ICE Resin.  Then I used different little bits and pieces form ButterBeeScraps to embellish the bezel and create the beaded dangle.  I used one of the Bronze Metal Filigree Embellishments (#550-B) on the bezel and then I added some copper micro beads and Light Colorado Topaz Flat Backs SS12.  I thought the copper and topaz would bring out the colors in the butterfly.  To create the beaded dangle I used a Bronze Ball End HeadpinBronze Filigree Bead Caps (#CAP052-B)Clear Rhinestone and Bronze Rondelle Spacer Beads – 6mm (#BD006-B/CL), and a couple of beads from my own stash.


Here is another photo of the necklace.


These are the earrings I designed.  Like I said if you are looking for some quick and easy Christmas presents these earrings would be perfect.  I used the pretty Silver Shepard Hook Earring Wires w/ Rhinestones (#J594-S).  For the wings I used the Stainless Steel Wings Metal Filigree Embellishments (#686-ST) and added Clear AB Flat Backs SS20, SS16SS12.  Easy peasy--done in 5 minutes or less!

Thanks so much for stopping by!

Please be sure to visit ButterBeeScraps!  Monique, adds new filigrees, jewelry findings and embellishments to the store every month.


Butterfly Beauty Bezel Necklace
Bronze Metal Filigree Embellishments (#550-B)
Light Colorado Topaz Flat Backs SS12
Bronze Filigree Bead Caps (#CAP052-B)
Clear Rhinestone and Bronze Rondelle Spacer Beads – 6mm (#BD006-B/CL)
Bronze Ball End Headpin
Other:  Digital Image from ArtCult on EtsyHobnail Long Rectangle Bezel, ICE Resin, Image, Copper Micro Beads

Silver Sparkle Wing Earrings
Stainless Steel Wings Metal Filigree Embellishments (#686-ST)
Silver Shepard Hook Earring Wires w/ Rhinestones (#J594-S)
Clear AB Flat Backs SS20, SS16, SS12

Friday, November 27, 2015

The Stamp Simply Ribbon Store - Graphic 45 Mon Amour - Thinking Of You Card

Hello blogging friends!  Today, is my day to post for The Stamp Simply Ribbon Store.  I have another CAS (Clean And Simple) card to share with you using some of the gorgeous papers from the Graphic 45 - Mon Amour 8 x 8 Paper Pad and 6 x 6 Paper Pad.


These two paper pads are so beautiful and could be used for a variety of occasions such as --everyday and think of you, love, anniversary and weddings and after the first of the year Valentine's Day.  The paper pad is filled with beautiful images and patterns and also several cut out pieces that are great for CAS cards.  The base fo my card is a A2 top folding and I used some of the dark gray floral print to add a mat.  Then I layered a piece of the pretty rose floral paper on top.  The main image is one of the cut out and so is the sentiment.  I layered both pieces with the same dark gray floral paper.  I added a few Therm-O-Web Foam Squares to add some dimension.  To finish off the card I added a couple of embellishments -- Petaloo Botanica Mums & Butterflies Pink and Melissa Frances White Pearls.


Here is a close up of the main image, sentiment and butterfly.


I love this butterfly and how perfectly it matches the paper.  Can you see the pink little butterflies on the paper?


Thank you so much for stopping by!  I hope you all had a Happy and Blessed Thanksgiving!  If you are going our Black Friday shopping be safe! :) 

Please be sure to check out The Stamp Simply Ribbon Store for all of the fantastic paper crafting products and the Blog for inspiration from the Design Team.

I hope you have a wonderful weekend!

Hugs & Smiles,
Heidi


Supplies
Paper:  Graphic 45 - Mon Amour 8 x 8 Paper Pad and 6 x 6 Paper Pad, Cardstock - Ivory
Accessories:  Petaloo Botanica Mums & Butterflies Pink, Melissa Frances White Pearls, Scor-tape, Therm-O-Web Foam Squares

Friday, November 20, 2015

The Stamp Simply Ribbon Store - Just For You Silver Bells Christmas Card

Hello blogging friends!  Today, is my day to post for The Stamp Simply Ribbon Store.  I have another CAS (Clean And Simple) Christmas card to share with you.  I know things get so busy with the holidays so it's nice to be able to quickly whip up some Christmas cards.  


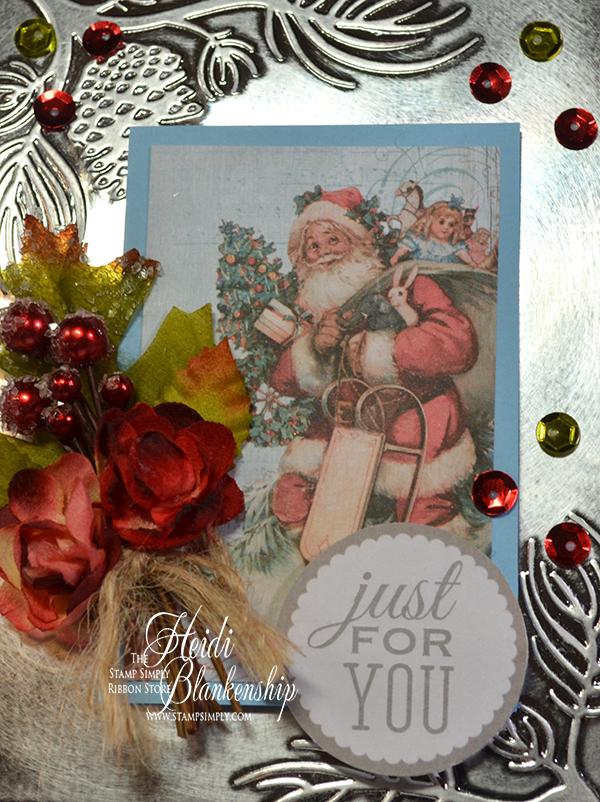
For the focal image on my card today I used one of the cut outs from the Kaisercraft Silver Bells 6-1/2'' Paper Pad.  This is such a beautiful paper pad!  The vintage Christmas images are fantastic and there are a lot of die cut images included in the paper pad--perfect for CAS card!  I used light blue cardstock for the card base which is a top folding A2 size.  I also used a piece of the light blue cardstock for a mat behind the Santa image.  For the background I used a piece of Bazzill Silver Mirror Cardstock and embossed it with the Darice Pine Branches In Corner embossing folder.


Here is a before and after look at the Bazzill Silver Mirror Cardstock.  I love how bright and shiny this paper is but for this card I wanted to tone it down a bit and give it a brushed/ aged look.  The first piece is the before and the second piece is the after.  I lightly sanded the paper with a very fine grit sanding block going in a circular motion.  Doing this not only toned down the silver but it also helped to make the embossed areas really pop.  Just a little tip--I used the tip of the corner on the sanding block to get in between all of the embossed areas and I also sanded over the embossing.


In this close up picture you can really see how much the embossed area pops.  I used Therm-O-Web Foam Squares to add some dimension to the Santa image and also the die cut circle with the sentiment.  For the flower cluster I used a Petaloo - Sugared Red Berry Clusters and then added a couple of flowers from the Botanica Minis Red.


For a little sparkle I added a few sequins from the Prima - Say It With Crystals A Victorian Christmas collection.


I hope you enjoyed another CAS Christmas card.  :)

Thank you so much for stopping by!

Please be sure to check out The Stamp Simply Ribbon Store for all of the fantastic paper crafting products and the Blog for inspiration from the Design Team.

I hope you have a wonderful weekend!

Hugs & Smiles,
Heidi


Supplies
Paper:  Kaisercraft Silver Bells 6-1/2'' Paper Pad, Bazzill Silver Mirror Cardstock, Cardstock - Light Blue
Embossing Folder:  Darice Pine Branches In Corner
Accessories:  Petaloo - Sugared Red Berry Clusters, Botanica Minis Red, Prima - Say It With Crystals A Victorian Christmas, Therm-O-Web Foam Squares, Scor-Tape, Sanding Block

Tuesday, November 17, 2015

Angel Earrings - ButterBeeScraps - Small Business Saturday Shopaholic SALE-bration!

Hello everyone!  I know I mentioned in a post not too long ago that I have a show coming up and I have been busy, busy, busy creating. I have been making Christmas ornaments, lots of jewelry, cards, scarves, handbags and some small home decor pieces.  If you are local we would love to see you at the show!  Here are the details.  :)

Small Business Saturday
Shopaholic SALE-bration
Saturday, November 28th, 2015
9 am - 3 pm
Marion Hall, St. Theodore Catholic Church
Albert Lea, MN  

Last year was the the first year for the show and they had 30+ vendor.  It's a great opportunity to get out and do a some Christmas shopping and support local small businesses.

Last year I made a few pairs of angel earrings and they sold out right away.  So I decided to make more these year and do a few different style designs.


These are some of the angel earrings that I have made.  I have them in bronze and silver.  I used a lot of bead caps, beads, head pins and rondelles from ButterBeeScraps.  All items from ButterBeeScraps are listed and linked below in the supply list.  I also used several beads and bead caps from my own stash.  

I didn't take pictures of every pair but I did take some close ups of a few different designs.


I hope you like all of the angel earring and you are inspired to make some.  These would make really cute pendants for a necklace too.

Thanks so much for stopping by today!

Hugs & Smiles,
Heidi


Supplies
ButterBeeScraps:  BRONZE BALL END HEAD PINSSILVER BALL END HEAD PINSBRONZE FILIGREE BEAD CAPS (#CAP486-B)BRONZE FILIGREE BEAD CAPS (#CAP052-B)BRONZE FILIGREE BEAD CAPS (#CAP827-B) SILVER FILIGREE BEAD CAPS (#CAP486-S)CLEAR RHINESTONE AND BRONZE RONDELLE SPACER BEADS – 6MM (#BD006-B/CL),  CLEAR AB RHINESTONE AND SILVER RONDELLE SPACER BEADS – 6MM (#BD006-P/AB)TIBETAN STYLE BRONZE WING BEADS (#BD712-B)TIBETAN STYLE SILVER WING BEADS (#BD712-S)8X12MM CLEAR AB FACETED GLASS TEARDROP BEADS4X6MM CLEAR AB FACETED GLASS ABACUS BEADS7X10MM COBALT BLUE PEARLIZED FACETED GLASS ABACUS BEADS7X10MM TEAL GREEN FACETED GLASS ABACUS BEADS7X10MM RED PEARLIZED FACETED GLASS ABACUS BEADS4X6MM RED PEARLIZED FACETED GLASS ABACUS BEADS,

Friday, November 13, 2015

The Stamp Simply Ribbon Store - Merry & Bright CAS Christmas Card

Hello blogging friends!  Today, is my day to post for The Stamp Simply Ribbon Store.  I have another CAS (Clean And Simple) Christmas card to share with you.  Over on the Stamp Simply Blog we are celebrating the 12 Days of Christmas with CAS cards.  If you are looking for inspiration to create some CAS cards then be sure to hop on over to the Stamp Simply Blog and check it out!  There are so many beautiful cards from the design team.


For my card I used some of the Wild Rose Studio - Painted Poinsettia paper.  This paper is so pretty and has some beautiful images on it.  I love this image of the little bird with the holly, berries and flowers.  Originally this card was going to be an A2 size.  But it was my first time working with the Elizabeth Craft Designs 953 Tags & More 3 - Leaves die (which by the way I love!) and the tag was a little larger than I thought it would be.  I had already cut the pattern paper to fit and A2 size card.  So this is what I did to resolve this and have a 5.5 x 5.5 card--I cut a 5.25 x 5.25 piece of white cardstock so I would have a base to add the papers to.  Then I cut another small strip of the pattern paper and added a strip of the Bazzill - Gold Mirror Cardstock along the side to fill in the space and then I had card front to fit the 5.5 x 5.5 card base.


The Elizabeth Craft Designs 953 Tags & More 3 - Leaves die is a pretty neat die set and allows you to be able to customize your tag.  You can make the tag different sizes and embellish it in different ways using all of the different die included in the set.  To create my tag I used the leaf die for the top part of the tag.  I saved the leaf drop out pieces to use as well.  Then I die cut some small flowers.  I added a little Tim Holtz Distress Ink - Mowed Lawn to the center of the flowers to try and make them look like the flowers in the pattern paper.  I also added a Melissa Frances White Pearls to the center of each flower.  I used JustRite Papercraft CR-02176 Christmas Handwriten Sentiments along with  Memento - Rich Cocoa to stamp the sentiment and add the little berry sprigs.  I used just a little Tim Holtz Distress Ink - Mowed Lawn to add a little color and then a Copic Marker - R85 Rose Red for the berries.


To finish off the tag I added May Arts Rose Silk Ribbon with a bow and then I also used some Therm-O-Web 3D Squares on the tag for some dimension.


Thank you so much for stopping by!

Please be sure to check out The Stamp Simply Ribbon Store for all of the fantastic paper crafting products and the Blog for inspiration from the Design Team.

I hope you have a wonderful weekend!

Hugs & Smiles,
Heidi


Supplies
Stamps:  JustRite Papercraft CR-02176 Christmas Handwriten Sentiments
Paper:  Wild Rose Studio - Painted Poinsettia, Bazzill - Gold Mirror Cardstock, Cardstock - White, Rose Pink
Ink:  Memento - Rich Cocoa, Tim Holtz Distress Ink - Mowed Lawn, Copic Marker - R85 Rose Red
Dies: Elizabeth Craft Designs 953 Tags & More 3 - Leaves
Ribbon:  May Arts Rose Silk Ribbon
Accessories:  Melissa Frances White Pearls, Therm-O-Web 3D Squares, Scor-Tape

Wednesday, November 11, 2015

Warm Wishes CAS Christmas Card and Tis The Season Christmas Card - Tonic Studios

Hello everyone!  Now that Halloween has passed and Thanksgiving will be here in just a couple of weeks I am in full swing for making Christmas cards, ornaments and presents.  I have a sale coming up November 28th (more information to come) so I have been busy designing a lot of jewelry too.  I am so excited to be a Guest Blogger for Tonic Studios today!  I have a couple of Christmas cards to share with you.  One of the cards is pretty CAS (Clean And Simple) and the other card has a lot of sparkle and detail.


Lets start with the CAS card first.  To create this card I started with a piece of white cardstock cut to 3-1/2 x 5.  Then lay the die template across the top (5 in side), tape in place and die cut.   I used 598E Header Fold Die Set Christmas Wishes from Tonic Studios.  After die cutting trim down sides to fit card and adhere to a light blue mat.  I stamped the Winter Wishes sentiment from Simon Says Stamps Hand Lettered Winter Wishes stamp set with VersaMark ink and heat embossed with Ranger Super Fine Detailed Gold Embossing Powder and a Heat Tool.  Next I added a layering mat with pink cardstock.  I used 422E Funky Tape Runner and 419E Craft Tacky Glue 120ml to adhere all the layers.


Save the drop out pieces to add stars and snowflakes to the top (sky part) of the card.  I used 419E Craft Tacky Glue 120ml to adhere all the tiny pieces.  Then I added Nuvo Crystal Drops - 660N Wedgewood Blue to the stars and snowflakes and 666N Gloss Carnation Pink on the tree to look like little lights or ornaments.


To finish off the card I added some May Arts Sheer Gold Sparkle ribbon and adhered everything to a light blue A2 card.


My second card is a lot more detailed, full of sparkle and I am using black for a non-traditional color.  I have to tell you I absolutely love the frame die cut on this card!  I used 641E Christmas Wreath Die Set 'Tis The Season from Tonic Studios.  Now I know this die set is in the Christmas collection but you could really use the frame die template year round.  I love all the flourishes.  To start I die cut the white frame using the 641E Christmas Wreath Die Set 'Tis The Season.  I added 3D Foam squares to the back of the frame to pop it up and add a little dimension.  I added the frame die cut to a black 5.5 x 5.5 card.  Then I applied 422E Funky Tape Runner to the white drop out piece and added it to the center of the frame.  


Next I die cut the Tis The Season sentiment using Gold Mirror cardstock.  Here is a **TIP** Gold foil or gold mirror paper will show any little imperfections like the cut lines in the mats used for die cutting. To avoid this lay down a scrap piece of paper on your mat and then add gold foil or mirror paper and die on top--results--no imperfections.  I used 419E Craft Tacky Glue 120ml to adhere the sentiment.  I really like the detailed tip on the glue bottle--it has such a tiny hole and it is fantastic for gluing the detailed die cuts.


To create the poinsettias I used 80E Rococo Poinsettia Strip Die from Tonic Studios.  I die cut the poinsettias three times--once with green cardstock and twice with red cardstock.  On both red die cuts fussy cut out the flowers.  On the green die cut use the Nuvo 203 Glue Pen Medium to quickly go over the leaf and vine areas and then I added Nuvo Pure Sheen Glitter 701N Green.  Then I used the Nuvo 203 Glue Pen Medium on the red poinsettias and then add Nuvo Pure Sheen Glitter 700N Ruby Red.  Tap off excess glitter and use 419E Craft Tacky Glue 120ml to adhere the red poinsettia pieces on top of the green poinsettia die cut piece.  Use 3D foam squares on the flowers to add some dimension to the card.  To finish off the poinsettias I added Nuvo Crystal Drops 653N Bright Gold to the flower centers.


I also added some Nuvo Crystal Drops 653N Bright Gold to a couple of the corners on the card.

I hope you enjoyed both of the cards I shared today.  I am loving the Christmas die collection from Tonic Studios!  

Did you know that Tonic Studios US now has a blog and website?  If you haven't already been over there you can click HERE to check it out.  While you are there take a look around.  They have a beautiful collection of dies, a variety of tool and some fabulous new Nuvo Pure Sheen Glitter and Nuvo Crystal Drops.  

Tonic Studios also announced last week they are having a 
TONIC US AMBASSADOR DESIGNER CALL!  
You can click HERE for all of the information.

Would you love to win some fabulous crafty goodies from Tonic Studios USA? During this season of gratitude and Thanksgiving Tonic Studios will be having some amazing giveaways.  
You can click HERE to visit the Tonic Studios USA Facebook Page and find out the details on how you could win!

Thanks so much for stopping by today and I hope you have a beautiful day!

Hugs & Smiles,
Heidi

Warm Wishes Card
Tonic Dies:  Tonic Studios - 598E Header Fold Die Set Christmas Wishes
Tonic Accessories:  Nuvo Crystal Drops - 660N Wedgewood Blue666N Gloss Carnation Pink422E Funky Tape Runner419E Craft Tacky Glue 120ml
Paper:  Cardstock - White, Lt. Blue, Pink
Stamps:  Simon Says Stamps Hand Lettered Winter Wishes
Ink:  Versa Mark
Ribbon:  May Arts Sheer Gold Sparkle
Accessories:  Ranger Super Fine Detailed Gold Embossing Powder, Heat Tool

Tis The Season Card
Tonic Dies:  Tonic Studios641E Christmas Wreath Die Set 'Tis The Season , 80E Rococo Poinsettia Strip Die
Tonic Accessories:  Nuvo Pure Sheen Glitter - 700N Ruby Red, 701N Green, Nuvo Crystal Drops - 653N Bright Gold, Nuvo 203 Glue Pen Medium, 422E Funky Tape Runner, 419E Craft Tacky Glue 120ml
Paper:   Cardstock - Gold Mirror, Black, White, Green, Red,
Accessories:  3D Foam Squares


Friday, November 6, 2015

The Stamp Simply Ribbon Store - Silver Bells Merry Little Christmas Card

Hello blogging friends!  Today, is my day to post for The Stamp Simply Ribbon Store.  I have another CAS (Clean And Simple) Christmas card to share with you.  Over on the Stamp Simply Blog we are celebrating the 12 Days of Christmas with CAS cards.  Today, is day 5 and if you are looking for inspiration to create some CAS cards then be sure to hop on over to the Stamp Simply Blog and check it out!


Here is the card that I designed.  I used the KaiserCraft Silver Bells 6-1/2'' Paper Pad to create this card.  This paper pad is filled with beautiful pastel Christmas images.  It also includes some foiled papers and die cuts in the paper pad. I just love these colors for Christmas.


Here is a close up of the beautiful vintage image of Santa.  I used some light blue pattern paper from the paper pad to add a mat layer behind the image.  The label shape with the sentiment is also from the paper pad.  I added a couple of Therm-O-Web 3D Square to pop the die cut shape up.  Then I added some May Arts - Pink Silk Ribbon and Melissa Frances White Pearls.


The card base is light blue cardstock and this is an A2 top folding card.


Thank you so much for stopping by!

Please be sure to check out The Stamp Simply Ribbon Store for all of the fantastic paper crafting products and the Blog for inspiration from the Design Team.

I hope you have a wonderful weekend!

Hugs & Smiles,
Heidi


Supplies
Paper:  KaiserCraft Silver Bells 6-1/2'' Paper Pad, Cardstock - Light Blue
Ribbon:  May Arts - Pink Silk Ribbon
Accessories:  Melissa Frances White Pearls, Scor-Tape, Therm-O-Web 3D Square

Wednesday, November 4, 2015

Casa de Jewels - Five Strand Aqua and Silver Beaded Bracelet

Hello everyone!  Today, is my day to blog on the Casa de Jewels Blog and I have a five strand aqua and silver beaded bracelet to share with you.  


Here is a look at the bracelet.  I just love how it turned out and the aqua beads are so pretty!

To see more pictures and find out all of the details you can 
click HERE to visit the Casa de Jewels Blog.

Thanks so much for stopping by and I hope you have a fabulous day!

Hugs & Smiles,
Heidi

LinkWithin

Related Posts Plugin for WordPress, Blogger...