
 Here is the card I created for the New Release. I used the Large Elegant Word Background, Daisy Patch Flowers, Simple Filler Stems, Daisy Patch Swirls and Perfect Petals DieCuts. These are all New Releases. I also have a step-by-step tutorial to share with you on how I created the card.
 Have you ever thought about using the back of your unmounted stamp to create a background? This is what I used to create an aged background for the stamp. First I covered the entire backside with Antique Linen ink and then I edged it with Vintage Photo ink.
 I lightly misted over the ink with Pearl Glimmer Mist and then I turned it over using it just like a regular stamp.
  Here's the result. It looks like an aged background and you can't see it from the photo but it has a nice soft all over pearl glimmer to it.
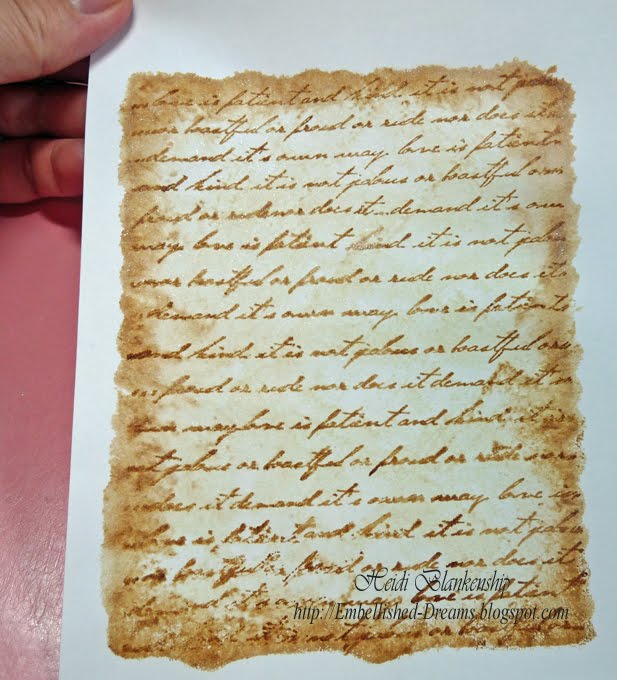 I inked up the Large Elegant Word Background with Vintage Photo ink and then misted it in a few places with the Pearl Glimmer Mist.
  Next I stamped the Daisy Patch Flowers and Simple Filler Stems and heat embossed with gold embossing powder.
 I did all of the same steps as mentioned above and embossed a second flower.
 Next I painted the images with Twinkling H2O's. These are the colors I used, Playful Peony, Terracotta Rose, Lemongrass and Green Tea.
 I painted the second flower with the same two pink tones and then I cut out the image, curled the petals and layered them. I offset the top flower to make the image appear larger. Then I added Peeled Pain Distress Stickles to the center of the flower.
  After the stickles was dry I added some green rhinestones from My Mind's Eye to the center.
  To create this beautiful corner diecut I used the Perfect Petals DieCuts Corner Flourish. I used white cardstock and then I inked the edges of the diecut with Vintage Photo ink and added glitter for a little sparkle.
 For the sentiment I used a stamp from the Daisy Patch Swirls stamp set and then I used the Fancy Tags die template from Spellbinders™ to create the tag. I used Rich Cocoa ink for the sentiment and Vintage Photo to ink the edges and then I used 3D Foam Squares from SCRAPBOOK ADHESIVES By 3L to add a little dimension to the tag.
 Here is another close-up of the flower image.
 Supplies~
Stamps~Heartfelt Creations-HCPC 3323 Large Elegant Word Background, HCPC 3318 Daisy Patch Flowers, HCPC 3319 Simple Filler Stems, HCPC 3324 Daisy Patch Swirls, HCD 704 Perfect Petals DieCuts
Paper~DCWV-The Rustic Stack; Georgia Pacific-White Cardstock
Ink~Ranger-Distress Ink Antique Linen, Vintage Photo; Tsukineko-Memento Rich Cocoa
Accessories~Spellbinders™-Wizard™, S4-235 Fancy Tags; SCRAPBOOK ADHESIVES By 3L™-E-Z Runner® (33'), 3D Foam Squares; Ranger-Gold Embossing Powder, Distress Stickles Peeled Paint; My Mind's Eye-Pink & Green Lush Rhinestones; Tattered Angels-Pearl Glimmer Mist; Twinkling H2O's-Playful Peony, Terracotta Rose, Lemongrass, Green Tea; Sparkle-N-Sprinkle-Crystal Ice Glitter; Paint Brush; Cotton Balls for inking; 2way Glue Pen; Heating Tool
Thank you so much for stopping by today. I hope you enjoyed the tutorial and I would love to hear what you think about the new releases. Don't forget to hop on over to the Heartfelt Creations Blog to see more beautiful samples! Hope you have a Wonderful Day!!
Hugs & Smiles,
Heidi
This is a fabulous card! And thanks so much for the background idea! It's one I would never have thought of!
ReplyDeletegreat idea!
ReplyDeleteSandra
Heidi Loo you have out done yourself again, beautifully done my friend...you are the queen of ideas.
ReplyDeleteThis is GORGEOUS!!! I love love love that flower! :):):):):):):):):):):):):):):):):):):):)
ReplyDeleteAbsolutely stunning!! I enjoyed watching this beauty unfold in your tutorial!!!
ReplyDeleteHeidi, I j ust loved this when I saw it. The flower looks almost real. Great job!!!!
ReplyDeleteHeidi this is just stunning.
ReplyDeleteOk, besides how FAB this looks, one question for you - does the back of the stamp still sticky with after stamping?
ReplyDeleteTFS
Wow that is so clever and creative how you did that background, so love the flower too, such great coloring and it does give it such dimension. Beautiful!!
ReplyDeleteHeidi, this is so pretty....I just came across it at the Heartfelt Card Gallery. I love it!!!
ReplyDeletePam