Friday, October 5, 2012

Halloween Blog Candy Winner!!

Hello!  I just have a quick blog post today to announce the Winner of the Halloween Blog Candy!!
I would have posted sooner but my little helper was gone tonight at a church activity.  ;-)

So are you ready to find out who won all these Halloween goodies???


Before I tell you who the lucky winner is I want to say Thank You for leaving so many wonderful comments and sharing your favorite parts about Halloween.  I had so much fun reading all of the comments--some were funny, some were about favorite costumes, memories from childhood or memories of your children and some really great traditions.  I have been sick most of this past week so all of your comments helped to cheer me up.  I am starting to feel a little better today so I hope I am on the upswing of this. ;-)


I printed out all of the comments, cut them into strips, folded them up and then my little helper picked out a winner. 


Anonymous Anonymous said...
(already a blog follower) My favorite halloween "thing" is actually remembering when my kids were little. i made costumes from things around the house. or sewed them myself. it was so much fun. i don't think i ever purchased a costume for any of the 3 kids. now i'll have to try my ideas out on the grandkids.
gail
robinson.gail@hotmaildotcom
October 2, 2012 2:48 PM


Congratulations Gail!!!

I sent Gail an email and I will be getting a package out to her in the next couple of days.

Again, thank you so much for playing along!  I hope you all have a wonderful weekend.  Tomorrow is World Card Making Day so I hope you can all find some time to have fun and be creative.  

Hugs & Smiles,
Heidi

Wednesday, October 3, 2012

Shabby Chic Key to my Heart Trinket Box

Hello!  Today, is my day to post for Julianna C. Hudgins Design Team over on her blog Positively Me.  I have an altered trinket box to share with you using S5-099 Jewel Keys and LF-013 Jewel Goddess (Hearts) from Julianna's Positively Me Collections from Spellbinders.


The S5-099 Jewel Keys die template set is one of my favorites and I thought it would work wonderfully with the two little hearts from the LF-013 Jewel Goddess die template set to create this shabby chic trinket box.  To see more pictures and find out all of the details please click HERE to see my blog post.


Thank you so much for stopping by today!  I hope you have a wonderful and creative day!

Hugs,
Heidi

Supplies Spellbinders:  S5-099 Jewel Keys, LF-013 Jewel Goddess (Hearts), S5-129 Foliage Two, S4-384 Exquisite Circles, Grand Calibur Other Supplies Paper:  Discount Cardstock Simply Smooth Ivory; Prima Tea-Thyme Collection; Accessories:  Really Reasonable Ribbon Pink Seam Binding, Ivory Mini Pom-Poms, Penelope Crochet Lace Trim; Pro 31 Designs White Curly Roses, Circle Pearl Spray; Ranger Diamond Stickles; Homemade Vintage Pink Mist; Tulle, Hot Glue

Tuesday, October 2, 2012

Breast Cancer Awareness Blog Hop - Really Reasonable Ribbon and Hampton Art - Choose HOPE ♥


Hello blogging friends!  Today, is the Really Reasonable Ribbon and Hampton Art Blog Hop for Breast Cancer Awareness.   The RRR Design Team Members and Special Events Design Team Members will be joining the Hampton Art Design Team Members showcasing the beautiful ribbons and trims from RRR and fantastic stamps from Hampton Art.  

Both RRR and Hampton Art will be offering prizes for the blog hop!  RRR will be offering a $20.00 gift certificate and Hampton Art will have a prize pack with a stamp set and  some ink pads with an approximate value of $20.00 so please be sure to leave a comment on each blog along the way to be eligible to win one of the prizes.  

If you are following the order of the blog hop you should have just come from Adora's Blog. If not and you just happened to pop in for a visit please click HERE to start the blog hop at the Hampton Art Blog.  If you happen to get lost along the way please visit the Hampton Art Blog or the Really Reasonable Ribbon's Rambling! Blog for a complete list of the blog hop.


For my project I altered a journal using Pink Satin w/ Scalloed Edge ribbon from Really Reasonable Ribbon and SC0038 Blooming Memories Stamp Set (Page 50 2012 eCatalog) from Hampton Arts.  I also used some inks from Hampton Arts, die templates from  Spellbinders and paper from Discount Cardstock.


To start I die cut a fancy label shape using S5-148 Decorative Labels Eight and Simply Smooth White cardstock.  Then I stamped the floral branch, bird image and sentiment using Color Box Chalk Ink Pink, Olive Pastel, Blue Lagoon, Black.  For the pink cardstock mat I used S5-131 A2 Matting Basics A die template.  I layered the paper pieces using 3D Foam Squares and then glued the Pink Satin w/ Scalloed Edge ribbon to the backside and attached the piece to the front of the journal.  


To add multiple colors of ink to a solid image I use Q-tips to apply the ink.  Here is a picture of the humming bird.


When I was attaching the ribbon to the paper I cut the strips of ribbon a little longer and then I cut in from each end towards the corner to create nice crisp corners on the ribbon.  I added a little bit of hot glue to the backside to hold the ribbons in place.


I stamped the ribbon from the KN2456 Think Pink Stamp and fussy cut it and added 3D Foam Squares to pop it up.  I added Pearls from The Rubber Cafe' to the flower centers.


I created a little ribbon and flower cluster down in the bottom corner.  I used the same Pink Satin w/ Scalloed Edge ribbon and then I added a Pink Acrylic Flower from Shabby Scraps and a couple of Pink/White Roses from I am Roses.  The Lg Flat Back Pearl for the flower center is from Beady Bom Bom. Then I added some leaves and diamond stickles.  To create the leaves I used S5-129 Foliage Two die template from Spellbinders.


I took a piece of the Pink Satin w/ Scalloed Edge and added three Round Acrylic Ribbon Buckles and then I glued this to the spine of the journal.


Once I had the ribbon glued in place then I added Lg Flat Back Pearls to the center of each buckle.


Now to continue in the blog hop you need to hop on over to Wendy's Blog and check out her fantastic project!

Thank you so much for stopping by today and I hope you enjoy the Really Reasonable Ribbon and Hampton Art Breast Cancer Awareness Blog Hop!! Don't forget to visit the Really Reasonable Ribbon's Rambling! Blog and  Hampton Art Blog for all your ribbon and papercrafting  inspiration!

I hope you have a wonderful and creative day!

Hugs & Smiles,
Heidi 


Supplies
Really Reasonable Ribbon:  Pink Satin w/ Scalloed Edge
Hampton Arts:  SC0038 Blooming Memories Stamp Set (Page 50 2012 eCatalog) , KN2456 Think Pink Stamp, Color Box Chalk Ink Pink, Olive Pastel, Blue Lagoon, Black
Paper:  Discount Cardstock Simply Smooth White, Cotton Candy
Dies:  Spellbinders Grand Calibur, S5-131 A2 Matting Basics A, S5-148 Decorative Labels Eight, S5-129 Foliage Two
Accessories:  The Rubber Cafe' Pearls, Scrap Happy Sheer Glue, Stick "EM" Up Tool;  Shabby Scraps Pink Acrylic Flower; Beady Bom Bom Round Acrylic Ribbon Buckles, Lg Flat Back Pearl; I am Roses Pink/White Roses; Ranger Diamond Stickles; Scrapbook Adhesives by 3L 3D Foam Squares; Hot Glue, Journal

Monday, October 1, 2012

Halloween Blog Candy

Hello blogging friends!  Happy October 1st!!  As many of you know Halloween is one of my favorite holidays.  I love to to decorate for it, love to create fun Halloween home decor pieces, love the costumes and we can't forget the candy--LOL!  So I thought this would be a fun time to offer up some Blog Candy--Halloween Style!

So what do you think?  Are you ready for some fun Halloween Blog Candy?

Check out these yummy goodies.


This is what is included in the Halloween Blog Candy

Cardstock-4 sheets of each color Purple, Black, Green, Orange
2 Brown Paper Bags
2 White Doilies
2 Sm. Glassine Bags
2 Tags
2 Mini Clear Halloween Stamp Sets (Candy/Skull-Potion)
1 Clear Acrylic Block
2 Wood Mounted Halloween Stamps (Pumpkin/Witch Boots)
1 Mini Bat Punch
1 Package Halloween Flair Buttons
1 Package Bakery Twine (Orange/Purple)
2 Packages Adhesive Gems (Green/Orange)
2 yds Ric-Rac Trim (Orange/Purple)
1 yds Black Mini Pom-Pom Trim
1 yd Black Lace
2 yds Black Crepe
1 Glitter Glue (Lt. Yellow)
2 Ink Pads (Orange/Black)
3 Leaf Trinket Pins
6 Garment Pins
2 Memo Pins
3 Charms
Assorted Buttons (Yellow/Orange/Green/Purple)


RULES
1.  Subscribe to my blog.
2.  Leave a comment telling me what you love about Halloween or any fun family traditions.

***You have to do both of the rules to be entered into the drawing.

***Please be sure to have a link back to a blog or an email so I can contact you if you win!!

The Halloween Blog Candy post will be open from today (10/1/12) until midnight (CST) Thursday, October 4th, 2012.  Winner will be announced Friday, October 5th, 2012.

Thank you so much for stopping by today and Good Luck!!

Hugs & Smiles,
Heidi


Sunday, September 30, 2012

Vintage Love Scrapbook Layout

Hello!  Today, I have a 8 x 8 scrapbook layout to share with you.  I love old vintage pictures and especially wedding pictures.  Sometimes when I have old photos I like to make layouts that I can put on an easel and display for a home decor piece.  Usually these layouts are a little heavier on the embellishments since they won't be in a scrapbook.   


Here is the layout that I designed using an old family photo.  This is one of the photos that I got this past summer when we were at my family reunion.  I am going to have to show this to my grandpa so I can find out the name of the couple, there was no writing on the back of the photo.  But I just love this picture and thought it needed to be put in to a layout.  The bride had a beautiful gown and a gorgeous bouquet of roses.


I used Prima Challis Tea-Thyme Collection for the printed paper.  I thought it would look so pretty with the photo.  Then I cut/embossed LF-015 Grand Decorative Circles One using Champagne Metallic cardstock and layered that behind the photo.  I used a piece of Simply Smooth Ivory to mat the photo.  For the flower cluster I used S5-086 Bitty Blossoms and  S5-129 Foliage Two.  I cut/embossed all of the piece using Simply Smooth Ivory cardstock and then once I had the roses and leaves shaped I airbrushed them using Copic markers.  I used R20, RV10, R85 to color the roses and G24 for the leaves.


Here is a close up.  I also tucked in some small pieces of vintage lace trim, trinket pins and bling.


Thank you so much for stopping by today!  I hope you have a wonderful day!

Please be sure to stop back tomorrow--I will be posting some fun Halloween Blog Candy.  ;-)

Hugs & Smiles,
Heidi


Supplies
Paper:  Discount Cardstock Simply Smooth Ivory, Champagne Metallic; Prima Challis Tea-Thyme Collection
Ink:  Copic Markers R20, RV10, R85, G24
Dies:  Spellbinders Grand Calibur, S5-086 Bitty Blossoms, LF-015 Grand Decorative Circles One, S5-129 Foliage Two
Accessories:  Maya Road Trinket Pins; Recollections Bling; Vintage Lace Trim; Hot Glue

Saturday, September 29, 2012

Scrapbook Adhesives by 3L at the Mall of America - Crafty Power Tape - Glitter Border Tutorial

Hello blogging friends!  A couple of weeks ago I was up at ScrapFest at the Mall of America.  I was working for Scrapbook Adhesives by 3L™ and I met so many wonderful ladies during the event! I ran into some local friends who were at the event and also some friends from FB--love being able to see everyone.  ;-)  If you haven't ever been to ScrapFest it is a fantastic time, the mall is filled with booths from all of your favorite companies and they are all doing make-n-takes, classes are also offered by most of the companies and from Archiver's. I have a couple of pictures to share but it was so busy I really didn't have time to take many picture.  We did around 575 make-n-takes a day (give or take a few). 


The lines.  ;-) 


Lots of ladies in line for make-n-takes.


These are some of the cards we did for make-n-takes during the event.


This is a card I had at ScrapFest for a sample.  Scrapbook Adhesives is known for Wear your Adhesive on the Outside and showing different ways to use adhesive.  For this card I used the Crafty Power Tape to make the beautiful and sparkling glitter border along the side of the card and I have a tutorial to share with you.  Several people at ScrapFest thought there was glitter tape on the card and they were so excited to hear it was Crafty Power Tape and glitter.  They loved the idea of being able to customize the card with whatever colors they wanted to use.  


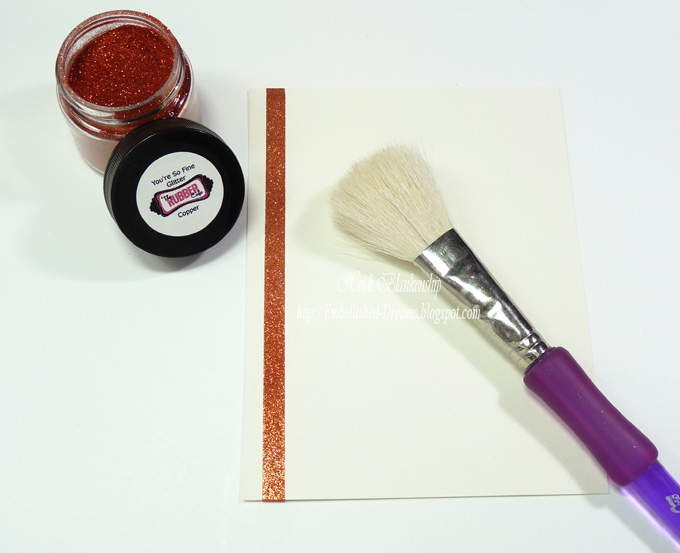
To start I added one strip of the Crafty Power Tape to the side of the cardstock.


 Then I applied the Copper glitter to the strip of tape.  I just used my finger to rub the glitter on.  I like to use the You're So Fine Glitter from The Rubber Cafe' because it is ultra fine and works so wonderfully for this technique.  Then I used a fluffy paint brush to remove the excess glitter.  


Next I added another strip of tape and then added Limeade Green glitter.


I used Bronze Medal for the final color of glitter.  See doing the glitter borders is so easy--gotta love it!!


I used Simply Smooth Ivory, Orange Fizz papers from Discount Cardstock and die templates from Spellbinders.  These are the different die templates I used, S4-161 Labels One, S4-379 Decorative Labels One, S4-385 Little Leaf Sets, S5-120 Fall Foliage.  For the leaves I used Craft Foil from Spellbinders.  The sentiment and leaf image are from the CR-03870 Shabby Chic Autumn Leaves stamp set from JustRite Papercraft.  I also used 3D Foam Squares to add some dimension to the label and leaves.


Here is another quick card using the same technique with the Crafty Power Tape and the glitter.

Thank you so much for stopping by today!  I hope you have a wonderful and creative weekend!

Hugs & Smiles,
Heidi

Supplies

Bounties of Fall Card
Stamps:  JustRite Papercraft CR-03870 Shabby Chic Autumn Leaves
Paper:  Discount Cardstock Simply Smooth Ivory, Orange Fizz
Ink:  Tsukineko Memento Rich Cocoa; Ranger Distress Inks Antique Linen, Rusty Hinge
Dies:  Spellbinders Grand Calibur, S4-161 Labels One, S4-379 Decorative Labels One, S4-385 Little Leaf Sets, S5-120 Fall Foliage
Accessories:  Spellbinders F-014 Delicate Pastels Foil, F-012 Precious Metals Foil; Scrapbook Adhesives by 3L 3D Foam Squares, Crafty Power Tape; The Rubber Cafe You're So Fine Glitter Copper, Limeade Green, Bronze Medal

Autumn Leaves Card
Stamps:  JustRite Papercraft CR-02225 Autumn Words
Paper:  Discount Cardstock Simply Smooth Ivory, Orange Fizz
Ink:  Tsukineko Memento Rich Cocoa; Ranger Distress Inks Rusty Hinge, Peeled Paint, Vintage Photo
Accessories:  Scrapbook Adhesives Crafty Power TapeThe Rubber Cafe You're So Fine Glitter Copper, Limeade Green, Bronze Medal, Scrap Happy Sheer Glue, Stick "EM" Up Tool, Root Beer Jellie Dots

Friday, September 28, 2012

Crimped Envelope Gift Card Holder for Christmas

Hello!  I know this is just the beginning of Fall but a lot of people are already working on Christmas cards and gift ideas.  I love to give gift cards for Christmas and I am always looking for creative ways to give them.  Today, I have a project to share with you using an envelope and creating a fun crafty project to use for giving gift cards.  


Here is the project that I designed.  


Now this isn't a new technique (it's been around for several years) but I love these little envelope cards and I haven't made one in awhile. Start with a White Envelopes A2 size envelope, seal envelope and cut 1-3/4 '' off one end.   Then ink edges, stamp images and sentiment on the smaller piece.  For the sentiment and snowflakes I used CR-03800 Large Fancy Holiday Sentiments stamp set from JustRite Papercraft.


For the next step ink the edges of the larger piece from the envelope.  Then roll the envelope through a crimper.

Cut a piece of White Linen cardstock slightly smaller then the envelope.  Stamp the snowflake images and ink the edges.  Then use a piece of double stick tape to attach the gift card.  This piece will slide into the envelope and then add the topper.


Next I cut/embossed the edge of a A7 envelope flap using E8-001 Classic ScallopE8-010 Classic Decorative Inserts Two die templates from Spellbinders. Then lightly ink the edges of the envelope.  Now I have a decorative envelope that is large enough to mail the envelope gift card.


I used S4-365 2012 Create-A-Flake 4S5-117 2012 Snowflake PendantS5-121 Frosty Forms die templates to create the snowflake and then I added a Silver Snowflake Embellishment and Recollections Pearls.  For the topper I added White Mini Pom-Pom and 3/16'' Stitched Edge Reversible Blue/White Ribbon from Really Reasonable Ribbon.

Thank you so much for stopping by today!!

Hugs & Smiles,
Heidi


Supplies
Paper:  Discount Cardstock White Envelopes A2, A7, White Linen
Stamps:  JustRite Papercraft CR-03800 Large Fancy Holiday Sentiments
Ink:  Tsukineko Memento Tuxedo Black, Blue Sky
Dies:  Spellbinders Grand Calibur, S4-365 2012 Create-A-Flake 4, S5-117 2012 Snowflake Pendant, S5-121 Frosty Forms, E8-001 Classic Scallop, E8-010 Classic Decorative Inserts Two
Accessories:  Really Reasonable Ribbon White Mini Pom-Pom, 3/16'' Stitched Edge Reversible Blue/White Ribbon; Silver Snowflake Embellishment; Recollections Pearls; Scrapbook Adhesives by 3L 3D Foam Squares; Hot Glue


Thursday, September 27, 2012

JustRite Papercraft - Amazing Paper Grace October 2012 Kit by Becca Feeken - Day 2


Hello!  Today, I have another project to share with you using the NEW Amazing Paper Grace October 2012 Kit by Becca Feeken from JustRite Papercraft.  The kit includes everything you need to recreate Becca's beautiful designs and it also includes AG-03910 Its Sew Vintage stamp set and AG-03915 Vintage Frame Label & Spool Topper die template set.  Click HERE to find out all of the details. 


Here is the card that I designed using the stamps and die templates from Becca's October 2012 Kit.  I used Sno Cone paper from  Discount Cardstock for the base of the card and all of the pattern paper is from My Mind's Eye The Sweetest Thing Lavender Collection.  


I used the largest label in the die set to cut/emboss this shape.  Then I stamped the flourish designs and the word LACE and inked the edges of the paper.  I added tiny metal hangers with pieces of vintage lace trims.  The hangers were originally silver and I added Ranger Snow Cap Paint Dabber, Vintage Photo and Antique Linen Distress Inks to give then a shabby chic look and then attached them with brads.


I added a little cluster of buttons to the top of the card with a little touch of shabby chic bling.  At the moment I am out of pearl swirl bling so I added paint and inks to the top of the clear rhinestone bling for a little different look.  I also used the stamps and die templates to create the little spool toppers.  Along the right side of the card I created a border using one of the stamps, seam binding and pattern paper.  To finish off the card I added an aqua seam binding bow and a memo pin with some beads added to it and one of the spool toppers.


Thank you so much for stopping by today!

Please be sure to visit all of the JustRite Papercraft Designers in the link list below and see what they have to share with you.


I hope you have a wonderful day!

Hugs & Smiles,
Heidi


Supplies

Stamps:  JustRite Papercraft Becca's October 2012 Kit AG-03910 Its Sew Vintage
Paper:  Discount Cardstock Sno Cone; My Mind's Eye The Sweetest Thing Lavender Collection
Ink:  Tsukineko Memento Tuxedo Black, Dessert Sand, Angel Pink; Ranger Vintage Photo, Antique Linen Distress Inks
Dies:  JustRite Papercraft Becca's October 2012 Kit AG-03915 Vintage Frame Label & Spool Topper
Accessories:  Really Reasonable Ribbon Aqua Seam Binding; Recollections Bling; Ranger Snow Cap Paint Dabber; Idea-ology Memo Pins; Shabby Scraps Hangers; Beady Bom Bom Flat Back PearlScrapbook Adhesives by 3L 3D Foam Squares, Buttons and Vintage Lace Trims

Wednesday, September 26, 2012

JustRite Papercraft - Amazing Paper Grace October 2012 Kit by Becca Feeken

Hello!  Today, I have a sweet little vintage inspired project to share with you using the NEW Amazing Paper Grace October 2012 Kit by Becca Feeken from JustRite Papercraft.  The kit includes everything you need to recreate Becca's beautiful designs and it also includes AG-03910 Its Sew Vintage stamp set and AG-03915 Vintage Frame Label & Spool Topper die template set.  Click HERE to find out all of the details. 


 Here is the project that I designed using the AG-03910 Its Sew Vintage stamp set and AG-03915 Vintage Frame Label & Spool Topper die template set from Becca's October 2012 Kit.  I designed a Bobbin Gift Bundle filled with some sewing goodies.


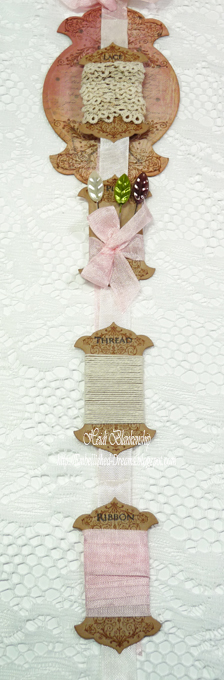
Here is a look at the inside of the bundle.  I used the largest die template in the set to create the front and back and for the bundle of goodies I used the smaller spool shaped die template and adhered the pieces to a long piece of seam binding.


Here is a picture with the little bundle opened and a couple of close up pictures.  I included vintage lace trim, trinket pins, thread and some pink seam binding.


To create the front and back I die cut Prima Tea Thyme Collection papers, stamped the flourishes and then I also die cut a piece of chipboard.  I covered both sides of the chipboard with Adhesive Sheets from Scrapbook Adhesives by 3L and then sandwiched all of the pieces together.


For the little spools I die cut the shapes using Kraft cardstock backed with the Adhesive Sheets, stamped the flourishes and then attached them to a piece of seam binding and attached this piece to the inside. 


On the front of the bundle I stamped the flourishes and inked the edges.  Then I stamped the sentiment on to a piece of Simply Smooth Ivory paper and used S4-116 Standard Circles Small die template to cut/emboss the circle shape.  I also used S5-119 Venetian Motifs die template with Mountain Rose Metallic paper and created a decorative die cut to layer with the circle die cut.  I used 3D Foam Squares in between the layers to add some dimension.  Then I added some vintage lace trim and buttons, pearls from my stash, trinket pins from Maya Road and White Curly Roses and Pink Mulberry Roses from  Pro 31 Designs to embellish the front.

Please be sure to visit each of the designers in the link list below to see what they created to share with you.


Thank you so much for stopping by today!

Hugs & Smiles,
Heidi


Supplies
Stamps:  JustRite Papercraft Becca's October 2012 Kit AG-03910 Its Sew Vintage
Paper:  Discount Cardstock Simply Smooth Ivory, Mountain Rose Metallic, Kraft; Prima Tea Thyme Collection
Ink:  Tsukineko Memento Tuxedo Black, Dessert Sand, Angel Pink; Ranger Vintage Photo Distress Ink
Dies:  JustRite Papercraft Becca's October 2012 Kit AG-03915 Vintage Frame Label & Spool Topper; Spellbinders Grand Calibur S4-116 Standard Circles Small, S5-119 Venetian Motifs
Accessories:  Really Reasonable Ribbon White Seam Binding, Pink Seam Binding; Pro 31 Designs White Curly Roses, Pink Mulberry Roses; Maya Road Trinket Pins; Scrapbook Adhesives by 3L 3D Foam Squares, Adhesive Sheets; Recollections Pearls; Thread, Vintage Lace Trim, Buttons

LinkWithin

Related Posts Plugin for WordPress, Blogger...