Monday, October 11, 2010

Creating Memories In Time Blog Hop Winner (Huge Bag of Prima Flowers), Photos from the Memory Expo & Photos from this weekend

Good morning!! I hope you had a wonderful weekend. I have several things to share with you today--the CMIT Blog Hop Winner, Photos from the Memory Expo and a few photos from this weekend.

First I want to Congratulate the WINNER for the CMIT Blog Hop!!

Pam and Presley said...AWESOME! I absolutely LOVE this card, the colors the black vine going all around the card and the beautiful vintage Halloween scene.
Thank you so much for sharing
Pam
pamandrandy@gmail.com
October 8, 2010 5:49 PM

Pam and Presley said...I also wanted to thank CMIT and all your designers for a great blog shop I had a lot of fun and thank you for a chance to win an AWESOME prize of the gorgeous
flowers I am a flower NUT!!!
Thank you
Pam
pamandpresley
October 8, 2010 5:54 PM

This was also posted on the CMIT Blog and we want to thank everyone who participated!! Also as a reminder ATC Tuesday will begin on October 12th so come take a look at the CMIT blog to see what the design team creates, play along to win a prize. Thanks!!

Next, I want to share some pictures with you from the Midland Care Memory Expo. The Expo was held in Topeka, Kansas Oct 1-2. One of the best things about the Memory Expo was getting to see my dear sweet friend Karen Taylor! We talk almost everyday but it has been almost 2 years since we have seen each other! It was so wonderful to spend the weekend with her!! Karen & I had asked if we could share a room together and we had these fun gift bags from Jennifer Friedley filled with all kinds of goodies waiting for us! This shot is from the Memory Expo VIP reception on Friday evening. Amazing and Very Talented Industry Personalities from left to right: Brooke Smith, Associate Editor of CardMaker magazine, Heidi Blankenship (me) crafter/teacher, Nikki Sivils owner of Nikki Sivils Scrapbooker papers, Kristi Van Doren crafter/teacher, Trudy Sjolander crafter/teacher, Karen Taylor crafter/teacher, and last but not least, Tanya Fox, Editor of CardMaker Magazine. Here is a photo with Tanya Fox. We have seen each other several times at the CHA shows but have never really had a chance to just sit down and visit and we were able to do that. What a wonderfully sweet lady!! Here's a couple of pictures from one of the classes I taught. The Memory Expo was such a wonderful experience and I met soooo many talented ladies!!

Are you still hanging in here with me? LOL! I know lots of info for one post! I wanted to share a lot of this with you last week but things just kept coming up and life happens. :)

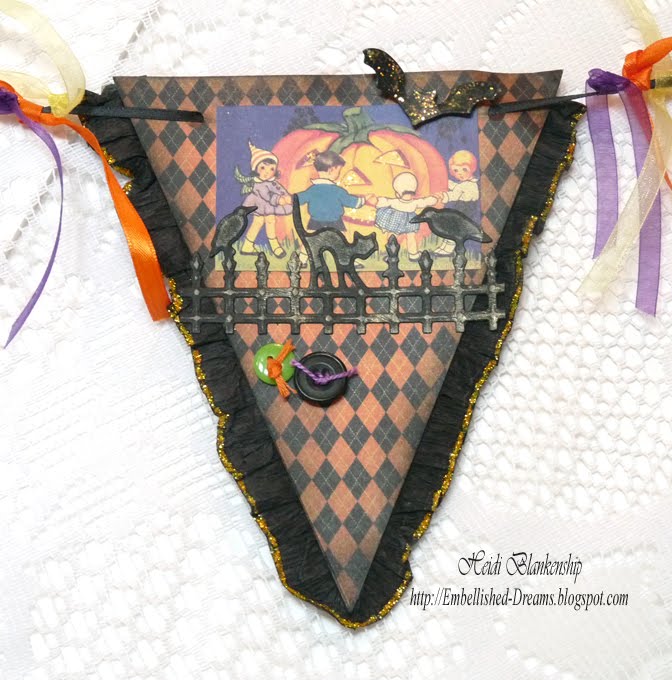
I also wanted to share with you the projects from one of my classes. We created a Vintage Halloween "Boo" Banner and 2 quick Halloween Card.Here is some close up pictures of the cards and each piece from the banner.Supplies
Paper: My Mind's Eye Blackbird Argyle; The Paper Company Black, White, Orange, Yellow, Purple, Green
Ink: Tsukineko Memento Tuxedo Black Ink
Dies: Spellbinders™ Grand Calibur™, S4-126 Classic Squares die #3, S4-301 Labels Sixteen die #3, S4-280 Halloween Fence Scene and Shapes, S4-282 Witches' Brew, S4-277 Nested Bats
Accessories: Crafty Secrets Halloween Greetings Creative Scraps; SCRAPBOOK ADHESIVES By3LCrafty Power Tape, 3D Foam Squares; Joann's Buttons, Ribbon, Thread; Ranger Lime, Orange Peel Stickles; Black Crepe Paper

I have to say a HUGE "Thank You" to several companies that helped sponsor and donate products for the classes and make-n-takes: Spellbinders™, JustRite Stampers, Crafty Secrets, My Mind's Eye, SCRAPBOOK ADHESIVES By 3L™, Heartfelt Creations and Elizabeth Crafts Designs.

Ok, just one more things---LOL! I took a few pictures of my oldest son this weekend for his senior pictures until we can decided for sure on which photographer we are going with.I have to tell you earlier this summer we were driving out in the country and I thought it would be really cool to have some pictures of my son with his drum set outside and I had to laugh when one day he said--hey mom do you think it would be possible to take some pictures with my drum set outside? I think that would be so cool!! He LOVES this one! *wink*Yes, those are real Texas Longhorns in the background! It was interesting working around them--LOL!Ok, taking this one kind of freaked me out!---LOL!
OMGosh I think this is the longest blog post ever--LOL!!! I just had a lot to share and thanks for letting share it with you!! Thanks so much for stopping by today and I guess I better get busy and create something! I hope you have a Wonderful Day!!

Hugs & Smiles,
Heidi

Thursday, October 7, 2010

CMIT 1st Blog Hop

The Creating Memories In Time’s Design Team would like to thank you for stopping by our blogs to check out our creativity. This blog hop is a two part hop, first in order to be eligible to win this fabulous bag of Prima Flowers

You must leave a creative comment on each of the following blogs

Terre Fry http://terresscraptherapy.blogspot.com/

Heidi Blankenship http://embellished-dreams.blogspot.com/

Margarita Ybarra http://mycreationsbymy.blogspot.com/

Mary Pfaff http://crafty-cabin.blogspot.com/

Marge Robertson http://www.maricopastamper.blogspot.com/

CMIT Blog http://cmitonlineblog.blogspot.com/

The second part of this blog hop is, sign up as a follower of the CMIT Blog, we will be hosting challenges, contests, tutorials and a new program called ATC Tuesday so you will not want to miss what we are up to next. Stay tuned for more creative news flashes.

Once we have verified that both parts of the blog hop have been completed we will pick one lucky winner from one of 6 blogs, thank you for stopping by and come back to see what we come up with next.

ATC Tuesday will begin on October 12th so come take a look at the CMIT blog to see what the design team creates, play along to win a prize.

Good morning! For today's Blog Hop I created a fun Christmas card with non-traditional Christmas colors.

I used designer paper from My Mind's Eye, Spellbinders™ die templates and Prima pearls and rhinestones with a touch of glitter.

I started by creating all of my diecut using Spellbinders™ die templates, S4-290 Labels Fourteen die #5, S4-286 2010 Snowflake Pendants center piece, S4-287 Fanciful Holiday. Then I used Distress Inks from Ranger to ink the edges on the paper and diecuts as shown in the photo above.

Here is a close up of the snowflake. I added some glitter and a rhinestone to the center. I also used a 3D Foam Square from SCRAPBOOK ADHESIVES By 3L™ to pop up the center on the snowflake.

Here is a close up of the reindeer, Christmas tree and swirly snow. I added a mix of pearls and rhinestones to the tree, glitter for the snow and a cute little pink bow for the reindeer.

Supplies:

Paper: My Mind's Eye Wonderful Winter; The Paper Company White, Pink, Blue, Green Cardstock

Dies: SpellbindersS4-290 Labels Fourteen die #5, S4-286 2010 Snowflake Pendants center piece, S4-287 Fanciful Holiday

Ink: Ranger Distress Ink Vintage Photo, Shabby Shutters, Antique Linen

Accessories: Prima Pearls/Rhinestones; Glitter, SCRAPBOOK ADHESIVES By 3L™ 3D Foam Squares, Crafty Power Tape; Pink Ribbon


Thank you so much for stopping by today & I hope you enjoy the Blog Hop!!

Hugs & Smiles,

Heidi

Thursday, September 30, 2010

Spellbinders Layout - On Top of the World

Hello! Today, I have a scrapbook layout to share with you using Spellbinders™ die templates. This is a very simple layout but I didn't want to do anything that would overpower the photo. This past summer my oldest son went on a mission trip with our church and a friend took this picture of him. I love this picture!! To create the large square diecut I used the NEW LF-126 Grand Squares die #7 and the Grand Calibur™ from Spellbinders™. I inked the edges of the large square diecut and then I stamped a flourish image from the My Mind's Eye "Boy" Stamp Set. Then I added a diecut. To create the diecut I used S4-300 Heraldry die templates from Spellbinders™. I used black cardstock and then inked over with silver metallic ink.I asked Dusty to write a little something about the photo and then I typed it up and used S5-025 Labels Seventeen dies #4, #5 to cut/emboss the diecut shapes. The dagger is also from the S4-300 Heraldry die templates set.To create the crest I used one of the die templates from S4-300 Heraldry. I used ivory cardstock, inked it with black and then silver. I added 3D Foam Squares to the crest to add a little dimension. Supplies:
Stamps: My Mind's Eye Portobella Road Boy Stamp Set
Paper: My Mind's Eye Portobella Road Buddies, Family
Ink: Tsukineko Memento Tuxedo Black, Encore Metallic Silver
Accessories: SpellbindersGrand Calibur™, LF-126 Grand Squares die #7, S4-300 Heraldry, S5-025 Labels Seventeen dies #4, #5; SCRAPBOOK ADHESIVES By 3L™ Crafty Power Tape, 3D Foam Squares

Thanks for stopping by today! I hope you have a wonderful day!!

Hugs & Smiles,
Heidi

Wednesday, September 29, 2010

JustRite Stampers - A Beautiful Story Sympathy Card

Hello! I am sorry for neglecting my blog the past few days!! I have been sooooo busy getting class kits ready for the past several days and getting ready for my trip to Topeka, Kansas. I was invited to be a VIP Guest at the 2010 Memory Expo!! While I am there I will be speaking, teaching classes, doing make-n-takes and demoing. I am very excited and best of all I will get to see my dear sweet friend Karen Taylor!! I am leaving in the morning and still need to pack--yikes! It will be a miracle if I can fit everything in my bags---LOL!!

For my blog post today I have a sympathy card to share with you using JustRite Stamps and Spellbinders™ die templates.It seems like I never have sympathy cards when I need them. Sympathy cards are something I don't really like to make but need. To start I stamped one of the images from the Thinking of You stamp set from JustRite Stampers with Rich Cocoa Ink onto white cardstock.Next I colored the image with Copic markers. Then I used the S4-112 Classic Ovals Small die #5 to cut/emboss an oval.After I created the diecut I inked the edges with Shabby Shutters Distress Ink.I also created two more diecuts to use for mats. I used the S4-251 Big Scalloped Ovals Large die # 5, S5-025 Labels Seventeen die # 6 from Spellbinders™. I added a few tiny pearls to the Labels Seventeen diecut.For a finishing touch I added some ribbon.

Supplies
Stamps: JustRite Stampers JB-08740 Thinking of You stamp set, JB-08119 Wood Stamper Oval 2-1/4'' x 3-1/16''
Dies & Punches: Spellbinders™ Grand Calibur™, S4-112 Classic Ovals Small die #5, S4-251 Big Scalloped Ovals Large die # 5, S5-025 Labels Seventeen die # 6
Paper: Shabby Green Door; Neenah Solar White
Ink: Tsukineko Memento Rich Cocoa; Ranger Shabby Shutters Distress Ink; Copic Markers E0000, E000, R81, G40, G24
Accessories: Joann's Ribbon, Pearls; SCRAPBOOK ADHESIVES By 3L™ Crafty Power Tape, 3D Foam Squares

Thank you for stopping by today!! I have a blog post scheduled for tomorrow but then I probably won't be posting again until after I am back home. I hope you have a Wonderful Day and Happy Creating!!

Hugs & Smiles,
Heidi

Wednesday, September 22, 2010

JustRite 12 Weeks of Christmas Blog Hop #3

Welcome to JustRite Stampers’ newest Wednesday feature, 12 Weeks of Christmas Blog Hops #3! Every Wednesday up until Thanksgiving some of your favorite designers will be joining some of the JustRite design team for a series of Christmas blog hops, showcasing JustRite’s entire Christmas Collection of stamps! So mark your calendars for Wednesdays at 9am Central for great Christmas gift, card & project ideas, starting at the JustRite Inspiration blog!For today's Blog Hop I created a Christmas card using JB-09780 Hearts Come Home stamp set from JustRite Stampers. The JB-09780 Hearts Come Home stamp set includes 6 Designer Centers and 6 Interchangeable Borders and fits the JB-09508 Clear 2'' Square Stamper. I started by stamping the center image two times on to white cardstock using Tuxedo Black ink.For the first image I colored the poinsettia with Copic Markers and then hand cut the image. On the second image I colored the pine, holly, berries and outer edges of the poinsettia with Copic markers. I only colored the outer edges of the poinsettia because I wanted to layer the first poinsettia that I cut out on top. Next I stamped the Border with a Merry Christmas sentiment on to raspberry cardstock using Gold Pigment Ink and then I added gold embossing powder and heat set with a heat tool.I used the Grand Calibur™ from Spellbinders™ and S4-128 Classic Squares Small die #3 to cut/emboss the center image. Then I used S4-295 Lacey Squares die #3 to make the square diecut. I inked the edges of the mat and two diecuts with Brushed Corduroy Distress Ink. Next I used a paint brush and Gem-Tac glue from Beacon Adhesives to add glue to the edges and then coated then with clear chunky glitter.Here is a close-up. I also used S4-301 Labels Sixteen die #3 to create the fancy raspberry colored diecut. I layered all of the piece and used 3D Foam Squares from SCRAPBOOK ADHESIVES By 3L™ to add a little dimension. I also added some pink rhinestones.On the raspberry colored mat I used the Flourish Impressabilites™ from Spellbinders™ and then lightly rubbed a gold ink pad over the embossed areas.I also added a bow and poinsettia with rhinestones. I added stickles to the poinsettia and holly for a little sparkle.Supplies
Stamps: JustRite Stampers JB-09780 Hearts Come Home, JB-09508 Clear 2'' Square Stamper
Dies & Punches: Spellbinders™ Grand Calibur™, S4-128 Classic Squares Small die #3, S4-301 Labels Sixteen die #3, S4-295 Lacey Squares die #3, I2-1009 Flourish Impressabilities™
Paper: My Mind's Eye Life Stories; Neenah Solar White; WolrdWin Raspberry
Ink: Tsukineko Memento Tuxedo Black; Ranger Brushed Corduroy Distress Ink; Clearsnap Gold Pigment Ink; Copic Markers R81, R29, R39, Y38, G14, G17, YG00
Accessories: Prima Flowers; Swirly Rhinestone; My Mind's Eye Lush Pink Rhinestones; SCRAPBOOK ADHESIVES By 3L™ EZ Runner, 3D Foam Squares; Joann's Ribbon, Clear Chunky Glitter; Beacon Adhesives Gem-Tac; Ranger Cotton Candy, Gold Stickles

Please visit these designers’ blogs to see what fabulous Christmas projects they have for you on the hop today!

Thank you so much for stopping by today and I hope you enjoy the Blog Hop!!

Hugs & Smiles,
Heidi

Tuesday, September 21, 2010

JustRite Stampers - Give Thanks Nested Frames - Altered Autumn Candy Tin

Good morning! Today, I am sharing a project I created with the New Release, Give Thanks Nested Frames from JustRite Stampers. The Give Thanks Nested Frames stamp set includes 3 Large Frames, 3 Small Frames, 3 Small Phrases and fits the Clear Horizontal Stampers.For my project I altered a candy tin using the Give Thanks Nested Frames stamp set, Copic markers, diecuts and embellishments with some sparkle. Here is a quick picture of the candy tin before I altered it. To start I stamped the image of the frames and sentiment onto ivory paper with Rich Cocoa Memento Ink. Then I colored the leaves and acorns with Copic markers.To create the diecut I used S5-025 Labels Seventeen die #5 from Spellbinders™. Once I had the shape cut/embossed then I airbrushed it with Copic markers.Here is a close-up of the Give Thanks Nested Frames. I love this sentiment!I also create a flower using the S4-192 Blossom dies #2, #3. I used old book print for the paper, added a small brad in the center and scrunched the flower to shape it. Then I airbrushed the flower with Copic markers, added rhinestones in the center and edged it with Gold Stickles. I also added a leaf, berries, ribbon and swirly rhinestones. I applied Gold Stickles to give it the added sparkle. For a finishing touch I added ivory lace around the top of the lid.

Supplies
Stamps: JustRite Stampers JB-09240 Give Thanks Nested Frames, JB-09520 Clear Horizontal Stampers-2 pack set
Dies & Punches: SpellbindersGrand Calibur™, S5-025 Labels Seventeen die #5, S4-192 Blossom dies #2, #3, S4-121 Doodle Parts
Paper: Neenah Cream; The Paper Company Kraft, Peach; Old Book Print
Ink: Tsukineko Memento Rich Cocoa; Ranger Brushed Corduroy Distress Ink; Copic Markers Y38, YR04, YR24, R39, R81, G24, YG63, E15, E27
Accessories: Tattered Angels Iridescent Gold Glimmer Mist; Candy Tin; SCRAPBOOK ADHESIVES By 3L™ Crafty Power Tape, 3D Foam Squares; Ranger Gold Stickles; Joann's Brown Ribbon, Rhinestones, Leaf, Berries, Lace

Please be sure to visit the JustRite Inspiration Blog and some of the JustRite DT Members listed below who have been busy creating Fabulous Fall creations to share with you.


Thank you so much for stopping by today! I hope you have a wonderful day!!

Hugs & Smiles,
Heidi

LinkWithin

Related Posts Plugin for WordPress, Blogger...