Thursday, March 31, 2016

Creating Crystal Like Flowers with ICE Resin® - Video

Hello blogging friends!  Today, I am sharing the video I made for ICE Resin® showing how you can add resin to paper flowers to give then a crystal or glass like look.  ICE Resin® looks so beautiful on paper!  So just remember it's not just for jewelry making you can use it on your paper crafting and mixed media projects.


If you would like to see a full step-by-step tutorial on how I designed the project you can 
click HERE to visit the ICE Resin® Blog.

I hope you enjoy the video!  Thanks so much for stopping by today!

Hugs and Smiles,
Heidi

Learn more about Heidi Blankenship
Instagram:  heidimblankenship
Pinterest:  heidimb


ICE Resin®/Ranger™ Supplies:
ICE Resin® 
ICE Resin® ICED Enamels™ Relique Powder Raspberry
ICE Resin® ICED Enamels™ Relique Glitz Gold Glitter
ICE Resin® ICED Enamels™ Medium
Paper Sealer
Brushes
Cups and Stir Sticks
Ranger Perfect Pearls™ - Pink Gumball, Sour Apple, Turquoise
Ranger - Multi Medium Matte

Other Supplies Used
Small Fancy Wood Frame, ArtCult.etsy.com - Vintage Style Image Bingo Butterfly Girl, Vintage Sheet Music, Wild Orchid Crafts Paper Flowers and Leaves, Vintage Book Paper, Ivory Flat Back Pearls, Sequins, Rhinestones, Craft Foam, Heat Tool, Hot Glue, Scor-Tape™

Tuesday, March 29, 2016

Creating Crystal Like Flowers with ICE Resin®

Hello everyone!  Today, I have a technique to share with you using ICE Resin®, ICED Enamels, Glitter, Ranger Perfect Pearls, and various types of paper from vintage sheet music to paper flowers.  I have to say I just love the look of ICE Resin® on paper!  It doesn’t matter if it is vintage paper or newer paper, sealed or not sealed it always has such a beautiful and unique look.  


I mixed up some of the ICE Resin® and then added small amounts of the resin to different cups.  Then I used few different colors of Ranger Perfect Pearls and added it to the resin.  I used the stir stick to mix the ICE Resin® and Perfect Pearls.  Doing this created a beautiful pearl colors.  I used a paint brush to add the pearly resin to the paper flowers and leaves.  When the ICE Resin® cures the flowers have a beautiful crystal look to them and they become hard from the resin.  I also added some of the ICED Enamels™ Relique Glitz Gold Glitter to the center of the larger flowers and the edges of this leaves for a bit of added sparkle.  Once the ICE Resin® has cured the flowers can be added to all kinds of home décor and DIY projects.  


Here is a close up.  I have a full step-by-step tutorial with pictures over on the ICE Resin Blog.  If you would like to find out all of the details you can click HERE.

I hope you enjoy the tutorial and remember ICE Resin® isn't just for jewelry you can use it with paper crafting too!

Thank you so much for stopping by today!

Hugs and Smiles,
Heidi


Learn more about Heidi Blankenship
Instagram:  heidimblankenship
Pinterest:  heidimb


ICE Resin®/Ranger™ Supplies:
ICE Resin® 
ICE Resin® ICED Enamels™ Relique Powder Raspberry
ICE Resin® ICED Enamels™ Relique Glitz Gold Glitter
ICE Resin® ICED Enamels™ Medium
Paper Sealer
Brushes
Cups and Stir Sticks
Ranger Perfect Pearls™ - Pink Gumball, Sour Apple, Turquoise
Ranger - Multi Medium Matte

Other Supplies Used
Small Fancy Wood Frame, ArtCult.etsy.com - Vintage Style Image Bingo Butterfly Girl, Vintage Sheet Music, Wild Orchid Crafts Paper Flowers and Leaves, Vintage Book Paper, Ivory Flat Back Pearls, Sequins, Rhinestones, Craft Foam, Heat Tool, Hot Glue, Scor-Tape™

Sunday, March 27, 2016

Happy Easter!


Wishing you all a very 
Happy and Blessed Easter!!

Hugs & Smiles,
Heidi

Saturday, March 26, 2016

Pretty In Pink Sparkling Kensington Hand Bad with Tutorial - Tonic Studios

Hello everyone!  Today, I have a sparkling and pretty Kensington Hand Bag  from Tonic Studios to share with you.  These little hand bags are so fun to make and with all the different dies that come in the set you will have a variety of styles you can create.  The hand bags are a perfect size to add a gift card, jewelry or some sweet treats.


Here is a look at the hand bag I designed.  Now I have to tell you I am a total girly girl and I love all the glitz and sparkle with the glitter and pearls being added to the hand bag.  I have a tutorial to share with you how I added all of the glitter to the decorative front panels of the hand bag.  If you would like to see a video on how to assemble the hand bag you can click HERE for a link.  Jodie Johnson, from the UK Tonic Studios has a fantastic video showing how to assemble the hand bag.


The great thing about the Kensington Hand Bag is that you can really create it to your own liking and style.  To start I die cut the base of the hang bag with Recollections - Spring Decorate It paper.  You will need to cut two (2) of each piece base piece and if you are wanting your handbag to look the same on both sides with will need to cut two (2) of each piece.  To create the front panels I covered a sheet of pink carsdstock with Stick It! adhesives sheets and then I die cut two (2) of each of the front panels--both the large and small.


Peel away the release paper from the adhesive sheet but save at least one of the pieces of release paper.  For the lacy decorative panel I used a white pearl paper.  Line up both of the die cuts and then use the piece of release paper to press the two papers together.  Doing this allows you to adhere both pieces without having the touch the sticky adhesive.


With your fingers rub over top of the release paper to adhere the two panels together.


Next pour some of the 705 US Pure Sheen Glitter Diamond on top of the panel.


Using your fingers rub or burnish the glitter over the areas with adhesive.  Then tap off the excess glitter.


Die cut three (3) of each size of the flowers from the 757E Entwining Trellis - Bellus Buttercup Die Set from the white pearl paper.  Lightly mist the paper with water and use the styluses from the 380 - 266E Floral Crafters Tool Set to shape each flower and set aside to dry.


Once the flower is assembled I used an old makeup brush to apply the ink to the tips of the flower.  Then I added pearl stamens to the center and edged the flower with 758N Glitter Drops - White Blizzard.


Here is a close up of the flower and you can see all of the sparkle from the glitter.  I also added mini pearls hearts to the top of the hand band and for the handles I added Melissa Frances White Pearls.


Thank you so much for stopping by the blog today!  I hope you enjoyed the project and tutorial.   
All supplies will be listed below.  :)

Happy crafting!


Tonic Studios Supplies
Dies:  763E Kensington Hand Bag Gift Box Die Set, 757E Entwining Trellis - Bellus Buttercup Die Set
NUVO:  705 US Pure Sheen Glitter Diamond, 758N Glitter Drops - White Blizzard, 669N Crystal Drops Gloss - Apple Green
Adhesive:  419E Crafty Tacky Glue 120ml
Tools:  Tangerine Die Cutting Machine, 550E US Decoupage Scissors, 160E US Tim Holtz Trimmer, 380 - 266E Floral Crafters Tool Set

Other Supplies Used
Paper:  Cardstock - White Pearl, Pink; Recollections - Spring Decorate It
Ink:  Distress Ink Picked Raspberry
Accessories:  Ken Oliver - Stick It! Adhesive Sheets, Melissa Frances White Pearls, Mini Pearl Hearts, Wild Orchid Craft -White Leaves, Pearl Stamens, Foam Squares, Scor-Tape, Fine Mist Spray Bottle w/ Water, Makeup Brush, Hot Glue

Friday, March 25, 2016

The Stamp Simply Ribbon Store - Blessed Are The Pure In Heart Watercolor Card With A Tutorial

Hello blogging friends!  Today, is my day to post for The Stamp Simply Ribbon Store I will be giving my card to someone for Easter, but with all of the beautiful sentiments and verses in the New Stamp Simply Clear Stamps you would be able to create cards for many different occasions.  I also have a tutorial to share with you on how I created the watercolor background.


Here is the card I designed.  I used one of the sentiments from the Stamp Simply Clear Stamps SS-Sent008 Blessings/Beatitudes 2.  I just absolutely love all of the new stamp sets that Sharon has to offer!  If you have any of the stamp sets from her first release they will also work nicely to mix and match with the new stamps.


These are the products I used to create the watercolor background.  I used the DecoArt Metallic Lustre - Gold Rush to add a pretty metallic shimmer to the paper.  I also used four of the Tim Holtz Distress Inks - Spiced MarmaladeRipe Persimmon, Squeezed Lemonade, Worn Lipstick.  The paint brush I used is a #16 Round.  I like to use this larger brush when I do backgrounds but you could use whatever you have in your crafty stash.


I used my craft mat and smooshed the Distress Inks on to the mat.  I also scooped out a little bit of the DecoArt Metallic Lustre - Gold Rush.  So this is what my paint palette looks like after adding water to active the colors.


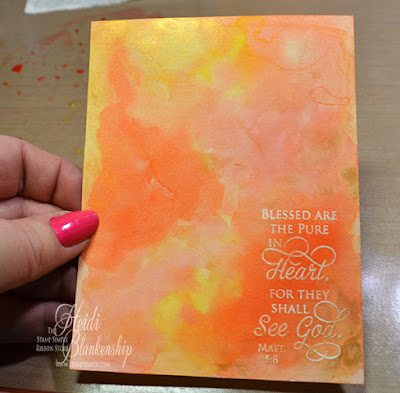
I am using a piece of Ranger Watercolor Paper.  You will notice on most watercolor paper one side has a little more texture or tooth to it and the other side will be smoother.  Whenever I am stamping on watercolor paper I stamp on the smoother side.  Doing this will give you a crisper stamped image or sentiment.  It's kind of hard to see in this picture but I stamped one of the sentiments from the SS-Sent008 Blessings/Beatitudes 2  Stamp Simply Clear Stamps in the lower right corner.  I used VersaMark Ink and then heat embossed using Stampendous Super Fine Embossing Powder - Detail White

When I am creating a watercolor background the first thing I do is to apply just plain water to the entire piece of paper.  If you start out with wet paper the colors will start to flow as soon as they touch the paper.  I started by applying some of the DecoArt Metallic Lustre - Gold Rush.  Then I dropped in the other colors.  I usually start with the lightest colors and work my way to the darker or more intense colors.


I use a heat tool to dry the paper in between the layers of color.  This is how the paper looked after the first layer of color.  I add water and color as I go and then when I get the look I am going for I heat set the paper.  This was very pretty--I loved how the colors blended and I could have stopped at this point but I wanted the colors to be a little more intense.


This is how the paper looked after I added more color.  For this second layer I used more paint/ink and less water and then I used a heat tool to dry the paper.  After the paper has cooled off you can take a baby wipe or damp cloth and wipe off any excess paint/ink on the embossed area.  Now the white embossing really pops and I love the shimmer from the metallic gold that is blended throughout the background.


Here you can see even more of the gold shimmer!  To create the cross I used two of the crosses from  Spellbinders Crosses Two set.  For the larger cross I used a pearl white paper and for the smaller cross I used white cardstock.  I used Therm-O-Web Foam Squares on the watercolor background and on the smaller cross to add some extra dimension to the card.  I also used Ranger - Glossy Accents and Scor-Tape to assemble the card.  I added the watercolor background to a white card base.  The card size is an A2 top folding card.  To finish the card I also added some Melissa Frances White Pearls to the cross and corners of the card.


Here is a close up of the sentiment and shimmer.


Thank you so much for joining me today and I hope you enjoyed the watercolor tutorial.

Please be sure to check out The Stamp Simply Ribbon Store for all of the fantastic paper crafting products and the Blog for inspiration from the Design Team.


I hope you have a wonderful holiday weekend and a very 
Happy and Blessed Easter!

Hugs & Smiles,
Heidi


Supplies  
Stamps:  Stamp Simply Clear Stamps SS-Sent008 Blessings/Beatitudes 2
Paper:  Ranger Watercolor Paper - 8.5 x 11, Cardstock - White, Pearl White
Ink:  VersaMark Ink, Tim Holtz Distress Inks - Spiced Marmalade, Ripe Persimmon, Squeezed Lemonade, Worn Lipstick
Dies:  Spellbinders Crosses Two
Accessories:  DecoArt Metallic Lustre - Gold Rush, Stampendous Super Fine Embossing Powder - Detail White, Melissa Frances White Pearls, Ranger - Glossy Accents, Scor-Tape, Therm-O-Web Foam Squares, Paint Brush Round #16

Wednesday, March 23, 2016

DIY Plush Peony and Bunny Spring Wall Hanging - Tonic Studios

Hello everyone!  Heidi, here and today I have a fun Spring DIY  home decor project to share with you using the Entwining Trellis Plush Peony Die Set from Tonic Studios and also some of the NUVO products.


Here is a picture of the plush peony and bunny wall hanging I created for Spring.  Since there is no Easter sentiment on the wall hanging you could have this piece hanging up in your home all throughout the Spring season.  I started with a small 6 x 6 wood frame.  I used a combination of white gesso, Gathered Twigs Distress Ink and NUVO Indian Gold Embellishment Mousse to paint the frame.  Then I rubbed a little more of the NUVO Indian Gold Embellishment Mousse on the frame.  I also added some water to the mousse to create gold paint splatters on the frame.  To finish the frame I applied Gathered Twigs Distress Ink around the outer and inside edges of the frame.  Next I die cut the large Entwining  Trellis border with one of the decorative edges using kraft cardstock.  I inked the edges of the cardstock using Gathered Twigs Distress Ink,  I placed the die cut in the upper corner of the frame and used some low tack tape to hold the die cut in place and trimmed the excess.  Then I used Crafty Tacky Glue to adhere the die cuts to the frame.  I did the same thing in the bottom corner of the frame.  


Here is a close up of the upper corner where you can see one of the peonies I created.  I used old book pages (without print) to die cut several of the flower shapes.  Then I shaped all of the flower petals and layered the flowers by off setting each layer to create a fuller flower.  I used Crafty Tacky Glue to adhere the flowers.  Then I used Worn Lipstick and Old Paper Distress Inks to color the flowers and I added pearl stamens to the center of each flower.


Here is a close up of the bottom corner.  I also added some NUVO Golden Sunset Glitter Drops to the Entwining Trellis border.  I just dabbed the glitter drops on with my finger to is would just leave a hint of sparkle.  I also added a couple pieces of some vintage tatting lace to the top and bottom of the frame and placed an ivory flat back pearl in the center of each lace scallop.  To finish off the flower clusters I added a couple of AB ivory and pink resin roses.


Here is a close up of the paint splatters using the NUVO Indian Gold Embellishment Mousse.


I added this sweet bunny image from ArtCult to the center of the frame.  To create the hanger I added baby pink, leather tan, and rose beige seam binding.  I frayed the edges of the seam binding to give it a more aged look.

Thank you so much for stopping by the blog today and I hope you enjoyed the project!  All supplies will be listed below.  :)

Happy crafting!


Tonic Studios Supplies:

Other Supplies Used:
Paper:  Kraft Cardstock, Vintage Book Paper; Ink:  Distress Inks - Worn Lipstick, Old Paper, Gathered Twigs; Ribbon/Trims:  Vintage Tatted Lace Trim; Accessories:  Ranger - White Gesso, Pearl Stamens, Fine Mist Water Bottle, Old Makeup Brush, 4mm Ivory Flat Back Pearls, Resin Roses - AB Ivory, Pink, ArtCult - Bunny Image, Seam Binding - Baby Pink, Leather Tan, Rose Beige, 6 x 6 Wood Frame, Paint Brush


Friday, March 18, 2016

The Stamp Simply Ribbon Store - Blog Candy Winner - He Has Risen Easter Card

Hello blogging friends!  Today, is my day to post for The Stamp Simply Ribbon Store.   I will be sharing an Easter card with you using another beautiful stamp sets from The Stamp Simply Clear Stamps Collection and also the Winner of the Blog Candy from our Easter week.  If you haven't seen Sharon's collection of Stamp Simply Clear Stamps you can click HERE to check them all out.  The stamp sets are beautiful sentiments and you can mix and match all of the stamps in the collection.

I used random.org to pick the Winner of the Blog Candy and the Winner is...

Number 20
Tricia T

Oh, Heidi! What a gorgeous card! I am so thankful that God brought my husband through brain surgery safely last June. Christ's love is so undeserved and amazing!

Congratulations Tricia!!  You can click HERE to visit Sharon's blog and find out all of the details on contacting her to get your new stamp set.

I also want to say thank you for all of the comments!  I really enjoyed reading them all and hearing about what everyone was thankful for in their lives and what kind of projects you would like to see from me on the blog.  


Here is the card that I designed using the New Stamp Simply Clear Stamps - SS-Sent005 He Has Risen.  The sentiments in this set are so beautiful and I love the fonts!


I used some of the paper from the Kaisercraft Provincial 6-1/2'' Paper Pad.  It has a floral print of roses on it and I wanted to add just a subtle hint of color to the roses so I used a cotton ball and added some Tim Holtz Distress Inks - Spun Sugar to the paper.


I layered three different types of lace and trims to create a border across the card. I used some Venise Lace 1.75" - Valentina White1/4" Ringlet Trim - Rose, and May Arts Ribbon Sampler - Vintage Pink.  I stamped the sentiment on to the white cardstock using Tim Holtz Distress Inks - Peeled Paint and then I stamped over it again using VersaMark Ink,  Then I added  Ranger Super Fine Embossing Powder - Clear to heat set and emboss the sentiment.  It's just a fun little trick you can do with clear stamps if you don't a lot of colors or the right color of pigment ink to match your project.  I used the Spellbinders Labels Thirty-Four to cut and emboss the label shape and then I added some Tim Holtz Distress Inks - Spun Sugar to the inside before removing the label from the die.  I also added some beautiful Petaloo - Mums and Butterflies PinkMinis White flowers and Melissa Frances White Pearls.


To finish off the card I added a pink mat and then the card base is a garden green.  I used Scor-Tape to adhere most of the card and then Therm-O-Web Foam Squares in between some of the layers to add some extra dimension.

Thank you so much for joining me today!

Please be sure to check out The Stamp Simply Ribbon Store for all of the fantastic paper crafting products and the Blog for inspiration from the Design Team.


I hope you have a wonderful weekend!

Hugs & Smiles,
Heidi


Supplies
Stamps:  Stamp Simply Clear Stamps - SS-Sent005 He Has Risen
Paper:  Kaisercraft Provincial 6-1/2'' Paper Pad, Cardstock - White, Pink, Green
Ink:  Tim Holtz Distress Inks - Spun Sugar, Peeled Paint, VersaMark Ink
Dies:  Spellbinders Labels Thirty-Four
Ribbon:  Venise Lace 1.75" - Valentina White1/4" Ringlet Trim - RoseMay Arts Ribbon Sampler - Vintage Pink
Accessories:  Ranger Super Fine Embossing Powder - Clear, Petaloo - Mums and Butterflies Pink, Minis White, Melissa Frances White Pearls, Scor-Tape, Therm-O-Web Foam Squares

Friday, March 11, 2016

The Stamp Simply Ribbon Store Easter Week - Four New Stamp Sets! - I Am The Resurrection and The Life Card - Giveaway!

Hello blogging friends!  Today, is my day to post for The Stamp Simply Ribbon Store and I will be share an Easter card with you plus four NEW and beautiful stamp sets from The Stamp Simply Clear Stamps Collection.  The new stamp sets are so wonderful and are filled with some of the most beautiful bible verses and sentiments.  All during this week the design team is sharing lovely cards using the four new stamps sets and we are each having a giveaway on our blogs. 


Here is a look at the card I designed using the Stamp Simply Clear Stamps - SS-Sent006 Easter.  Like I said the verses and sentiments in the four stamp sets are so beautiful and I love the fonts too.  For my card I started with a light blue card base.  I embossed the pick mat using the Darice Embossing Folder - Bold Floral.  Then I die cut a piece of white cardstock using the Spellbinders Labels Thirty-Nine die and I stamped the verse using VersaMark Ink and heat embossed using Ranger Super Fine Detail Gold Embossing Powder.  I used the Die D-Lites - Crosses Three along with Bazzill Gold Mirror Cardstock to die cut the cross.


Here is a close up for the cross.  I added some May Arts Metallic Gold String and a flower from the Petaloo Botanica Collection Minis Pink and a few Melissa Frances White Pearls.  I also used Therm-O-Web Foam Squares in between some of the layers to add some dimension to the card.


To finish off the card I stacked two of the sentiments from the same stamp set and heat embossed in gold on white cardstock.


Blog Candy Offering!


The Blog Candy offered is 
YOUR CHOICE of any ONE of the stamp sets from this release
OR
$15.00 of ANY product of your choice.

How to Enter the Drawing?

Simply leave a comment on this post and answer one of two questions or both if you would like.  What is something in your life that you are the most thankful for?  What cards of cards of projects would you like to see on my blog--CAS, Vintage, Mixed Media etc?

International viewers welcome to play along! We ship internationally daily.
All comments through midnight EST Monday, March 14 will be considered and a winner will be announced next Tuesday morning, March 15, selected by a random number generator.

Thank you so much for joining me today and I hope you love the new stamp sets as much as I do!

Please be sure to check out The Stamp Simply Ribbon Store for all of the fantastic paper crafting products and the Blog for inspiration from the Design Team.


I hope you have a wonderful weekend!

Hugs & Smiles,
Heidi


Stamps:  Stamp Simply Clear Stamps - SS-Sent006 Easter
Paper:  Bazzill Gold Mirror Cardstock, Cardstock - White, Pink, Blue
Ink:  VersaMark Ink
Dies:  Spellbinders Labels Thirty-NineDie D-Lites - Crosses Three
Embossing Folder:  Darice Embossing Folder - Bold Floral
Ribbon:  May Arts Metallic Gold String
Accessories:  Ranger Super Fine Detail Gold Embossing Powder, Petaloo Botanica Collection Minis Pink, Melissa Frances White Pearls, Therm-O-Web Foam Squares, Scor-Tape, Heat Tool

LinkWithin

Related Posts Plugin for WordPress, Blogger...