
 Check it out! How cute is this? I love this Garden Variety paper from Cosmo Cricket with the little sweet pea and flower pattern on it. After looking at the paper I was inspired to create a little pea pod. I used the Mega Classic Scalloped Ovals Large S5-024 Die# 5 to create the oval shape card.
 To start creating the pea pod I made oval and circle diecuts using the Wizard™, Mega Ovals Large S5-023 Die #2 and Standard Circles Small S4-114 Die #1 die templates from Spellbinders™. I cut two ovals and three circles.
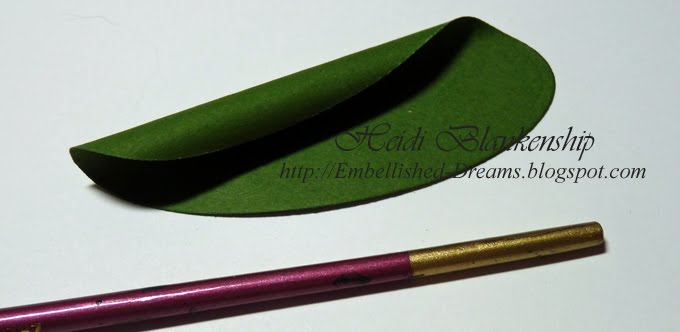 Next I used a paintbrush to curl the top half of one of the ovals.
 Then on the bottom half of the curled oval I applied E-Z Runner® (31') adhesive and some 3D Foam Squares from SCRAPBOOK ADHESIVES By 3L™.
 I applied 3D Foam Squares from SCRAPBOOK ADHESIVES By 3L™ to the peas (circles) to add a little dimension to the pea pod.
 I also cut/embossed two leaves using the Daisy Heads S4-058 (small leaf) die template and for the stem I used half of a tag made using Fancy Tags S4-235 die template. Then I inked the edges of all the diecuts.
 Here is a close-up of the finished pea pod on the front of the card.
 For the sentiment I used the Times New Roman Lowercase Font 25pt and 1-3/8" x 3-1/2” Horizontal Stamper from JustRite Stampers. That is one of the things that I love about JustRite Stampers, you can customize your stamps to fit your cards and create any kind of sentiment you would like. To make sure the sentiment will fit on the diecut I place the die template on top of the block. It looks like a perfect match to me!
 Here is a close-up of the sentiment. I stamped the sentiment using black ink onto white cardstock, cut/embossed using Mega Ovals Large S5-023 Die# 1 and then I inked the edges with Antique Linen ink. I also cut/embossed a scalloped oval for a mat using Mega Classic Scalloped Ovals Large S5-024 Die# 1. I added 3D foam Square to the back of the sentiment to add some dimension.
 I used a Copic marker on the ribbon to tone down the white a little.
 Here is the inside of the card.
Supplies~
Stamps~JustRite Stampers-Times New Roman Lowercase Font 25pt, 1-3/8" x 3-1/2” Horizontal Stamper
Paper~Cosmo Cricket-Garden Variety 6 x 6 Mini Deck; The Paper Company-Light Green, Olive Green, White, Red
Ink~Tsukineko-Memento Tuxedo Black; Ranger-Peeled Paint, Antique Linen Distress Inks
Other~Spellbinders™-Wizard™, Mega Ovals Large S5-023 Dies# 1, 2, 4, 5, Mega Classic Scalloped Ovals Large S5-024 Die# 1, 5, Standard Circles Small S4-114 Die# 1, Fancy Tags S4-235, Daisy Heads S4-058 (small leaf); Offray-Micro Check Red Ribbon; Copic Marker-Wide E31; SCRAPBOOK ADHESIVES By 3L™-3D Foam Squares, E-Z Runner® (31')
Thank you for stopping by today! I hope you enjoyed the tutorial on how to make the sweet pea. :)
Hugs & Smiles,
Heidi
PS >>>Don't forget to leave a comment HERE on this blog post for a chance to win a $50! Giveaway.
"sweet" card!
ReplyDeleteOh, Heidi! That is just so stinkin' cute!! Love it! Just bought that paper too! Hmmm....heehee!! xo
ReplyDeleteThis is genius Heidi!!! Very clever :)
ReplyDeleteThis is great Heidi! I love your work and this just proves how talented you are!
ReplyDeleteThis is so creative and just plain adorable!
ReplyDeletePrecious card. Thanks for sharing. ~Diane
ReplyDeleteNever saw a sweet pea look soooooo cute or clever!!!!
ReplyDeleteJan
This is adorable Heidi!
ReplyDeleteThank you so much for taking the time to do the tutorial!
I am alway in awe of your projects, thank you for all of the inspiration!
this is so cute!! thanks for the tutorial!
ReplyDeleteSo stink'n cute and clever!!
ReplyDeleteThis is absolutely the cutest card ever! I just love it! It truly makes you smile. Thanks so much for sharing.
ReplyDelete