Good morning! Today is the
Crafty Secrets Postcard Challenge Day and
Vicki Chrisman our wonderful Design Team leader came up with a Fantastic challenge for us this month! Each DT Member has created a project to share using the
NEW Vintage Postcard Kits. We could have any theme and use any
NEW Vintage Postcard Kit we would like for the challenge. I love these
New Vintage Postcard Kits!! Each kit includes a custom Clear Art Stamp Set, 6 large postcard sized images, 12 smaller images to use for embellishments and 18 ivory chipboard pieces.
I made three projects to share with you today and I used the
NEW Halloween Vintage Postcard Kits. For my first project I designed a Halloween candy bucket. The little pan/bucket was a great find at a garage sale and I knew exactly what I wanted to do with it.

Before I started working on the bucket I wanted to create a custom ribbon to tie around it. I started looking through my stash of ribbons and I found some twill ribbon that would be prefect. The twill ribbon is 1-1/2 '' wide and I stamped several of the images from the custom Clear Art stamp set that is included in the
Halloween Postcard Kit onto the ribbon using Tsukineko Memento Rich Cocoa Ink and set it aside to dry.

Here is a close up of the ribbon. The images stamp so clear and wonderfully onto the twill ribbon!

Here is a picture of the ribbon after the entire piece was stamped. I know some of you might be thinking, oh my gosh how long did it take to do that? Honestly it was less then ten minutes to do the stamping.

The ribbon looks fantastic just the way it is so if you wanted to stop at this step you could or if you wanted to add a little color and more detail you can keep adding to it and that is what I did. I took a wide Copic marker (E31) and I went over the whole ribbon to give it more of a vintage look and then I colored some of the images in using Copic markers.


Here is a picture of the backside of the bucket and you can see the finished piece of twill ribbon. I colored the pumpkins, moons and added black eyes and diamond stickles to the ghosts.

The bucket was already painted a dark brown and I used a sanding block to give it a more worn look. It also had little stars cut out going around the rim and I added some Orange Peel Stickles from Ranger to the stars. For the front of the candy bucket I added one of the vintage Halloween images from the
Halloween Vintage Postcard Kits. To glue the image onto the chipboard I used 3 in 1 Advanced Craft Glue from Beacon. Once the glue was dry I used finishing files from CTMH to get the edges all nice and smooth. Then I inked the edges with Vintage Photo Distress Ink from Ranger. I also added several colors of Stickles to the image and finished it off by adding Rock Candy Distress Stickles to the edge and copper eyelets. I also added vintage buttons with copper wire going around the edge of the bucket and then filled it up with goodies for Halloween.
 Halloween Candy Bucket Supplies~Crafty Secrets-Halloween Vintage Postcard Kit with matching Mini Halloween Stamp SetInk~Tsukineko-
Memento Rich Cocoa,
Ranger-Distress Ink Vintage Photo,
Other~Twill Ribbon (1-1/2'' wide),
Copic-E31 (Wide), Y15, Y19, Y38, YR04, YG63, 100,
Beacon-3 in 1 Advanced Craft Glue,
Ranger-Stickles Diamond, Orange Peel, Lime Green, Distress Stickles Rock Candy,
Glue Dots-Glue Lines,
CTMH- Finishing Files, Crop-a-Dile, Copper Eyelets, Copper Wire, Vintage Buttons, Black Glitter Glue
For my second and third projects I made two hanging postcards. I would love to make up several of these to hang all over the house for Halloween! You can use them together or alone and they would also look great on the front of a gift bag or package for someone. The postcards are quick, easy and fun to make and it's up to you as to how you embellish them.

I use 3 in 1 Advanced Craft Glue from Beacon to adhere all the pieces. I inked the edges on both postcards and added stickles from Ranger to the images. I also stamped images on the back of the postcards, added eyelets, buttons, bling and copper wire.
Here is the first one I made.
Front~

Back~

Close up~
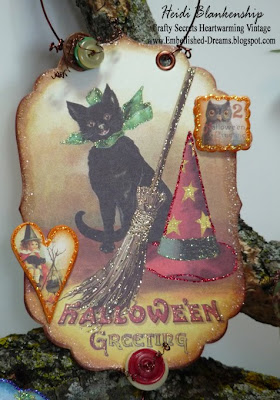 Black Cat Halloween Post Card Supplies~Crafty Secrets-Halloween Vintage Postcard Kit with matching Mini Halloween Stamp SetInk~Tsukineko-
Memento Tuxedo Black,
Ranger-Distress Ink Vintage Photo,
SU-Pumpkin Pie
Other~Beacon-3 in 1 Advanced Craft Glue,
Ranger-Stickles Diamond, Orange Peel, Lime Green, Red, Gold, Distress Stickles Rock Candy,
CTMH- Finishing Files, Crop-a-Dile, Copper Eyelets, Copper Wire, Vintage Buttons
Here is the second one I made.
Front~

Back~

Close up~
 Black Cats & Mice Halloween Post Card Supplies~Crafty Secrets-Halloween Vintage Postcard Kit with matching Mini Halloween Stamp SetInk~Tsukineko-
Memento Tuxedo Black
,
SU-Pumpkin Pie, Old olive, Not Quite Navy
Other~Beacon-3 in 1 Advanced Craft Glue,
Ranger-Stickles Diamond, Orange Peel, Lime Green, Gold, Dark Blue,
CTMH- Finishing Files, Crop-a-Dile, Black Eyelets, Copper Wire,
Creative Impressions-Bits of Bling Bright Smooth Circle Bling, Yellow and Orange Ribbon

Please be sure to hop on over to all of the other Crafty Secrets DT Members Blogs and see what they have created to share with you!! I can't wait to see what they have designed!! Also don't forget to check out the
Crafty Secrets Heartwarming Vintage Blog, Sandy will be announcing the winner of the Halloween Blog Candy!!
Thank you so much for stopping by today!! I hope you enjoy the
Crafty Secrets Challenge/Blog Hop and I would love to hear what you think about the
NEW Vintage Postcard Kits from
Crafty Secrets. ;)
On a more personal note I just wanted to say to my blog readers I am sorry I haven't been able to post very much this past month! We have been having some problems with our newer computer and it is still in the shop. I do have an older computer but it is so much slower and doesn't have the same programs I am used to using so trying to do a blog post takes forever! :( But hopefully we will have the newer computer back very soon!! Thanks for understanding!!!
I hope you all have a Fantastic Day!!
Smiles!
Heidi


