

30 designers, FIVE shopping sprees each day. No one knows where the prizes will be! Each day of the hop JustRite will have five Mystery Blog Candy Prizes hidden along the hop with a total retail value of $600. JustRite will randomly select five mystery blogs each day of the hop and randomly allocate each of the shopping sprees. For your chance to win, simply leave a little love (a comment) on each designer’s blog including the JustRite blog. The more designers you leave comments with, the better your chances of winning. Each day’s comments will remain open for three days. A winner from each of the mystery blogs’ comments will be randomly chosen using Random.org. Consult the listing of designers at the JustRite blog each day (each day’s designers will be different) and start out on your way! Beginning Friday, March 26, summaries of all the winners will be posted on the JustRite blog. Good luck to everyone and enjoy all the JustRite eye candy along the hop!
Today during the JustRite Mega March Blog Hop (Day Three) JustRite and its sponsors will be giving away the following five prizes:
· $200 JustRite Shopping Spree
· $100 Spellbinders Shopping Spree
· $100 Copic Prize Package, and
· Two additional $100 JustRite Shopping Sprees!
Blog comments for Day Three will be open until Saturday at 6pm EST. On Sunday, JustRite will announce on their blog which five blogs have the mystery candy for Day Three. You will need to go to the JustRite blog to determine where you need to go to find out if you are one of the five lucky winners.
Debbie Olson
Sherrie Siemens
Beate Johns
Heidi Blankenship You are here! :)
Kathy Jones
Karen Hunsaker
Peet Roeven
Michele Kovack
Cheryl Nelson
Anja Curvers
Kay Sibley
Katarina Menzies
Holly McMillen
Tammy Hershberger
Angela Barkhouse
Heidi Van Laar
Jerri Jimenez
Sarah Parker
Jennie Black
Laura Davis
Ashley Newell
Tanis Giesbrecht
Alice Wertz
Shanna Vineyard
Rae Barthel
Ryann Salamon
Terre Fry
Mona Pendleton
Lisa Silver
Kim Moreno
 Here is the project that I created to share with you. I altered a large Altoids tin and gave it a beautiful vintage look.
 Here is what the tin looked like before I altered it. It's a 10 oz. Altoids tin so it's not a little purse size one.
 The first thing I did was to apply foam mounting tape on the lid. I didn't add mounting tape to the word Altoids because it is already raised up and once the mounting tape is on the word and the tape are about at the same level.
  I traced the tin onto some designer paper from Daisy Bucket, the paper is from the new line Shabby Green Door. I applied the paper to the top of the tin with the foam mounting tape but to seal the edges I used Fabri-Tac from Beacon Adhesives. Although Fabri-Tac is for fabric, ribbon and lace it also works wonderfully with paper.
  Next I sanded and inked the edges of the paper.
 Then I airbrushed the tin a pretty brown. Now this part was kind of an afterthought and if I was going to do this again I would airbrush and then apply the paper. *wink*
 After the airbrushing was done I added a darker brown ink the the edges of the paper and then I set the tin aside while I worked on the embellishments for the top.
 The stamped image I used is from the Breath of Spring Stamp Set from JustRite Stampers. This set includes 4 Beautiful Floral Images including Violets, Lily of the Valley, Daffodils and Tulips and 4 Interchangeable Borders and it fits the 2-1/4'' x 3-1/16'' Oval Stamper. These are the Copic markers I used to colors the violets.
 Next I added the green to the stems and leaves.
 I added pinks for the bow.
 After the floral image was colored the I used the Wizard™ and Classic Ovals Large S4-110 Die #3 from Spellbinders™ to cut/emboss the oval. I stamped the floral image twice and cut out a few of the flowers and the leaves and used foam tape to adhere the flowers and add some dimension and I also inked the outside of the oval with Antique Linen Ink.
 I stamped the image again and colored the border with Copic markers, cut out the oval and then inked the edges with Antique Linen Ink.
 Next I cut/embossed four accent pieces using the Wizard™ and Floral Accents S4-199 die templates from Spellbinders™. I also cut/embossed a scalloped oval using the Big Scalloped Ovals Large S4-251 Die #4 die templates. I cut all of the accent pieces in half.
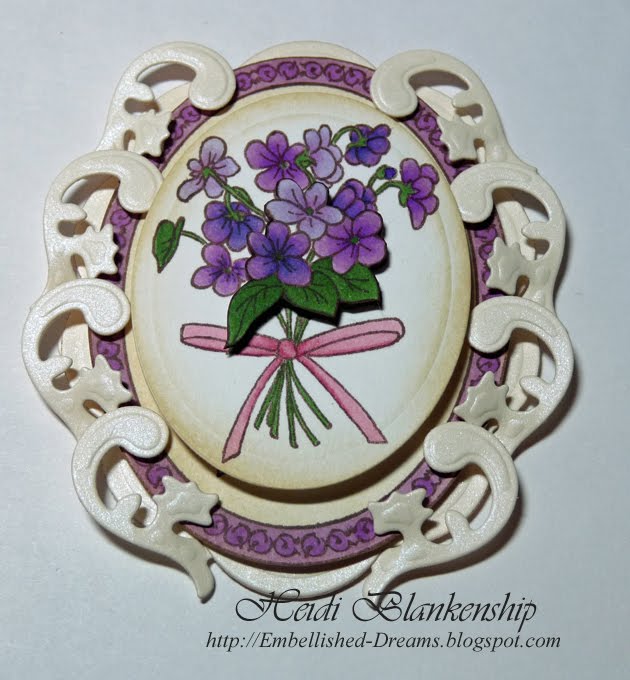
 Once I had all of the piece cut/embossed I layered them. The scalloped oval is on the bottom and then the oval with the border is the second layer and then I added all of the accent piece and the small oval with the violets is the top layer. In between each layer is foam tape with gives it this great dimension.
 Then I worked on the tag. The sentiment is from Joyful Hearts from JustRite Stampers and it contains 6 Wonderful Sentiments with 6 Interchangeable Borders and it fits the 1-3/4'' x 2-5/16'' Oval Stamper. I stamped the sentiment and then made an oval diecut using the Wizard™ and Classic Ovals Small S4-112 Die #3 from Spellbinders™. Before removing the oval I airbrushed with a Copic marker.
 Here are all of the piece for the tag. I made a tag and accent diecuts using the Wizard™ and Fancy Tags S4-235, Floral Accents S4-199 die templates.
 Here is the layered and finished tag.
  These are all of the Copic markers I used for this project.
 For a finishing touch I added some lace trim and rhinestones.
Supplies~
Stamps~JustRite Stampers-Breath of Spring, Joyful Hearts, 2-1/4'' x 3-1/16'' Oval Stamper, 1-3/4'' x 2-5/16'' Oval Stamper
Paper~Neenah Solar White; Curious Iridescent Poison Ivory; Daisy Bucket Shabby Green Door-Songbird
Ink~Tsukineko-Memento Rich Cocoa; Ranger-Distress Inks Antique Linen, Vintage Photo
Other~Spellbinders-™Wizard™, Classic Ovals Large S4-110 Die #3, Classic Ovals Small S4-112 Die #3, Big Scalloped Ovals Large S4-251 Die #4, Fancy Tags S4-235, Floral Accents S4-199; Copic-Airbrush System, Markers as shown in the picture; My Mind's Eye-Lush Brown Rhinestones; Webster's Pages-Lace Trim; Beacon Adhesives-Fabri-Tac; 3M Scotch-Foam Mounting Tape; 10oz. Altoids Tin

 Thank you so much for stopping by today! I hope you are enjoying the March Mega Blog Hop and don't forget to visit each of the designers and leave them a little love (comment). Good Luck with the contest! I hope you have a Wonderful Wednesday!!
Hugs & Smiles,
Heidi
Gorgeous altered can. Thanks for the wonderful tutorial!
ReplyDeleteAmazing transformation!
ReplyDeleteWhat a gorgeous project! I love how you framed the flowers with the scrolls.
ReplyDeleteI collect the smaller Altoid cans for a friend - she likes to alter them...I'll have to have her check out your blog....these are beautiful!!!
ReplyDeleteWho knew that an Altoids tin could be so elegant and beautiful?!?!?
ReplyDeletethis is awesome - what a great way to use the spellbinders
ReplyDeletewhat a beautiful project! Wow I'm saying a lot of that with this hop LOL Thanks for the step by step instructions they're awesome :)
ReplyDeleteThis is really beautiful! I love how you used the floral accent die to embellish around the stamped image. Thanks for the step by step instructions.
ReplyDeleteAaahhh! Soooo beautiful! Your clever use of the Spellbinder accents with the focus piece is outstanding!
ReplyDeleteWhat a gorgeous tin! I am so glad I found your blog! I have 2 Altoids tins like yours and had no idea what to do with it. Thank you so much for the directions and inspiration! I can't wait to get started!
ReplyDeleteThis tin is so cool. Thanks for the step-by-step details of how you made it. Your coloring is gorgeous, and I love the flourishes along the edges.
ReplyDeleteWOW... wow..... wow! :) Thanks for showing and sharing!
ReplyDeleteHeidi this is so beautiful. You always have great ideas for altering things.
ReplyDeleteSimply gorgeous! I love turning trash to treasure and you did it beautifully! Thanks for sharing.
ReplyDeleteDawnW
You did a fabulous job! Love the details.
ReplyDeleteabsolutely gorgeous!!! what a lot of work for a little tin :) amazing details!
ReplyDeleteGreat tutorial, thank you.
shame I don't have any copics or nestabilities :(
Wouldn't it be great if all the designers drew names for the creations they made for this blog hop?!! LOL
Thanks for the opportunity and Good luck to everyone,
Susan
OMG....this is a gorgeous card! Your attention to detail is awesome with your special inking techniques and choice of embellishments. Love the step by step photos...thanks so much!!
ReplyDeleteBeautiful!!! The time, work and color choices are terrific!!! Great blog hop.
ReplyDeleteI love this project, so much detail. Very pretty.
ReplyDeleteWow. This was so cool -- I would never have thought to do that! Thanks for the inspiration.
ReplyDeleteVery unique vintage project, love it
ReplyDeleteWow! Gorgeous, thanks for sharing.
ReplyDeleteThis is a beautiful project. I love the die cut shapes and the way you've layed them out. The lace and jewels are perfect for the entire look.
ReplyDeletelove vintage, purple and violets..beautiful
ReplyDeleteWonderful instructions for what you did that's helpful and inspires us to be more creative.
ReplyDeleteAbsolutely gorgeous!!! Thank you for the step-by-step too, I'm bookmarking it for later when I have time to make my own :)
ReplyDeleteWow. Your tin is stunning!! Thanks for all the details. I will be back.
ReplyDeleteOh my Heidi, what a gorgeous tin, I just love it. You are truly amazing. Thanks so much for sharing that amazing talent and caring spirit with us.
ReplyDeletewhat a darling little tin.
ReplyDeleteGreat idea--I love the vintage look--TFS
ReplyDeleteAbsolutely beautiful Heidi! Fantastic step shots. *gasp!*
ReplyDeleteI love this project, beautiful... the detail is amazing!
ReplyDeleteThanks for Sharing!!!
xoxo
Ola
okj83 at live dot com
I love what you did with the labels=how they wrap around the image and frame it so beautifully!
ReplyDeleteLove to recycle and this is a great project. The violets are lovely.
ReplyDeleteWow! Very pretty! Love how you used the floral accent pieces around the image and tag!
ReplyDeleteVery creative idea! All of the extra touches you put on the box really show.
ReplyDeleteWOW~~ Amazing tin you created!!! So gorgeous!! Love all the detail~~
ReplyDeleteyour artwork makes me want to go out and purchase all the items you use!!! thanks so much for sharing all of your talent with everyone!!! ~lpzps
ReplyDeletewhat a beautiful tin and so vintage- love your colours and the lacey feel-thanks for sharing
ReplyDeleteThis is a gorgeous project! Thank you for providing all the "how to" details. I love the violets too!
ReplyDeleteBeautiful. TY for the step by step instructions and photos.
ReplyDeleteGreat design. Love the coloring of the violets. Thought the copic air gun was adorable
ReplyDeleteWhat a beautiful project. I love all things about it, the lace, the soft colors, the antiquing, and the dies. Those flower stamps are perfect. Thanks for sharing, Rae
ReplyDeleteThis is absolutely gorgeous, thanks for sharing.
ReplyDeleteGorgeous project, looks so pretty and delicate! Thanks for showing how it's done! off to hop
ReplyDeletehugs
Heidi, your project is Beautiful!
ReplyDeleteI love how you used the die cuts for the frames around your images,and also the vintage feel1
Thank you for sharing and for the detail of your instructions!
Have a great weekend!
Heidi, this is gorgeous. Thanks for the details on how you did it.
ReplyDeleteI liked your idea of air-brushing the tin. Great job!!!
Love this project! It is so pretty, I'm going to make some for Easter gifts. I better start eating altoids......LOL. Thanks for sharing this!
ReplyDeleteHow gorgeous! This is stunning, Thanks for sharing and the opportunity to win!
ReplyDeleteOh Wow absolutely gorgeous! Thanks for sharing how you made this awesome project!
ReplyDeleteWhat a fabulous project. Your use of the nestabilities is fantastic. Thanks for the details.
ReplyDeleteGorgeous project! Thanks for sharing the details!!!
ReplyDeleteLove what you did with the little accent pieces - great idea
ReplyDeleteAnother fantastic card. You ladies are fantastic. Hope to be this good some day.
ReplyDeleteBeautiful project and so many nice details, just fabulous
ReplyDeleteYour violets and the surrounding accents are breathtaking! Thanks so much for the detailed pictures, too.
ReplyDeleteVery pretty - love the swirled accents
ReplyDeleteLove this!!! So much detail!
ReplyDeleteBEAUTIFUL! I love your projects and this is so awesome. Now I know what can be done with my tins.
ReplyDeleteSmiles~
Marilyn
Simply GORGEOUS, love the detail and the vintage look--- thanks for sharing.
ReplyDeleteI have several Altoid tins and had no idea what to do with them....now I do! Thank you.
ReplyDeletelove how you created the frame
ReplyDeletebeautiful vintage look box!
ReplyDeleteGreat project but even better, great tutorial.
ReplyDeleteLove your attention to detail and it came together so beautifully!
ReplyDeleteWow thankyou so much for showing the tape to raise the area up around the raised lettering on the tin - "lightbulb moment" now I can use those tins I've been hoarding (now why didn't I think of that)LOL I love your tin it's gorgeous:)
ReplyDeleteI am so attracted to this project and its "Old World feel"! Wow Heidi - Spectacular job!!
ReplyDeleteThe details and the airbrushing on this are amazing!!! And I have an Altoid box sitting in front of my keyboard now...thanks for a beautiful post!!
ReplyDeleteBeautiful tin and great instructions. Thanks for sharing.
ReplyDeleteWow...this is beautiful! Love the vintage look and what a great idea to use an Altoid tin can. Thanks for all the details on how to do it.
ReplyDeleteSimply BEAUTIFUL!!!!!!!
ReplyDeleteI have these stupid tins all over my house! My hubby is addicted to Altoids!! Thanks for showing me how to make use of an otherwise object I would have to pick up and throw away!(I think he is allergic to the trash can also!!)
ReplyDeleteLOVe those violets!!!
ReplyDeletewhat great instructions! thank you for all the pictures. love your project!!
ReplyDeleteBeautiful project and such a great detailed tutorial.
ReplyDeleteWhat a great project. TFS.
ReplyDeleteAmazing! I didn't know Copic markers would stay on metal. I love all the rhinestones!
ReplyDeleteDarling altered tin! Thanks for the tip about the Fabri-Tac. Also I appreciated the step-by-step pictures. Thanks so much! Gail S.
ReplyDeleteThis is the most gorgeous tin I've ever seen!! I LOVE the vintage look and the die cuts...so creative!!
ReplyDeleteWow!! Your creativity amazes me! Thanks for sharing.
ReplyDeleteGorgeous little altered tin. Your tutorial was very detailed, thanks so much for sharing.
ReplyDeleteSuch a beautiful project...but then your work is always amazing...Thanks for the detailed tutorial.
ReplyDeleteWow! Some of you are just WAY dedicated to your art! LOL. This is just beautiful.
ReplyDeleteThis is such a beautiful project, and love the tutorial. Thanks!! :-)
ReplyDeleteLove all your attention to details. Great project, thank you for taking the time to show us how.
ReplyDeleteIncredible tutorial! I love the box and who ever receives it will surely treasure it!
ReplyDeleteWow! Great project! Thats for showing all the steps!
ReplyDeleteWhat a beautiful tin! Thank you for the tutorial. I always like to learn how designers put their projects together.
ReplyDeleteYou made that tin look fabulous!! Great job!!
ReplyDeleteThis is so lovely. And the step-by-step is very much appreciated. Thank you so much!
ReplyDeleteThis tin is lovely. And I bet it smells great, too.
ReplyDeleteWow. Lots of work details.
ReplyDeleteDiane C-S
wow. amazing.
ReplyDeleteWOW! What a gorgeous project!Love it!!
ReplyDeleteOh, what a clever tin! Iris Soscia
ReplyDeleteThanks, not only for the wonderful example, but all the how-tos.
ReplyDeleteomg! its so pretty!
ReplyDeleteTHat is absolutely stunning!
ReplyDeleteI love this project. I have a box full of the tins and now maybe I will use some of them. Beautiful trinket box. Thanks for sharing.
ReplyDeleteLinda D.
Heidi Loo, I love all the attention to detail you do when you create a project, it looks beautiful. Hugs Terre
ReplyDeleteHeidi - this should be one of the blog hop prizes!!!!
ReplyDeletePretty box -- love all of your details!
ReplyDeleteWow your project is beautiful, the trinket box is amazing.
ReplyDeleteGod Bless,
Jeanine
What a gorgeous altered Altoid tin!!!
ReplyDeleteAvery pretty project, what a great idea, wonderful coloring
ReplyDeleteLynn
I just love your blossoms! Thank you for a chance to win!
ReplyDeletegreat job
ReplyDeleteI really like this project. Thanks for the tutorial on it . I have about 20 of the tins sitting now i can try making them. Linda Harris lsunflower58@aol.com
ReplyDeleteDefinitely a "Thing of Beauty." Exquisite detail work.
ReplyDeleteWOW--what gorgeous results!
ReplyDeleteWho knew a little tin could be converted to something so lovely!?
ReplyDeleteI love how you transformed that tin in to a work of art!
ReplyDeletelove the altered altoid box. beautiful colors.
ReplyDeletePerfect Project!!! I just love your blog!!!Thank you for sharing your talent with all of us.
ReplyDeleteWhat a work of art! I like the brown tin : )!
ReplyDeleteLove what you did with the floral accents.
ReplyDeleteGreat tutorial! Air brushing? Nice touch. Very elegant.
ReplyDeleteYour vintage box is beautiful. I love the dies you used to make them.
ReplyDeleteBeautiful isn't the word for this project! To start with a tin box and come up with a beautiful container like you did is absolutely stunning! What incredible talent!
ReplyDeleteBeautiful!!!!! I love all your cards and projects! They are always beautiful.
ReplyDeleteWhat a great way to reuse a candy tin. THanks for the great idea.
ReplyDeletewhat a lovely idea, so beautiful. Love the lace and rhinestones.
ReplyDeleteWOW! Awesome project! Thanks for sharing!!!
ReplyDeleteBeautiful, great creativity.
ReplyDeleteWow! Beautiful and delicate!
ReplyDeleteAll I can say is WOW!!!! Thank you for sharing the steps you took to turn that tin into such a beauty
ReplyDeleteBetty M
Very cute idea.
ReplyDeleteWhat a great project! Beautiful result!
ReplyDeleteWow....this is simply gorgeous. Thank you for the tutorial....simply amazing talent.
ReplyDeleteSuch a beautiful project! Great work!
ReplyDeleteJust gorgeous - I love all the little finishing touches!!
ReplyDeletegreat project!!
ReplyDeleteAwesome job.. Love your coloring...
ReplyDeleteBeautiful tin. The floral accents are gorgeous.
ReplyDeleteThis is a really neat creation here! Thanks for sharing! Carol M in TX/carolswingster77@aol.com
ReplyDeleteA beautiful do-over of a ugly tin. Love the vintage feel of it.
ReplyDeleteAwesome, a great idea for mothersday. Very pretty!
ReplyDeleteIn a word Stunning!! Thank you for sharing your stamps along the week. It was a fabulous tutorial and the final piece is gorgeous!
ReplyDeleteI often save old tins and boxes and then never know what to do with them. Thanks for a great idea.
ReplyDeleteThat is incredible!
ReplyDeleteExquisite and so vintage looking! I always wondered how to cover a tin with raised letters. TFS xxD
ReplyDeleteThis is my most favorite....
ReplyDeleteWow that's stunning! Love the vintage feel and such beautiful lace. Love the recycled ideas. I'm on the look out for little tins around my house. TFS!
ReplyDeleteBeth Greco
Wow! I love how you re-made the tin! Who would guess?! Your step-by-step info is so much appreciated! I love to know how the fabulous designers think, and strive to think the same way some day!
ReplyDeleteWho knew I should be saving these tins. Beautiful job.
ReplyDeletesimply elegant.. you turned a plain old Altoids tin into a masterpiece.. love it.. thnx
ReplyDeleteThis is such a beautiful project. Thank you so much for including the directions.
ReplyDeleteLove your project! Gorgeous!
ReplyDeletehugs,
Gini
I enjoy altering the smaller tins, and you've inspired me! Love everything vintage and yours is fab!
ReplyDeleteGreat Technique with the double stick tape to raise the rest of the tin up! Can't wait to try it! Love all the layers... Beautiful work! Snick~Sue
ReplyDeleteLove the tin!!! TFS
ReplyDeletekimfletcher@shaw.ca
What a fantastic idea! Love the way you created (recycled) a new use for this tin. Thanks for all the directions. Can't wait to try it. It turned out beautiful. Wow!
ReplyDeleteThanks now to get out the markers and stamps
ReplyDeleteLOVE, LOVE, LOVE your altered box...way to recycle!! Thanks for sharing.
ReplyDeleteSue
I loved your project!
ReplyDeleteGorgeous!
ReplyDeleted
Oh, the detail, simply gorgegous and girlie girl. I love it! Thanks for sharing.
ReplyDeleteStay well,
AnnMarie
Love the project! Very pretty.
ReplyDeleteI can't believe this started as a box of mints! Great job!
ReplyDeleteYou are amazing Lady! I just love the Victorian feel to this!
ReplyDeleteAnd may I say, your pictorial is one of the most detailed & easy to follow that I have yet to see!
WOW!!! Love this card!
I'm new 2 JustRite® & am just in awe of all the incredible products they offer & the incredibly talented designers such as yourself that inspire everyone! Really looking forward to learning & becoming more involved w/ the JustRite family! Thank you so much for sharing your talent w/ us! LOVE your STYLE!
WOW!!! Love this Tin & the Victorian look of it!
ReplyDeleteI'm new 2 JustRite® & am just in awe of all the incredible products they offer & the incredibly talented designers such as yourself that inspire everyone! Really looking forward to learning & becoming more involved w/ the JustRite family! Thank you so much for sharing your talent w/ us! LOVE your STYLE!
Love these scalloped embossed labels and the tutorial is amazing. Thanks so much for sharing with someone like me who hasn't a clue about copic markers. Lol. Beautiful job on your altered project.
ReplyDeleteThanks so much for the marvelous inspiration!!!
ReplyDeleteAll that beauty from an Altoids container - wow. Great job.
ReplyDeleteLove your step by step tutorial! This is gorgeous!!!
ReplyDelete