

30 designers, FIVE shopping sprees each day. No one knows where the prizes will be! Each day of the hop JustRite will have five Mystery Blog Candy Prizes hidden along the hop with a total retail value of $600. JustRite will randomly select five mystery blogs each day of the hop and randomly allocate each of the shopping sprees. For your chance to win, simply leave a little love (a comment) on each designer’s blog including the JustRite blog. The more designers you leave comments with, the better your chances of winning. Each day’s comments will remain open for three days. A winner from each of the mystery blogs’ comments will be randomly chosen using Random.org. Consult the listing of designers at the JustRite blog each day (each day’s designers will be different) and start out on your way! Beginning Friday, March 26, summaries of all the winners will be posted on the JustRite blog. Good luck to everyone and enjoy all the JustRite eye candy along the hop!
Today during the JustRite Mega March Blog Hop (Day Three) JustRite and its sponsors will be giving away the following five prizes:
· $200 JustRite Shopping Spree
· $100 Spellbinders Shopping Spree
· $100 Copic Prize Package, and
· Two additional $100 JustRite Shopping Sprees!
Blog comments for Day Three will be open until Saturday at 6pm EST. On Sunday, JustRite will announce on their blog which five blogs have the mystery candy for Day Three. You will need to go to the JustRite blog to determine where you need to go to find out if you are one of the five lucky winners.
Debbie Olson
Sherrie Siemens
Beate Johns
Heidi Blankenship You are here! :)
Kathy Jones
Karen Hunsaker
Peet Roeven
Michele Kovack
Cheryl Nelson
Anja Curvers
Kay Sibley
Katarina Menzies
Holly McMillen
Tammy Hershberger
Angela Barkhouse
Heidi Van Laar
Jerri Jimenez
Sarah Parker
Jennie Black
Laura Davis
Ashley Newell
Tanis Giesbrecht
Alice Wertz
Shanna Vineyard
Rae Barthel
Ryann Salamon
Terre Fry
Mona Pendleton
Lisa Silver
Kim Moreno
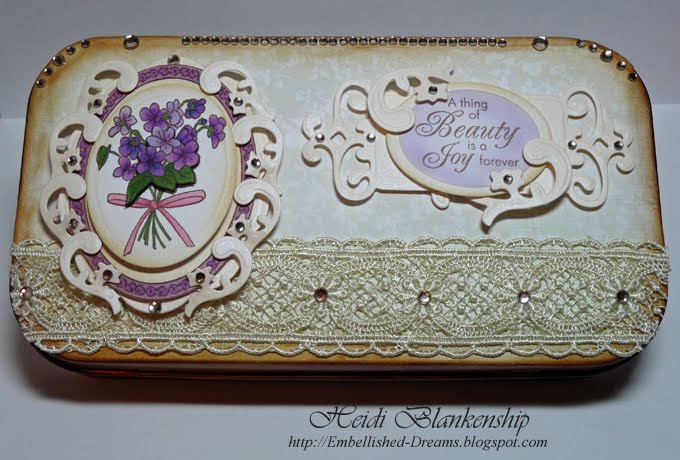
 Here is the project that I created to share with you. I altered a large Altoids tin and gave it a beautiful vintage look.
 Here is what the tin looked like before I altered it. It's a 10 oz. Altoids tin so it's not a little purse size one.
 The first thing I did was to apply foam mounting tape on the lid. I didn't add mounting tape to the word Altoids because it is already raised up and once the mounting tape is on the word and the tape are about at the same level.
  I traced the tin onto some designer paper from Daisy Bucket, the paper is from the new line Shabby Green Door. I applied the paper to the top of the tin with the foam mounting tape but to seal the edges I used Fabri-Tac from Beacon Adhesives. Although Fabri-Tac is for fabric, ribbon and lace it also works wonderfully with paper.
  Next I sanded and inked the edges of the paper.
 Then I airbrushed the tin a pretty brown. Now this part was kind of an afterthought and if I was going to do this again I would airbrush and then apply the paper. *wink*
 After the airbrushing was done I added a darker brown ink the the edges of the paper and then I set the tin aside while I worked on the embellishments for the top.
 The stamped image I used is from the Breath of Spring Stamp Set from JustRite Stampers. This set includes 4 Beautiful Floral Images including Violets, Lily of the Valley, Daffodils and Tulips and 4 Interchangeable Borders and it fits the 2-1/4'' x 3-1/16'' Oval Stamper. These are the Copic markers I used to colors the violets.
 Next I added the green to the stems and leaves.
 I added pinks for the bow.
 After the floral image was colored the I used the Wizard™ and Classic Ovals Large S4-110 Die #3 from Spellbinders™ to cut/emboss the oval. I stamped the floral image twice and cut out a few of the flowers and the leaves and used foam tape to adhere the flowers and add some dimension and I also inked the outside of the oval with Antique Linen Ink.
 I stamped the image again and colored the border with Copic markers, cut out the oval and then inked the edges with Antique Linen Ink.
 Next I cut/embossed four accent pieces using the Wizard™ and Floral Accents S4-199 die templates from Spellbinders™. I also cut/embossed a scalloped oval using the Big Scalloped Ovals Large S4-251 Die #4 die templates. I cut all of the accent pieces in half.
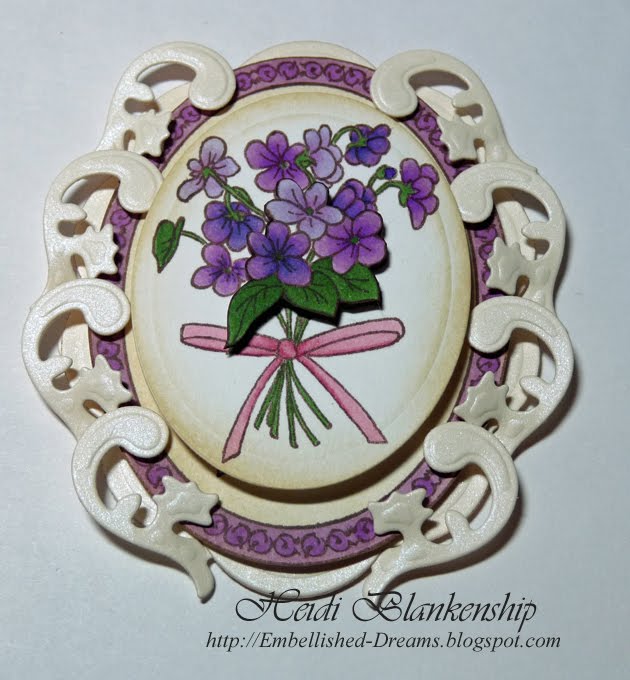
 Once I had all of the piece cut/embossed I layered them. The scalloped oval is on the bottom and then the oval with the border is the second layer and then I added all of the accent piece and the small oval with the violets is the top layer. In between each layer is foam tape with gives it this great dimension.
 Then I worked on the tag. The sentiment is from Joyful Hearts from JustRite Stampers and it contains 6 Wonderful Sentiments with 6 Interchangeable Borders and it fits the 1-3/4'' x 2-5/16'' Oval Stamper. I stamped the sentiment and then made an oval diecut using the Wizard™ and Classic Ovals Small S4-112 Die #3 from Spellbinders™. Before removing the oval I airbrushed with a Copic marker.
 Here are all of the piece for the tag. I made a tag and accent diecuts using the Wizard™ and Fancy Tags S4-235, Floral Accents S4-199 die templates.
 Here is the layered and finished tag.
  These are all of the Copic markers I used for this project.
 For a finishing touch I added some lace trim and rhinestones.
Supplies~
Stamps~JustRite Stampers-Breath of Spring, Joyful Hearts, 2-1/4'' x 3-1/16'' Oval Stamper, 1-3/4'' x 2-5/16'' Oval Stamper
Paper~Neenah Solar White; Curious Iridescent Poison Ivory; Daisy Bucket Shabby Green Door-Songbird
Ink~Tsukineko-Memento Rich Cocoa; Ranger-Distress Inks Antique Linen, Vintage Photo
Other~Spellbinders-™Wizard™, Classic Ovals Large S4-110 Die #3, Classic Ovals Small S4-112 Die #3, Big Scalloped Ovals Large S4-251 Die #4, Fancy Tags S4-235, Floral Accents S4-199; Copic-Airbrush System, Markers as shown in the picture; My Mind's Eye-Lush Brown Rhinestones; Webster's Pages-Lace Trim; Beacon Adhesives-Fabri-Tac; 3M Scotch-Foam Mounting Tape; 10oz. Altoids Tin

 Thank you so much for stopping by today! I hope you are enjoying the March Mega Blog Hop and don't forget to visit each of the designers and leave them a little love (comment). Good Luck with the contest! I hope you have a Wonderful Wednesday!!
Hugs & Smiles,
Heidi
Great idea using the mounting tape to level out the surface. now I can use those tins too! What A beautiful box you created.
ReplyDeleteLove your little box; now i have to make one!
ReplyDeleteWhat a nice card. I like the vintage look.
ReplyDeleteSo beutiful! What a great idea to 'hide' the raised surfaces of the tin!
ReplyDeleteAs per usual, such amazing detail put into one project...beautiful job! Such creativity!
ReplyDeleteThanks for the tutorial~ Great project~
ReplyDeleteGood job!
ReplyDeleteHeidi, what an incredible work of love and art your little tin is! I can't thank you enough for the exquisite detail you provided in your description! (It also helps with my shopping list!)
ReplyDeleteI'd love to receive this as a gift. How lovely. And you were so generous with details. Thanks.
ReplyDeleteI love vintage looking projects, and this one takes the cake! The colors are gorgeous, and I love the way you've used the accent pieces from the die cuts. Beautiful!
ReplyDeleteWhat a lovely project .
ReplyDeleteThanks for the inspiration.
Beautiful JustRite stamps!
WOW IS ALL I CAN SAY. WONDERFUL PROJECT AND SO MUCH DETAIL.
ReplyDeleteVery informative, I'm going to come back later when I can spend more time
ReplyDeleteJust beautiful!! That tin is a lovely project :)
ReplyDeleteOh My! This is gorgeous. I love this idea!
ReplyDeleteA great altered tin. Your tutorial is wonderful. Almost like you are sitting next to me. Thanks.
ReplyDeleteWowsers! How delightful ~ I am bookmarking this, so when I have a bit more time I can go step by step to make this work!
ReplyDeleteWhat a great idea. Absolutely beautiful. Thanks for sharing.
ReplyDeleteWonderful!
ReplyDeleteCargo
Beautiful tin!!
ReplyDeleteSTUNNING project!!
ReplyDeleteI love the floral accents. Darlenea
ReplyDeleteVery pretty
ReplyDeleteShaz x
Oh my goodness that is gorgeous!! I love it.
ReplyDeleteWhat a beautiful makeover - mother earth thanks you for recylcing! Thanks for the great detailed instructions also!
ReplyDeleteGORGEOUS!!! Love all the details!
ReplyDeleteWhat beautiful violets! My favorite flower!
ReplyDeleteGreat re-purpose project!
ReplyDeleteJust beautiful! The die cuts really add to the vintage feel. Thanks for the tip about the mounting tape to even out the top surface.
ReplyDeleteWow, what an amazing job you've done! Thanks for giving such detailed instructions, I just love this.
ReplyDeleteThank you for the step by step instructions. I love the detail work and the end project is very elegant I must say.
ReplyDeletesyeda_lubabah@hotmail.com
wow, this is really detailed...gorgeous!
ReplyDeleteenjoy *~*
What a fabulous project you created. Love the way you used the accents.
ReplyDeleteLove that you recycled to make this project, awesome!
ReplyDeleteGOrgeous altered tin! Love the image and the dies you used! :o)
ReplyDeleteWow! Amazing detail -- this is a gorgeous project! Thank you for sharing the detailed pictures!
ReplyDeleteBeautiful, beautiful! Love the distressing and all the embellishments! Thanks for your detailed instructions!
ReplyDeleteWhat a lovely tin! So beautiful!
ReplyDeleteCool. I think this is one of my favorites
ReplyDeleteWhat an awesome altered project!
ReplyDeleteBeautiful box. What a transformation. Thanks for sharing!
ReplyDeleteSuch a gorgeous project. I love the way you framed the violets and the sentiment - wow.
ReplyDeleteSimply gorgeous! Thanks for the step by step tutorial...love it!
ReplyDeletewhat a great way to recycle. and your creation is so antique looking or shall i say vintage . just great.
ReplyDeleteWow- what an amazing transformation of the tin- it's simply gorgeous!
ReplyDeleteThat is so cool! I just happen to have that exact tin in one of my drawers, awaiting inspiration. I think I have it now :)
ReplyDeletePure magic...no one would guess this was not a wonderful antique box...would have a special place to shine in my home!
ReplyDeleteBeautiful, simply beautiful! Your detail in this project is just right and it just brings out the richness of every step you have taken. Thanks for sharing!
ReplyDeleteWOWZER!!! Unreal... so beautiful, and so clever!
ReplyDeleteWhat a good idea!
ReplyDeleteThis one is beyond words. Wow! It's beautiful. Thanks for the tutorial.
ReplyDeleteLove the altered tin! Very pretty! It would make a lovely gift for everyone!
ReplyDeleteFantastic box. I love the colors and love that you showed us how it was done
ReplyDeletewow, great project. thanks for all the pics.
ReplyDeleteStunning- the end result of this tin is simply amazing. I love how you used all the dies, and thanks for the tip about the foam tape when working around something with raised parts.
ReplyDeleteI cant believe thats an altoids box! Super great idea! :) Thanks for the chance to win!
ReplyDeleteThis is absolutely beautiful!!
ReplyDeleteI love it!!!!
WOW,absolutley BEAUTIFUL! and the tutorial was great!
ReplyDeleteDorene
Recycling like this is so rewarding! I love it! I have a couple of those tins in my stash! Thanks for the great ideas!
ReplyDeleteNot only is it a gorgeous project but the tutorial puts it over the top! Thank you.
ReplyDeleteWow! Great project. So much lovely detail and perfect vintage look.
ReplyDeleteFrom ugly duckling to a lovely swan -- who knew.
ReplyDeleteBeautiful tin! I love it! Robin P.
ReplyDeleteWOW WOW WOW!! Looks like I need to add more spellbinders dies and the just rite floral set to my collection. This is giving me ideas for little Easter tins for the kids! Thank you so much for the tutorial. Off to my craft room...
ReplyDeleteI just love this project, you truly have a talent for this sort of thing. Absolutely ingenius.
ReplyDeleteTHANKS ALOT FOR THIS ONE!!!
What a great idea and this is a beautiful box!! Thanks for showing it to us.
ReplyDeleteThe beautiful violets remind me of my grandmother Violet. :) Thanks for making me smile today.
ReplyDeletei think i need to learn how to recycle better...great project!!!
ReplyDeleteOh, thanks for showing us how to decorate the box. Love the idea!
ReplyDeleteHeidi what a beautiful project.
ReplyDeletestamp on...
You certainly did a good job on this! Lovely.
ReplyDeleteWhat a beautiful tin. I love your attention to detail. Thanks for your tutorial on how to do this project.
ReplyDeleteThis is fabulous!!
ReplyDeleteabsolutely beautiful Heidi.
ReplyDeleteJust lovely. Such a transformation of a little Altoids tin. Love the way you made the nestie frame around the flowers too.
ReplyDeleteLove the old world feel of the tin you created!
ReplyDeleteLove love these violets! Beautiful!
ReplyDeleteLove how you used those floral accents! This is gorgeous!! Another great green project. Thanks for sharing
ReplyDeleteJenny L.
Neat idea! Way to recycle!
ReplyDeleteWho would have thought an Altoid tin could be made into something so BEAUTIFUL?!!
ReplyDeleteThis is an awesome project. Just incredibly elegant. Thank you for sharing your talent.
ReplyDeleteso beautiful!!! amazing use of your spellbinders!!! you are so creative!!!
ReplyDeleteOh my...this is fabulous, Heidi!!!!
ReplyDeleteGreat project! Thanks
ReplyDeleteHeidi, a beautiful piece and I especially am impressed with the embellishments placement after they were cut in two. TFS
ReplyDeleteHeidi, love, love , love the box.
ReplyDeleteWow! What a transformation, just gorgeous.
ReplyDeleteJust... WOW!!!!!!!!!!!! Stunning!
ReplyDeleteLOOOOVE IT!!!!!!!!
love the rework of the tin. I don't usually like vintage but this is really beautiful. Thanks for sharing
ReplyDeleteHi Heidi,
ReplyDeleteWonderful project. Love how you altered the Altoids tin. You know how I love to alter. I enjoyed your step shots on how to make it. Also, love the cute face on your airbrush. Gave me a smile. I miss you. Have a wonderful day my friend.
Thanks for the step-by-step tutorial. Love the little tin...gorgeous!
ReplyDeleteDebra Dukes
Beautifully done! Thanks for sharing the details of this jewel!
ReplyDeleteI love repurposing! This is really sweet!!
ReplyDeletewhat a beautiful vintage project. Love it all
ReplyDeleteHeidi - Love your Altoid tin! Just lovely.
ReplyDeleteLynneZ
What a great gift idea!
ReplyDeleteOhhhhh this is a beautiful project!!!!! Thanks for the step by step photos! Gorgeous tin!!!!
ReplyDeleteWhat a pretty project.
ReplyDeleteWow, this is SO cool - I've been wondering how to do an Altoid tin when it had raised lettering... Thanks so much!
ReplyDeleteLove your box!
ReplyDeleteWOW - another amazing creation!!
ReplyDeleteHope you have a lovely day!
Love the vintage look.
ReplyDeleteSo pretty! Love all the detail
ReplyDeleteWow, this is amazing! love the tutorial!
ReplyDeleteLove your tin. And wow, I NEVER would have thought to use those dies that way. Thanks for the inspiration.
ReplyDeleteHeidi,
ReplyDeleteOh so clever. Love how you add the scroll detail with the spellbinders die. This is stunning and now I think I will keep those tins.
I knew I was saving that tin for a reason! Stunning!
ReplyDeleteTeresa Blue
tmblueb@hotmail.com
Waanzinnig mooi een dikke 10!!!!!
ReplyDeleteGaaf deze doos en de stempels van JustRite....
Warme groetjes,
Anita
Thank you for such a wonderful project and sharing your before photo. Lovely work.
ReplyDelete"Beautiful vintage look" is right!! Great job! I love it!
ReplyDeleteGorgeous! Love the vintage look, and love how you used the spellbinders as a frame.
ReplyDeleteloved that tin!!!
ReplyDeleteI love the layering of the different Nesties and Spellbinders dies. Beautiful.
ReplyDeleteLove what your did. I am going to case the idea. TFS.
ReplyDeleteWhat a beautiful project! I love the step-by-step too!
ReplyDeletelove your altered tin and thanks for the tutorial.
ReplyDeleteThis is really cute!
ReplyDeletegreat idea. so pretty!
ReplyDeleteThat altered tin is a thing of beauty! I have some small Altoid tins that I have been trying to figure out what to do with them.
ReplyDeletemks
What a great use of a tin that would just end up in the garbage. What a pleasure to see PURPLE violets!!! Every one seems to be coloring them in so many odd colors that I, a flower person who has violets even in my lawn only see them in purple and white... Love your project, it is absolutly great too. A gold star for you for sure... Woops, a purple one!!! LOL
ReplyDeleteYou are amazing Heidie Blankenship! You take an Altoids tin to a level beyond imagination. This is reeeeeally gorgeous!
ReplyDeleteHugs
Beautiful! What a great altered project!
ReplyDeleteThis is so beautiful.
ReplyDeleteSue
WOW! Gorgeous tin. Thanks for all the explanation also.
ReplyDeleteFab project - thanks for the instructions too!
ReplyDelete:o)
This is just gorgeous Heidi!
ReplyDeleteWhat a great idea lov ethe colors and it looks so danity.
ReplyDeleteHi, I really lloove this project, I love reusing and this is very classy and would make a very nice gift with an embroidery kit or something like that inside. Thank you for sharing your talent, PattyC.
ReplyDeleteWhat beautiful details!Thank you for showing the colours of copics you used!I love it!
ReplyDeleteThis ideas is so beautiful, I loved the vintage look.
ReplyDeleteWOW this is amazing. The detailing is beautiful.
ReplyDeleteGreat work, this is so pretty. Thanks for sharing how you did this.
ReplyDeleteLove your altered tin! Great vintage look. Thanks for sharing your details with us!!
ReplyDeleteJust beautiful!! Thanks for sharing!!
ReplyDeleteWondered if those curved lid tins could be altered. Thanks for showing how.
ReplyDeleteThat is a beautiful box.
ReplyDeleteI love your decorated tin! You added an amazing amount of details.Thanks for sharing you project.
ReplyDeleteGorgeous idea decorating that box Heidi, love your colour scheme, love how you coloured the stamps and just love how you decorated the box!
ReplyDeleteThis is stunning Heidi! I LOVE how you used the Spellbinder floral accents die to create the flourished frame, your colouring on the flowers, the lace...everything. Beautiful details!
ReplyDeleteWow, anyone would be thrilled if they received that tin as a gift. It is absolutely beautiful!
ReplyDeletewhat an amazing amount work went into this! It's GORGEOUS!!
ReplyDeleteWhat a beauty!
ReplyDeleteWow,
ReplyDeleteWhat a fabulous little box. I am learning so many techniques! Very beautiful.
I love your little box. What I like most about you is that you include instruction with the Copic colors you use and how you execute your design. Thanks so much for that. Shelly K
ReplyDeleteHow anyone can turn that tin into that beautiful piece is beyond me!
ReplyDeleteBeautiful project. I love the colors.
ReplyDeleteWow! What a wonderful project and thanks for the step by step instructions. I appreciate you participating in the hop and inspiring us all.
ReplyDeleteMelissa
Thanks for the ideas on what to do with all my Altoid gum tins. I was at a loss with the curved lids.
ReplyDeleteWhat a great idea, very pretty.
ReplyDeleteLove your vintage box! Wow, it's gorgeous! Thanks for sharing!
ReplyDeleteCool project! I love this idea. Thank you for sharing it, and for the fab tutorial.
ReplyDeleteOh my I want this it is just beautiful...
ReplyDeleteBeautiful!
ReplyDeleteabsolutely beautiful. love the spellbinder dies used with Just rite stamps.
ReplyDeleteWow, who would have thought an Altoid tin could look SO gorgeous!!! This is amazing and thank you for giving us a fabulous tutorial. Wonderful creation!
ReplyDeleteKay
That's a great project. I love the lace.
ReplyDeleteHow beautiful!
ReplyDeleteBeautiful project...love the idea of the foam tape to deal with the raised type!!
ReplyDeleteOMGosh! Who would have thought an Altoid's tin could be stunning? How beautiful!!!!
ReplyDeleteWhat a fun project.
ReplyDeleteThis just took my breath away! What an absolutely beautiful work of art. So much detail!
ReplyDeleteHeidi,
ReplyDeleteWhat a fantastic project. Looks very vintage. Thanks for sharing.
Your project is very Victorian looking.
ReplyDeletecarol b.
Love this little tin. Thanks for the detailed instructions. It's so pretty and feminine!
ReplyDeleteThe raised words on the tins have always been a challange for me. Thanks for the tip. Absolutely beautiful.
ReplyDeleteThe raised words on the tins have always been a challange for me. Thanks for the tip. Absolutely beautiful.
ReplyDeleteWOW!! This is the cutest little container I have ever seen!!! Thanks for the inspiration!!
ReplyDeleteWhat a great idea, this is lovely!! Fab tutorial too!
ReplyDeleteSuch a pretty tin! Thanks for the wonderful sample!
ReplyDeleteDebra
Wow Heidi -- you do amazing things. Guess I'm going to have to buy some Altoids!
ReplyDeleteThis is a wonderful altered tin.You do lovely work.
ReplyDeleteThis is so pretty- I love your altered projects! This stamp set was perfect.
ReplyDeleteWOW! Simply amazing and out of altoids, who would of thought!
ReplyDeleteI love what you did with the altoids tin. Now I need to experiment and see what I can come up with.
ReplyDeleteWhat an awesome project. Thanks for the detailed tutorial. Your work is truly inspiring.
ReplyDeleteAwesom. Just absolutly gorgous. Thanks for all the details. Just love it.
ReplyDeleteThe coloring is gorgeous. Thanks for the detailed instructions.
ReplyDeleteWhat a beautiful project - thank you for the tutorial!
ReplyDeleteFrom an Altoid can to a work of art. It truly is elegant!!!!
ReplyDeleteA work of art! Tons of detail. Thank you for sharing with all of us. Whew-tons of work too.
ReplyDeleteGorgeous! Love it!
ReplyDeleteBarbara in SC
I love the accent pieces. Very lovely.
ReplyDeleteWOW! What a beautiful project.
ReplyDeleteHoly smokes! What a gorgeous gift tin!
ReplyDeletereally amazing!
ReplyDeleteLove your altoid tin. It is beautiful. Sooo creative!
ReplyDeleteWhat a GREAT idea! And SO BEAUTIFUL!
ReplyDeleteI love vintage and this is fabulous!
ReplyDeleteOh, Heidi, this box is absolutely gorgeous! You know I love vintage "stuff" and you are so good at creating it! This has got to be one of my favorite designs in this Blog Hop. Why doesn't that surprise me? Thank you for sharing your talent! You are so special!!
ReplyDeletethanks for the fabulous directions - what a great project :)
ReplyDeleteIf there is one item people have in there home that needs a use, it's Altoid tins! Beautiful work : )
ReplyDeleteI LOVE your altered tin box!!!
ReplyDeleteJust BEAUTIFUL!!! I love Spellbinders and I use them on almost everything I make.
Thank you for sharing!
Carol F
Thanks for the Tutorial! STUNNING project!
ReplyDeleteThis is beautiful, the Breath of spring stamp is awesome and I love what you did with the Spellbinder dies! Thanks for sharing ~Diane
ReplyDeleteBeautiful! Thanks for the detailed directions. I've been saving some of these tins for just the right project.
ReplyDeleteWOW.This project is totally amazing and I love it!! Great Design and you r in my favs!! Thank you so much for sharing this with all of us!!! ♥
ReplyDeleteThanks for being on the Blog Hop.
ReplyDeleteLovely - I love tins and this altered one is so charming!
ReplyDeleteWhat a wonderful project! Thanks for sharing! Such a huge transformation!
ReplyDeleteBeautiful detailing very vintage which I love!!
ReplyDelete