Hello blogging friends! Today, is my day to post for The Stamp Simply Ribbon Store. I have a beautiful card and tutorial to share with you.
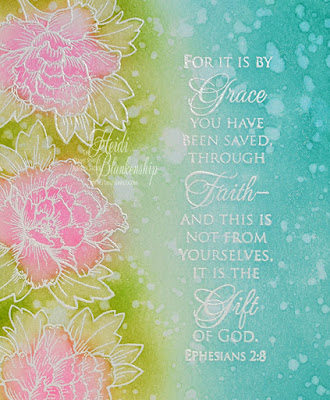
Here is the card that I designed. I am calling the technique dreamy faux watercolor. The light colors and the marks from the tiny water droplets give it the dreamy watercolor look but in reality there is no watercolor with this technique. Instead I used water to pull away or remove the color. This isn't a new technique--people have been doing it for years with watercolor but it has a bit of a different spin on it using Tim Holtz Distress Inks.
To start I used the smooth side of the Ranger Watercolor Paper. I stamped the image from the JustRite Papercraft CR-02198 Peonies Clear Stamps and the sentiment from the Stamp Simply Clear Stamps SS-Sent005 He Has Risen with VersaMark Ink, Next I applied Stampendous Super Fine Embossing Powder - Detail White and used a heat tool to melt and heat set the powder.
I started adding color to the flowers going from the lightest to darkest color. In the picture above you can see I first applied Spun Sugar to all of the flowers (shown in 1st flower). Then I applied a second layer of ink using Worn Lipstick (shown in 2nd flower). For the second layers on ink I came in more towards the center of the flower so the edges of the petals would still have the light color for the Spun Sugar. For the final layer of ink I used Picked Raspberry (shown in the 3rd flower) and I came in even closer to the center with the 3rd ink color. So once all the flowers are done they would have three layers of ink and all look like the last flower in the picture. With the photo I wanted to show you how the look of the ink would change with each layer. When I apply the Tim Holtz Distress Inks I used a cotton ball for each color. I ink up the cotton ball just like a sponge and start off of the paper and work in a circular motion. I like using the cotton balls because I can achieve a very smooth blend and when I am done I can just toss them.
The next section I colored was the leaves and stems. I did the exact same technique as above going from the lightest to darkest ink. I used Shabby Shutters, Peeled Paint, and Mowed Lawn for the leaves.
Then I applied the blue inks with the same technique. I started all the way over on the right with the lightest color Tumbled Glass and worked my way to the middle and created a nice soft blend between the blue and green. Then I applied Broken China and Peacock Feather ink coming out towards the edge of the paper. Now all of the inking is done. :)
This is where the magic and the faux watercolor come into play. I used a round paint brush and just applied clear water over each of the flowers and then I used a paper towel to blot off the ink. After doing this the colors are pretty, soft, and light. Then I moved on to the leaves and stems and did the same technique of applying clear water and blotting it off with a paper towel.
Here is a look at the flowers once some of the color was removed.
To create the water droplet I just used the paint brush with clean water and tapped on it. I let the water sit on top of the paper for a few seconds and then I blotted it with a paper towel. I think the water droplets give it the dreamy look.
Here you can see the finished piece. The water droplets give it the dreamy look and by using the water to remove some of the color it gives the piece a water color look.
Here is a close up.
To finish off the card I added some Therm-O-Web Foam Squares to an A2 top folding white card base. I hope you enjoyed this technique and tutorial and will give it a try.
Stop back tomorrow and I will show you the results of using different inks, markers and paint you might have in your stash to play with and achieve this same look.
Thank you so much for joining me today and I hope you have a wonderful weekend!
Please be sure to check out The Stamp Simply Ribbon Store for all of the fantastic paper crafting products and the Blog for inspiration from the Design Team.
Hugs & Smiles,
Heidi
Supplies
Stamps: Stamp Simply Clear Stamps SS-Sent005 He Has Risen, JustRite Papercraft CR-02198 Peonies Clear Stamps
Paper: Ranger Watercolor Paper
Ink: Tim Holtz Distress Inks - Spun Sugar, Worn Lipstick, Picked Raspberry, Shabby Shutters, Peeled Paint, Mowed Lawn, Tumbled Glass, Broken China, Peacock Feather, VersaMark Ink
Accessories: Stampendous Super Fine Embossing Powder - Detail White, Therm-O-Web Foam Squares, Scor-Tape, Heat Tool, Paint Brush, Paper Towel


FABULOUS TUTORIAL! Thank you so much!
ReplyDeleteBeautiful card, I love, love, love it. Thank you for the tutorial.
ReplyDeletedreamy beautiful!
ReplyDeleteThis is absolutely gorgeous! Just love everything about!
ReplyDeleteThank you for explaining and having the photos of how to recreate the card. Beautiful
ReplyDeleteThis technique is very lovely. I think I'm going to try this today and see if I can mine to look as pretty as yours!
ReplyDeleteI love your card, and this creative technique! I decided it wasn't fair to just "drool" over your card and not comment. Excellent work!!
ReplyDeleteAbsolutly beautiful!
ReplyDeleteWhat a great technique and with materials I already have on hand. I will definitely have to give this a try. Thanks for sharing!!
ReplyDelete