Showing posts with label Tonic Studio. Show all posts

Tuesday, October 20, 2015

JustRite Papercraft October New Release - Peonies Clear Stamps and Coordinating Dies - Peonies and Mason Jar Card

Hello everyone!  Toady, I have one last project to share with you using a New Release stamp set and coordinating die set from JustRite Papercraft.  This stamp set is another favorite of mine from the release and I love the little mason jar!


Here is the card I designed using the new CR-02198 Peonies Clear Stamps and DIE-02213 Peonies Cutting Dies from JustRite Papercraft.  I stamped the peonies twice for each flower on to Strathmore Mixed Media paper using StazOn Jet Black ink and then I used the dies to die cut each shape. I used Zig Clean Color Real Brush Markers for all of the coloring.


Here is a close up of the peonies.  I used craft foam to layer in between the die cut layers for some added dimension.


I die cut the mason jar twice--one using Strathmore Mixed Media paper and for the second die cut I used a piece of clear acetate.  I did a watercolor wash on the mixed media die cut jar and for the acetate I stamped with StazOn Jet Black ink.  I used a craft knife to cut a small slit at the top of the mason jar so I could slide the flower stems inside the jar.  I used Ranger Multi Medium Matte to adhere the paper and acetate along the edges.  To finish off the jar I added some craft foam to the back for added dimension and tied a bow with some twine.  I die cut another small flower and added that to the bottom of the card next to the mason jar.


Here is another view so you can see the layers and dimension.


To finish off the card I did a watercolor wash on the background.  I backed the mixed media paper with craft foam and placed it on a light blue A2 size top folding card base.

Please be sure to visit the Design Team Members in the link list below to see what they have to share with you.


Thanks so much for stopping by today!

Hugs & Smiles,
Heidi

Supplies
Stamps:  JustRite Papercraft CR-02198 Peonies Clear Stamps
Paper:  Strathmore Mixed Media, Acetate, Cardstock - Light Blue
Ink/Markers:  StazOn Jet Black Ink, Zig Clean Color Real Brush Markers -
Dies: JustRite Custom Dies - DIE-02213 Peonies Cutting Dies, Tonic Studios - 484e Layering Die Set RECTANGLE Scalloped & Straight
Accessories:  Craft Foam, White Pearls, Twine, Heat Tool, Craft Knife, Watercolor Brush Round 8, Ranger Multi Medium Matte

Monday, October 19, 2015

JustRite Papercraft October New Release - Pinwheel Daisies Happy Birthday Watercolor Card

Hello everyone!  Today, I have another card to share with you using one of the newest releases from JustRite Papercraft.  I used the CR-02196 Pinwheel Daisies Clear Stamps from  to create my card.  If you love flowers and coloring you will love this new stamp set.


I think this might be one of the brightest and boldest cards I have ever designed lol but I have to say I am loving the bright colors on this card.  I started by stamping the floral images on to Strathmore Mixed Media with StazOn Jet Black ink.  Then I colored the images and the background with the  Zig Clean Color Real Brush Markers.  I used Light Pink, Pink, Bright Yellow, Orange, Light Violet, Violet, Pale Green, Light Green, and Cobalt Blue for the coloring.  Then I added some water to Distress Ink - Black Soot and used a paint brush to flick on the paint splatters.  I used a number 8 round watercolor brush.  


Here you can see a close up of the coloring.


Next I used 164E Happy Birthday Pansy Topper Die Set from Tonic Studios to die cut a piece of black craft foam for the Happy Birthday sentiment.  Before die cutting the craft foam I backed it with some Stick It Adhesive Sheets so it would be easy to apply to the card front.  I used one of the dies from 636E Fanciful Flutter Keepsake Frame & Insert Die Set from Tonic Studios to create the die cut with the scalloped and dotted edges.  Then I cut a piece of black cardstock for a mat and rounded the edges with a corner punch.  I layered the two pieces with more black craft foam.  I used JustRite Custom Dies - Die-02144 Pinwheel Daisies Die Set to create the purple flower.  I added Zig Wink of Stella Clear Glitter Brush Pen to the sentiment and the flower and then I covered both pieces with Glossy Accents for a pretty and sparkly shine.


Here you can see some of the dimension on the card with the layers.


To finish off the card I added some aqua rhinestones.

Please be sure to visit the Design Team Members in the link list below to see their fabulous projects!


Thanks so much for stopping by today!

Hugs & Smiles,
Heidi


Supplies
Stamps:  JustRite Papercraft CR-02196 Pinwheel Daisies Clear Stamps
Paper:  Strathmore Mixed Media, Cardstock - Raspberry, Black, Lavender, Purple, Aqua
Ink/Markers:  StazOn Jet Black Ink, Distress Ink - Black Soot, Zig Clean Color Real Brush Markers - Light Pink, Pink, Bright Yellow, Orange, Light Violet, Violet, Pale Green, Light Green, Cobalt Blue
Dies:  JustRite Custom Dies - Die-02144 Pinwheel Daisies Die Set, Tonic Studios - 164E Happy Birthday Pansy Topper Die Set, 636E Fanciful Flutter Keepsake Frame & Insert Die Set
Accessories:  Black Craft Foam, Stick It Adhesive Sheets, Zig Wink of Stella Clear Glitter Brush Pen, Aqua Rhinestones, Ranger Glossy Accents, Watercolor Brush Round 8, Heat Tool, Corner Rounder Punch


Sunday, October 18, 2015

JustRite Papercraft - New Release Doodled Roses - You Are A Blessing Watercolor Card

Hello everyone!  I am back to share another New Release from JustRite Papercraft.  For my card today I am using the CR-02194 Doodled Roses Clear Stamp Set and I have to say I think this is one of my favorite sets from the release.  I love how this stamp set can be used for CAS (Clean And Simple) cards and also for elegant cards.  I love the sentiments too!


Here is a look at the card I designed.  To start I die cut a piece of Strathmore Mixed Media paper using one of the dies from the Tonic Studios633E Indulgence Keepsakes - Regal Frame & Lovebird Insert Die Set.  Next, I applied painter's tape along the edge of the die cut and then I stamped the images of the Doodled Rose with VersaMark ink and then I added Ranger Super Fine Detailed Embossing Powder.  I removed the tape and then heat set the embossing powder.  I also stamped the sentiment using StazOn Jet Black.  Then I applied more of the painter's tape along the edge of the die cut.  Doing this helps to keep a white outer edge.  I used Zig Clean Color Real Brush Markers - Light Pink, Bright Yellow (looks like light orange), Yellow, Pale Green, Light Green along with a Watercolor Brush Round 8 to watercolor the images and the background.  I used a heat tool to speed up the drying process in between the layers of paint.


Here is a close up of the watercolor.  I love how the Zig Clean Color Real Brush Markers blend so easily and the colors are beautiful and vibrant.  


I cut the larger die cut shape from the Tonic Studios633E Indulgence Keepsakes - Regal Frame & Lovebird Insert Die Set with black cardstock and layered the two pieces together.  I used craft foam (fun foam) along with Scor Tape to layer in between the layers.  Craft foam is a great alternative to pop dots or 3D foam squares.  A lot of times I use a combination of both.  The nice thing about the craft foam is it give you a smooth even coverage on larger areas.  Just be sure to use a strong adhesive like Scor Tape or something similar.


Here you can see the dimension in the layers.


The base of the card is black and the card measures 3-3/4 x 6-3/4.  For the background I used a piece of raspberry cardstock and I stamped the Doodles Roses using VersaMark ink.  Then I layered a piece of orange swiss dot behind the raspberry paper. To finish off the card I added some black and hot pink rhinestones.

Please be sure to visit the Design Team Members in the link list below to see what they have created to share with you.


Thank you so much for stopping by today!  I hope you are having a wonderful weekend!

Hugs & Smiles,
Heidi


Supplies
Stamps:  JustRite Papercraft CR-01294 Doodled Roses Clear Stamps
Paper:  Strathmore Mixed Media, Cardstock - Raspberry, Orange Swiss Dot, Black
Ink/Markers:  VersaMark Ink, StazOn Jet Black, Zig Clean Color Real Brush Markers - Light Pink, Bright Yellow (looks like light orange), Yellow, Pale Green, Light Green
Dies:  Tonic Studios - 633E Indulgence Keepsakes - Regal Frame & Lovebird Insert Die Set
Accessories:  Ranger Super Fine Detailed Embossing Powder, Rhinestones - Black, Hot Pink, Craft Foam, Heat Tool, Scor Tape, Watercolor Brush Round 8, Painter's Tape

Thursday, October 15, 2015

JustRite Papercraft October New Release - Lasting Joy Wedding Card

Hello blogging friends!  Today, is the first day of the October JustRite Papercraft New Release.  I have a lovely wedding card to share with you using two of the New Releases.


Here is a look at the card I designed.  I stamped the beautiful frame from the CR-02199 Framed with Love Clear Stamps using VersaMark ink on to Strathmore Mixed Media paper and then I heat embossed it with Ranger Super Fine Detail Gold Embossing Powder.  Next, I used Zig Clear Color Real Brush Pens - Cobalt Blue, Pale Green, Light Green to do a very light watercolor around the frame.  I used one of the dies from Tonic Studio 587E Intrica Romantic Vine Oval to die cut the frame.  Then I stamped the sentiment from CR-02192 Grand Wedding Wishes Clear Stamps with VersaMark ink and heat embossed with gold.  I used one of the dies from 485E OVAL Scalloped & Straight Cut to die cut the sentiment.


Here is a close up.  I used foam tape to layer the two die cuts.  For the leaves I used 657E Royal Fern to create the die cuts and then I added some color using the Zig Clear Color Real Brush Pens.  I also added some pearl swirls and Wild Orchid Craft flowers.


Here is a close up of the couple die cut.  I used 70E Silhouette Scenes First Dance.  I love this die cut and how detailed the dress is.  I die cut the couple in white and then die cut another piece in pink.  I layered the two pieces and then fussy cut around the top of the couple to remove some of the die cut.  Next, I added Zig Wink of Stella Clear Glitter Brush Pen over the entire piece.  Then, I applied Ranger - Glossy Accents on the entire piece.  You can see some of the shimmer and sparkle in the photo but IRL it is so shimmery!  I added a couple more fern leaves and pearls around the couple.  For a finishing touch I also added a few tiny pearls for a necklace.


Please be sure to visit each of the Design Team Members in the link list below to see what they have created to share with you.


I have a couple of other posts going up in the next couple of days so please be sure to check out the JustRite Inspiration Blog to see the New Releases during the next couple of days.  I will be back on Sunday sharing more projects with the JustRite New Release.

Thanks so much for stopping by today!

Hugs & Smiles,
Heidi


Supplies
Stamps:  JustRite PapercraftCR-02192 Grand Wedding Wishes Clear StampsCR-02199 Framed with Love Clear Stamps
Paper:  Strathmore Mixed Media, Cardstock - White, Pink, White Swiss Dot
Ink/Markers:  VersaMark Ink, Zig Clear Color Real Brush Pens - Cobalt Blue, Pale Green, Light Green, Zig Wink of Stella Clear Glitter Brush Pen
Dies:  Tonic Studio 587E Intrica Romantic Vine Oval, 485E OVAL Scalloped & Straight Cut, 70E Silhouette Scenes First Dance, 657E Royal Fern
Accessories:  Wild Orchid Flowers, Pearl Swirls, Ranger - Glossy Accents, Super Fine Detail Gold Embossing Powder, Multi Medium Matte, Foam Tape, Scor Tape, 8 Round Watercolor Brush

Tuesday, September 29, 2015

JustRite Papercraft Tutorial Tuesday - Prima Water Soluble Oil Pastels with Multi-Step Stamping

Hello everyone!  
I am so happy to be back sharing the JustRite Papercraft Tutorial Tuesday with all of you!  


Today, in the tutorial I am featuring the Prima Water Soluble Oil Pastels.  Love these!!  I also used the CR-02187 Multi-Step Poinsettia Clear Stamp from  JustRite Papercraft along with some beautiful dies from  Tonic Studios.


Here is the card that I designed for the tutorial.  The Prima Water Soluble Oil Pastels are so easy to work with and they blend beautifully.


Here is the second card that I designed.  For this card I did  generation stamping to get the different looks using the same pastel color.  All of the details for this are listed on the JustRite Inspiration Blog and also in the Prima Water Soluble Oil Pastels with Multi-Step Stamping YouTube video.  You can click HERE to see the blog post and click HERE for the video.


Here is the third card that I designed.  I love the non-traditional Christmas colors!

Hop on over to the JustRite Inspiration Blog for a full step-by-step tutorial (written and video).  Lots of photos and all of the details.  There is also a Giveaway! :)

I hope you enjoy the tutorial and projects!  Thanks so much for stopping by today!

Hugs,
Heidi


Supplies
Card #1 Wishing You Christmas Card (Tutorial) 5.5 x 5.5 square card
Stamps:  JustRite Papercraft CR-02187 Multi-Step Poinsettia Clear Stamp
Paper:  Strathmore Mixed Media, Cardstock - Red, Brown
Pastels/Ink:  Prima Water Soluble Oil Pastels, Memento - Rhubarb Stalk
Dies:  Tonic Studios 480E Square Layering Die Set
Accessories:  Sequins - Gold 4mm, Tea Rose 4mm, Pearl Satin 3mm, Quick Stick, Ranger Multi Medium Matte, White Kraft Foam, ATG, Heat Tool, Paint Brush Round 8, 16

Card #2 Merry Christmas Card A2 Top Folding Card
Stamps:  JustRite Papercraft CR-02187 Multi-Step Poinsettia Clear Stamp
Paper:  Strathmore Mixed Media, Cardstock -White, Kraft
Pastels/Ink:  Prima Water Soluble Oil Pastels, Memento - Rich Cocoa
Dies:  Tonic Studio 489E Trellis Circle Base Die Set
Accessories:  May Arts Gold Metallic String, Zig Wink of Stella Clear Glitter Brush Pen, White Pearls, Foam Tape, Ranger Multi Medium Matte, Glossy Accents, Hot Glue, ATG, Heat Tool, Paint Brush Round 8, 16

Card #3 Peace Christmas Card 4.5 x 6.5 Card
Stamps:  JustRite Papercraft CR-02187 Multi-Step Poinsettia Clear Stamp
Paper:  Strathmore Mixed Media, Cardstock -White, Aqua, Lavender
Pastels/Ink:  Prima Water Soluble Oil Pastels, Memento - Teal Zeal, LuLu Lavender
Dies/Folder:  Tonic Studio 484E Mixed Scalloped and Straight Rectangles Layering Die Set, 639E Keepsake Royal Frame & Butterfly Insert Die Set, A4 Embossing Folder - Annabel
Accessories:  Aqua Bling, Ranger Multi Medium Matte, ATG, Craft Foam, Heat Tool, Paint Brush Round 8, 16

Thursday, September 10, 2015

ButterBeeScraps September Challenge

Hello everyone!  During the month of September ButterBeeScraps is having a challenge and all of the Design Team Members are playing along with the challenge and sharing some creative projects that hopefully inspire you.  Would you like to play along in the challenge?  You can click HERE to find out all of the details.  Each week on of the Design Team Members is posting a project for the challenge.  Last week, Monique, owner of ButterBeeScraps posted her project (you can click HERE to see it) and this week is my turn to post a project.

The challenge is to pick one item from the store and use it in three different ways.  You can bend it, shape it, cut it, paint it or whatever you would like to do.


For the challenge I used the SILVER FLOWER METAL FILIGREE EMBELLISHMENT (#282-P) and I designed a card and matching gift tag.


I started by creating the three dimensional flower.  I used three of the SILVER FLOWER METAL FILIGREE EMBELLISHMENT (#282-P) pieces.  The first one I flattened.  For the second one I cut in between each of the flower petals and then bent some of them up and then curled the tips to shape them.  On the third piece I cut in between each petal and then I curled the sides in.


Here is a close up of the second flower piece.


Here is a close up of the third flower piece--this is the center of the flower.  Once this piece was glued in place then I bent each petal in towards the center.


Here is a close up of the finished flower.


To create the border in the card I cut off all of the petals on the metal flower.


After I cut, glued and shaped all of the pieces I used a combination of Martha
Stewart Antique Silk (pink) Paint, Lumiere Pearl Magenta to paint all of the metal pieces.  I used the small petal pieces to create a border and added some white flat back pearls in between each piece.  I also added some white crochet lace trim under the metal border.  I used Stamp Simply Clear Stamps - Birthday Blessings with Memento Black Ink for the sentiment.  I added some white pearl stamens to the center of the flower and then add the flower to the card front.


Here is another close up of the flower.


Here is a look at the bottom half of the card.  I used A4
Embossing Folder - Rosalyn from Tonic Studios and then I used a Faber Castele Lavender Gelato to add some color and make the embossing pop.  To add a little bit of sparkle I went over the embossed areas with Zig Wink of Stella Clear Glitter Brush Pen.


I used pink cardstock for the card base.


To create the tag I used Tonic Studios I Miss You Topper Inner Die Set 173E and A4
Embossing Folder - Rosalyn.  I went over the embossed area with the same color Gelato and Wink of Stell pen.  The sentiment is from the Stamp Simply Clear Stamps - Birthday Blessings.  


To create the tiny little flowers I cut the centers from three of the SILVER FLOWER METAL FILIGREE EMBELLISHMENT (#282-P)'.


To finish off the tags I added some pearls and white crochet lace trim.

I hope you enjoyed my challenge projects and I hope you will play along with the challenge!

Thanks so much for stopping by today!

Heidi


ButterBeeScrapsSILVER FLOWER METAL FILIGREE EMBELLISHMENT (#282-P)
Stamps:  Stamp Simply Clear Stamps - Birthday Blessings
Paper:  Cardstock - White, Pink
Ink/Paints:  Memento Black Ink, Faber Castele Lavender Gelatos, Martha
Stewart Antique Silk (pink) Paint, Lumiere Pearl Magenta, Zig Wink of
Stella Clear Glitter Brush Pen
Dies/Folders:  Tonic Studios I Miss You Topper Inner Die Set 173E, A4
Embossing Folder - Rosalyn
Ribbon:  White Lace Trim
Accessories:  White Flat Back Pearls, White Pearl Stamens, Foam Tape,
Ranger Multi Medium Matte, Hot Glue, Baby Wipes

Tuesday, March 31, 2015

JustRite Papercraft April New Release - Day One - Hello Card

Hello everyone!  Today, is the first day of the  JustRite Papercraft April New Release and we are getting a little jump start on it going a day early.  :)


Here is the card I designed using the New CR-02172 Grand Handwritten Sentiments Clear Stamps, and CL-02169 Burlap Cheveron Background Cling Stamp.  The sentiment stamp set has a fun handwritten look to it with lots of great sentiments and the background stamp gives a great textured look to the chevrons.  For this card I embossed the CL-02169 Burlap Cheveron Background Cling Stamp using VersaMark Ink and white embossing powder.  Then I did a very simple watercolor wash using Spectrum Aqua Markers-Aquamarine, Teal, Kingfisher, Peacock Blue, Marine, Navy.  I started with the lightest color and worked my way to the darkest giving this a beautiful ombre look. 


I heat embossed the sentiment and then added watercolor to the background.  I used 484e MIXED RECTANGLE LAYERING DIE SET from  Tonic Studios to create the die cuts.  I added some 3D Foam Squares in between the layers from some dimension.  Then I added blue sequins, Wild Orchid Craft Pearl Stars, and ButterBeeScraps SS16 Aquamarine Flat Back Rhinestones.  


To finish off the card I added the background to a white mat and then to a aqua card base.


Just as a friendly reminder today (3/31/15) is the last day to get some great savings on Spellbinders die templates.


You can click HERE to see all of the Spellbinders dies.


Thanks so much for stopping by today and I hope you enjoyed day one of the April New Release!

Hugs & Smiles,
Heidi


Supplies
Stamps:  JustRite Papercraft CR-02172 Grand Handwritten Sentiments Clear Stamps, CL-02169 Burlap Cheveron Background Cling Stamp
Paper:  Strathmore Watercolor Paper, Cardstcok-White, Aqua
Ink/Markers:  ImagineCrafts/Tsukineko VersaMark Ink, Spectrum Aqua Markers-Aquamarine, Teal, Kingfisher, Peacock Blue, Marine, Navy
Dies:  Tonic Studios-484e MIXED RECTANGLE LAYERING DIE SET
Accessories:  Wild Orchid Craft Pearl Stars, ButterBeeScraps SS16 Aquamarine Flat Back Rhinestones, Blue Sequins, Ranger Multi Medium Matte, Scrapbook Adhesives by 3L 3D Foam Squares, E-Z Runner Permanent Strips-Refillable Dispenser 49', White Embossing Powder, Heat Tool, Paint Brush

Sunday, March 22, 2015

Day One Stencil Girl and Ken Oliver Crafts Blog Hop


Hello everyone!  Today, is the first day of the Stencil Girl and Ken Oliver Crafts Blog Hop.  Designers and Style Contributors from both teams have come together to create some fabulous projects using products from both companies.  We hope to inspire you!


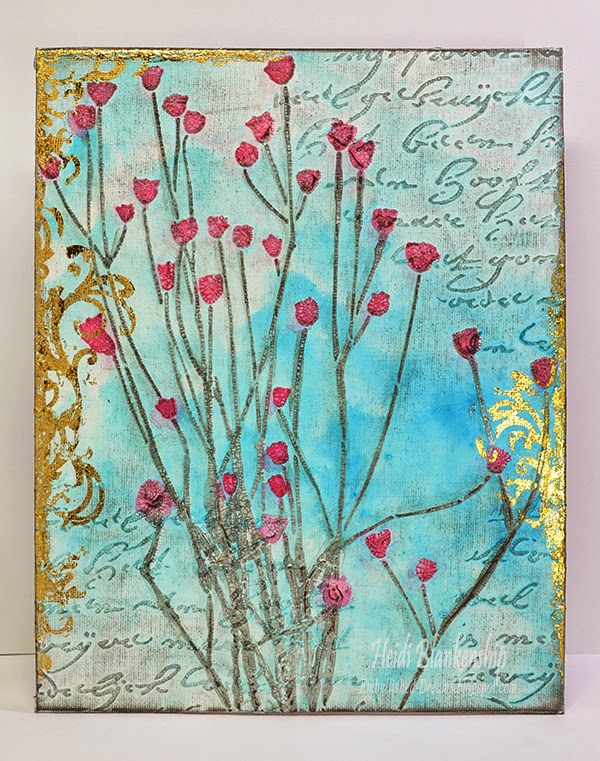
For my project I designed a 8 x 10 mixed media canvas board and I have a tutorial to share with you.


First I applied a layer of white gesso to the canvas.  Once that was dry then I used the 6 x 6 Rembrandt's Words Small Stencil and added a layer of the crackle texture paste.


Once the crackle texture paste was dry then I misted the entire canvas with water and sprinkled a little bit of the Ultramarine Blue Color Burst on to the canvas.  Here you can see the Color Burst already starting to activate with the water.


I used a large watercolor brush and kept adding more water to move the Color Burst around the canvas until I achieved a look I liked.  If you get more than you would like in one spot you can use a paper towel to lift up a little of the color.  Set this aside to dry or you can use a heat tool.


Sorry, I know it's a little hard to see exactly what I am doing in this picture from all of the texture paste lol.  Here I am using the 9 x 12 Nosegay Stencil and adding a layer of the crackle texture paste.


After the crackle texture paste was dry then I started to watercolor the flowers using Color Burst.  I used Alizarin Crimson for the flowers.  Here you can see a close up of the Color Burst as soon as I applied it to the crackle texture paste.  I love how it fills in all the little cracks and makes the flowers really pop.  I mixed a few colors of the Color Burst to create a darker green.  I used Pthalo Green, Alizarin Crimson, Ultramarine Blue, and Lemon Yellow.


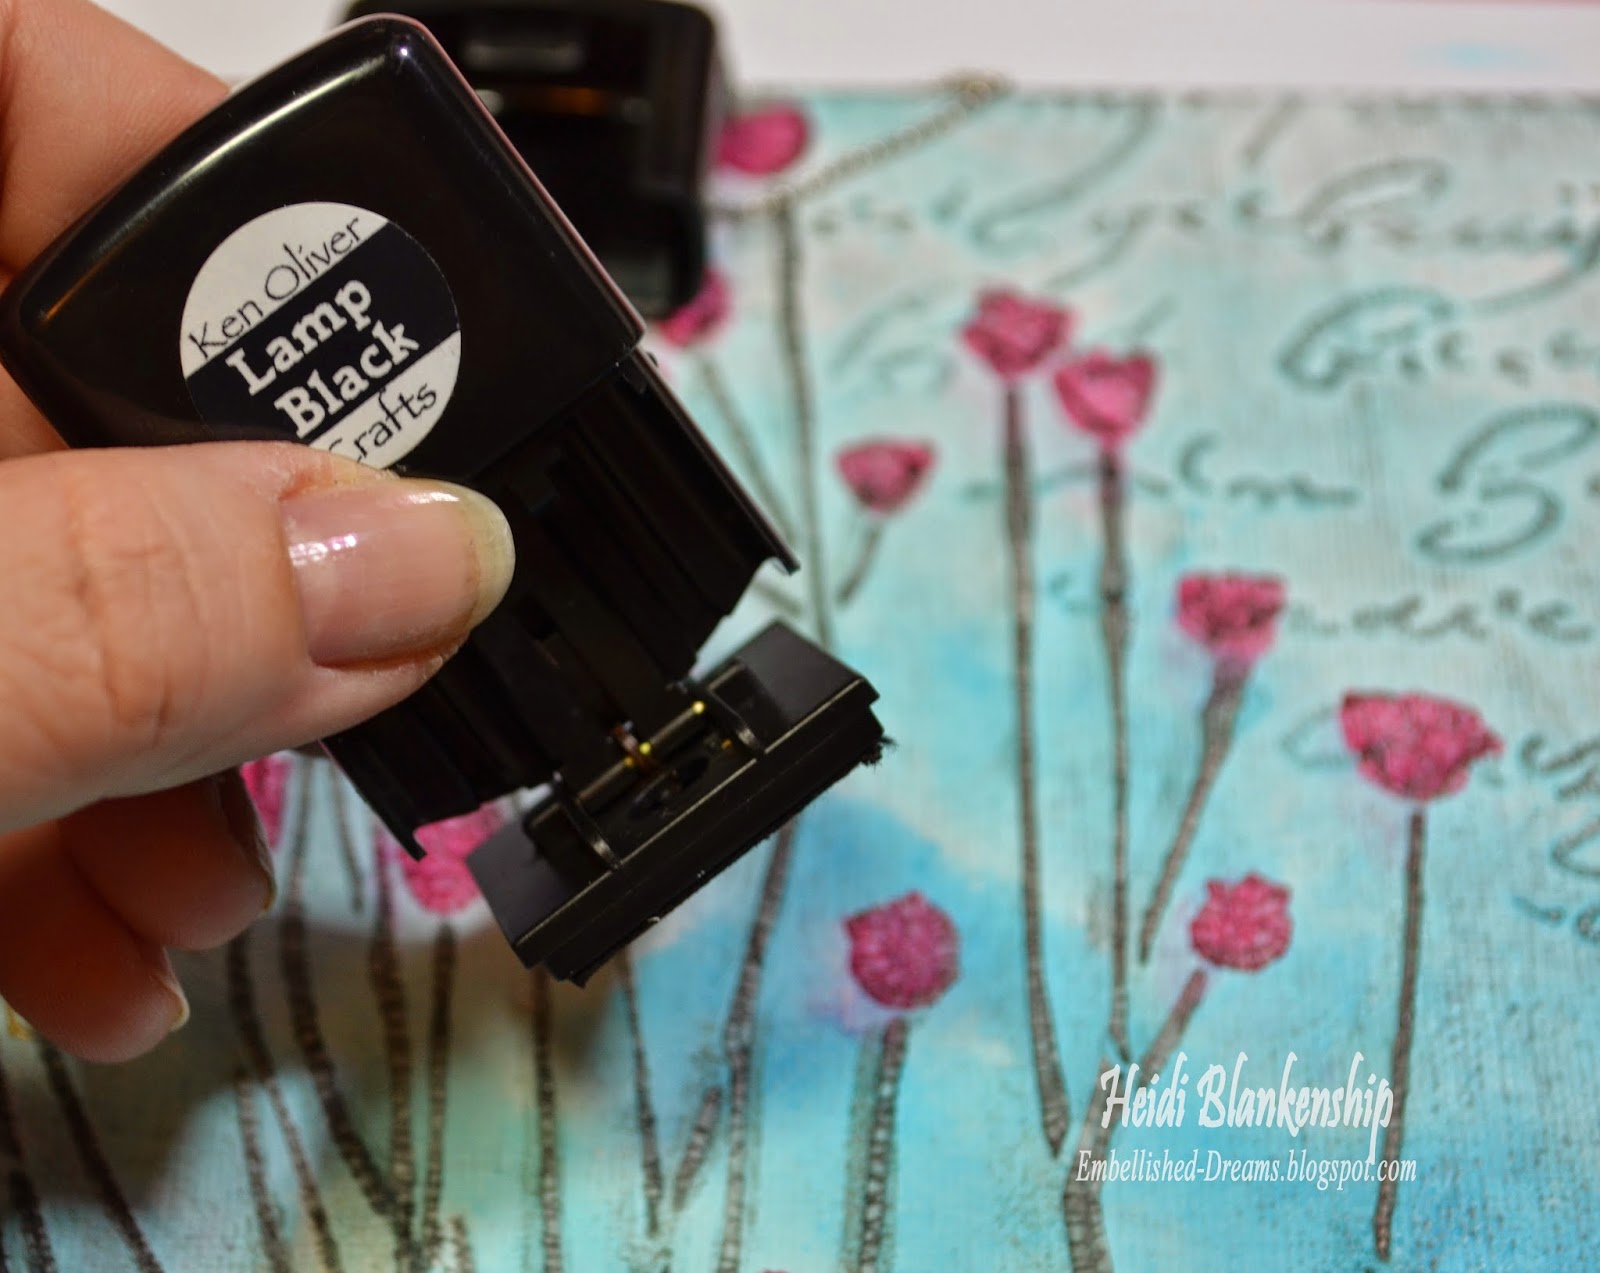
Next I used the Lamp Black Click It Ink to go over the entire canvas board.  Doing this really adds a lot of depth and dimension to the canvas and it picks up all of the little cracks in the texture paste.


To finish off the canvas I created some die cuts using Stick It and the die template from Tonic Studios.  I removed the backing on the Stick It and applied it to the canvas.  Then I added the gold foil on top of the adhesive and rubbed it to to transfer the foil.  I thought this would add a nice decorative element and gold foil it very hot right now.


Here is a close up of some of the flowers with the gold foil along the edge.


I added a few bits of the gold foil along the edges of the canvas.


I hope you enjoyed the tutorial.  Please be sure to visit the blogs listed below to see what the Designers and Style Contributors have created to share with you.

Heidi Blankenship-You are here :)

Thank you so much for visiting our blogs today and I hope that you'll be inspired to create something with Stencil Girl Products and Ken Oliver Crafts! We have a crafty haul of prizes from Ken Oliver up for grabs, just leave a comment below and you'll be eligible to win!

Winners will be randomly selected from our blogs, just leave a comment to become eligible for a prize. It's that easy!

We'll list the daily winners in the comments sections of our respective blogs so watch for the winners names.  

Here's what we're giving away!
12 Daily Prizes - 1 Pack Ken Oliver Crafts 6x6 Papers(24 pieces).
2 Grand Prizes on Friday- 1 Complete Set of Color Burst (6 Colors); 1 Complete Set of Click It Ink Pads (6 Colors); 1 Set Pegz Alphabet Stamp Set;
Leave a comment on each StencilGirl Talk post and the team members posts to be entered to win a $50 gift certificate from Stencil Girl!
Join us every day this week, you can enter every day...

Thank you again and

GOOD LUCK!  

Hugs & Smiles,
Heidi


LinkWithin

Related Posts Plugin for WordPress, Blogger...