Showing posts with label Simon Says Stamps. Show all posts

Wednesday, September 28, 2016

Simon Says Stamp - Handwritten Floral Greetings Watercolor Card

Hello everyone!  Today, I have a floral watercolor card to share with you using one of the stamp sets from a Simon Says Stamp Card Kit of the Month.  The kits are so much fun to receive and they are filled with all kinds of crafty goodness.  The kits always have a stamp set, pattern paper, and cardstock and then they have extra goodies such as dies, embellishments, and inks just to name a few.  There is also an inspiration sheet with colored photos of cards made using the kit.  The card kits are also very reasonably priced and you have the option to sign up for a subscription or check them out each month.  But I can tell you this--a lot of times the kits sell out so if its something you want don't wait lol.  I started getting the kits for something fun and different to do and now I look forward to them every month.


I stamped the flowers and leaves from the 101627 Handwritten Floral Greetings clear stamp set from Simon Says Stamp onto Strathmore Mixed Media paper using VersaMark Ink.  The I added NUVO Embossing Powder - 602N Glacier White from Tonic Studios and used my heat gun to melt the powders and emboss the images.  


Here is a close up of the flowers.  I used Zig Clean Color Real Brush Pens to watercolor the images.  I think these pens are so fun and easy to use and you can use them with or without water.  For this card I blended the colors with water.  On the background I started with a blue in the upped left corner and then I added a very light yellow and pink to the bottom right corner.  The closer I got to the middle of the card the more water I used to blend and achieve the very light colors.  If you are new to watercolor you might want to start out with embossed images as they can be easier to work with. The raised embossed areas help to keep the color in the lines (if that is the look you want) and also the embossed areas resist the watercolor.  After I was done with the watercolor I took a paint brush and added clean water droplets over the entire piece.  I let the water sit for a few seconds and then I used a paper towel to blot off the water.  Doing this removes some of the watercolor.  It also adds texture and interest to the background piece.


I also used some watered down wicker white acrylic paint and added little paint splatter on the background.  


To create the pretty pink die cut thanks I used a piece of white cardstock and I applied VersaMark Ink directly to the paper.  Then I added NUVO Embossing Powder - 605N Ballerina Pink and used a heat gun to melt the powders and emboss the paper.  Next I used the Painted Thanks Wafer Die from Simon Says Stamp and die cut the word using the Tangerine Die Cutting Machine from Tonic Studios.  Then I added more of the VersaMark Ink and embossing powder and heat set the word die.  I repeated this step one more time to build up the embossing powder.  Doing this adds dimension to the die cut.  I keep the embossed paper to use on another project.


Here is another look at the die cut word.  I really like the added dimension from the embossing powder.  To finish off the die cut I added Glossy Accents from Ranger on to the die cut and then I added NUVO Pure Sheen Glitter 711N Candy Pink on the bottom half.  I set the piece aside to dry.  Once the Glossy Accents was dry then I used Multi Medium Matte Adhesive from Ranger to adhere the die cut to the card front.
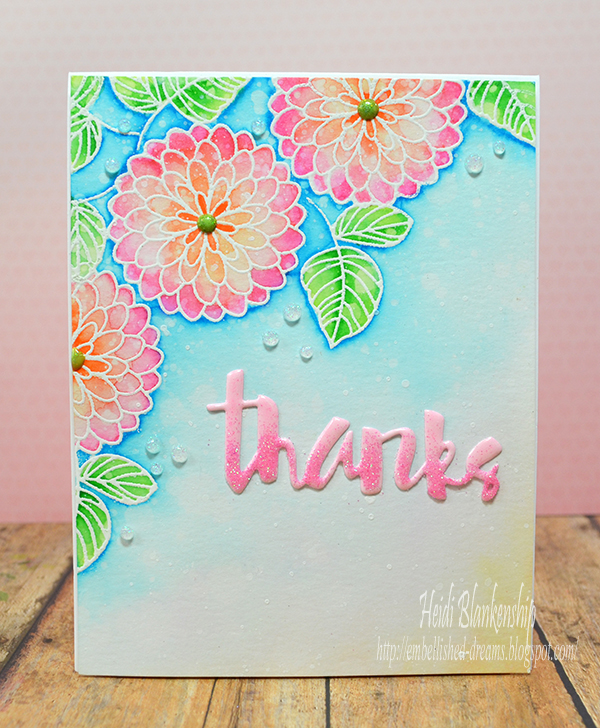

Using Scor-Tape I added a piece of white craft foam to the back of the watercolor panel and adhered that to an A2 top folding card base.  To finish off the card I added NUVO Crystal Drops - 669N Gloss Apple Green to the center of the flowers and  NUVO Glitter Drops - 758N White Blizzard for little accents.  The crystal and glitter drops dry pretty quickly but you want to make sure you don't lay anything on top of the card for 24 hours so the drops can cure and harden.  If you love the look of enamel dots the crystal and glitter drops are a fun alternative for your projects.

Thank you so much for stopping by today!
I hope you have a wonderful day!

Hugs & Smiles,
Heidi


Are you interested in the products I used?  I have all of the supplies listed and linked below.
Compensated affiliate links are used when possible.  Products with an asterisk (*) were provided by a store or the manufacturer.
The Stamp Simply Ribbon Store = TSSRS
Tonic Studios = TS
Simon Says Stamp = SSS
Amazon = AZ

Supplies
Stamps:
Simon Says Stamp - 101627 Handwritten Floral Greetings
Paper:
Strathmore - Mixed Media (AZ)
Cardstock - White Hammermill Color Copy Digital Cover, 80 lb (AZ)
Ink/Markers:
VersaMark Ink (TSSRS) (SSS) (AZ)
Zig Clean Color Real Brush Pens (SSS) (AZ)
Dies:
Simon Says Stamp - Painted Thanks Wafer Die SSSD111546
Accessories:  
*Tonic Studios NUVO Embossing Powder - 602N Glacier White (SSS) (AZ) (TS)
*Tonic Studios NUVO Embossing Powder - 605N Ballerina Pink (SSS) (AZ) (TS)
*Tonic Studios NUVO Pure Sheen Glitter 711N Candy Pink (AZ) (TS)
*Tonic Studios NUVO Crystal Drops - 669N Gloss Apple Green (SSS) (AZ) (TS)
*Tonic Studios NUVO Glitter Drops - 758N White Blizzard (SSS) (AZ) (TS)
*Tonic Studios Tim Holtz Tonic Guillotine Comfort Paper Trimmer 160E (SSS) (AZ) (TS)
*Tonic Studios Tangerine Die Cutting Machine (TS)
Ranger Multi Medium Matte Adhesive (SSS) (AZ)
Ranger Glossy Accents (AZ) (TSSRS) (SSS)
Quilled Creations Precion Tip Empty Applicator Bottle 317 (SSS) (AZ)
Scor-Tape (SSS) (AZ) (TSSRS)
Wagner Heat Gun (AZ)
White Craft Foam (SSS) (AZ)
FolkArt Wicker White Acrylic Paint (AZ)
Paint Brush


Wednesday, July 27, 2016

Pink Ink Stamp Company - Flowery Flip Flops Watercolor Card


Hello everyone! Today, I have to a fun and colorful summertime card to share with you.  I used some of the rubber stamps from the Summer Fun 2016 collection from Pink Ink Stamp Company to create an embossed resist watercolor card.


This is almost a one layer card.  I used Versa Mark ink to randomly stamp the Flowery Flip Flops stamp on to a piece of Strathmore mixed media paper.  Then I added white embossing powder and used a heat tool to melt and heat set the powder.  Next I used Distress Inks on a craft mat and added water to them to create the rainbow watercolor look on the card front.  I added clean water to the entire piece of paper and then added the color.  Doing this helps the colors to flow and blend together.  I added a couple of layer of color and used a heat tool to speed up the drying time. These are the colors of Distress Ink I used -- picked raspberry, ripe persimmon, squeezed lemonade, mowed lawn, salty ocean, seedless preserved.


Once the paper was dry I used a slightly damp paper towel to wipe off the excess ink on top of the embossing.  Doing this will really help to make the white embossed areas pop.  Next I stamped the Flip Flop Life sentiment on to a piece of velum using Versa Mark ink and heat set with white embossing powder. I taped the velum to the back side of the card.  Then I added some white craft foam to the back of the paper using scor-tape.  I mounted the card front to an A2 top folding white card base.


To finish off the card I added some crystal reflections sequins for a little bit of sparkle. I love how the sequins match the rainbow colors so perfectly.


I hope you enjoyed today's card!  Thanks so much for stopping by the Pink Ink Blog.  I hope you have a beautiful and creative day!


Heidi


To find the Pink Ink products used please visit Ellen Hutson LLC

2272J Flowery Flip Flops
10134 Flip Flop Life

You can also visit Pink Ink's website to find a local store near you that carries our stamps, or to order wholesale.

Other Supplies Used
Paper:  Strathmore Mixed Media PaperVellumCardstock - White
Ink:  VersaMark Ink, Tim Holtz Distress Inks - Picked Raspberry, Ripe Persimmon, Squeezed Lemonade, Mowed Lawn, Salty Ocean, Seedless Preserves
Accessories:  White Embossing Powder, Simon Says Stamps - Crystal Reflections Sequins, Ranger - Multi Medium Matte Adhesive, Scor-Tape, White Craft Foam, Paint Brushes - Round 16, 24, Heat Tool

Wednesday, November 11, 2015

Warm Wishes CAS Christmas Card and Tis The Season Christmas Card - Tonic Studios

Hello everyone!  Now that Halloween has passed and Thanksgiving will be here in just a couple of weeks I am in full swing for making Christmas cards, ornaments and presents.  I have a sale coming up November 28th (more information to come) so I have been busy designing a lot of jewelry too.  I am so excited to be a Guest Blogger for Tonic Studios today!  I have a couple of Christmas cards to share with you.  One of the cards is pretty CAS (Clean And Simple) and the other card has a lot of sparkle and detail.


Lets start with the CAS card first.  To create this card I started with a piece of white cardstock cut to 3-1/2 x 5.  Then lay the die template across the top (5 in side), tape in place and die cut.   I used 598E Header Fold Die Set Christmas Wishes from Tonic Studios.  After die cutting trim down sides to fit card and adhere to a light blue mat.  I stamped the Winter Wishes sentiment from Simon Says Stamps Hand Lettered Winter Wishes stamp set with VersaMark ink and heat embossed with Ranger Super Fine Detailed Gold Embossing Powder and a Heat Tool.  Next I added a layering mat with pink cardstock.  I used 422E Funky Tape Runner and 419E Craft Tacky Glue 120ml to adhere all the layers.


Save the drop out pieces to add stars and snowflakes to the top (sky part) of the card.  I used 419E Craft Tacky Glue 120ml to adhere all the tiny pieces.  Then I added Nuvo Crystal Drops - 660N Wedgewood Blue to the stars and snowflakes and 666N Gloss Carnation Pink on the tree to look like little lights or ornaments.


To finish off the card I added some May Arts Sheer Gold Sparkle ribbon and adhered everything to a light blue A2 card.


My second card is a lot more detailed, full of sparkle and I am using black for a non-traditional color.  I have to tell you I absolutely love the frame die cut on this card!  I used 641E Christmas Wreath Die Set 'Tis The Season from Tonic Studios.  Now I know this die set is in the Christmas collection but you could really use the frame die template year round.  I love all the flourishes.  To start I die cut the white frame using the 641E Christmas Wreath Die Set 'Tis The Season.  I added 3D Foam squares to the back of the frame to pop it up and add a little dimension.  I added the frame die cut to a black 5.5 x 5.5 card.  Then I applied 422E Funky Tape Runner to the white drop out piece and added it to the center of the frame.  


Next I die cut the Tis The Season sentiment using Gold Mirror cardstock.  Here is a **TIP** Gold foil or gold mirror paper will show any little imperfections like the cut lines in the mats used for die cutting. To avoid this lay down a scrap piece of paper on your mat and then add gold foil or mirror paper and die on top--results--no imperfections.  I used 419E Craft Tacky Glue 120ml to adhere the sentiment.  I really like the detailed tip on the glue bottle--it has such a tiny hole and it is fantastic for gluing the detailed die cuts.


To create the poinsettias I used 80E Rococo Poinsettia Strip Die from Tonic Studios.  I die cut the poinsettias three times--once with green cardstock and twice with red cardstock.  On both red die cuts fussy cut out the flowers.  On the green die cut use the Nuvo 203 Glue Pen Medium to quickly go over the leaf and vine areas and then I added Nuvo Pure Sheen Glitter 701N Green.  Then I used the Nuvo 203 Glue Pen Medium on the red poinsettias and then add Nuvo Pure Sheen Glitter 700N Ruby Red.  Tap off excess glitter and use 419E Craft Tacky Glue 120ml to adhere the red poinsettia pieces on top of the green poinsettia die cut piece.  Use 3D foam squares on the flowers to add some dimension to the card.  To finish off the poinsettias I added Nuvo Crystal Drops 653N Bright Gold to the flower centers.


I also added some Nuvo Crystal Drops 653N Bright Gold to a couple of the corners on the card.

I hope you enjoyed both of the cards I shared today.  I am loving the Christmas die collection from Tonic Studios!  

Did you know that Tonic Studios US now has a blog and website?  If you haven't already been over there you can click HERE to check it out.  While you are there take a look around.  They have a beautiful collection of dies, a variety of tool and some fabulous new Nuvo Pure Sheen Glitter and Nuvo Crystal Drops.  

Tonic Studios also announced last week they are having a 
TONIC US AMBASSADOR DESIGNER CALL!  
You can click HERE for all of the information.

Would you love to win some fabulous crafty goodies from Tonic Studios USA? During this season of gratitude and Thanksgiving Tonic Studios will be having some amazing giveaways.  
You can click HERE to visit the Tonic Studios USA Facebook Page and find out the details on how you could win!

Thanks so much for stopping by today and I hope you have a beautiful day!

Hugs & Smiles,
Heidi

Warm Wishes Card
Tonic Dies:  Tonic Studios - 598E Header Fold Die Set Christmas Wishes
Tonic Accessories:  Nuvo Crystal Drops - 660N Wedgewood Blue666N Gloss Carnation Pink422E Funky Tape Runner419E Craft Tacky Glue 120ml
Paper:  Cardstock - White, Lt. Blue, Pink
Stamps:  Simon Says Stamps Hand Lettered Winter Wishes
Ink:  Versa Mark
Ribbon:  May Arts Sheer Gold Sparkle
Accessories:  Ranger Super Fine Detailed Gold Embossing Powder, Heat Tool

Tis The Season Card
Tonic Dies:  Tonic Studios641E Christmas Wreath Die Set 'Tis The Season , 80E Rococo Poinsettia Strip Die
Tonic Accessories:  Nuvo Pure Sheen Glitter - 700N Ruby Red, 701N Green, Nuvo Crystal Drops - 653N Bright Gold, Nuvo 203 Glue Pen Medium, 422E Funky Tape Runner, 419E Craft Tacky Glue 120ml
Paper:   Cardstock - Gold Mirror, Black, White, Green, Red,
Accessories:  3D Foam Squares


LinkWithin

Related Posts Plugin for WordPress, Blogger...