Sunday, March 31, 2013

Life is short, eat more Cupcakes!

Hello everyone and Happy Easter!!  Today, I have a sparkling card and a tutorial to share with you using Scrap Happy Sheer Glue and You're So Fine Glitter Diamond Clear Cool Highlights.  


Here is the card that I designed to share with you.  It is SO sparkly!!  I have some close up pictures so you can see all of the details.  How many of you love to use glitter paper?  Did you know that you can make your own glitter paper?  


Making your own glitter paper is so easy--you will love it!  I stamped the frosting image from the S-102 Hey Cupcake! stamp set from The Rubber Cafe`.  I used Pink Lemonade cardstock from DiscountCardstock.com with Rose Bud Memento ink from Imagine Carfts/Tsukineko.  Then I used a makeup sponge to apply Scrap Happy Sheer Glue over the entire image.


Next I applied You're So Fine Glitter Diamond Clear Cool Highlights over the entire image using my fingers to rub in the glitter.  The glitter is ultra fine and once you rub and buff it, it almost had the look and feel of velvet.  


Then I stamped the bottom half of the cupcake on to pattern paper from-Carta Bella™ True Friends 6 x 6 Paper Pad.  I stamped the flower, colored it with Copic markers and fussy cut all of the pieces.


I also made some glittery pattern paper.  Follow the same instructions as mentioned above using a makeup sponge to apply the Scrap Happy Sheer Glue.


Here is a close up of the paper--check out all of the sparkle! 


I used S5-131 A2 Matting Basics AS5-132 A2 Matting Basics B and S5-156 Labels Twenty-Nine die templates to create all of the die cuts.  I added some pretty Celery Green Silk Ribbon from Really Reasonable Ribbon and Diva Pink Jellie Dots from The Rubber Cafe` to embellish the card.


I hope you enjoyed the tutorial for making your own glitter paper!  If you give the glitter paper a try post a comment with a link--I would love to see it!

Thanks so much for stopping by today!

Hugs & Smiles,
Heidi

Supplies
The Rubber Cafe`:  S-102 Hey Cupcake!, You're So Fine Glitter Diamond Clear Cool Highlights, Scrap Happy Sheer Glue, Diva Pink Jellie Dots, Stick "EM" Up Tool
Paper:  DiscountCardstock.com Cascata Felt, Pink Lemonade; Carta Bella™ True Friends 6 x 6 Paper Pad
Ink:  Imagine Carfts/Tsukineko Memento Tuxedo Black, Rose Bud; Copic Markers G14, RV06, R83
Dies:  Spellbinders Creative Arts™ Grand Calibur® Machine, S5-131 A2 Matting Basics A, S5-132 A2 Matting Basics B, S5-156 Labels Twenty-Nine
Accessories:  Really Reasonable Ribbon Celery Green Silk Ribbon

Friday, March 29, 2013

Embellished Gift Bag

Hello everyone!  Today, I have a quick post and a project to share with you.  Solid colored gift bags are something I like to keep on hand.  How many times have you went shopping, picked out the perfect gift only to get home and realize you forgot to pick up tissue paper and a gift bag?  I know its happened to me a few times--LOL!  So now I try to keep a few solid colored gift bags on hand and then I can embellish them quick and I am good to good.  Not to mention I am sure I saved a little $$$ too.  Gift bags can get expensive and solid colored bags can be purchased in bulk and are less expensive.


Here is a gift bag that I embellished and it only took a couple sheets of paper and I few minutes.


I started out by adding a few layers of paper.  I used Simply Smooth Ivory and BoBunny Vintage Burnt Orange and then I added another layer of Simply Smooth Ivory (not shown).


Next I added a couple cut-fold-tuck die cuts.  I used S5-169 Double Delight die templates to cut/emboss these two pieces.


I added the die cuts using 3D Foam Square to layer the pieces, placed a button in the center and added some bling.  


Quick and easy--gotta love that!  Next time you're at the store pick up some solid colored gift bags and tissue paper.  ;-) 

Thanks so much for stopping by today!

Hugs & Smiles,
Heidi

Supplies
Paper:  DiscoutCardstock.com BoBunny Vintage Burnt Orange, Simply Smooth Ivory
Dies:  Spellbinders Creative Arts™ Grand Calibur® Machine, S5-131 A2 Matting Basics A, S5-132 A2 Matting Basics B, S5-169 Double Delight
Accessories:  Green Gift Bag, Recollections Bling, Button, Scrapbook Adhesives by 3L™ 3D Foam Square


Thursday, March 28, 2013

Wednesday, March 27, 2013

Have a Fabulous Day Card


Hello everyone!  Today, I have a quick post and a card to share with you.  


The base of the card is Simply Smooth Ivory  and the mat is BoBunny Vintage Passion Fruit.  


I stamped the sentiment from the CR-04460 Celebration Labels One & Bracket Borders One stamp set from JustRite Papercraft using Memento Tuxedo Black ink from Imagine Crafts/Tsukineko.  Then I used S4-387 Decorative Labels Twenty-Two die template from Spellbinders Creative Arts™ to cut/emboss the decorative shape.  To create the roses I used BoBunny Vintage Passion Fruit paper from DiscoutCardstock.com and S5-086 Bitty Blossoms die template.  After I had the roses in place then I added some mulberry leaves and a couple of Recollections bling swirls.


Thank you so much for stopping by today!  

I hope you have a wonderful and creative day!

Hugs & Smiles,
Heidi
  
Supplies
Paper:  DiscoutCardstock.com BoBunny Vintage Passion FruitSimply Smooth Ivory 
Stamps:  JustRite Papercraft CR-04460 Celebration Labels One & Bracket Borders One
Ink:  Imagine Crafts/Tsukineko Memento Tuxedo Black
Dies:  Spellbinders Creative Arts™ Grand Calibur® Machine, S5-131 A2 Matting Basics A, S4-387 Decorative Labels Twenty-Two, S5-086 Bitty Blossoms
Accessories: Recollections Bling, Button, Scrapbook Adhesives by 3L™ 3D Foam Square, Mulberry Leaves

Monday, March 25, 2013

Vintage Street Market Easter Bunny Blog Hop Giveaway!

Hello blogging friends!  Would you like to win a fun "vintagey" prize from Vintage Street Market?  During the week each of the Design Team Members will be posting their favorite Easter candy on their blogs and once you have a list of all of the designers and their favorite candy post a comment on the VSM Blog for your chance to win!

Here is my favorite Easter candy.  


Please click HERE for all of the details and a link list for the Design Team Members. 

Have fun and good luck!

Hugs & Smiles,
Heidi 

Sunday, March 24, 2013

Hop on Over Easter Treat Bag

Hello everyone!  Today, is my day to post over on the Vintage Street Market Blog and I have a fun Easter gift bag to share with you.


Easter is only one week away and a lot of people give sweet treats during the holiday so I thought I would share a quick, easy and pretty gift bag that would be prefect for the occasion.  If you would like to see more pictures and find out all of the details you can click HERE.

Hugs & Smiles,
Heidi
Supplies
Vintage Street Market:  Aqua Twirly Twine, Happy Easter Quote Sticker Sheet, White Pom-Poms
Other Supplies:  Gift Bag; Really Reasonable Ribbon Lavender Double Ruffle Ribbon; Pink, Lavender Roses; Hot Glue

Tuesday, March 19, 2013

Mixed Media Blog Hop Day Two with JustRite Papercraft and Faber-Castell

Hello everyone!  It's day two of the  JustRite Papercraft and Faber-Castell Design-Memory-Craft Mixed Media Blog Hop. 


The Design Team Members from JustRite Papercraft and Faber-Castell Design-Memory-Craft have more inspiration to share with you using fantastic products from both companies!  

We also have a second day of prizes!!

Today, for your chance to win you will need to leave a comment on each of the designers blog posts--see the link list below.  We will randomly select two designers blogs and select winners from each designer's comments.  Comments will be open until March 22nd at midnight EST.


This is the prize package from JustRite Papercraft and


this is the prize package from Faber-Castell Design-Memory-Craft.


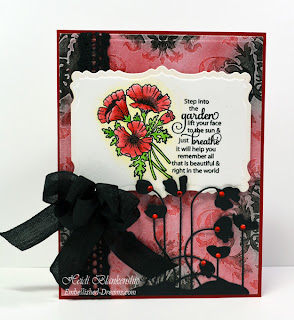
For my project I designed a card and I had fun with the Gelatos using them to create a wonderful background and also for water coloring the poppies image.


To start I stamped the floral image and sentiment from CL-04380 Poppies Lables Twenty Nine stamp set from JustRite Papercraft on to a piece of Simply Smooth White paper from DiscountCardstock.com.  I used VersaMagic Midnight Black ink from Imagine Crafts/Tsukineko and then I embossed it with clear embossing powder and my heat tool.


Next I scribbled the Gelatos--Green TeaRed Cherry and Black on to an acrylic block and used a water brush to watercolor the image.  I started with the Green Tea on all of the leaves and then I used Red Cherry for the poppies and Black for the flower centers.


I wanted to add just a hint of color around the floral image to soften it up so I lightly colored with Art Grip Aquarelle Yellow 105 and then I used a water brush to blend out the color.


Moving on the to background I used CL-04500 Grand Damask Background stamp and  Red Cherry and Black Gelatos.  I used the Gelatos to color directly on to the stamp.  I started with the Black Gelato in the center of each damask and then I went around the edge of the Black with the Red Cherry Gelato to blend the two colors.  Then I wiped off the end of the Red Cherry Gelato with a baby wipe to remove any of the black color that was mixed in. I finished the coloring by adding the Red Cherry Gelato on the outer edges of each damask image to get the deep red color.  I lightly misted the stamp with water and then stamped on to a piece of Simply Smooth White cardstock.


Here is a close up of the background.


I blended the background using my fingers and I started with the Black and then blended the Red Cherry.  I added a little more Red Cherry as needed.  Once I had the stamped image and the background done it was time to put my card together.


Here is a close up of my card.


I used Really Red cardstock for a base and then I die cut the damask background using S5-131 A2 Matting Basics A die template from Spellbinders Creative Arts™.  For the image of the poppies I used S5-156 Labels Twenty-Nine die template.  I thought the S2-004 Poppy Patch die template would make the perfect die cut to match the card.  I used Black Licorice cardstock and added some Recollections red bling to each flower.  I also added some 5/8" Black Crochet Lace Trim and Black Seam Binding from Really Reasonable Ribbon.  

Please be sure to visit the Designers in the link list below to see what they have created to share with you.  Don't forget to leave comments for your chance to win the fabulous prize packages.


Thank you so much for stopping by today!

Hugs & Smiles,
Heidi


Supplies
Stamps:  JustRite Papercraft CL-04380 Poppies Lables Twenty Nine, CL-04500 Grand Damask Background
Ink:  Faber-Castell Design-Memory-Craft, Gelatos Green Tea, Red Cherry, Black, Art Grip Aquarelle Yellow 105; Imagine Crafts/Tsukineko VersaMagic Midnight Black
Paper:  DiscountCardstock.com Simply Smooth White, Black Licorice, Really Red
Dies:  Spellbinders Creative Arts™ Grand Calibur® Machine, S5-131 A2 Matting Basics A, S5-156 Labels Twenty-Nine, S2-004 Poppy Patch
Accessories:  Really Reasonable Ribbon 5/8'' Black Crochet Lace Trim, Black Seam Binding; Scrapbook Adhesives by 3L 3D Foam Squares; Recollections Bling; Water Brush, Clear Embossing Powder, Heat Tool

Monday, March 18, 2013

Mixed Media Blog Hop Day One with JustRite Papercraft and Faber-Castell

Hello everyone!  
Today, is day one of the JustRite Papercraft and Faber-Castell Design-Memory-Craft Blog Hop!  


Today and tomorrow the Design Teams from both companies will be sharing projects that they have designed using products from JustRite Papercraft and Faber-Castell Design-Memory-Craft.  I love the products from both companies and I am really excited to see what all of the designers have created.

Not only do we have fabulous inspiration to share with you but both of the companies have Fantastic Giveaways as well!!  


This is the Faber-Castell Prize Package that will be given away on the JustRite Inspiration Blog.  You will need to click HERE and leave a comment on the JustRite Inspiration Blog for a chance to win this prize package.


This is the JustRite Papercraft Prize Package that will be given away on the Faber-Castell Blog.  You will need to click HERE and leave a comment on the Faber-Castell Blog for a chance to win this prize package.


For my project I altered a canvas.  I used three background stamps and two other stamp sets from JustRite Papercraft and markers and gelatos from Faber-Castell Design-Memory-Craft to go from a white canvas to a beautiful and colorful canvas.  


I used Mod Podge to apply the strips of paper and then I brushed Gesso over the entire piece.  In some areas I applied the Gesso an little thicker but I was careful not to completely cover the image.


Next I used a combination of Gelatos to lay down the base colors.  These are to colors I used BoysenberryCotton CandyBubble GumGuavaLavenderGrape.  Then I used PITT Artist Pen Big Brush to add more depth to the canvas and these are the colors I used--Light Cobalt Turquoise 154Cobalt Blue 143Pink Madder Lake 129.  Both the Gelatos and PITT Artist Pen Big Brush are so easy to work with!  The Gelatos are so rich and creamy and easy to blend and the PITT Artist Pen Big Brush are so vibrant and they can also be blended while they are wet.


I used a baby wipe to carefully remove some of the color.  I used Krylon Crystal Clear Satin to seal the canvas.


I wanted to really make the canvas pop so I colored the edges with PITT Artist Pen Big Brush Cold Grey IV 235 and then I blended to edges on the top of the canvas while the ink was still wet.


I wanted to tone down the colors just a little bit so I went back over the canvas with Gesso.


I used the PITT Artist Pen Big Brush Cold Grey IV 235 with CR-03680 Classic Lace Edges One stamp set to create a decorative edge around the canvas.  For stamping on to the canvas I didn't use acrylic blocks.  I just used the marker to apply the ink to the stamp, carefully picked the stamp and applied it to the canvas.  Doing this allows you to push directly on the stamp where you need to to transfer the ink to the canvas.  When the stamp is on an acrylic block it is a lot harder to get a good image on the canvas.


To create the butterfly I used some of the Gelatos and blended them on to a piece of Simply Smooth White cardstock and then I used S4-395 Les Papillions Two die template from Spellbinders Creative Arts™ to die cut the image.


Here is a close up of the butterfly.  I used the flourish stamp from CL-04390 Butterfly Dreams with the PITT Artist Pen Big Brush Cobalt Blue 143 and Cold Grey IV 235.


The sentiment is also from the CL-04390 Butterfly Dreams stamp set and I cut it into strips and then applied it to the canvas.


Here is a close up of the flower cluster.  I used S5-086 Bitty BlossomsS5-129 Foliage Two to create the die cuts and then I made a ribbon flower using Black Sheer Box Pleats ribbon from  Really Reasonable Ribbon and added the larger rose to the center.  I also added some Recollections bling and a handmade stickpin.


For a little touch of sparkle I added some You're So Fine Glitter in Diamond Clear and Black Licorice using Scrap Happy Sheer Glue from The Rubber Cafe'.


To finish off the canvas I added Metal Filigree Corners from ButterBeeScraps.  I used Beacon Adhesives ZipDry to adhere the corners.

I had so much fun creating this canvas and working with all of the wonderful products!!

Please be sure to visit all of the Designers in the link list below to see what they have created to share with you.  Also don't forget to hop on over to the JustRite Inspiration Blog and Faber-Castell Blog and leave a comment for your chance to win one of the fabulous prize packages!


Thank you so much for stopping by today!!

Hugs & Smiles,
Heidi

Supplies
Stamps:  JustRite Papercraft CL-04355 French Rose Background, CL-03700 Heart Scrolls Background, CL-04320 Elegant Damask Background, CR-03680 Classic Lace Edges One, CL-04390 Butterfly Dreams
Inks:  Faber-Castell Design-Memory-Craft PITT Artist Pen Big Brush Light Cobalt Turquoise 154, Cobalt Blue 143, Pink Madder Lake 129, Cold Grey IV 235, Gelatos Boysenberry, Cotton Candy, Bubble Gum, Guava, Lavender, Grape; Imagine Crafts/Tsukineko StazOn Jet Black Ink
Paper:  DiscountCardstock.com Simply Smooth White, Black Licorice
Dies:  Spellbinders Creative Arts™ Grand Calibur® Machine, S4-395 Les Papillions Two, S5-086 Bitty Blossoms, S5-129 Foliage Two
Accessories:  Really Reasonable Ribbon Black Sheer Box Pleats; The Rubber Cafe' Scrap Happy Sheer Glue, You're So Fine Glitter Diamond Clear, Black Licorice; Beacon Adhesives ZipDry; Recollections Bling; Gesso, Mod Podge; Handmade Stickpin; ButterBeeScraps Metal Filigree Corners; Hot Glue; Krylon Crystal Clear Satin

LinkWithin

Related Posts Plugin for WordPress, Blogger...