Friday, February 28, 2014

Just A Note Card with a Dangle Purse Charm

Hello everyone!  Today, I have a card with a little gift all in one to share with you.  


Dangle purse charms are so trendy right now and why not create one to add to the front of a card.  These are quick, easy and inexpensive to create--plus they really dress up the card and make cute little gifts.  


To create the dangle purse charm I started with a bottle cap, added the image and then added the clear round epoxy sticker.  Then I punched a couple of holes in the bottle cap--top and bottom.  Next I added Silver Jump Rings and some Silver Tone Chain (Item #CH876-P) to the bottle cap and started creating the dangle charm.  I added a bird charm from the Birds of a Feather collection, a tree from the Natures Garden Charm Collection , a silver flower charm and a couple of Frosted Acrylic Flower Beads (Item #ABD332-BK) with pearls.  All of the charms, chain and jump rings are from  ButterBeeScraps.  Then I added a large clasp.  When I made the bow I added a Silver Jump Rings so I would be able to clip on the dangle purse charm and add it to the card.  I added one of the Frosted Acrylic Flower Beads (Item #ABD332-BK) with a pearl to the top so when the dangle purse charm is removed there wouldn't be an empty jump ring on the bow.  Tip--I know the chunky dangle purse charms are very popular but when you are adding one to a card don't make it too chunky or your card won't be able to stand up with the charm attached to it.  ;-)


To create the card base I used black cardstock with S6-001 5x7 Matting Basics A die template.  Then I used kraft cardstock with the S5-211 Romantic Rectangles Two die template.  Before removing the paper I inked the inside edges with Memento Tuxedo Black ink.  Then I stamped a sentiment from the CR-04915 Just A Note Vintage Sentiment Tag Clear Stamp Set from  JustRite® Papercraft.  Next I die cut the birds using black cardstock and the IN-024 Bird On A Wire die template.  All of the die templates are from  Spellbinders Paper Arts®.  I used 3D Foam Squares from Scrapbook Adhesives by 3L™ in between the layers and to add some dimension.  

I hope you like the card I shared today.  It would be a great card and gift to give to your girlfriends.  
Hope you have a Fantastic weekend!
Thanks so much for stopping by!

Hugs & Smiles,
Heidi

Supplies
Stamps:  JustRite® Papercraft  CR-04915 Just A Note Vintage Sentiment Tag Clear Stamp Set
Paper:  Black, Kraft
Ink:  Imagine Crafts/Tsukineko Memento Tuxedo Black
Dies:  Spellbinders Paper Arts® S6-001 5x7 Matting Basics A, S5-211 Romantic Rectangles Two, IN-024 Bird On A Wire
Accessories:  ButterBeeScraps Birds of a Feather (bird charm), Natures Garden Charm Collection (tree charm), Silver Flower Charm, Silver Jump Rings, Silver Tone Chain (Item #CH876-P), Frosted Acrylic Flower Beads (Item #ABD332-BK); The Paper Studio Bottle Cap, Bottle Cap Image, Clear Round Epoxy Sticker, Scrapbook Adhesives by 3L™ 3D Foam Squares, E-Z Runner® Permanent Strips-Refillable Dispenser 49' ; Round Nose Pliers, Flush Cutters, Head Pins, Pearls, Clasp

Thursday, February 27, 2014

Chameleon™ Color Tones Marker Pens - Hello Daisy Card

Hello blogging friends!  Today, I am very excited to be sharing a brand New product with you!  Have you heard of  Chameleon™ Color Tones Marker Pens?  

This past January at the 2014 Craft & Hobby Association (CHA) Trade Show Chameleon™ Color Tones Marker Pens were selected as one of the Hot 20 Awards for 2014!!  

I feel very fortunate and honored that I was chosen as one of the limited number of designers to test the markers.  I have been playing with then for a little over a week now and I am really loving them.  The markers are alcohol based but the really cool thing about them--they give you the power to change color! Chameleon Color Tones brings color control and simplicity to your art. Create stunning effects such as 3D, smooth transitions, highlighting, shading, graduations and blending, all with one pen. Each pen goes from as light as hint of a tint to rich tones, eliminating tonal gaps in your collection. One pen multiple tones!  For more details you can click HERE to check out the website.  


Check out all of the color tones you can get from just one pen!  Pretty amazing!  To achieve the different color tones the marker is inserted into the mixing chamber and then it is infused with the toning medium.  This changes the color at the source and allows you to go from a hint of a tint to the true vibrant color of the markers.  

The markers are easy to use and to put it very simply you just color with them--the markers to all the work for you.  I love being able to get such a wide range of colors from one pen.


Here is my first card that I designed using the Chameleon™ Color Tones Marker Pens.  


These are the five markers I used to color the daisy image--Y1, YO1, YG1, OL1, BR2.  The beautiful daisy image is from CL-02004 Hello Daisy Cling Stamp from JustRite® Papercraft.  After I colored the image then I used S6-010 5x7 Heirloom Legacy die template from Spellbinders Paper Arts® to die cut the image.


Before removing the paper from the die template I inked the inside edges with Ranger Spun Sugar Distress Ink.


I stamped the sentiment on to a piece of light yellow cardstock and then I die cut it using S4-425 Elegant Ovals die template.  I edged the die cut with a little sparkle using my Zig Wink of Stella Clear Glitter Brush Pen.  Then I added one of the Silver Filigree pieces from ButterBeeScraps.  I cut the filigree piece in half and attached it to each side of the die cut.


I also used the Zig Wink of Stella Clear Glitter Brush Pen pen on the daisy to add a little bit of sparkle.  I just love the shimmer from that pen!


For the base of the card I used a light yellow cardstock and for the mat I used pink lemonade.  To create the mat I used S6-001 5x7 Matting Basics A die template.  

If you have any questions about the markers please let me know.  I would love to hear what you think!  Don't forget you can click on all of the images to enlarge them and see all of the details.
Thanks so much for stopping by today!

Hugs & Smiles,
Heidi

Supplies
Stamps:  JustRite® Papercraft CL-02004 Hello Daisy Cling Stamp
Paper:  Simply Smooth White, Light Yellow, Pink Lemonade
Ink:  Imagine Crafts/Tsukineko Memento Tuxedo Black; Ranger Spun Sugar Distress Ink
Markers:  Chameleon™ Color Tones Marker Pens Y1, YO1, YG1, OL1, BR2
Dies:  Spellbinders Paper Arts® S6-001 5x7 Matting Basics A, S6-010 5x7 Heirloom Legacy, S4-425 Elegant Ovals
Accessories:  ButterBeeScraps Silver Filigree 683S-SWink of Stella-Zig Wink of Stella Clear Glitter Brush Pen; White Pearls; Scrapbook Adhesives by 3L™ 3D Foam Squares, E-Z Runner® Permanent Strips-Refillable Dispenser 49'

Monday, February 24, 2014

The Stamp Simply Ribbon Store - Easter Greetings Card - Graphic 45 and Spellbinders

Hello and Happy Monday to everyone!  Today, is my day to post for The Stamp Simply Ribbon Store and I have a pretty Easter card to share with you.  


Check out this gorgeous paper from the New Graphic 45 Sweet Sentiments 8 x 8 paper pad!  I love Graphic 45 paper!  In the past I never wanted to cut into the images because they were so beautiful but then I started to look at it a little differently.  Since the paper is so beautiful you can use one of the images and some of the patterns and very quickly and easy you can have a gorgeous card with very little work because the paper does all the work for you!  Just like the card I am sharing today--it might look hard or like it took a long time but it was actually pretty easy to put together--beautiful paper, a few die cuts, some flowers and pearls = Gorgeous card! ;-)

For the base of the card I used a light aqua cardstock.  Then to create the mats and die cuts I used S6-001 5x7 Matting Basics A and S6-012 5x7 Mystical Embrace.  For the mat I used some floral pattern paper from the Graphic 45 Sweet Sentiments 8 x 8 paper pad and for the die cut I used simply smooth ivory cardstock.  I layered these die cuts on to the front of the card and used 3D Foam Squares in between the layers.  Then I fussy cut one of the images from the Graphic 45 Sweet Sentiments 8 x 8 paper pad and added flourish die cuts to the top and bottom.  To create the flourish die cuts I used one of the die templates from the S2-069 Outrageous Butterfly  set.


Here is a close up of the beautiful Easter image.  I fussy cut the Easter Greetings banner and added that to the top of the card.  To finish off the card I added some Prima-Audrey Flowers-TurquoisePrima-Mini Rose Stems Anna Marie Flowers and Melissa Frances Cream Pearls.


I hope you enjoyed the card today and don't be afraid to cut in to your beautiful pattern papers! 

As always you can click on all the photos to enlarge them and all of the supplies are listed below with links.

I hope you had a wonderful weekend!
Please be sure to check out The Stamp Simply Ribbon Store for all of the fantastic paper crafting products and the Blog for inspiration from the Design Team.

Thanks so much for stopping by today! 

Hugs & Smiles,
Heidi


Supplies
Paper:  Graphic 45 Sweet Sentiments 8 x 8 paper pad-The Stamp Simply Ribbon Store; Cardstock-Simply Smooth Ivory, Light Aqua
Dies:  Spellbinders Paper Arts® S6-001 5x7 Matting Basics A, S6-012 5x7 Mystical Embrace, S2-069 Outrageous Butterfly (flourish)
NOTE:  You can also find Spellbinders® products at The Stamp Simply Ribbon Store
Accessories:  Prima-Audrey Flowers-Turquoise, Prima-Mini Rose Stems Anna Marie Flowers; Melissa Frances Cream Pearls-The Stamp Simply Ribbon Store; Hot Glue; Scrapbook Adhesives by 3L® 3D Foam SquaresEZ Runner® Permanent Strips-Refillable Dispenser 49'
NOTE:  You can also find Scrapbook Adhesives by 3L® products at The Stamp Simply Ribbon Store

Sunday, February 23, 2014

So Proud!!! Science Fair 2014

Hello everyone!  I have a quick post today--just had to share.  Yesterday was the Science Fair and Evan took home a trophy!!  So very proud of him!!  ;-)


His science project was--Which Laundry Soap Works The Best?
He tested four kinds of laundry soap--Tide, All, Purex, and Xtra.  He had small white t-shirts and put a variety of things on them to create stains (ketchup, mustard, baby food (peas), grape juice, coffee, marker) and then scrubbed and washed each t-shirt to see which would remove the stains the best.  
Tide was the Winner!
All and Purex were pretty close and Xtra was the worst at removing the stains.  Evan also did a lot of research and reading on how soap actually works.  He said he was very surprised to find out soap was so scientific!  ;-)

Thanks so much for letting me share and for stopping by today!

Hugs & Smiles,
Heidi

Friday, February 21, 2014

ButterBeeScraps - Spellbinders - Two Necklaces and a Card - Bezels

Hello everyone!  So sorry my posts have been few and far between lately!  I still haven't been feeling the best and I think it has kind of zapped my mojo.  I have lots of things I want to create and several ideas but you know how it is when you don't feel very good--you sit down to craft and it just doesn't always come out looking the way you want it to or you just don't have the energy lol.  But I have been creating some new things here and there.  Today, I have a few projects to share with you.
  

I have two necklaces and a card that I designed.  I used the same bezel on all three projects.  I wanted to be able to show you how you can use bezels not only for jewelry making but also in your paper crafting projects.

Before I share the details of each project I want to show you how I used Stazon inks to distress and change the color of the bezels.


The bezels started out as silver.  For the first layer of ink I applied Saddle Brown StazOn ink to the entire bezel.  I used a sponge to apply the ink.  There is a StazOn Glaze that you can apply in between ink colors if you are adding layers and don't want your colors to mix.  But for this projects I didn't use the glaze because I wanted the colors to mix and blend a little.


For the second layer I used Timber Brown StazOn ink.  I didn't cover the entire piece because I still wanted some of the Saddle Brown in to show through.


For the last layer I used Jet Black StazOn ink and I lightly applied it around the edges.  Once this was dry then I used the StazOn Glaze to seal the inks.  I also lightly sanded the bezels to reveal some of the silver metal and give them more of an aged look.  


Here is the first necklace I designed.  Both of the necklaces are long (18'' to 20'').  I used one of the small filigree pieces on the inside of the necklace and I cut it in half and put one half on each side with the part that would have been the end pointing towards the center.  Then I added a Copper Flower Charm.  I used a flush cutter to cut off the loop on the charm and filed it down so it would be smooth.  I added some Flat Back Crystals SS12, SS16.  I also added 2 mm rhinestone chain around the inside of the bezel.  


Here is a close up.


I wanted to be able to add a dangle to the bezel so I attached Large Filigree Silver piece to the back of the bezel using E6000.  For my dangle I used Small Rhinestone CharmsSmall Bronze Bead Cap CAP052-B


Now for the card.


This is a card that I made for my husband for Valentine's Day using one of the bezels.  For the card I used black and deep red cardstock.  To create the die cuts I used S5-217 A2 Valiant Honor and  S5-207 Labels Thirty-Eight die templates from Spellbinders Paper Arts®.  I layered the die cuts and added 3D Foam Squares from Scrapbook Adhesives by 3L for some added dimension.


Here is a close up of the bezel.  I used the same inking technique and then I added a Gunmetal Decorative Key Pendant (KY901-GM)Heart Charm and a few Flat Back Crystals Siam (red) SS12, SS16.  I finished it off by adding a LOVE word block and some black ribbon.


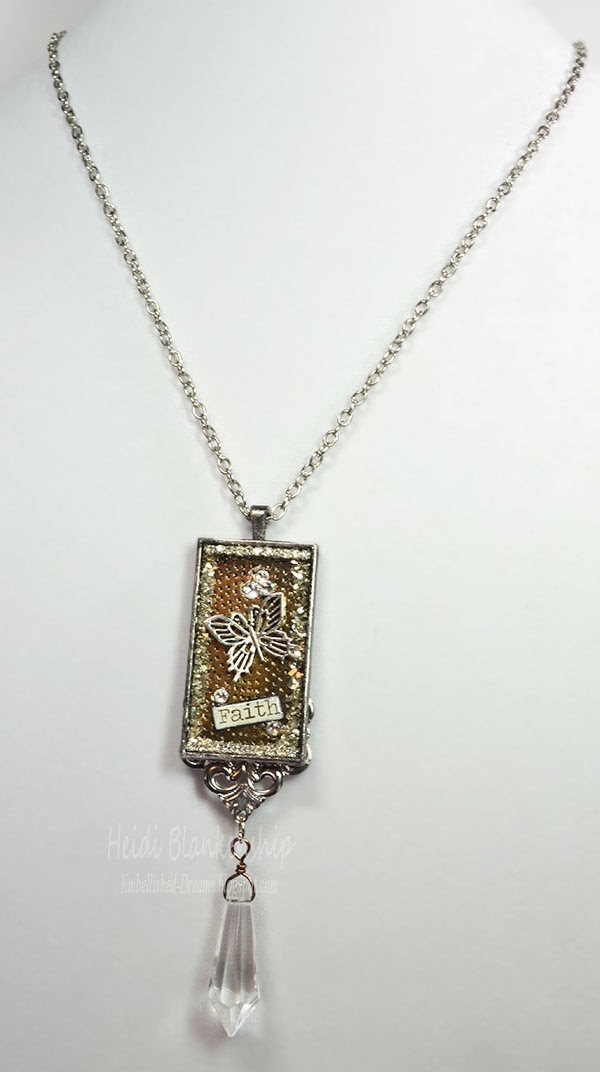
Here is the second necklace that I designed.  I used the same bezel and inking techniques as I did on the two other projects.  On the inside of the bezels I added some 2 mm Rhinestone Chain and Silver German Glass Glitter.  Then I added a Butterfly Charm from the Natures Garden Charm Collection, a few Flat Back Crystals SS12, SS16 and a FAITH word block.  I also added some glossy accents on top of the word block.  I used E6000 to adhere a Silver Filigree (025-P) to the back of the bezel so I would be able to hang a crystal.  I used some bronze 20 Ga wire to attach the Clear Glass Chandelier Drop GL1437-CL.


Here is a close up of the bezel.  I love all of the sparkle from the crystals and glitter!


I hope you enjoyed the project and the quick tutorial with the StazOn ink!  I think it's a lot of fun to incorporate the metal pieces, charms, and filigrees into both jewelry and paper crafting projects and I hope these projects will inspire you to do the same.

Have a wonderful weekend!

Hugs & Smiles,
Heidi 


Supplies
ButterBeeScraps Artistic Treasures:
Butterfly Faith Necklace:
Bezel F418-S (currently out of stock)
Silver Chain CH735-P
Silver Jump Rings
Clear Glass Chandelier Drop GL1437-CL
Silver Filigree (025-P)
Natures Garden Charm Collection-Butterfly Charm 
Flat Back Crystals SS12, SS16 (currently out of stock)

Flower Filigree Necklace:
Bezel F418-S (currently out of stock)
Silver Chain CH735-P
Silver Jump Rings
Large Filigree (on the back of bezel) Silver
Small Filigree (inside bezel) Silver
Copper Flower Charm
Small Rhinestone Charms
Small Bronze Bead Cap CAP052-B
Medium Bronze Bead Cap CAP114-B
Large Bronze Bead Cap CAP486-B
Silver Stardust Bead BD249-S
Rhinestone Rondelle Spacer Beads BD010-P/CL
Flat Back Crystals SS12, SS16 (currently out of stock)

Love Card:
Bezel F418-S (currently out of stock)
Gunmetal Decorative Key Pendant (KY901-GM)
Heart Charm
Flat Back Crystals Siam (red) SS12, SS16 (currently out of stock)
Paper:  Deep Red, Black
Dies:  Spellbinders Paper Arts® S5-217 A2 Valiant Honor, S5-207 Labels Thirty-Eight
Accessories:  Black Ribbon, Silver Wire, Glossy Accents, E6000

Other Supplies:
Ink:  StazOn Saddle Brown, Timber Brown, Jet Black, StazOn Glaze
Accessories:  Glossy Accents, Artistic Wire Bronze 20Ga, 2mm Rhinestone Chain, Silver German Glass Glitter,Clasps, Clear Crystal Beads, E6000, Sand Paper

Monday, February 17, 2014

The Stamp Simply Ribbon Store - Welcome Spring

Hello and Happy Monday to everyone!  Today, is my day to post for The Stamp Simply Ribbon Store and I have a Welcome Spring shape card to share with you.


Here is the card that I designed.  I used the new  JustRite® Papercraft SW-02008 Welcome Spring Clear Stamp Set from The Stamp Simply Ribbon Store to create the cute little image with the bunny and flowers.  I also used S4-426 Luscious Labels One and S4-161 Labels One die templates to create the shape card.


To combine the images I did the masking technique.  For anyone who is new to stamping this basically means that you stamp an image and then cover it up to stamp over top adding more images but the ink doesn't get on the images that are covered up.  Doing this you can use several stamps and it will appear to be one image.  Here I stamped the bunny and then stamped it a second time--fussy cut that image and place it on top and continued to stamp.


Here is a picture after all the stamping was done.  Now it looks like the bunny, flowers and grass are all one image.


I used Copic markers to color in the image.


Here is a close up on the card.  I think this little bunny is so sweet.


Here is a close up of the ribbon, flower and bead cluster at the top of the card.  I used 1/4" Silk Ribbon by May Arts-Celery  and May Arts Pearlized String Beads-Pink, Light Blue and then topped it off with two of the Prima Pink Abbey Flowers.  I love the beads--they make great little accent pieces.

As always you can click on all the photos to enlarge them and all of the supplies are listed below with links.

I hope you had a wonderful weekend!
Please be sure to check out The Stamp Simply Ribbon Store for all of the fantastic paper crafting products and the Blog for inspiration from the Design Team.

Thanks so much for stopping by today! 

Hugs & Smiles,
Heidi

Supplies
Stamps:  JustRite® Papercraft SW-02008 Welcome Spring Clear Stamp Set-The Stamp Simply Ribbon Store
Paper:  Simply Smooth White, Light Blue
Ink:  Memento Dew Drop Dye Ink 4 Pack - Arizona Canyon-Rich Cocoa, Desert Sand-The Stamp Simply Ribbon Store; Copic Markers
Dies:  Spellbinders Paper Arts® S4-426 Luscious Labels One, S4-161 Labels One
NOTE:  You can also find Spellbinders® products at The Stamp Simply Ribbon Store
Ribbon: 1/4" Silk Ribbon by May Arts-Celery , May Arts Pearlized String Beads-Pink, Light Blue -The Stamp Simply Ribbon Store
Accessories:  Prima Pink Abbey Flowers-The Stamp Simply Ribbon Store,  Scrapbook Adhesives by 3L® 3D Foam SquaresEZ Runner® Permanent Strips-Refillable Dispenser 49'
NOTE:  You can also find Scrapbook Adhesives by 3L® products at The Stamp Simply Ribbon Store;
Hot Glue

Monday, February 10, 2014

The Stamp Simply Ribbon Store - Butterfly Kisses Card

Hello and Happy Monday to everyone!  Today, is my day to post for The Stamp Simply Ribbon Store and I card to share with you.  I used the largest die template S6-013 Modern Stationary in the set to create a shape card.  


I love the soft colors of brown and ivory.  I used  JustRite® Papercraft CL-02007 Whisper Secrets Cling Stamp and CL-02001 Butterfly Kisses Cling Set from The Stamp Simply Ribbon Store for the beautiful butterfly image and sentiment.  I used Memento Dew Drop Dye Ink 4 Pack - Arizona Canyon (Desert Sand) ink for the butterfly image and Memento Rich Cocoa for the sentiment.  


Here is a close up.  I used the large oval from S6-010 5x7 Heirloom Legacy die set and S4-425 Elegant Ovals to create the die cuts.  The Prima Le Mia - Brown Cream roses were a perfect match for this card.  I used Tombow Mono Multi Liquid Glue and Tim Holtz Distress Glitter - Clear Rock Candy to add a little sparkle to the roses.  


Here is a close up of the roses. So pretty!


As always you can click on all the photos to enlarge them and all of the supplies are listed below with links.

I hope you had a wonderful weekend!
Please be sure to check out The Stamp Simply Ribbon Store for all of the fantastic paper crafting products and the Blog for inspiration from the Design Team.

Thanks so much for stopping by today! 

Hugs & Smiles,
Heidi


Supplies
Stamps:  JustRite® Papercraft CL-02007 Whisper Secrets Cling Stamp, CL-02001 Butterfly Kisses Cling Set-The Stamp Simply Ribbon Store
Paper:  Simply Smooth Ivory
Ink:  Memento Rich Cocoa, Memento Dew Drop Dye Ink 4 Pack - Arizona Canyon (Desert Sand)-The Stamp Simply Ribbon Store
Dies:  Spellbinders Paper Art® S6-013 Modern Stationary, S4-425 Elegant Ovals, S6-010 5x7 Heirloom Legacy
NOTE:  You can also find Spellbinders® products at The Stamp Simply Ribbon Store
Ribbon:  May Arts 1/2" Wrinkled Ribbon - 5 yard Bundle (Ivory)Webster's Pages Trim Card - Modern Romance (Rosette)-The Stamp Simply Ribbon Store
Accessories:  Prima Le Mia - Brown CreamMelissa Frances Pearls - Tan/BrownTim Holtz Distress Glitter - Clear Rock CandyTombow Mono Multi Liquid Glue -The Stamp Simply Ribbon StoreScrapbook Adhesives by 3L® 3D Foam SquaresEZ Runner® Permanent Strips-Refillable Dispenser 49'
NOTE:  You can also find Scrapbook Adhesives by 3L® products at The Stamp Simply Ribbon Store;

Sunday, February 9, 2014

Home Bakery Labels - JustRite Papercraft - February New Release

Hello blogging friends and Happy Sunday!  Today, is the fifth day of the JustRite® Papercraft February New Release.  We are showcasing a stamp set and a matching die template set.


Here is the little treat bag that I made using both the SW-04985 Home Bakery Labels Clear Stamps and JustRite® Custom Dies JB-04905 Vintage Tag Dies.  This is going to be such a fun stamp set for making little treat bags and other goodies.  


For the topper I stamped the frame using Espresso Truffle ink and then I stamped the sentiment using Lady Bug ink.  I also inked around the edges with Desert Sand.  Then I filled in around the frame using Copic marker R46.  I used the  JustRite® Custom Dies JB-04905 Vintage Tag Dies to cut/emboss the label shape and then I cut/embossed a second piece using milk chocolate cardstock.  For the second die cut I cut it in half and taped it to the back of the label with just a little bit peaking out for a layered look.  I stamped and colored the rolling pin and cookies and then fussy cut them.  I added 3D Foam Squares to rolling pin and cookies for a little dimension.  The brown paper bag has some yummy chocolate chip cookies inside and it folded it shut, added a couple of doilies and some seam binding and then I added the label with a couple of tiny clothes pins.


This was a really quick and easy way to dress up a brown bag with some goodies.

Please be sure to visit all of the designers in the link list below to see what they have to share with you.


Thank you so much for stopping by today and I hope you have a wonderful weekend!

Hugs & Smiles,
Heidi

Supplies
Stamps:  JustRite® Papercraft SW-04985 Home Bakery Labels Clear Stamps
Paper:  Simply Smooth Ivory, Milk Chocolate
Ink:  Memento Espresso Truffle, Rich Cocoa, Desert Sand, Lady Bug; Copic Markers R46, E31
Dies:  JustRite® Custom Dies JB-04905 Vintage Tag Dies
Accessories:  Small Brown Paper Bag, Doilies-The Paper Bag Lady, White Seam Binding, Mini Clothes Pins, Scrapbook Adhesives by 3L® 3D Foam Squares, E-Z Runner® Permanent Strips-Refillable Dispenser 49'

Saturday, February 8, 2014

Welcome Spring Clear Stamp Set - JustRite Papercraft - February New Release Day Four

Hello blogging friends!  Today, is the forth day of the JustRite® Papercraft February New Release.  We are showcasing a stamp set and a matching die templates set designed by Samantha Walker for 


Here is the sweet Easter card that I designed using both the SW-02008 Welcome Spring Clear Stamp Set and JustRite® Custom Dies SW-04950 Nested Cloud and Tag Dies.  The stamp set is filled with so many great stamps for Spring and Easter.  For the Easter basket full of colorful eggs I did a masking technique and I have a tutorial to share with you on how to do that.  


To start I stamped the image of the basket using Rich Cocoa ink on to white cardstock.  Then I stamped the image a second time on to post-it-note paper and used a craft knife to cut out the image.  I placed the cut out on top of the image--doing this creates a mask and allows you to stamp over an image and create layers.  Then start stamping the eggs.  I also stamped several of the eggs and cut them out to create masks. *Tip--if you use post-it-notes they have the sticky back so the cut out will stay in place on top of the image.  If you don't have post-it-notes use some copy paper and apply a little two way glue on the backside to make the paper a little tacky.


Here you can see I have stamped the eggs several times and I have masks (cutouts) covering most of the eggs.  Once you are done with masks and stamping then you can peel all of the little pieces off to reveal the entire image.


Pretty cool!  This is the basket of eggs once all of the masks are taken off.


I used several colors of Memento inks to stamp the images and then I colored them in with Copic markers.  All the names of the ink and Copic markers are below in the supply list.


I lightly airbrushed around the die cut with the basket using Copic marker B00.  For the second layer I stamped the frame from the SW-02008 Welcome Spring Clear Stamp Set using Rose Bud ink and then I used the largest die in the JustRite® Custom Dies SW-04950 Nested Cloud and Tag Dies set to cut/emboss the shape.  I also stamped and fussy cut a few more eggs and layered them on the front.  I stamped the Happy Easter sentiment with a little flower on to a tag die cut and then added a lavender/silver bow with some Iridescent White Metallic String.  I used 3D Foam Squares in between the layers to add a little dimension.  For the sparkle I used a Zig Wink of Stella Clear Glitter Brush Pen.  I love the Wink of Stella Clear Glitter Brush Pen pen and how much sparkle it adds to the project!


To finish off the card I stamped and die cut two of the corner pieces and then I added a few pearls. 

Please be sure to visit all of the designers in the link list below to see what they 
have created to share with you.   


Thanks so much for stopping by today!  I hope you have a wonderful weekend!

Hugs & Smiles,
Heidi

Supplies
Stamps:  JustRite® Papercraft SW-02008 Welcome Spring Clear Stamp Set
Paper:  Cardstock-Simply Smooth White, Pink Lemonade; Hampton Art Ki Doilies Paper Pad
Ink:  Memento Rich Cocoa, Rose Bud, Bamboo Leaves, Dandelion, Grape Jelly, Bahama Blue; Copic Markers RV10, Y11, G40, E23, E31, B000, BG000
Dies:  JustRite® Custom Dies SW-04950 Nested Cloud and Tag Dies
Accessories:  Lavender/Silver Ribbon, Iridescent White Metallic String, Pearls, Wink of Stella-Zig Wink of Stella Clear Glitter Brush Pen  , Scrapbook Adhesives by 3L® 3D Foam Squares, E-Z Runner® Permanent Strips-Refillable Dispensers 49'

LinkWithin

Related Posts Plugin for WordPress, Blogger...