Showing posts with label Nuvo. Show all posts

Saturday, February 17, 2018

Tonic Studios and Neat & Tangled Collaboration Blog Hop - You Make Life Sparkle Card

Hello everyone!  I'm sorry I have been mia for awhile.  I haven't been feeling the best for a few weeks so I took some time away.  Hopefully I will be able to do a post soon with a little bit of a life update.  So watch for that post coming soon.  But, for today I am so happy to be sharing a very colorful and sparkly card with you.  All this past week Tonic Studios and Neat & Tangled have been doing a collaboration blog hop.  Both teams have been creating fantastic projects so if you missed any of the days I encourage you to visit both of the blogs.  Also, be sure to leave comments on the company blogs for a change to win a fabulous prize. 

YouMakeLifeSparkleCardHeidiBlankenship560-022018-1

Here is the card I designed for the collaboration.  I have a full step-by-step tutorial with photos over on the Tonic Blog.  Love the beautiful rainbow of colors and all of the sparkles on this card.

YouMakeLifeSparkleCardHeidiBlankenship560-022018-10

Thanks so much for stopping by today and I hope you enjoyed my project share.  I had so much fun playing with all of the fantastic Neat & Tangle products along with the Tonic Studios products!

Hope you have a wonderful weekend!

Heidi 


Supplies
Stamps:  Neat & Tangled Dazzling Clear Stamp Set
Paper:  Strathmore Mixed Media Paper 400 SeriesHammermill Paper - Color Copy Digital Cover 100lb (Copic friendly)
Ink/Markers:  Tim Holtz Distress Oxide Inks - Picked Raspberry, Wilted Violet, Peacock Feathers, Twisted Citron, Ranger Jet Black Archival Ink, VersaMark InkNuvo Aqua Flow - Sping Meadows 893n - Lilac Blossom, Soft Rose, Fresh Green Nuvo Aqua Flow - Winter Skies 891n - Indigo Dawn, Azure Blue Nuvo Aqua Flow - Summer Holiday 892n - Red Apple, Aqua Splash Nuvo Aqua Flow - Autumn Woodland 890n - Evergreen Fern Nuvo Brush Script - Vivid Kaleidoscope 114n - 137 Tropical Aqua Nuvo Brush Script - Pretty Pastels 112n - 132 Ballet Pink, 133 Soft Sky Nuvo Brush Script - Bright Florals 111n - 128 Pale Lilac, 129 Deep Rose Nuvo Brush Script - Mandala Infusion 113n - 134 Sapphire Blue
Dies:  Mixed Edge Rectangle Layering Basic Die Set 1457e,  Neat & Tangled Dazzling - Nice and Neat Dies
Accessories:  Nuvo Glimmer Paste - Moonstone 953n Nuvo Glitter Embossing Powder - Gold Enchantment 596n  Nuvo Glitter Drops - White Blizzard 758n Nuvo Crystal Glaze 947n Neat & Tangled Nesting Hexagons - Simply StencilNuvo Light Mist Spray Bottle 849n V Blade Trimmer 159e Essentials Easy Clean Mat 14" x 14" 1514e Tangerine Die Cutting & Embossing Machine 138e, White Craft Foam, Scotch Foam Tape, Scor Tape, Heat Tool, Palette Kinfe    


Wednesday, November 22, 2017

Quick DIY Fall Jar Candle Holder - Tonic Studios

Hello everyone!  I have very quick DIY Fall home decor project to share with you.  This project is fast, inexpensive and would also make a great gift if you are going to someone else's house to celebrate Thanksgiving.  I also have a great tip to share with you over on the Tonic Studios Blog. :) 


If you would like to find out all of the details and see a step-by-step tutorial on how to create this Fall jar candle holder you can click HERE to visit the Tonic Studios Blog.

Thanks so much for stopping by today!

Happy Crafting!
Heidi

Supplies
Ball Mason Jar (or you could use a recycled jar) 
Ranger Cut-N-Dry Sponge 
Post-It Tape 
Post-It Notes (full adhesive) 
Twine 
Battery Operated Candle 


Tuesday, October 3, 2017

Happy Halloween Banner - Tonic Studios USA

Hello everyone!  I can't believe it's already October.  We've had kind of a strange start to the Fall weather with the warmer temps.  The start to the holidays will be here before we know it.  It seems like once school starts then the next thing it's Halloween and after that time just seems to fly by.  Today, I have a fun Halloween banner to share with you using some of the fantastic new Halloween dies from Tonic Studios.  I'm just sharing a few pictures here on my blog and if you would like to see the full tutorial you can click HERE to visit the Tonic Studios USA Blog.


Here is a look at the Happy Halloween banner.  Sorry the picture isn't very big.  It's hard to get a longer photo to fit in the space without cutting part of it off lol.  But if you click on the images you will be able to see larger ones with more detail.


I had so much fun creating this banner!  I used Tim Holtz Distress Oxide Inks for the background on all of the banner pieces.  Once the banner was all assembled then I added glitter drops, crystal drops, and glow drops for embellishments.  I added the ruby slippers glitter drops to all of the spiders.  Halloween paper spiders are the only spiders I like lol.


Here is a close up to see where I added the glow drops on the haunted house.


This is the first banner piece.  I am loving the Halloween dies!  The next few pictures are close ups of each banner piece.


I also added some of the glow drops to the moon.


To finish off the banner I added seam binding in between each of the banner pieces.  I can't wait to hang this banner up and decorate for Halloween.

Don't forget if you would like to see the full tutorial you can click HERE to visit the Tonic Studios USA Blog.  Are you creating any home decor pieces for Halloween or fun cards, treat bags?  Halloween is a favorite at our house so I think we will be getting all of the decorations out this weekend.  Thanks so much for stopping by today!

Hugs & Smiles,
Heidi


Supplies Used: 
Paper:  
Starthmore Mixed Media Paper 
Cardstock - Black, White
Dies:  
Grand Gala Beautiful Bunting Die Set 1796e 
Spooktacular Coffin Treat Box Die Set 1800e (spider, bat, skull) 
Huanted House Insert Die Set 1802e 
Witchy Bits Halloween Trio Die Set 1820e (hat) 
Happy Halloween Minature Moments Die Set 1861e 
Rococo Wicked Web 1822e 
Rococo Pumpkin Scene 1823e 
Rococo Creepy Cauldron 1821e 
Inks:  
Tim Holtz Distress Oxide Inks 
Twisted Citron 
Spiced Marmalade 
Wilted Violet 
Black Soot
NUVO:  
Nuvo Glimmer Paste - Black Diamond 952n 
Nuvo Crystal Drops Gloss - Ebony Black 650n 
Nuvo Glitter Drops - Ruby Slippers 752n 
Nuvo Glow Drops Neon - Banana Split 747n 
Nuvo Glue Pen Medium 203n 
Nuvo Light Mist Spray Bottle 849n 
Ribbons:  
Seam Binding 
Purple 
Orange
Yellow
Green 
Accessories/Tools:  
Essentials Easy Clean Mat 1514e 
Tim Holtz – 8″ Guillotine – 160e 
Tim Holtz – 5 inch/ 12.3cm Mini Snips – 816e 
Tangerine Die Cutting Machine with Plates 138e   
Mini Ink Blending Tools 
1" Foam Circles
Palette Knife 
Foam Tape 
Heat Tool 

Thursday, June 8, 2017

U-Paint Metal Crafts - Acanthus Leaf Scroll Cuff Bracelet with Tutorial

Hello everyone!  Today, I am excited to share my first U-Paint Metal Crafts® project with you.   If you are not familiar with UPMC I encourage you to visit their website.  They have over 300 U-Paint Metal Craft Kits to choose from.  The metal pieces are designed for all Designers, Artists, Makers, DIY Crafters/Hobbyists. The detail on the designs is amazing! The metal pieces can be used for mixed media, home decor, altered art, and even jewelry.  If you have been following my blog for any length of time you know I love to design jewelry.  So it shouldn't be any surprise that my first project is a jewelry piece--and I have to say I love how it turned out!  I also have a step-by-step tutorial to share with you.


Here is a look at the cuff bracelet I designed using a piece of the Acanthus Leaf Scroll Brass Deco - Trim U-Paint Metal Crafts®.  This leaf scroll design is so beautiful!
All supplies are listed and linked below.  :)


1)  To start, cut a piece of the Acanthus Leaf Scroll Brass Deco - Trim to the desired length.  The length will depend on the size of bracelet you would like to make.

2)  Using a metal file smooth the edges on each end of the metal trim piece.

3)  Then wash the metal piece with warm soap and water to remove any dust and oil.


4)  Using a Vintaj™ Filigree Shaping Pliers bend and shape the piece of metal trim to form the shape of the cuff bracelet. 


5)  Use Krylon© White Matte Spray Paint to paint all sides of the bracelet.  Be sure to paint the edges too.  The backside of the bracelet will feel a little rough at first but with a couple coats of paint it smooths out.


6)  Using a sponge apply Tonic Studios© NUVO® Embellishment Mousse, 822N Pacific Teal and 807N Aquamarine.  If you haven't used the embellishment mousse before it is very easy to work with. It is smooth and creamy--kind of like whipped butter.  For the best coverage pounce the sponge onto the bracelet instead of trying to wipe it on.

7)  Set aside to dry or use a heat tool to speed up the drying time.  If you use a heat tool please be careful as the metal will become very hot.  So allow the piece some time to cool.


8)  Next, use a piece of Steel Wool Grade #0000 to sand and buff back the paint until some of the metal is revealed.  When working with steel wool you might want to wear a mask.  When sanding the steel wool creates a lot of tiny fibers.  


9)  To add the glitter apply a small amount of Beacon Adhesives©, Gem-Tac™ using a Mini Applicator Disposable Adhesive Brush.  If you don't have one of these applicators you can use a small paint brush.  Just be sure to wash the brush right away so the adhesive doesn't dry.  Then sprinkle on some Tonic Studios© NUVO® Pure Sheen Glitter, 720N Champagne.  Whenever I used glitter I use a coffee filter to catch the excess and then it can easily be funneled back into the container.

10)  Set aside to dry.  If you end up with too much glitter in a certain area wait for the adhesive to dry and then gently rub off the excess glitter with your fingers.


11)  Use a toothpick to apply the Beacon Adhesives©, Dazzle Tac Jewelry Glue™ and then add the ButterBeeScraps, SS16 Aquamarine Flat Back Crystals.  Set aside to dry.


12)  For the final step, mix a small amount of ICE Resin®.  Mix ICE Resin® according to the instructions. Then use a brush to apply a thin layer of resin. Be sure not to add resin on top of the crystals, but you can apply it around the edges to secure the crystals even more.  Set aside on a ICE Resin® Studio Sheet to harden and cure.  Approximately 6-8 hours.


If you like to create jewelry this is a really great project and it would make a wonderful gift--for yourself or a friend.  The leafy scroll design is so beautiful!


This aqua blue color is very on trend right now.  I love all of the sparkle from the glitter and crystals.


I hope you enjoyed the step-by-step tutorial.  Don't forget to check out all of the fabulous metal pieces and kits in the U-Paint Metal Crafts® online store.  If you are an Amazon shopper some of the metal kits are also available there.  
Thanks so much for stopping by today!

Hugs & Smiles,
Heidi

Are you interested in the products I used?  I have all of the supplies listed and linked below.  Compensated affiliate links are used when possible.  Products with an asterisk (*) were provided by a store or the manufacturer.
U-Paint Meatal Crafts = UPMC
ButterBeeScraps = BBS
Amazon = AZ
The Stamp Simply Ribbon Store = TSSRS
Tonic Studios = TS
Simon Says Stamp = SSS

Etsy = ET

Supplies
UPMC:  
*Acanthus Leaf Scroll Brass Deco - Trim U-Paint Metal Crafts® (UPMC), (AZ)
Tonic Studios©:  
*Tonic Studios© NUVO® Embellishment Mousse, 822N Pacific Teal (AZ)
*Tonic Studios© NUVO® Embellishment Mousse 807N Aquamarine (AZ)
*Tonic Studios© NUVO® Pure Sheen Glitter, 720N Champagne (AZ)
Adhesive:  
*Beacon Adhesives©, Gem-Tac™ (AZ)
*Beacon Adhesives©, Dazzle Tac Jewelry Glue™ (AZ)
Resin: 
*ICE Resin® (IR), (AZ)
*ICE Resin® Mixing Cup & Stir Stick (IR), (AZ)
*ICE Resin® Brushes (IR), (AZ)
*ICE Resin® Studio Sheets (IR), (AZ)
Accessories: 
*ButterBeeScraps, SS16 Aquamarine Flat Back Crystals (BBS)
Paint:  
Krylon© White Matte Spray Paint (AZ)
Tools:  
Metal Snips (AZ)
Vintaj™ Filigree Shaping Pliers (AZ)
Metal Jewelry File (AZ)
Sponge (AZ)
Steel Wool Grade #0000 (AZ)
Coffee Filter (AZ)
Mini Applicator Disposable Adhesive Brush (AZ), (SSS)
Heat Tool (AZ)
Disposable Face Mask (AZ)
Toothpicks (AZ)


Monday, March 13, 2017

Lucky St. Patrick Day Banner - Tonic Studios USA

Hello everyone!  Today, I have a fun St. Patrick's Day project over on the Blog Tonic USA. 


Here is the LUCKY St. Patrick's Day banner that I made.  Banners are a great project that can be made for any holiday.


Here is a close up of one of the banner pieces.  If you would like to see more pictures and fine out all of the details on how I put this banner together you can click HERE to visit the Blog Tonic USA.

Thanks so much for stopping by today!

Hugs & Smiles,
Heidi


Esstentials Mini Blender Brush Set 1558E
Other supplies used:
White Cardstock
White Crepe Paper
DCWV Green Glitter Paper
Ranger - Tim Holtz Distress Ink Cracked Pistachio
Brads
Pallette Knife
May Arts Green Ribbon
May Arts White Lace
3M Foam Tape
Hot Glue
Ranger Craft Mat

Wednesday, March 1, 2017

Gilded Trinket Box - Tonic Studios USA


Hello blogging friends!  Today, I have a post up on the Tonic Studio USA Blog sharing how I designed this gilded trinket box.  This is one of those projects that just makes me happy.  I have seen several mixed media and modern art canvas done with this same technique and I wanted to give it a try on a smaller level.  Now that I have tried this and I am very happy with the results I see some canvases in my future. :)

If you would like to find out more about this technique please visit the Tonic Studios USA Blog.  
I share the step-by-step instructions and also more photos.

Thanks so much for stopping by today!

Hugs & Smiles,
Heidi


Supplies used
 Nuvo Embellishment Mousse - Aquamarine 807N
Nuvo Embellishment Mousse - Indian Gold 802N
Nuvo Pure Sheen Glitter - Aqua 714N
Nuvo Pure Sheen Glitter - Turquoise 712N
Nuvo Gilding Flakes - Radiant Gold 850N
Nuvo Glitter Drops - Blue Lagoon 753N
Craft Tacky Glue 120 ml. 419E
Martha Stewart Mother of Pearl Acrylic Paint
ButterBeeScraps - Metal Feet, Small Filigrees
B'Sue Boutiques - Large Metal Filigree
Ranger Multi Medium Matte (to glue metal)
Large Round Crystal Bead
Wood Box
Silicone Spatula
Paint Brush
Scoochy Sponge (rough or textured sponge)

Monday, January 2, 2017

Tonic Studios - Sneak Peek - Let It Snow 7 x 14 Mixed Media Canvas


Hello everyone!  Here is a little sneak peek of a Let It Snow 7 x 14 mixed media canvas that I designed for Tonic Studios.  I used dies, embellishment mousse, stencils, glimmer paste New script brush pens, crystal drops and glitter to create this fun and whimsical winter canvas,

I hope you will hop on over to the Tonic Studios USA Blog and check out the tutorial.  I have a full step-by-step tutorial with instructions and photos.  You can click HERE to see the blog post.  I hope you enjoy the project and I would love to hear your thoughts.

Thanks so much for stopping by today!

I hope the New Year is off to a great start for all of you!!

Hugs & Smiles,
Heidi

Tuesday, May 24, 2016

Tonic Studios - Dreams, Wishes & Fairy Kisses Card and Tutorial

Hello blogging friends!  Today, I have a pretty Springtime and glittery fairy card to share with you.  I am loving all the pretty little fairies in the Fairy Reflections Die and Stamp Collection.  As an added bonus there is also a coordinating paper pack.


Here is a look at the card I designed using the fairy 1306E Aurora Reflections Stamp and 1206E Aurora Reflections Die Set.  I also used 483E Scalloped Circles Layering Die Set524E Pinhole Circle Die Set,112 0E Filigree Flourish Die Set, and 1055E Fairy Wishes Illustrated Paper Pack.


To start I stamped the 1306E Aurora Reflections Stamp using VersaMark ink on to Strathmore mixed media paper.  Then I added 600N Embossing Powder - Classic Gold and used my heat to to melt and heat set the powders.  I used Zig Clean Color Real Brush Pens to watercolor the image.  The colors are listed below in the supplies.


Next I die cut the fairy shape using the silhouette die from the 1206E Aurora Reflections Die Set.  No fussy cutting!  The die cuts that fairy shape perfectly.


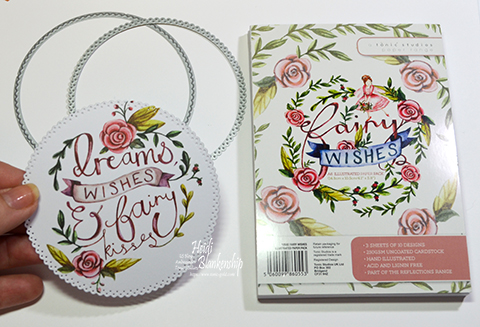
I used one of the sentiments from the 1055E Fairy Wishes Illustrated Paper Pack.  To die cut and add some details to the dies cut shape I used the 483E Scalloped Circles Layering Die Set and 524E Pinhole Circle Die Set.  When using these dies you will want to die cut the scalloped circle first and then you can match up the pinhole circle die to add the detail.  For all of the die cutting I used the  147E Tangerine Machine and Bag Set and I also used the 160E Tim Holtz - 8" Comfort Guillotine/Trimmer to cut all of my paper pieces.


I used the NUVO 203N Glue Pen Medium and 705N US Pure Sheen Diamond Glitter to add some sparkle to the fairy and the flowers in the die cut sentiment.


For some finishing touches on the fairy and sentiment die cuts I added some 651N Crystal Drops Gloss - White to look like some white pearls.


I also used the 112 0E Filigree Flourish Die Set to cut a couple of floral flourished to add on the bottom and right side of the card.  I used the same Strathmore mixed media paper and  Zig Clean Color Real Brush Pens to color the die cuts.  I used a sheet of pattern paper from the Simple Stories Color Vibe 6 x 6 Paper Pad and added that to a pink cardstock base.  I also added some green May Arts ribbon and sequins from Cartwright Sequins & Beads.


I love all the sparkle from the glitter and sequins.


Thanks so much for joining me today and I hope you enjoyed the card tutorial.

Hugs & Smiles,
Heidi


Supplies
Tonic Studios USA
Stamps:  1306E Aurora Reflections Stamp
Dies:  1206E Aurora Reflections Die Set, 483E Scalloped Circles Layering Die Set, 524E Pinhole Circle Die Set,112 0E Filigree Flourish Die Set
NUVO:  600N Embossing Powder - Classic Gold, 651N Crystal Drops Gloss - White, 705N US Pure Sheen Diamond Glitter
Paper Range:  1055E Fairy Wishes Illustrated Paper Pack
Adhesive:  NUVO 203N Glue Pen Medium, 419E Craft Tacky 120ml
Tools:  147E Tangerine Machine and Bag Set160E Tim Holtz - 8" Comfort Guillotine/Trimmer819 - 107E Time Holtz Titanium Shear
Other Supplies
Paper:  Strathmore Mixed Media Paper, Simple Stories Color Vibe 6 x 6 Paper Pad, Cardstock - Pink
Ink/Markers:  Versa Mark Ink, Zig Clean Color Real Brush Pens - Flesh Color, Mustard, Pale Pink, Light Pink, Light Carmine, Wine Red, Geranium Red, Orange, Yellow, Light Green, Olive Green, Oatmeal, Middle Brown, Haze Blue (All colors in set of 60 markers except Haze Blue)
Ribbon:  May Arts Ribbon Sampler - Spring Green
Accessories:  Foam Squares, Cartwright Sequins & Beads - 4mm Medium Pink, 3mm Gold Flower, 3mm Moonshine

Tuesday, April 12, 2016

Toby's Flower Window Sill Card - Tonic Studios

Hello everyone!  Today, I have a card to share with you using some of the dies from the New Pampered Pets collection from Tonic Studios.  I also used one of the Entwining Trellis dies and crepe paper so create some pretty flowers to cascade around the window sill.


Here is the card I designed.  To start I used white and kraft cardstock along with 1197E Toby's Sill Die Set and 1198E Harvey's Ledge Die Set (flowers) to die cut the window sill, curtains, vase of flowers and the kitty cat.  I used 419E Craft Tacky Glue 120 ml to adhere the white decorative part of the window sill and the kraft piece together.  Then I added Foam Squares to the window sill pieces to add some dimension.  I also added vintage lace behind the die cut curtains.


Here is a picture to show you how I lined up the dies on the paper.  I put each of the smaller dies in the corners and used a piece of painters tape to hold the dies in place.  By doing this it will create equal space for the die cut lines in the window sill.  Then I used the Tangerine Die Cutting Machine to die cut the images.


To finish off the window sill I die cut the curtain a second time.  In this picture you can see the equal space for the lines in the window sill as I mentioned earlier.


Here is a close up of the curtains where I added the vintage lace.  For the background rectangle die cut piece I used some paper from Graphic 45 Mon Amour 6 x 6 Paper Pad.


I used Copic markers to color the kitty cat and the flowers in the vase.  I added some adhesive from the 204 NUVO Glue Pen Large to the vase and let it sit for a couple of minutes.  Then I applied 850N Gilding Flakes - Radiant Gold to the vase.  I used 419E Craft Tacky Glue 120 ml to adhere the vase and kitty cat inside the window sill.


For the foliage I used the 1187E Rococo Love Cats Die along with green cardstock to create the leaves.  I die cut the image a couple of times and then just sniped off the leaves I needed to create the cascade along the side of the window.  To create the flowers I used pink crepe paper and 769E Entwining Trellis Plush Peony Die Set.  To lightly color the tips of the flowers I used a makeup brush and Distress Ink Picked Raspberry.  Then I squeezed out some of the 758N US Glitter Drops - White Blizzard and used the makeup brush to lightly apply the glitter drops to the flowers for a bit of sparkle.  I also scattered a few white 4mm flat back pearls in with the cascade of flowers.


I adhered all of the die cut pieces to a light blue A2 top folding card base.

Thanks so much for stopping by!
I hope you have a beautiful and creative day!


Tonic Studios Supplies
Dies:  1197E Toby's Sill Die Set, 1198E Harvey's Ledge Die Set (flowers), 1187E Rococo Love Cats Dies (leaves), 769E Entwining Trellis Plush Peony Die Set
Accessories:  NUVO - 850N Gilding Flakes - Radiant Gold, 758N US Glitter Drops - White Blizzard
Adhesive:  NUVO - 204 NUVO Glue Pen Large, 419E Craft Tacky Glue 120 ml
Tools:  Tangerine Die Cutting Machine, 604E  153 US Super Trimmer, 550E 114E US Kushgrip Decoupage Scissors,

Other Supplies Used
Paper:  Graphic 45 Mon Amour 6 x 6 Paper Pad, Cardstock - White, Kraft, Green, Blue, Crepe Paper - Light Pink
Inks/Markers:  Distress Ink Picked Raspberry, Copic Markers - R83, R85, G21, G24, E15, G29
Ribbon/Trims:  Vintage Ivory Lace
Accessories:  White 4mm Flat Back Pearls, Brushes, Foam Squares

LinkWithin

Related Posts Plugin for WordPress, Blogger...