Monday, November 28, 2016

Pink Rose & Crystal Cross Necklace and Earrings - Guest DT for ButterBeeScraps

Hello everyone!  Today, I am very excited to tell you that I am a Guest Designer for ButterBeeScaps.  I love using all of the beautiful metal filigrees, rhinestones, and jewelry findings to create jewelry.  So when Monique, owner of ButterBeeScraps, asked me if I would like to guest design I was happy to say yes! :) 

But before I get to my project I wanted to let you know there is a 
fantastic sale going on over at ButterBeeScraps and it ends Monday night at 11:59 pm PST.  
Black Friday Weekend SALE!!!  
Enter coupon code BF2016 for 
30% off store wide
(excluding items already on sale)
While you are there check out all of the New Arrivals, Beautiful Filigrees, Jewelry Findings and a Gorgeous Graphic 45 Mini Kit Album.  Stock up on your crafty stash or perfect presents for your crafty friends.


Here is a look at the goodies I received.  I have been having so much fun creating with these beautiful pieces and I have several ideas already sketched out for future projects.


This is the pink rose and crystal cross necklace and earring set I created.  To start I added glossy accents to the floral image and then placed a Small Round GLASS Cabochons (#CAB018) on top and moved it around until I had it centered on the image.  Then, I set the piece aside to dry for a few minutes.  Once the piece was dry I turned it over to the back side and fussy cut the excess of the image from the cabochon.  Next, I added glossy accents to the back of the glass cabochon and placed it inside of the Small Bronze Round Cabochon Settings (#F018D-B).  


I used E6000 to adhere the cabochon setting to the Bronze Decorative Cross Pendants (#J397-B).  This is such a pretty cross and it has a lot of detail.  To finish off the cross I added some SS16 Light Rose Flat Back Glass Rhinestones.  I added a couple of jump rings to the cross and then I added some chain and beaded spacers.


Here is a close up of the beaded spacers.  I used powder pink crystal beads and darker pink beads along with the Clear Rhinestone and Bronze Rondelle Spacer Beads – 6mm (#BD006-B/CL).  I thought the beaded spacers were pretty and would dress up the chain.


To create the earrings I used some of the Bronze Ball End Head PinsClear Rhinestone and Bronze Rondelle Spacer Beads – 6mm (#BD006-B/CL), and the same beads that were used for the necklace.  I also used the Bronze Ball End Head Pins along with the 1-Step Ear Wire Maker Tool to make the ear wires.  


I hope you enjoyed today's jewelry projects.  If you like to make jewelry this would be a quick and easy jewelry project to make for a Christmas gift or any other occasion.  

Don't forget to check out the 30% OFF Sale at ButterBeeScraps!  Also, check out the ButterBeeScraps Blog for more inspiration from the design team.

Thank you so much for stopping by and stay warm!

Hugs & Smiles,
Heidi


Are you interested in the products I used?  I have all of the supplies listed and linked below.
Compensated affiliate links are used when possible.  Products with an asterisk (*) were provided by a store or the manufacturer.

ButterBeeScraps = BBS
Amazon = AZ
The Stamp Simply Ribbon Store = TSSRS
Tonic Studios = TS
Simon Says Stamp = SSS
Amazon = AZ
Etsy = ET

Butterbeescraps Supplies = BBS
*Bronze Decorative Cross Pendants (#J397-B)
*Small Bronze Round Cabochon Settings (#F018D-B)
*Small Round GLASS Cabochons (#CAB018)
*SS16 Light Rose Flat Back Glass Rhinestones
*Clear Rhinestone and Bronze Rondelle Spacer Beads – 6mm (#BD006-B/CL)
*Bronze Ball End Head Pins

Other Supplies
ArtCult Floral Image (ET)
E6000 (AZ)
Ranger Glossy Accents (AZ), (TSSRS), (SSS)
Powder Pink Crystal Beads 
Pink Beads 
Bronze Chain (AZ)
Antique Brass Jump Rings (AZ)
Antique Brass Lobster Clasp (AZ)
*Beadalon Flush Cutter (AZ)
*Beadalon Round Nose Pliers (AZ)
*Beadalon Bent Chain Nose Pliers (AZ)
1-Step Ear Wire Maker (AZ)
Camera used for photography Nikon D5100 (AZ)

Friday, November 25, 2016

The Stamp Simply Ribbon Store - Silver Snowflakes & Happy Holidays CAS Card

Hello everyone!  I hope you all had a very Happy Thanksgiving.  We had a very nice and relaxing day with family.  Lots of yummy food and some leftovers too.  Today, is my day to post for The Stamp Simply Ribbon Store but before I get to my card I want to share a Special with you.

~~~Current Special~~~

We are welcoming the holidays with FREE RIBBON for you!
Each order over $25 (product value) placed during the remainder of November will receive 10% BACK in FREE RIBBON. We’ll match the ribbon to items in your order (paper, stamp styles, etc). It’s as easy as that. A fun way to treat yourself to a little surprise!


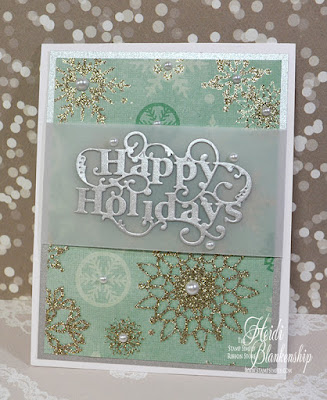
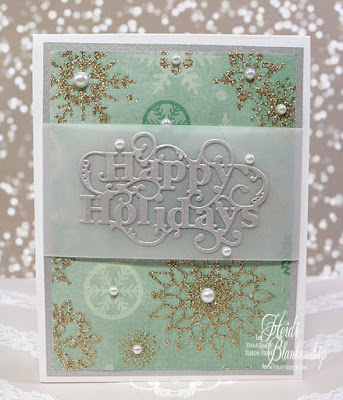
Here is the card that I desgined, it is very CAS (Clean And Simple) but I love how it turned out and I love the colors too.  I cut a piece of the My Mind's Eye Sugar Plum pattern paper to fit the card front and then I cut a piece of the Luxury Pearlescent Metallic Silver Cardstock to layer behind the pattern paper.  The metallic silver looks so pretty with the silver glitter snowflakes on the pattern paper.


I wrapped a piece of Vellum around the card front pieces and tape it in place on the back side.  Then I used the Spellbinders Die D-Lites - Happy Holidays Sentiment and the Luxury Pearlescent Metallic Silver Cardstock to die cut the sentiment.  I used Ranger Glossy Accents to adhere the sentiment.


Here is a close up of the sentiment.  To finiah off the card I added a few Melissa Frances White Pearls to the center of the snowflakes and around the sentiment.


I used Scrapbook Adhesives by 3L E-Z Runner to adhere the card front panel to the white A2 top folding card base and the card was done.  Easy peasy!  This card would be great to make for Christmas cards because it comes together so quick and easy.

Thank you so much for stopping by today!  Please be sure to check out The Stamp Simply Ribbon Store for all of your paper crafting goodies and also the Stamp Simply Blog for more inspiration from the design team.  Don't forget about the ribbon special too!

If you are venturing out for the Black Friday shopping and sales I wish you luck and I hope you find some great deal!  Happy Holidays and Merry Christmas!!

Hugs & Smiles,
Heidi


Supplies
Paper:  My Mind's Eye Sugar Plum, Luxury Pearlescent Metallic Silver Cardstock, Vellum, Cardstock - White
Dies: Spellbinders Die D-Lites - Happy Holidays Sentiment
Accessories:  Melissa Frances White Pearls, Scrapbook Adhesives by 3L E-Z Runner, Ranger Glossy Accents

Friday, November 18, 2016

The Stamp Simply Ribbon Store - Peace Watercolor Christmas Card with Distress Inks

Hello everyone!  Today, is my day to post for The Stamp Simply Ribbon Store and I have a beautiful Christmas watercolor card to share with you.


I used the Penny Black - Adornment 3996J wreath stamp on my card.  I know this stamp is a little bit older but I absolutley love it.  I think it is one of my all time favorite wood mounted stamps.  The wreath looks beautiful for the holidays but it is also a stamp that can be used year round and for all different occassions.


To start I stamped the wreath image with VersaMark Ink onto Ranger Watercolor Paper and then I heat embossed it using Ranger Super Fine Embossing Powder - White.


To do the watercolor on the paper I used two colors of Tim Holtz - Distress Inks - Cracked Pistachio and Evergreen Bough.  I love the combination of these two ink colors!  When I do watercolor I have two containers of water and two brushed.  I used one of the containers of water and the #24 paint brush to add clean water to my paper and I used the second container with a #16 paint brush to do the watercolor and rinse off my brush.  I started by adding water to the entier piece of paper.  Then I started adding color with the Cracked Pistachio since it is the lighter color and then I added in the Evergreen Bough.  I kept going back dropping in color and adding water until I liked the look of the watercolor.  Then I set the paper aside to dry.


Here is a close up of the wreath when the paper was still a little wet.


Once the paper was dry then I added little drops of  Ranger - Glossy Accents and sprinkled Tim Holtz - Distress Glitter Clear Rock Candy on top of the glossy accents.


I just love the white embossing and the soft watercolor with just a bit of sprakle.


The sentiment is from the Stamp Simply Clear Stamps - Christmas Blessings SS-012 stamp set.  I used Delicata - Silvery Shimmer ink to stamp the word peace and then I added Ranger Super Fine Embossing Powder - Clear and used my heat tool to melt and heat set the embossing powders.


I added some Therm-O-Web Foam Squares to the watercolor panel and then I added a piece of Luxury Pearlescent Metallic Silver behind the watercolor piece.  I added the May Arts 1.5" Sheer w/Glitter Dots - White/Silver  ribbon and tied it in the front.  This ribbon is another favorite.  It comes in several different colors and it is so sparkly and pretty.  I added the card front to an A2 top folding white card base.  The watercolor on this card is very easy--nothing technical--just dropping in colors so this would be a great card to mass produce for Christmas cards.  I know I will be making a few more like this one.

I hope you enjoyed today's card share!  Please be sure to check out The Stamp Simply Ribbon Store for all of your paper crafting goodies.  Also hop on over to the Stamp Simply Blog to check out more inspriation from the design team.

We have had some beautiful and very unseasonal weather here in Minnesota but I know any day now we will wake up to the white stuff lol.  But in the mean time we will enjoy the days.  Thanks so much for stopping by today and I hope you have a wonderful weekend!

Hugs & Smiles,
Heidi


Supplies
Stamps:  Stamp Simply Clear Stamps - Christmas Blessings SS-012, Penny Black - Adornment 3996J
Paper:  Ranger Watercolor Paper, Luxury Pearlescent Metallic Silver, Cardstock - White
Ink:  VersaMark Ink, Tim Holtz - Distress Inks - Cracked Pistachio, Evergreen Bough, Delicata - Silvery Shimmer
Ribbon:  May Arts 1.5" Sheer w/Glitter Dots - White/Silver 
Accessories:  Ranger Super Fine Embossing Powder - White, Ranger Super Fine Embossing Powder - Clear. Tim Holtz - Distress Glitter Clear Rock Candy, Ranger - Glossy Accents, Therm-O-Web Foam Squares, Scrapbook Adhesives by 3L E-Z Runners, Paint Brushes #16, #24, Heat Tool

Friday, November 11, 2016

The Stamp Simply Ribbon Store - Ivory and Gold CAS Merry Christmas Card

Hello everyone!  Today, is my day to post for The Stamp Simply Ribbon Store and I have a CAS (Clean And Simple) Christmas card to share with you.


Here is the card I designed.  This is a card that would be great to mass prodouce for your Christmas cards.  I didn't time myself but I am pretty sure it was less than 10 minutes start to finsih for this card.  I used pattern paper from the Carta Bella Merry Christmas Gold Foil 12x12 collection.  If you love tradition Christmas colors with the elegance of gold foil this collection is for you and it includes ivory, red and green papers.  I layered a piece of Bazzill - Gold Mirror paper behind the pattern paper.  Next, I cut a strip of Vellum and stamped the sentiment from the Stamp Simply Clear Stamps - SS-013 Jesus stamp set using Versamark ink.  Then I added Ranger - Super Fine Detail Gold Embossing Powder and used my heat tool to melt and heat set the embossing powders.


I wrapped the Vellum around the two paper layers and adhered it to the back.  Then I added May Arts Gold Metallic String Ribbon and tied a simple bow on the front.  I used Scrapbook Adhesives by 3L E-Z Runner to adhere the card pannel to the card base.  I used ivory cardstock for the 5.5 x 5.5 square top folding card base.


To finish off the card I added some 5 mm Crystal Cup Sequins.  I used Ranger - Glossy Accents to adhere the sequins.  

I hope you enjoyed this CAS Christmas card.  Please be sure to stop by The Stamp Simply Ribbon Store for all of your paper crafting goodies and check out the Stamp Simply Blog for more inspiration from the design team.

Thanks so much for stopping by today!

I hope you have a fantastic Friday!

Hugs & Smiles,
Heidi


Supplies
Stamps:  Stamp Simply Clear Stamps - SS-013 Jesus
Paper:   Carta Bella Merry Christmas Gold Foil 12x12, Bazzill - Gold Mirror, Vellum, Cardstock - Ivory
Ink:  Versamark
Ribbon:  May Arts Gold Metallic String Ribbon
Accessories:  Ranger - Super Fine Detail Gold Embossing Powder, 5 mm Crystal Cup Sequins, Ranger - Glossy Accents, Scrapbook Adhesives by 3L E-Z Runner, Heat Tool

Friday, November 4, 2016

The Stamp Simply Ribbon Store - Graphic 45 St. Nicholas Christmas Card

Hello everyone!  Today, is my day to post for The Stamp Simply Ribbon Store and I have a Christmas card to share with you using one of the New Christmas stamps sets from the Stamp Simply Clear Stamps collection and beautiful Graphic 45 papers.


Here is the card I designed using papers from the  Graphic 45 St. Nicholas 8 x 8 Paper Pad.  I know I have said it many times before but I just love the beautiful images from Graphic 45 and how quickly it is to create cards.  I love this image of Santa with all of the toys!  After I had this image picked out then I picked some red cardstock and another pattern paper to layer with the image.  Then I started creating the background for the card base.  I wanted something to fill in the ivory card base but I wanted it to be subtle and not take away from the image of Santa.  I stamped the ivory card base with the holly leaf and berries from the Stamp Simply Clear Stamps - Christmas Blessings SS-012 using  Tim Holtz Distress Ink Vintage Photo.  Then I lightly inked the edges of the paper with the same ink. Next, I applied Ranger - Glossy Accents and Tim Holtz Distress Glitter Rock Candy on the holly leaves and berries and then set the card base aside to dry.


Here is a close up of the holly leaves and berries.  In a few spots you can see the glitter.  I was having a hard time getting it to show up in the photos but in real life it is very sparkly.  I also added some glitter to the image of Santa around his hat and cuffs and also to the candycane and a couple of toys.  I added some May Arts 3/8" Metallic Velvet in red around each corner.  This ribbon is gorgeous!


In the bottom left corner I added a  Petaloo - Botanica Collection Sugar Red Berry Clusters and Botanica Collection Red Minis flower.  The berries already had glitter on them so I added a little glitter to the flower.


This image reminds me of the book Twas the Night Before Christmas.  I had the giant golden book and it was filled with beautiful pictures.  My mom would read it to me during the Christmas holiday.  Actually come to think of it I still have that book--I still have Twas the Night Before Christmas, Peter Pan, and The Angel Baby--they are all giant books.  Cherished memories...


After the Glitter Rock Candy and Glossy Accents were dry then I assembled the card using Scrapbook Adhesives by 3L E-Z Runner.  The finished card is a top folding 5-1/2 x 5-1/2 square card.

Please be sure to check out The Stamp Simply Ribbon Store for all of your paper crafting goodies and also the Stamp Simply blog for more inspiration from the design team.

Thank you so much for stopping by today and I hope you have a wonderful weekend!

Hugs & Smiles,
Heidi


Supplies
Stamps:  Stamp Simply Clear Stamps - Christmas Blessings SS-012
Paper:  Graphic 45 St. Nicholas 8 x 8 Paper Pad, Cardstock - Ivory, Red
Ink:  Tim Holtz Distress Ink Vintage Photo
Ribbon:  May Arts 3/8" Metallic Velvet
Accessories:  Tim Holtz Distress Glitter Rock Candy, Ranger - Glossy Accents, Petaloo - Botanica Collection Sugar Red Berry Clusters, Botanica Collection Red Minis, Scrapbook Adhesives by 3L E-Z Runner

LinkWithin

Related Posts Plugin for WordPress, Blogger...