Showing posts with label Stamp Simply Steel Dies. Show all posts

Friday, May 25, 2018

The Stamp Simply Ribbon Store - Spring Summer 2018 Coffee Lovers Blog Hop

Hello and good morning to everyone!  Today, I have a card to share with you that I designed for The Stamp Simply Ribbon Store.  But I am also participating in the Spring Summer 2018 Coffee Lovers Blog Hop so my card goes along with the summertime theme for the hop.  


Anyone can participate in the Spring Summer 2018 Coffee Lovers Blog Hop and there are loads of wonderful prizes too!  You can click HERE to find out all of the details and join in the fun.


Flowers always make me think of summertime.  Here is the card I designed for the Coffee Lovers Blog Hop.  I used some of the beautiful pattern papers from the Graphic 45 Fairie Dust 8 x 8 Paper Pad.  To die cut the coffee cup I used the Stamp Simply Steel Dies - Coffee or Tea? SS-DIE011 and a piece of the pretty floral pattern paper and also Bazzill Gold Mirror Cardstock.  I wanted the cup to have some gold accents.  I die cut both the cup and the handle with the gold mirror cardstock.  Then I cut the cup die cut in half and offset it with the floral die cut cup so the top and bottom edges would be accented with gold.


Here you can see a close up of the coffee cup.  I added Foam Tape to the backside of the cup for some added dimension.  I added some  Petaloo Botanica Collection Baby Blooms Purple and Minis Coral for embellishments.


For the sentiment I die cut the word coffee from black card stock three times and then layered the die cuts.  Using VersaMark Ink I stamped the sentiment from Stamp Simply Clear Stamps - Coffee or Tea? SS-023 on to a piece of black card stock and then heat embossed it using Ranger Super Fine White Embossing Powder and my heat tool.  I fussy cut the fishtail end and added some foam tape to pop the sentiment up.  I also added another flower by the sentiment.


I knew I wanted to use the beautiful pattern paper with the violets for the background.  But I wanted to soften it a bit so the coffee cup would still stand out and not get lost in the background paper so I added a piece of Vellum as a top layer.  I love how you can still see the pattern paper but it really softened the look.  I used a white A2 top folding card base for this card.


Sharon, is having a sale over at The Stamp Simply Ribbon Store on ALL items in the Coffee/Tea section so if you're looking for some new goodies I encourage you to check it out.  If you would like to see more card inspiration be sure to visit The Stamp Simply Blog.  Thanks so much for stopping by today!

I hope you all have a wonderful and safe Memorial Day and holiday weekend!

Love, hugs, and blessings,
Heidi


Supplies
Stamps:  Stamp Simply Clear Stamps - Coffee or Tea? SS-023
Paper:  Graphic 45 Fairie Dust 8 x 8 Paper Pad, Vellum, Bazzill Gold Mirror Cardstock, Cardstock - White, Black
Ink:  VersaMark Ink
Dies:  Stamp Simply Steel Dies - Coffee or Tea? SS-DIE011
Accessories:  Ranger Super Fine White Embossing Powder, Ranger Glossy Accents, Petaloo Botanica Collection - Baby Blooms Purple, Minis Coral, Scrapbook Adhesive by 3L EZ Runner, Foam Tape

Friday, January 26, 2018

The Stamp Simply Ribbon Store - Farmhouse Signage Collection - Choose Joy Card

Good morning and happy Friday!  Today, I have a card to share with you using a couple of the NEW releases from The Stamp Simply Ribbon Store Farmhouse Signage Collection.  I love the decorating style and all of the home decor with the Farmhouse style so I was really excited to see this collection.  This style always seems so fresh and clean to me with a very slight vintage feel at times. 


Here is the card I designed using the  Stamp Simply Clear Stamps - Farmhouse Simple Sentiments SS-024 and Farmhouse Signage SS-027.  The sentiments are fantastic in the new sets and I love the font.  I used a few different sheets of pattern paper from the  Kaisercraft - Sea Breeze collection.


I used a piece of the paper that has the look of white washed boards to stamp the sentiment on.  To make sure I had perfect placement I used the Tim Holtz Stamp Platform to stamp the sentiment.  I used Espresso Truffle ink.


I used the largest heart die from the Farmhouse Pierced Nested Hearts SS-DIE013 die set to cut the heart shape. Then I stamped the little leafy twigs using  Altenew Sea Shore (4 pack) - Lagoon ink.  To finish off the heart I inked the outer edges with Tim Holtz Distress Oxide Ink - Vintage Photo.  To get the nice smooth blend I used one of the  Mini Ink Blending Tools and the Craft Mat .


Here is a look at how I laid out the pattern papers for the card front.  I also added some fig beige seam binding around the middle of the card.


Here is a close up of the heart and sentiment.  I also used a piece of the pattern paper and one of the dies from the Farmhouse Signage SS-DIE012 set to die cut the arrow and added it above the sentiment.  I added a few  Melissa Frances White Pearls for embellishments.


Here is a close up of the bow and I added one of the Petaloo Botanica Collection Teal Minis to the center of the bow.


Here is another look at the finished card.  I used a white A2 top folding card base.

Thanks so much for stopping by today!  I hope you enjoyed the card share.  All of the supplies to create the card are listed and linked below and can be found at The Stamp Simply Ribbon Store.  If you would like to see more card inspiration using the New releases I encourage you to check out the Stamp Simply Blog.

I hope you have a wonderful weekend!
Heidi


Supplies
Stamps:  Stamp Simply Clear Stamps - Farmhouse Simple Sentiments SS-024, Farmhouse Signage SS-027
Paper:  Kaisercraft - Sea Breeze, Cardstock - White
Ink:  Altenew Sea Shore (4 pack) - Lagoon, Tim Holtz Distress Oxide Ink - Vintage Photo, Memento - Espresso Truffle
Dies:  Stamp Simply Steel Dies - Farmhouse Signage SS-DIE012, Farmhouse Pierced Nested Hearts SS-DIE013
Ribbon:  Seam Binding Fig Beige 
Accessories:  Tim Holtz Stamp Platform, Petaloo Botanica Collection Teal Minis, Melissa Frances White Pearls, Scrapbook Adhesives by 3L - Form Tape, EZ Runner, Ranger - Glossy Accents, Mini Ink Blending Tools, Craft Mat 

Friday, December 15, 2017

The Stamp Simply Ribbon Store - Poinsettia Tea Cup Card

Hello everyone and happy Friday!  Today, I have a card to share with you using the NEW Stamp Simply Clear Stamp - Coffee or Tea? SS-023.  You might have seen a sneak peek of this card on the Stamp Simply Blog when Sharon announced the new releases.


Here is the card I designed.  This card could be used for Christmas or just as a thinking of you card through the winter months.  The stamp set is filled with several sentiments and verses.  The die set is a really fun one because it allows you to be able to build you cup.  There are two different sizes of the cups with matching handles, two little steam swirls, the words coffee and tea, and a tiny tag.  Some of the sentiments in the stamp set fit perfectly with the tiny tag.


To create the cup I die cut the cup two times.  Once using Wild Rose Studios - Birds & Berries and for the second one I used Gold Mirror Cardstock.  I also die cut the handle with the gold mirror cardstock.


I have a beautiful tea cup collection that was my Great Grandma's.  Several of the cups are edged in gold and I wanted to create the same look for my cup.  I cut the top and bottom of the gold die cut piece and then offset them and adhered them to the back of the pattern paper.


Here is a look at the cup once it was assembled.  I just love the gold accents and it reminds me of my Great Grandma's tea cup collection.


I die cut three of the little steam swirls from Vellum.  I adhered two to the back of the cup and then added the third swirl at the top.  I used glossy accents to adhere the steam swirls.  Since almost all adhesives show through vellum I added some Wink of Stella Clear Glitter Brush Pen on top of the swirls and then added White Pearls to each of them to help cover up where the adhesive was showing.


Here is a close up of the cup.  I also added some of the Wink of Stella Clear Glitter Brush Pen to the flowers on the pattern paper.  I added more white pearls along the top of the cup.  I die cut one of the tiny tags using white cardstock and then stamped the sentiment using Tuxedo Black Ink.  I used a piece of May Arts Gold Metallic String to attach the tag to the handle on the cup.


The card is a white A2 top folding card base.  I used a couple more pieces of the pattern paper from the same collection to layer in the background.  Then I used Foam Tape to attach the cup to the front of the card.

Thanks so much for stopping by today and I hope you enjoyed the card share.  If you would like to see more card inspiration I encourage you to check out the Stamp Simply Blog.  All of the supplies to create the card are listed and linked below and can be found at The Stamp Simply Ribbon Store.

I hope you have a wonderful weekend and Happy Holidays!

Heidi


Supplies
Stamps:  Stamp Simply Clear Stamp - Coffee or Tea? SS-023
Paper:  Wild Rose Studios - Birds & Berries, Gold Mirror Cardstock, Vellum, Cardstock - White
Ink:  Tuxedo Black Ink
Dies:  Stamp Simply Steel Dies - Coffee or Tea? SS-DIE011
Ribbon:  May Arts Gold Metallic String
Accessories:  Melissa Frances White Pearls, Wink of Stella Clear Glitter Brush Pen, Scrapbook Adhesives by 3L EZ Runner, Foam Tape

Friday, November 3, 2017

The Stamp Simply Ribbon Store - Peace On Earth Christmas Card with Ink Smooshing.

Hello everyone and happy Friday!  Today, I have a beautiful Christmas card to share with you using one of the stamp sets and die sets from The Stamp Simply Ribbon Store.


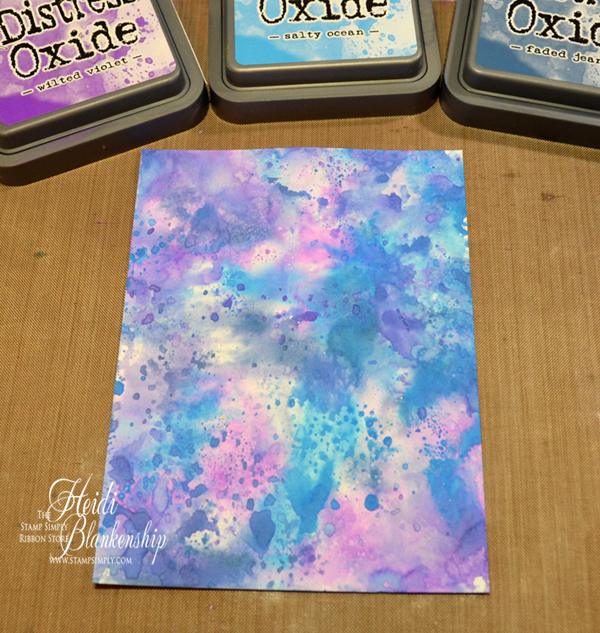
Here is a look at the card I designed.  Don't you just love the soft colors in the background?  I had some fun playing with the Tim Holtz Distress Oxide Inks.  But you might be surprised to know I did the ink smooshing technique and achieved such light colors.  Actually I didn't lol.  The secret is to use a vellum overlay.


Here is a look at the paper with the smooshing technique.  The vellum makes such a huge difference.  I used im Holtz Distress Oxide Inks - Wilted VioletSalty Ocean, and Faded Jeans.  


I stamped the sentiment on to the Vellum and the star on to a piece of white cardstock using VersaMark Ink and then heat embossing with Ranger Super Fine Detail Embossing Powder.  I used the Stamp Simply Steel Dies - Merry Christmas Star SS-DIE008 to die cut the star.


Here is a close up of the star.  I added some imply Stories Record It Enamel Dots for embellishments and added Foam Tape to pop up the star.  I applied adhesive to the backside of the vellum where the star and enamel dots are to hold the vellum in place on the card front.


Here is a close of the sentiment and the background.


To finish off the card I trimmed down the watercolor and vellum and added foam tape to the back and then added the card front to a white A2 top folding card base.  This card came together pretty quick and easy and would be a great one to make multiples of if you don't mind your fingers getting a little inky.

Thank you so much for stopping by today!  If you would like to see more card inspiration I encourage you to check out the Stamp Simply Blog.  All supplies used for the card are listed and linked below and can be found at The Stamp Simply Ribbon Store.

Happy Crafting!
Heidi


Supplies
Stamps:  Stamp Simply Clear Stamps - Merry Christmas SS-011
Paper:  Ranger Watercolor Paper, Vellum, Cardstock - White
Ink:  VersaMark Ink, Tim Holtz Distress Oxide Inks - Wilted Violet, Salty Ocean, Faded Jeans
Dies:  Stamp Simply Steel Dies - Merry Christmas Star SS-DIE008
Accessories:  Ranger Super Fine Detail Embossing Powder, Simply Stories Record It Enamel Dots, Scrapbook Adhesives By 3L Foam Tape, E-Z Runner, Craft Mat, Heat Tool

Friday, September 15, 2017

The Stamp Simply Ribbon Store - 2017 FALL Coffee Lovers Blog Hop

Hello everyone and happy Friday!  Today, is my day to post for The Stamp Simply Ribbon Store and I am also participating in the 2017 FALL Coffee Lovers Blog Hop.

If you would like to play along create a card with coffee, tea &/or cocoa images and then visit the Coffee Lovers blog and link your card.  It's always fun to see all of the cards and you will have a chance to win some fabulous prizes!  The Stamp Simply Ribbon Store is one of the Super Sponsors with a $25 GC!

When: Friday, September 15 - Friday, September 22
Time: 6 am pacific
THEME: FALL
USE: coffee, tea &/or cocoa images
#fall2017clh

You can click HERE to find out all of the details about the 
2017 FALL Coffee Lovers Blog Hop. 


Here is a look at the card I designed for the 2017 FALL Coffee Lovers Blog Hop.  You are also getting a sneak peek of the NEW  Stamp Simply Clear Stamps - Welcome Fall SS-020 and  Stamp Simply Steel Dies - Welcome Fall Pumpkin SS-DIE009.  I also used a couple of the coffee cup images and part of a sentiment from the Altenew - Coffee Love stamp set.  I love being able to stretch my stamps or use multiple stamps to create something new and that is what I did for the sentiment on this card. 


Using the Tim Holtz Stamp Platform makes it so easy to use multiple stamps and create your own unique images or sentiments.  To do this you can use a post-it note or even just a piece of paper.  Cover up the part of the stamp that you don't want to ink.  Then, ink up the other part of the stamp, remove the inky paper piece and stamp as usual.


You can see here I only inked up the part of the sentiment that says I love you more than with Memento Tuxedo Black.  This is a great sentiment because you can add so many different this after the word than to create unique and personalized sentiments.


Next I lined up the stamp from Welcome Fall SS-020.  I repeated the same process by covering part of the stamp, adding the ink, remove the paper and stamp.  On my card I used Altenew Warm and Cozy (Orange Cream) for the pumpkin spice part of the sentiment but in the photo I used black ink so it would show up better.  I repeated the same process for the word spice.


Here you can see a close up of the finished sentiment.  I inked the edges of the paper using a Ranger Mini Ink Blending Tool and Tim Holtz Distress Oxide Ink Vintage Photo.  I added My Mind's Eye Follow Your Heart Enamel Dots for embellishments and to pull in some of the aqua blue color from the pattern papers.


Here is a close up of the images.  I used Copic markers for all of the coloring.  I fussy cut the coffee cups and added some Foam Tape to the back.  I used the coordinating die for the pumpkin and I added two layers of foam tape to the pumpkin.


All of the pattern paper is from the  Bo Bunny Dreams of Autumn collection.  I used a white A2 top folding card base.  I hope you enjoyed today's card share!

Don't forget to check out The Stamp Simply Blog and 2017 FALL Coffee Lovers Blog Hop.  All of the supplies used to create my card can be found at The Stamp Simply Ribbon Store.

Thanks so much for joining me today and I hope you have a wonderful weekend!

Hugs & Smiles,
Heidi


Supplies
Stamps:  Stamp Simply Clear Stamps - Welcome Fall SS-020, Altenew - Coffee Love
Paper:  Bo Bunny Dreams of Autumn, Cardstock - White
Ink/Markers:  Memento Tuxedo Black, Altenew Warm and Cozy (Orange Cream), Tim Holtz Distress Oxide Ink Vintage Photo, Copic Markers Y38, YR04, YR14, Y15, YG25, G24, E55, E57
Dies:  Stamp Simply Steel Dies - Welcome Fall Pumpkin SS-DIE009
Accessories:  My Mind's Eye Follow Your Heart Enamel Dots, Scrapbook Adhesives by 3L E-Z Runner, Foam Tape, Tim Holtz Stamp Platform, Ranger Mini Ink Blending Tool

Friday, August 18, 2017

The Stamp Simply Ribbon Store - Autumn Distress Oxide Ink Smooshing Card with Tutorial

Hello blogging friends!  I know on the calendar it's still summer but I have to tell you it's looking a lot like Autumn here in Minnesota--at least in my driveway lol.  The oak trees have let loose with the acorns!  Basically it's stand outside at your own risk lol.  My grandpa has always said if the acorns fall early we are in for an early and long winter.  I hope not but I guess we'll see.  Regardless of the calendar it's never too early to work on cards and craft projects for the next season.  Today, I have a pretty Autumn card and tutorial to share with you.


I finally had a chance to play with some of the new Tim Holtz Distress Oxide Inks.  I have to say I love them just as much as the first set--maybe even a little more lol.  The colors are so pretty in the second set.  For my card I used the Stamp Simply Clear Stamps Harvest SS-010 and Stamp Simply Steel Dies - Harvest SS-DIE006 from The Stamp Simply Ribbon Store.


For the background I did the ink smooshing technique.  To start, apply Tim Holtz Distress Oxide Inks - Twisted CitronWild HoneyAbandoned Coral on to the Craft Mat.  Then, mist water on the inks using the Distress Sprayer Bottle.


Next, take a piece of  Ranger Watercolor paper and smoosh it down onto the ink.  I usually hold one of the corners and then press the paper down with my other hand.  Lift up the paper and then use a heat tool to dry the paper and heat set the inks.  This is what my paper looked like after smooshing it in the ink one time.


Repeat the process until you achieve the desired look.  Be sure to use your heat tool to dry and heat set the paper after each time of smooshing it into the ink.  I repeated the process probably about seven or eight times.  If you want you can also add more ink and mist again with water.


Next, I used the EK Success Powder tool on the background so I wouldn't have excess embossing powder sticking to the paper.  Then, I stamped the leaves using VersaMark Ink and heat embossed using Ranger Super Fine Detail Gold Embossing Powder.  The background is so pretty and I didn't want to waste it so I stamped the leaves in the center of the paper so when I do the die cutting I can still use the paper.


Here are the leaves after I die cut them using the Stamp Simply Steel Dies - Harvest SS-DIE006.  Don't forget to keep the background piece.  It will be great for layering.


I applied the background piece to the card front and then I will cover it with a piece of kraft paper leaving a pretty border.


For the May Arts - Brown Burlap String I wrapped it around my fingers five times and then cut another piece and tied a knot to hold everything in place.


To assemble all of the leaves, string and flower I used hot glue.   First I put the burlap string in place.  Then I added the flower and finished with the leaves.  The flower is from the Petaloo Burlap Wild Sunflowers.  I used brown cardstock for the A2 card base.  To finish off the card I added a few Simple Stories We are Family Enamel Dots.


Thank you so much for stopping by today!  All of the supplies used for today's card can be found at The Stamp Simply Ribbon Store.  If you would like to see more card inspiration check out the Stamp Simply Blog.

I hope you enjoyed today's card and tutorial.  Hope you have a wonderful weekend!

Hugs & Smiles,
Heidi


Supplies
Stamps:  Stamp Simply Clear Stamps - Harvest SS-010
Paper:  Ranger Watercolor, Cardstock - Brown, Kraft
Ink:  VersaMark Ink, Tim Holtz Distress Oxide Inks - Twisted Citron, Wild Honey, Abandoned Coral
Dies:  Stamp Simply Steel Dies - Harvest SS-DIE006
Ribbon:  May Arts - Brown Burlap String
Accessories:  Ranger Craft Mat, Distress Sprayer Bottle, Super Fine Detail Gold Embossing Powder. Simple Stories We are Family Enamel Dots, Petaloo Burlap Wild Sunflowers, EK Success Powder Tool, Scrapbook Adhesives by 3L E-Z Runner, Hot Glue, Heat Tool

Friday, August 4, 2017

The Stamp Simply Ribbon Store - Watercolor Coneflower Card

Hello everyone and happy Friday!  Did you follow along last week with the New Releases from The Stamp Simply Ribbon Store?  The release included two beautiful stamp sets for Fall and  coordinating die set.  In addition to those there are New Die Releases that coordinate with all of the stamp releases that have images to color.


For my card I used the Stamp Simply Clear Stamps - Thank You for Caring Coneflower SS-019.  I stamped the flower image on to Ranger - Watercolor paper using VersaMark Ink.  Then, I sprinkled on Ranger Super Fine White Embossing Powder and used a heat tool to melt and heat set the powder.  


All of the watercolor was done using the Tim Holtz Distress Ink.  For the center of the flower I used Fossilized Amber and for the petals  Hickory Smoke.  Whenever you want to have white flowers you will need to do the shading in gray colors.  I know it might sound strange but the gray actually makes the flower appear white and really makes it pop.  For the stem and leaves I used Twisted CitronMowed Lawn, and Peeled Paint.  The background was done using Faded Jeans and Stormy Sky.  Then I used the heat tool to speed up the drying time on the paper.  To finish the background I used Black Soot and added paint splatters.  Then I dried the paper one more time and added water droplets.  I trimmed the watercolor paper down and added a black mat.  I used Foam Tape behind the watercolor piece to add some dimension.  The background paper is from the Wild Rose Studio - Dancing Daisies.  I added May Arts 5/8" Solid Plaid Olive Ribbon and My Mind's Eye Record It Charmed Enamel Dots.  


To finish off the card I added the card front to a black A2 top folding card.  This is a really quick and easy watercolor card with no special techniques so it would be a great card to make multiples of.

I hope you enjoyed today's card share.  If you missed seeing the New Release last week I encourage you to visit the Stamp Simply Blog for lots of inspiration.  If you are looking for any paper crafting goodies be sure to check out The Stamp Simply Ribbon Store.

Thanks so much for stopping by today and I hope you have a wonderful weekend.  

Hugs & Smiles,
Heidi


Supplies
Stamps:  Stamp Simply Clear Stamps - Thank You for Caring Coneflower SS-019
Paper:  Wild Rose Studio - Dancing Daisies, Ranger - Watercolor, Cardstock - Black
Ink:  VersaMark Ink, Tim Holtz Distress Ink -Fossilized Amber, Hickory Smoke, Twisted Citron, Mowed Lawn, Peeled Paint, Faded Jeans, Stormy Sky, Black Soot
Ribbon: May Arts 5/8" Solid Plaid Olive Ribbon
Accessories:  Ranger Super Fine White Embossing Powder, My Mind's Eye Record It Charmed Enamel Dots, Waterbrush, Scrapbook Adhesives by 3L Foam Tape, E-Z Runner, Heat Tool

LinkWithin

Related Posts Plugin for WordPress, Blogger...