Showing posts with label ImagineCrafts/Tsukineko. Show all posts

Monday, February 29, 2016

JustRite Papercraft - Chrysanthemums Just Because Card with Tutorial

Hello everyone!  You all know I am a huge fan of watercolor cards and I have recently shared a few new ones with you.  I don't have a watercolor card to share with you today--BUT I have a card using Copic markers and the end result looks kind of like a watercolor card.  :)  Before I get started I have to say the inspiration for this card came from Jennifer McGuire.  Recently Jennifer shared a video where she did a technique called Negative Space Coloring.  In her video she talks about coloring the negative space instead of the stamped image and it gives your card or project a totally different look.  I just absolutely loved the look of the negative space coloring so I had to give it a try. But you all how much I love the look of watercolor cards so I added an extra step.  :)


Here is a look at the finished card.  I love this color combination of the light to medium pink and a coral pink.


To start I die cut a piece of  Hammermill Color Copy Dogital Cover paper using the largest die in the DIE-05033 JustRite Three In A Row set.  Then I used Tuxedo Black ink to stamp the floral images from the CR-05028 Chrysanthemums Clear Stamps.  In the video (I will leave a link below) Jennifer uses the MISTI tool for her stamping.  I have the MISTI tool but I was only stamping one time for each flower and using Memento Tuxedo Black ink.  I started coloring the negative space (background) with the lightest Copic marker RV00 and I colored the entire piece.  Then I came in with the medium Copic color RV13 and colored the middle and then I blended it back out using the RV00 marker.  For the last and darkest color I used R22 on the bottom and then I blended the colored back out with RV13 and RV00.  


Like I said I love the look of watercolor and I just can't help myself lol.  So I used some of the 0-Colorless Blender to try and achieve the look of a watercolor with the water droplets.  First I put some of the colorless blender on my craft mat and then I used and old makeup brush to dab on some of the colorless blender.  Then I also added some to the paint brush to create larger droplets.  I just love how this piece turned out!


Next I wanted to add a touch of sparkle so I added the Zig Wink of Stella Clear Glitter Brush Pen to the flowers.


To finish off the flowers I added Ranger Glossy Accents.


To finish off the card I added the watercolor piece to a black and pink cardstock mat.  Then I added those pieces to the white card front.  I stamped the sentiment in the bottom corner and added a thin strip of black paper.  Then I mounted everything to a pink card base.

To see Jennifer McGuire's video on Negative Space Coloring you can click HERE and you can click HERE to visit her blog.

This is a really quick, easy, and fun technique and I hope you will give it a try!

Thanks so much for stopping by today!

Hugs & Smiles,
Heidi


Supplies
Stamps:  JustRite Papercraft CR-05028 Chrysanthemums Clear Stamps
Paper:  Hammermill Color Copy Dogital Cover (White), CS - Pink, Black
Ink/Markers:  Memento Tuxedo Black Ink, Copic Markers - RV00, RV13, R22, 0 Colorless Blender. Zig Wink of Stella Clear Glitter Brush Pen
Dies:  DIE-05033 JustRite Three In A Row Dies
Accessories:  Paint Brush and Makeup Blush Brush (To Apply 0 Colorless Blender), Ranger Glossy Accents, Black Craft Foam, Scor-Tape

Friday, May 15, 2015

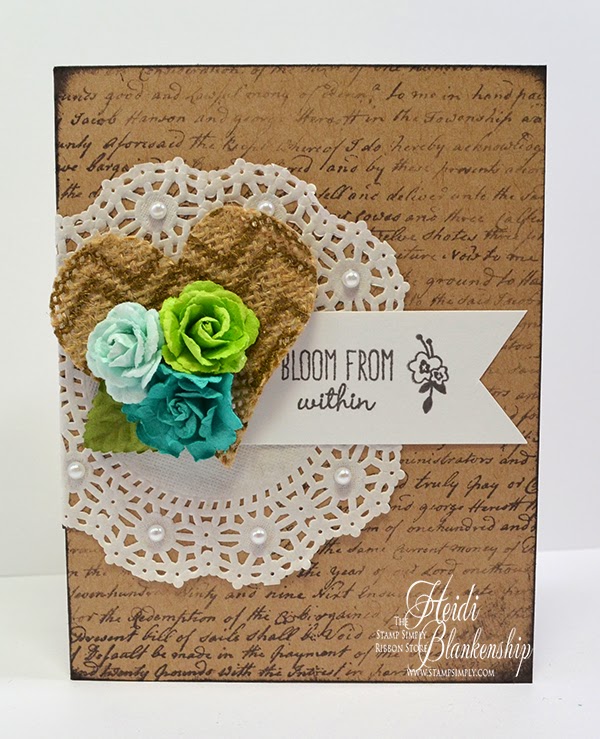
The Stamp Simply Ribbon Store - Bloom From Within Card

Hello everyone! Today, is my day to post for The Stamp Simply Ribbon Store and I have a fun little card with a few layers of embellishments to share with you.


This card is very quick and easy to make.  For the background I used CL-02157 Script Background Cling Stamp from JustRite Papercraft.  I inked up the stamp with Memento Espresso Truffle and then I blotted off some of the ink ink random spots so it would be more faded and give the background and aged look.  Then I inked the edges of the card base.


To create the cluster and layers of fun embellishments I started with the Wilton Paper Doilies - 4" White Lace on the bottom.  Then I cut a banner shape from white paper and stamped the sentiment and flower.  I used the CR-02184 Choose Joy Clear Stamps from JustRite Papercraft.  Then I used some May Arts 3" Printed Burlap - Gold Chevron and the SCD-025 Spellbinders Celebrations Die - Pierced Hearts to die cut the heart.  Here is a little tip--I added packaging tape to the back of the ribbon and then burnished.  Doing this will give a backing to the ribbon and it will be easier to die cut and also it will keep the burlap from fraying apart.  I used 3D Foam Squares on the back of the heart to pop it up a little and add some dimension.  Then I added some Prima Laraine - Blue Lagoon flowers.  To finish off the card I added a few Melissa Frances Pearls - White.


Thank you so much for stopping by!

Please be sure to check out The Stamp Simply Ribbon Store for all of the fantastic paper crafting products and the Blog for inspiration from the Design Team.

Happy Friday and I hope you have a wonderful weekend!

Hugs & Smiles,
Heidi


Supplies
Stamps:  JustRite Papercraft CR-02184 Choose Joy Clear StampsCL-02157 Script Background Cling Stamp
Paper:  Kraft, White
Ink:  Memento Espresso Truffle
Dies:  SCD-025 Spellbinders Celebrations Die - Pierced Hearts
Ribbon:  May Arts 3" Printed Burlap - Gold Chevron
Accessories: Melissa Frances Pearls - White, Prima Laraine - Blue LagoonWilton Paper Doilies - 4" White Lace, Scrapbook Adhesives by 3L 3D Foam Squares, E-Z Runner Permanent Strips-Refillable Dispenser 49'

Tuesday, May 12, 2015

Tutorial Tuesday for JustRite Papercraft - Multi Step Stamping with the MISTI Stamping Tool

Hello everyone!  It's time for Tutorial Tuesday with  JustRite Papercraft and today I will be sharing with you how to use the MISTI Stamping Tool with Multi-Step Stamping.


This is the MISTI Stamping Tool and it is a great to for perfect placement when stamping with 
Multi-Step stamps.  You can also use the MISTI with all clear and cling stamps.  There is a piece of black foam inside the MISTI tool that you use when stamping with clear stamps.


If you want to stamp using cling stamps simply remove the black foam.


These are the two cards that I designed using the MISTI Stamping ToolCR-02187 Multi-Step Lilac Bouquet and CL-02182 A2 Garden View Cling Background Stamp.  The beautiful stamps are from the May 2015 stamp release from  JustRite Papercraft.  I also used CR-02141 Sentimental Damask Vintage Labels Eight Clear Stamps and CR-02152 Best Wishes Clear Stamps for the sentiments.

I have a step-by-step picture tutorial to share with you over on the JustRite Inspiration Blog and you can click HERE to visit the blog.  I also have a video tutorial on YouTube on the JustRite Papercraft YouTube channel and you can click HERE to see the video.  
If you like the video don't forget to give it a thumbs up! :)

Don't forget to leave a comment on the JustRite Inspiration Blog and the Video for a chance to WIN a $25.00 Gift Certificate from JustRite Papercraft.

Thanks so much for joining me today!

Hugs & Smiles,
Heidi


Supplies
Stamps:  JustRite Papercraft CR-02187 Multi-Step Lilac Bouquet, CL-02182 A2 Garden View Cling Background StampCR-02141 Sentimental Damask Vintage Labels Eight Clear StampsCR-02152 Best Wishes Clear Stamps
Paper:  White Cardstock
Ink:  Memento-LuLu Lavender, Grape Jelly, Angel Pink, Rose Bud, Bamboo Leaves, Olive Grove, Summer Sky, Teal Zeal, Dandelion, Tuxedo Black
Tools:  MISTI Stamping Tool
Accessories:  Ranger Glossy Accents, Glitter, Sequins, White Fun Foam, Scrapbook Adhesives by 3L E-Z Runner Permanent Strips-Refillable Dispenser 49'

Tuesday, May 5, 2015

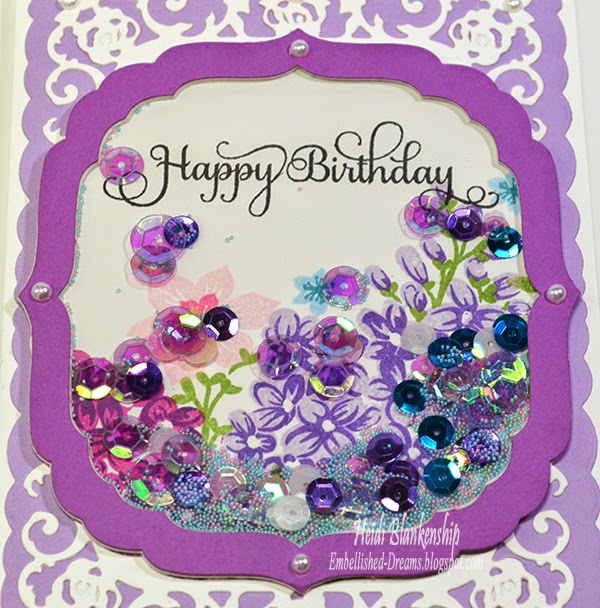
Lilac Bouquet Happy Birthday Shaker Card - JustRite Papercraft New May Release

Hello everyone!  Today, is the first day of the May New Release from JustRite Papercraft.  The Design Team has been busy creating some beautiful projects to share with you!


Here is the card that I designed using the new CR-02181 Multi-Step Lilac Bouquet Clear Stamps from JustRite Papercraft.  If you love multi-step stamping then you are going to love this beautiful lilac stamp set!  Lilacs are one of my favorite flowers so I know this is going to be a stamp set that I will use over and over again.


I used the CR-02181 Multi-Step Lilac Bouquet Clear Stamps to create the pretty background for my shaker card.  For the sentiment I used a Happy Birthday stamp from the CR-03815 Large Fancy Sentiments Clear Stamps from  JustRite Papercraft.


I haven't made a shaker card in years but they are back on trend and hotter than ever so I thought this would be a fun and pretty stamp set to create a shaker card with.  I used the S4-489 Labels Forty Seven die template from Spellbinders to create the frame for the shaker.  I started with a piece of white fun foam and I covered the front and back with Ken Oliver Crafts Stick It Adhesive Sheets and then I used the label dies to die cut the frame shape out of the fun foam.  I also applied the adhesive sheets to the purple cardstock and die cut a frame using the same dies.  Lastly I die cut the label shape from a piece of acetate for the window of the shaker.


Once all the die cuts were made for the shaker part of the card all I had to do was assemble the pieces.  I placed the acetate on top of the fun foam and then the purple frame on top of the acetate.  Then I turned the piece over and filled it with some Cartwright's Sequins and Martha Stewart Micro Beads-Blue Topaz, Kunzite (pink).  To finish it off I added the stamped die cut to the back.  Making shaker cards with die cuts is easy peasy.  :)


To finish off the card I used the two largest die templates in the S5-230 Romantic Rose set and made a couple of die cuts for the background of the card.  I also added a few white pearls.

Please be sure to visit each of the Design Team Members in the link list to see their beautiful projects.


Thanks so much for stopping by today!
I hope you have a beautiful day!

Hugs & Smiles,
Heidi

Supplies
Stamps:  JustRite Papercraft CR-02181 Multi-Step Lilac Bouquet Clear Stamps, CR-03815 Large Fancy Sentiments Clear Stamps
Paper:  White, Lavender, Purple
Ink:  Imagine Crafts/Tsukineko Memento LuLu Lavender, Grape Jelly, Lilac Posies, Angel Pink, Rose Bud, Summer Sky, Teal Zeal, Bamboo Leaves, Olive Grove, Tuxedo Black
Dies: Spellbinders S4-489 Labels Forty Seven, S5-230 Romantic Rose
Accessories:  Ken Oliver Crafts Stick It Adhesive Sheets, Fun Foam, Acetate, Cartwright's Sequins, Martha Stewart Micro Beads-Blue Topaz, Kunzite (pink), White Flat Back Pearls, Ranger Multi Medium Matte

Monday, April 27, 2015

Welcome Baby Boy - JustRite Papercraft & ButterBeeScraps

Hello everyone!  Today, I have a baby card to share with you.  It seems like it has been awhile since I have had to make a baby card.  My husband's work supervisor and his wife just recently just welcomed a sweet baby boy into their family.


Here is the baby boy card that I designed.  I just love this stork image!  I used the CR-04815 Special Delivery Clear Stamps from JustRite Papercraft.  I stamped the image and sentiment on to white cardstock using Memento Rich Cocoa ink from Imagine Crafts/Tsukineko.  Then I colored the image using Spectrum Noir Markers.  After I had all of the coloring done then I die cut the image and a mat using Spellbinders SCD-012 Pierced Rectangles.  The base of the card is white with blue and white layers for mats.  I also used CL-02077 Shooting Stars Cling Stitched Background Stamp and Memento Sky Blue ink to stamp the background and then I inked the edges of the paper too.  I used Bronze Filigree Connector 004-B from  ButterBeeScraps to accent the corners around the focal image.  I added a few white pearls to cover the holes in the connectors.


Here is a close up of the Bronze Filigree Connector 004-B.


I wrapped some twine around the card and tied it into a bow.  I added a charm from the Be Inspired Charm Collection and a Silver Rattle Charm.  I attached the charms using Bronze Jump Rings.  All of the metal filigree and charms are from ButterBeeScraps.


Here is another close up of the stork.  I used 3D Foam Squares from Scrapbook Adhesives by 3L in between the paper layers for some dimension.

A Huge Congrats to Mommy, Daddy and Baby!!

On another note I will be posting an update about my recent Joann.com haul tomorrow (Tuesday).  I know a lot of you were wanting to know what kind of response I received.

Thanks so much for stopping by today!

Hugs & Smiles,
Heidi


Supplies
Stamps:  JustRite Papercraft CR-04815 Special Delivery Clear StampsCL-02077 Shooting Stars Cling Stitched Background Stamp
Paper:  White, Swiss Dot Blue
Ink:  Imagine Crafts/Tsukineko Memento Rich Cocoa, Memento Sky Blue; Spectrum Noir Markers
Dies:  Spellbinders SCD-012 Pierced Rectangles
Accessories:  ButterBeeScrapsBe Inspired Charm Collection, Bronze Jump Rings, Silver Rattle Charm, Bronze Filigree Connector 004-B, Twine, White Pearls, Scrapbook Adhesives by 3L 3D Foam Squares, E-Z Runner Permanent Strips-Refillable Dispenser 49'

Monday, April 20, 2015

The Stamp Simply Ribbon Store - Butterfly Birthday

Hello everyone! Today, is my day to post for The Stamp Simply Ribbon Store and I have a CAS (Clean And Simple) card with lots of sparkle to share with you.


I stamped a border of butterflies down one side of the card.  I used the butterflies in each of these stamp sets--CL-02034 Butterflies Cling Stamps, CL-02136 Morning Glory Cling Stamps, CL-02137 Thank You Daffodil.  To stamp the butterflies I used three colors of ink,  Memento Nautical Blue, LuLu Lavender, New Sprout.  I stamped each butterfly one time with a different color of ink and then I inked the butterfly stamp a second time but I stamped on a piece of scratch paper to pull off some of the ink and then stamped on to the card base.  Doing this gives the appearance of a lighter shade of ink.  If you don't have many colors of ink this is a fun little trick to stretch your ink.


I applied the Zig Wink of Stella Clear Glitter Brush Pen to the butterflies to add some shimmer and sparkle.


For the Happy Birthday sentiment I used CR-02152 Best Wishes clear stamps from JustRite Papercrafts.  I used VersaMark Ink and Ranger Super Fine Detail Gold Embossing Powder and then used a heat tool to emboss the sentiment.  I added a strip of Bazzill Gold Mirror Cardstock along the side and then I also added a few Webster's Pages Party Time Sequins.  The card base is lavender.

Thank you so much for stopping by!

Please be sure to check out The Stamp Simply Ribbon Store for all of the fantastic paper crafting products and the Blog for inspiration from the Design Team.

Hugs & Smiles,
Heidi


Supplies
Stamps:  JustRite Papercrafts CL-02034 Butterflies Cling Stamps, CL-02136 Morning Glory Cling Stamps, CL-02137 Thank You Daffodil, CR-02152 Best Wishes
Paper:  Bazzill Gold Mirror Cardstock, Cardstock-White, Lavender
Ink:  VersaMark Ink, Memento Nautical Blue, LuLu Lavender, New Sprout
Accessories:  Zig Wink of Stella Clear Glitter Brush Pen, Ranger Super Fine Detail Gold Embossing Powder, Glossy Accents, Webster's Pages Party Time Sequins, Scrapbook Adhesives by 3L E-Z Runner Permanent Strips-Refillable Dispenser 49'

Tuesday, April 14, 2015

JustRite Papercraft - Tutorial Tuesday - Color Burst Tutorial Series 1

Hello everyone!  This is my week to post for  JustRite Papercraft  with a new Tutorial Tuesday.  For this week's tutorial I will be sharing with you the fun new Color Burst by Ken Oliver Crafts.  


You will be happy to hear that  JustRite Papercraft is now carrying Color Burst and Stick It Adhesive Sheets by  Ken Oliver Crafts!  I know so many people who are excited to try the new products!


I have both a video tutorial and a tutorial with step out pictures and instructions on the JustRite Inspiration Blog.  Over the next few weeks I will be doing a tutorial series using Color Burst and sharing with you all kinds of fun techniques, tricks and tips to create some beautiful projects.  In the first tutorial I will be sharing how to hand dye seam binding, create color mist spray, and quick and easy watercolor backgrounds.  You can click HERE to see the video and you can click HERE to check out the blog post.  There is also a Giveaway for a $20.00 Gift Certificate to the JustRite Papercraft Store--so be sure to check it out!

I hope you enjoy the tutorial with Color Burst!
Thanks so much for stopping by today!

Hugs & Smiles,
Heidi


Supplies
Stamps:  JustRite Papercraft CR-02172 Grand Handwritten Sentiments Clear StampsCR-02166 Stacking Sentiments Clear Stamps
Paper:  Strathmore Watercolor Paper, White Cardstock
Inks/Paints:  Ken Oliver Crafts Color Burst-Ultramarine Blue, Alizarin Crimson, Lemon Yellow, Orange, Pthalo Green; Memento Tuxedo Black, VersaMark, Ranger Distress Ink-Mowed Lawn
Dies:  Spellbinders S2-139 Sentiments 3SCD-012 Pierced Rectangles Dies
Ribbon:  Hug Snug Seam Binding Winter White (Hand Dyed)
Accessories:  ButterBeeScraps-Butterfly Filigree 769-B, Gold Rub-N-Buff, Ranger Gold Embossing Powder, Cartwright's Sequins-Saffron 5, 8, 10mm, Pink Potion 8mm, Tea Rose 5mm, Mermaid Green 5, 8, 10mm, Mixed Colors Iris 5, 6mm, Acrylic Flower, Acrylic Leaf, Stick It Adhesive Sheets, Water Bottle, Mini Mister

Tuesday, March 31, 2015

JustRite Papercraft April New Release - Day One - Hello Card

Hello everyone!  Today, is the first day of the  JustRite Papercraft April New Release and we are getting a little jump start on it going a day early.  :)


Here is the card I designed using the New CR-02172 Grand Handwritten Sentiments Clear Stamps, and CL-02169 Burlap Cheveron Background Cling Stamp.  The sentiment stamp set has a fun handwritten look to it with lots of great sentiments and the background stamp gives a great textured look to the chevrons.  For this card I embossed the CL-02169 Burlap Cheveron Background Cling Stamp using VersaMark Ink and white embossing powder.  Then I did a very simple watercolor wash using Spectrum Aqua Markers-Aquamarine, Teal, Kingfisher, Peacock Blue, Marine, Navy.  I started with the lightest color and worked my way to the darkest giving this a beautiful ombre look. 


I heat embossed the sentiment and then added watercolor to the background.  I used 484e MIXED RECTANGLE LAYERING DIE SET from  Tonic Studios to create the die cuts.  I added some 3D Foam Squares in between the layers from some dimension.  Then I added blue sequins, Wild Orchid Craft Pearl Stars, and ButterBeeScraps SS16 Aquamarine Flat Back Rhinestones.  


To finish off the card I added the background to a white mat and then to a aqua card base.


Just as a friendly reminder today (3/31/15) is the last day to get some great savings on Spellbinders die templates.


You can click HERE to see all of the Spellbinders dies.


Thanks so much for stopping by today and I hope you enjoyed day one of the April New Release!

Hugs & Smiles,
Heidi


Supplies
Stamps:  JustRite Papercraft CR-02172 Grand Handwritten Sentiments Clear Stamps, CL-02169 Burlap Cheveron Background Cling Stamp
Paper:  Strathmore Watercolor Paper, Cardstcok-White, Aqua
Ink/Markers:  ImagineCrafts/Tsukineko VersaMark Ink, Spectrum Aqua Markers-Aquamarine, Teal, Kingfisher, Peacock Blue, Marine, Navy
Dies:  Tonic Studios-484e MIXED RECTANGLE LAYERING DIE SET
Accessories:  Wild Orchid Craft Pearl Stars, ButterBeeScraps SS16 Aquamarine Flat Back Rhinestones, Blue Sequins, Ranger Multi Medium Matte, Scrapbook Adhesives by 3L 3D Foam Squares, E-Z Runner Permanent Strips-Refillable Dispenser 49', White Embossing Powder, Heat Tool, Paint Brush

Friday, March 27, 2015

The Stamp Simply Ribbon Store - All Boy Card Set

Hello everyone! Today, is my day to post for The Stamp Simply Ribbon Store and I have three CAS (Clean And Simple) and quick and easy boy cards to share with you.


Here is a look at the three cards I designed using the SW-04540 All Boy Clear Stamps from JustRite Papercraft.  This is a great stamp set for all the little guys in your life--son or grandson or maybe even a neighbor.  The set this filled with sentiments and images you guys--big and little.


Here is the first card in the set.  For this one I used several of the sentiments in the stamp set and then I used three colors of ink--Momento Bahama Blue, Dandelion, Cottage Ivy.  I overlapped each color of ink just a little bit to blend the colors.  


Here is a very quick ans easy way to do cards with several sentiments.  Simply lay the stamps out on top of you paper in the way you would like them to look.  Once you have them all laid out carefully place a large acrylic block on top of the stamps.  Now you are ready to ink up the stamps.


Here is a look at the second card in the set.  I used all of the same inks and papers for the cards.  For quick and easy layering I used Spellbinders SCD-012 Celebrations Die - Pierced Rectangles die templates.  I love the pierced edge around these dies.


Here is the third and final card in the set.  I used 3D Foan Squares to add a little dimension and then for a simple embellishment I added a few My Mind's Eye Enamel Dots - Record It! Pretty Things.

I hope you enjoyed the cards today and thank you so much for stopping by!

Please be sure to check out The Stamp Simply Ribbon Store for all of the fantastic paper crafting products and the Blog for inspiration from the Design Team.

Hope you have a great weekend!

Hugs & Smiles,
Heidi


Supplies
Stamps:  JustRite Papercraft SW-04540 All Boy Clear Stamps
Paper:  White, Blue, Yellow, Green
Ink:  Momento Bahama Blue, Dandelion, Cottage Ivy
Dies:  Spellbinders SCD-012 Celebrations Die - Pierced Rectangles
Accessories:  My Mind's Eye Enamel Dots - Record It! Pretty Things, Scrapbook Adhesives by 3L 3D Foan Squares, E-Z Runner Permanent Strips-Refillable Dispenser 49'

Friday, March 20, 2015

The Stamp Simply Ribbon Store - Romantic Wild Rose Thank You Card

Hello everyone!  Happy First Day of Spring!!  Today, is my day to post for The Stamp Simply Ribbon Store and I have a quick and easy card to share with you using the new JustRite Papercraft CR-02162 Romantic Wild Roses Clear Stamps and Spellbinders GLD-016 Baby Buntings die templates.


With the Romantic Wild Roses Clear Stamps and a few different colors of ink you can quickly create a very pretty card.  I started by die cutting the banner shape using Spellbinders GLD-016 Baby Buntings die.  Then I used Angel Pink, Rose Bud, Bamboo Leaves, and Olive Garden Memento inks to stamp the roses and leaves.  For the sentiment I used Memento Tuxedo Black ink and the CR-02119 Extra Grand Sentiments Clear Stamps.


Here is a close up of the banner.  I added some Wink of Stella Clear Glitter Pen to the flowers and leaves for a little bit of sparkle.  Then I added some  May Arts Pink Sheer Ribbon and a flower from the Petaloo Botanica Collection Pink Minis to the top of the banner.  I used 3D Foam Squares on the back of the banner to add a little dimension.


To finish off the card I added the banner to two layers of pink mats and then a pink card base.

Please be sure to check out The Stamp Simply Ribbon Store for all of the fantastic paper crafting products and the Blog for inspiration from the Design Team.

Thanks so much for stopping by today!
I hope you have a great weekend!

Hugs & Smiles,
Heidi


Stamps:  JustRite Papercraft CR-02162 Romantic Wild Roses Clear StampsCR-02119 Extra Grand Sentiments Clear Stamps
Paper:  White, Pink, Rose
Ink:  Memento Tuxedo Black, Angel Pink, Rose Bud, Bamboo Leaves, Olive Garden
Dies:  Spellbinders GLD-016 Baby Buntings
Ribbon:  May Arts Pink Sheer Ribbon
Accessories:  Wink of Stella Clear Glitter Pen, Petaloo Botanica Collection Pink Minis, Scrapbook Adhesives by 3L 3D Foam Squares, E-Z Runner Permanent Strips-Refillable Dispenser 49'

LinkWithin

Related Posts Plugin for WordPress, Blogger...