Showing posts with label Photography. Show all posts

Monday, April 29, 2013

Picture Perfect Card

Hello everyone!  Today, is going to be a quick post with a fun and easy card to create.


For the cute little camera image and the sentiment I used the D-504 Picture Perfect stamp set from The Rubber Cafe`.  The card came together really quick and easy with a few layers of paper (all cardstock from DiscountCardstock.com listed below), stamps and die cuts.  I used S5-149 SnapshotS4-399 Charmed I'm Sure and S4-398 Say What die templates from Spellbinders Creative Arts™.  I used Royal & Langnickel Silver Engraving Art Foil for the camera die cut and lightly sanded the paper to reveal the silver foil.  I love how the camera turned out!  The only coloring that I did was to add a little sparkle to the stamped image of the camera using a Spica Silver Glitter Pen.


Here is a close up of the camera.  Love the sparkle!


For the snapshot and little word block I used letter press technique (or maybe you have heard it called Reverse Stencil) with Versa Magic Midnight Black in from Imagine Craft/Tsukineko.  If you have never done the letter press technique it is really easy--put the die template on a piece of scratch paper with the cut side (ridges) face up, press the ink pad in to the die template giving it a good coverage of ink.  Then carefully pick up the die template and place it face down on the paper you want to cut and then die cut the image.  The ink can get a little messy so I usually put a sheet of printer paper down on my mat, then the die template and cardstock and then fold over the printer paper.  When you do this both sides of  the die template will be covered and you won't get ink on your mats.  Once you are done you can use a baby wipe to remove the ink or wash it with soap and water.  The best ink to use for this technique is a craft ink--like a pigment or chalk ink--something that won't dry too quick.  To finish off the card I added a few Holly Berry Red Jellie Dots from The Rubber Cafe`.

Just a friendly reminder click HERE to sign up for my Big Giveaway!!

Thank you so much for stopping by today!

Hugs & Smiles,
Heidi


Supplies
Stamps:  The Rubber Cafe` D-504 Picture Perfect
Paper:  DiscountCardstock.com Simply Smooth White, Kraft, Really Red; Royal & Langnickel Silver Engraving Art Foil
Ink:  Imagine Craft/Tsukineko Memento Tuxedo Black, Versa Magic Midnight Black; Copic Spica Silver Glitter Pen
Dies:  Spellbinders Creative Arts™ Grand Calibur™ Machine, S5-149 Snapshot, S4-399 Charmed I'm Sure, S4-398 Say What
Accessories:  The Rubber Cafe` Holly Berry Red Jellie Dots, Scrap Happy Sheer Glue, Stick "EM" Up Tool; Really Reasonable Ribbon Silver Metallic String; Scrapbook Adhesives by 3L 3D Foam Squares; Sanding Block


Sunday, November 25, 2012

Your Special Day & a Few Wedding Pictures

Hello blogging friends!  A couple of weeks ago my cousin Cassie and her new husband Adam were married.  They had a beautiful wedding ceremony, a wonderful reception and a great dance.  Today, I am sharing the wedding card that I made for them and for those of you who aren't on FB a couple of pictures from the wedding.  


Here is the wedding card that I designed.  The colors/theme of the wedding was peacock feathers.  Love that beautiful blue color!  I used Simply Smooth White paper for the base of the card.  Then I layered Gold Mirror Mirri and Simply Smooth White papers.  I used S5-131 A2 Matting Basics A for the Gold Mirror Mirri and S5-132 A2 Matting Basics B and S5-152 Fancy Lattice to create the white lattice piece.  Before I die cut the lattice piece I applied a piece of Adhesive Sheets to the back of the Simply Smooth White.  I used S5-132 A2 Matting Basics B to make the first cut of the paper and then I used the S5-152 Fancy Lattice.  Peel of the backing of the Adhesive Sheets and apply to the Gold Mirror Mirri paper for a perfect fit.


For the sentiment I used gold pigment ink and gold embossing powder with the stamps from CR-03825 Ever After Antique Labels stamp set from JustRite Papercraft.  Then I used S5-148 Decorative Labels Eight to cut/emboss the shape.  Before removing the paper from the die template I used Coipc Marker B04 Tahitian Blue to airbrush the inside edges of the label.  I added 3D Foam Squares to the back of the label for a little dimension.  I added a couple of stickpins for embellishments and then added a seam binding bow using Peacock and Dusty Olive Seam Binding from Really Reasonable Ribbon.   I also added a few pearls.


I used a garment pin and added a tiny pearl heart to the bow.


Now for a look at the beautiful couple on their wedding day.


In the church where they were married there were stained glass windows that were up at the top and they were the whole length of the church.  It was the perfect time of day for the light to shine through creating the beautiful display in the background.


I love her bouquet!!  She had silk flowers and then a mix of new and antique broaches.  The butterfly was in memory of Alex, Cassie's sisters little girl that passed away a few years ago.  The family always has butterflies in memory of sweet little Alex.  

   
This is a picture frame that Cassie's dad made for one of their wedding presents and I painted the sentiment on the frame.  One of their engagement pictures is in the frame.

Thank you so much for stopping by today and for letting me share a little bit of my family with you.

I hope you have a wonderful day!

Hugs & Smiles,
Heidi

Supplies
Stamps:  JustRite Papercraft  CR-03825 Ever After Antique Labels
Paper:  DiscountCardstock.com Simply Smooth White, Gold Mirror Mirri
Ink:  Gold Pigment Ink; Coipc Marker B04 Tahitian Blue
Dies:  Spellbinders Paper Arts™ Grand Calibur® Machine, S5-148 Decorative Labels Eight, S5-131 A2 Matting Basics A, S5-132 A2 Matting Basics B, S5-152 Fancy Lattice
Accessories:  Really Reasonable Ribbon Peacock and Dusty Olive Seam Binding; Stickpins; Garment Pin; Pearl Heart, Scrapbook Adhesives by 3L 3D Foam Squares, Adhesive Sheets

Friday, August 31, 2012

Blue Moon Behind the Clouds

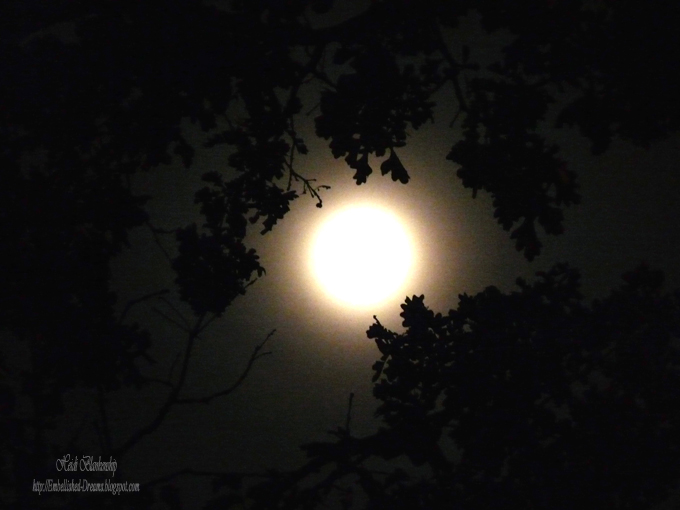
It's a little cloudy here in MN tonight but we can still see the Blue Moon.  I thought I would share a couple of pictures of the Blue Moon behind the clouds.  


Thanks for stopping by.  ;-) 
I hope you have a Fantastic weekend!!

Hugs & Smiles,
Heidi

Friday, December 31, 2010

Spellbinders - JustRite Stampers - Winter Wonder Layout - Happy New Year 2011!!

Hello! Today, I have a wintery layout to share with you. The past few days the trees have been covered with a beautiful crystal frost. It looks almost like everything was sprinkles with sugar--LOL!I started with a piece of My Mind's Eye paper from the Meadow lark Collection. Here is the before shot of the paper.This is the after shot. I added Waterslide Glimmer Mist and Cotton Candy Chalk. Then I used baby blue stickles for the flowers and glitter on the leaves. I love how this turned out and it totally changed the look of the paper.Next I stamped the sentiment from JB-09800 Nature's Nested Sentiments from JustRite Stampers with Tuxedo Black ink on to Simply Smooth cardstock. Then I used the Grand Calibur™ and S5-025 Labels Seventeen die #2 from Spellbinders™ to cut/emboss the diecuts. The JB-09800 Nature's Nested Sentiments includes 8 beautiful sentiments. Here is a close up of the sentiment. I added blue rhinestones and pink crinkle seam binding to the top of the layout.Here is a close up of the snowflakes. I used the Grand Calibur™ and S4-286 2010 Snowflake Pendants (small snowflake) to cut/emboss the diecuts. I used White Iris Shimmer Sheetz from Elizabeth Craft Designs for the snowflakes and then I added blue rhinestones. On one of the snowflakes I added a Sparkle Burst Brad from Karen Foster. To create the diecuts for the photo and the mat I used the Grand Calibur™ and LF-190 Grand Labels Four dies #2, #3. This photo is at a different angle so you can see all the glimmer and sparkle from the Glimmer Mist, Stickles and Glitter.

Supplies
Stamps: JustRite Stampers Original JB-09800 Nature's Nested Sentiments, JB-09520 Clear Horizontal Stamper Set (Set of Two)
Paper: My Mind's Eye Meadow Lark Collection; DCS Simply Smooth White, Blue Crepe Paper; Elizabeth Craft Designs White Iris Shimmer Sheetz
Ink: Tsukineko Memento Tuxedo Black
Dies & Punches: SpellbindersGrand Calibur™, LF-190 Grand Labels Four dies #2, #3, S5-025 Labels Seventeen die #2, S4-286 2010 Snowflake Pendants (small snowflake)
Accessories: Tattered Angels Waterslide Glimmer Mist, Cotton Candy Chalk; Ranger Baby Blue Stickles; Karen Foster Sparkle Burst Brad; BoBunny Blue Rhinestones; SCRAPBOOK ADHESIVES By 3L™ My Stik™ Permanent Strips Dispenser , 3D Foam Squares; Crinkle Seam Binding (tinted with Glimmer Mist); Joann's Glitter

If you are going out to celebrate for New Years Eve have fun but be safe!! I want to thank you all so much for subscribing to my blog and for all of the followers who come by to visit each day, for all of you support over the year and wonderful comments!!! I wish you Happiness and many Blessing in the New Year!!! Happy New Year--2011!!!

Hugs & Smiles,
Heidi

Wednesday, December 8, 2010

Youth for Christ - Soup and Truffles - Fund Raiser - Table-scapes

Hello! This past weekend I helped my mom decorate for a fund raising event and I wanted to share a few photos with you. My mom was asked to decorate a table with place settings for 6-8 people and a complete table-scape. It was up to her to pick the theme/colors for the table. The fund raiser is for Youth for Christ and they have many wonderful programs for children of all ages. The person who sponsored the table (my mom) was in charge of inviting ladies to share and experience the event. They had a couple of speakers, a singer and dancers and it was a very beautiful and moving program. After the program they severed soup and rolls for the meal. Then we had the most Amazing homemade truffles I have ever tasted!! It was like a little piece of heaven in your mouth!! Oh they were SO yummy!!! They had a free will donation and gave away many prizes but the best part is that they raised over $5000 for Youth for Christ!!!!

Ok so on to the photos of the tables.Here is my mom's table. The black tablecloth with the red and white looked Amazing!! Here is a close up of the centerpiece I designed. Before my youngest son was born I was a floral designer and managed a local floral shop. These are the place cards I designed for each of the guests at the table. I used the JB-09250 Christmas Nested Frames and JB-08097 Myriad Pro-50 point Font Set from JustRite Stampers. I used Lady Bug and Tuxedo Black Memento inks and all of the coloring was done with Copic markers. For the die cutting I used the Grand Calibur™ and S5-025 Labels Seventeen and S4-290 Labels Fourteen die templates from Spellbinders™. For a little bit of sparkle I added red rhinestones and red stickles.

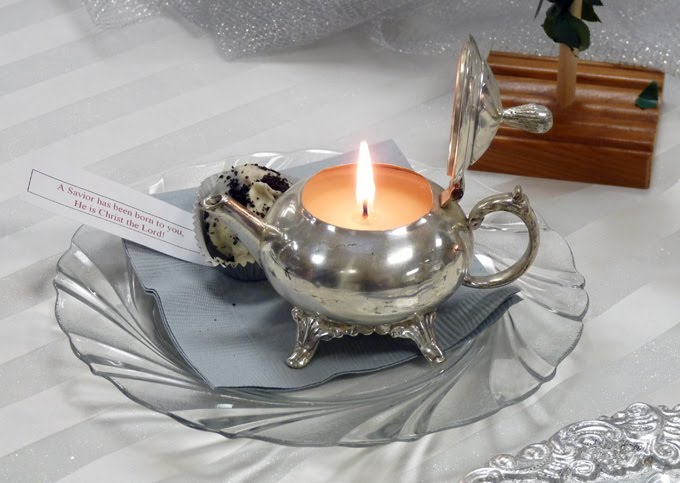
The next few photos are a couple of favorites. I love this table and the centerpiece was so Beautiful!!This table with the white and silver was simply Gorgeous!LOVE these little teapot candles!!This table just makes me smile. It was so pretty and the centerpiece reminds me of the Night before Christmas story--while visions of sugarplums danced in their heads.The centerpiece on this table was so creative! This table was sponsored by a local company that makes soap and the trees were made from soap and then they added the lights!!

Thank you for letting me share! I had such a wonderful day with my mom and friends!! The whole room was so full of the Christmas Spirit and it was so Beautiful!!! I think there were 20-25 tables that were decorated and it was such a wonderful fund raiser.

Thank you for stopping by today!

Hugs & Smiles,
Heidi

Tuesday, November 30, 2010

Spellbinder & JustRite Stampers JustRite Cling Stamp Set and Fairy Wings

Hello! Today I have a fun layout to share with you. Do remember in my last post I mentioned a little girl who LOVES Tinker Bell?Check her out! Is she Adorable or what? I love this photo--so sweet and dreamy looking. Having two boys it's not very often that I get to create a totally girly girl layout project and let me tell you I had so much fun creating this layout!! The background paper started out as a white sheet of cardstock and I used several colors of Glimmer Mist to create the pretty purple/pink/blue and green paper. I used the Grand Calibur and LF 190 Grand Labels Four to cut/emboss and mat the photo. Then I used LF 114 Grand Circles along with Garden Blossom Glimmer Screen to cut/emboss the circle. Then I added airbrushing, inks, Glimmer Mist and Glimmer Glam to the circle. For the title I used My Mind's Eye Lush Printed Chipboard Alphabet Stickers, colored them with Copic markers, Glimmer Glam and Stickles.To create the wings I used two different fairy wings from JustRite Stampers JustRite Cling CL-02050 Quiet Moments stamp set and stamped them using Rich Cocoa Ink.Next I airbrushed the wings with Copic markers and then I hand cut the wings and lightly misted then with Iridescent Gold Glimmer Mist.Here is a close up of the border at the bottom. I used S7-017 On the Vine Border Grand and added the fairy wings with rhinestones and tiny pink roses.The sentiment is also from the JustRite Cling CL-02050 Quiet Moments stamp set. I used S4-293 Lacey Circles die #4 to cut/emboss the circle and then I used a Copic marker to airbrush using the die template as a stencil.Here is a close up of the sentiment.

Supplies
Stamps: JustRite Stampers JustRite Cling CL-02050 Quiet Moments
Paper: Core'dinations Purple; The Paper Company White, Light Green
Ink: Ranger Peeled Paint, Shabby Shutters, Broken China; Tsukineko Memento Rich Cocoa; Copic Markers V04, BG45, B000, RV02, G40
Dies& Punches: Spellbinders™ Grand Calibur™, LF 190 Grand Labels Four, LF 114 Grand Circles, S7-017 On the Vine Border Grand, S4-293 Lacey Circles die #4
Accessories: Tattered Angels Key Lime Pie, Timeless Lilac, Patina, Popsicle, Iridescent Gold, Cotton Candy (Chalkboard) Glimmer Mists, Chandelier (Glam), Garden Blossom Glimmer Screen; Ranger Lime Green Stickles; My Mind's Eye Lush Printed Chipboard Alphabet Stickers Green; Prima Pink Roses; Joann's Rhinestones; SCRAPBOOK ADHESIVES By 3L™ My Stik™ Permanent Strips Dispenser , White 3D Foam Squares

Thank you so much for stopping by today! I hope you have a wonderful day and stay warm.

Hugs & Smiles,
Heidi

Thursday, October 28, 2010

Spellbinders Layout - The Mask

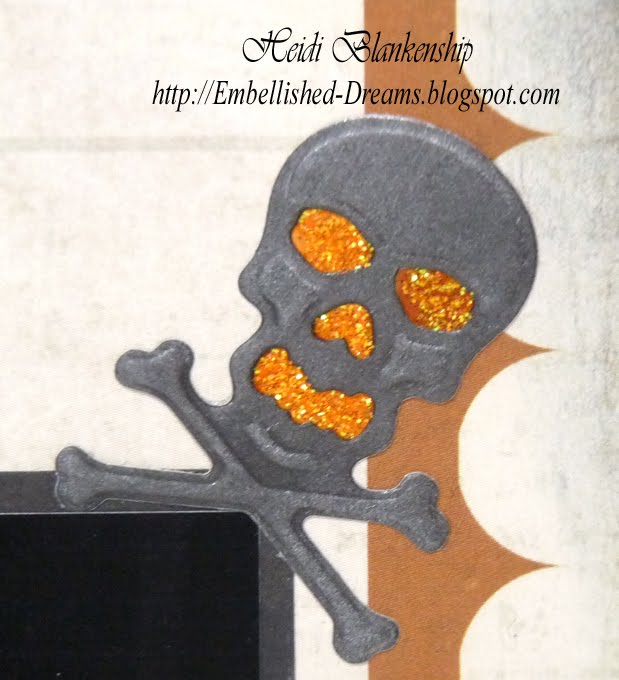
Hello! I can't believe Halloween is just a couple of days away and then it will be November! Where does the time go? Today, I have a Halloween layout to share with you using several of the Spellbinders™ Halloween die templates and My Mind's Eye papers. The photos are of my oldest son from last Halloween. He designed the mask himself and then we ordered some really wild looking contacts for him. I thought the mask turned out really cool looking and all of his friends loved it! But what made it kind of creepy is that he didn't talk at all and you couldn't tell who he was once he put everything else on so he had fun messing with people all night. Oh to be young again--LOL!To create the row of pumpkins across the top of the layout I cut/embossed and then airbrushed three of the pumpkins from S4-281 Jack O' Lanterns. I added the three die cut pumpkins across the top of the photo and then I cut out some pumpkins from the My Mind's Eye The Spider Web "Pumpkin Patch" paper. To add a little dimension I layered the pumpkins using 3D Foam Squares from SCRAPBOOK ADHESIVES By 3L™. Then I added Orange Peel Stickles to the eyes, nose and mouth of the pumpkins and Ultra Fine Sage Flower Soft on the stems and vines.For the graveyard scene I cut/embossed and inked several Halloween die cuts using S4-279 Graveyard Scenes and Shapes and S4-280 Halloween Fence Scene and Shapes and Brilliance Starlite Silver and Cosmic Copper inks. I layered all of the Halloween die cuts and then added Orange Peel Stickles to the windows in the house and the face on the tree. I also added Ultra Fine Sage Flower Soft to create mossy grass. I cut/embossed a few bats using S4-277 Nested Bats and added tiny red rhinestones for eyes.Here is a close up of the skull and crossbones.

Supplies
Paper: My Mind's Eye The Spider Web "Halloween Night", "Pumpkin Patch"
Ink: Tsukineko Memento Tuxedo Black, Brilliance Starlite Silver, Cosmic Copper; Copic Markers
Dies: SpellbindersGrand Calibur™; S4-279 Graveyard Scenes and Shapes, S4-281 Jack O' Lanterns, S4-280 Halloween Fence Scene and Shapes, S4-277 Nested Bats
Accessories: Flower Soft Glue, Ultra Fine Sage; Ranger Orange Peel Stickles; Joann's Tiny Red Rhinestones; SCRAPBOOK ADHESIVES by 3L™ My Stik, 3D Foam Squares; Beacon Adhesive Zip-Dry

I can't wait for Halloween! Tomorrow is my youngest son's Halloween party at his school and I am one of the room parents. He is going to be Harry Potter and he's so excited for the party!!

Thanks so much for stopping by today!

Hugs & Smiles,
Heidi

Monday, October 11, 2010

Creating Memories In Time Blog Hop Winner (Huge Bag of Prima Flowers), Photos from the Memory Expo & Photos from this weekend

Good morning!! I hope you had a wonderful weekend. I have several things to share with you today--the CMIT Blog Hop Winner, Photos from the Memory Expo and a few photos from this weekend.

First I want to Congratulate the WINNER for the CMIT Blog Hop!!

Pam and Presley said...AWESOME! I absolutely LOVE this card, the colors the black vine going all around the card and the beautiful vintage Halloween scene.
Thank you so much for sharing
Pam
pamandrandy@gmail.com
October 8, 2010 5:49 PM

Pam and Presley said...I also wanted to thank CMIT and all your designers for a great blog shop I had a lot of fun and thank you for a chance to win an AWESOME prize of the gorgeous
flowers I am a flower NUT!!!
Thank you
Pam
pamandpresley
October 8, 2010 5:54 PM

This was also posted on the CMIT Blog and we want to thank everyone who participated!! Also as a reminder ATC Tuesday will begin on October 12th so come take a look at the CMIT blog to see what the design team creates, play along to win a prize. Thanks!!

Next, I want to share some pictures with you from the Midland Care Memory Expo. The Expo was held in Topeka, Kansas Oct 1-2. One of the best things about the Memory Expo was getting to see my dear sweet friend Karen Taylor! We talk almost everyday but it has been almost 2 years since we have seen each other! It was so wonderful to spend the weekend with her!! Karen & I had asked if we could share a room together and we had these fun gift bags from Jennifer Friedley filled with all kinds of goodies waiting for us! This shot is from the Memory Expo VIP reception on Friday evening. Amazing and Very Talented Industry Personalities from left to right: Brooke Smith, Associate Editor of CardMaker magazine, Heidi Blankenship (me) crafter/teacher, Nikki Sivils owner of Nikki Sivils Scrapbooker papers, Kristi Van Doren crafter/teacher, Trudy Sjolander crafter/teacher, Karen Taylor crafter/teacher, and last but not least, Tanya Fox, Editor of CardMaker Magazine. Here is a photo with Tanya Fox. We have seen each other several times at the CHA shows but have never really had a chance to just sit down and visit and we were able to do that. What a wonderfully sweet lady!! Here's a couple of pictures from one of the classes I taught. The Memory Expo was such a wonderful experience and I met soooo many talented ladies!!

Are you still hanging in here with me? LOL! I know lots of info for one post! I wanted to share a lot of this with you last week but things just kept coming up and life happens. :)

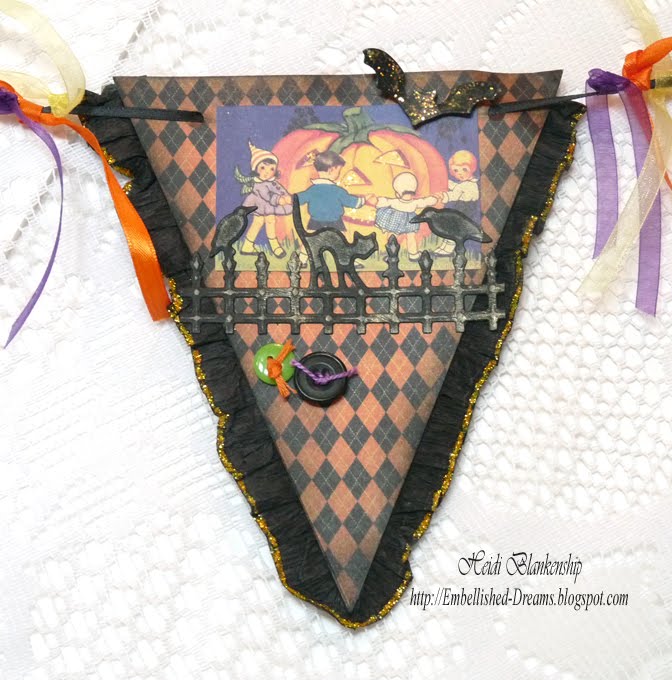
I also wanted to share with you the projects from one of my classes. We created a Vintage Halloween "Boo" Banner and 2 quick Halloween Card.Here is some close up pictures of the cards and each piece from the banner.Supplies
Paper: My Mind's Eye Blackbird Argyle; The Paper Company Black, White, Orange, Yellow, Purple, Green
Ink: Tsukineko Memento Tuxedo Black Ink
Dies: Spellbinders™ Grand Calibur™, S4-126 Classic Squares die #3, S4-301 Labels Sixteen die #3, S4-280 Halloween Fence Scene and Shapes, S4-282 Witches' Brew, S4-277 Nested Bats
Accessories: Crafty Secrets Halloween Greetings Creative Scraps; SCRAPBOOK ADHESIVES By3LCrafty Power Tape, 3D Foam Squares; Joann's Buttons, Ribbon, Thread; Ranger Lime, Orange Peel Stickles; Black Crepe Paper

I have to say a HUGE "Thank You" to several companies that helped sponsor and donate products for the classes and make-n-takes: Spellbinders™, JustRite Stampers, Crafty Secrets, My Mind's Eye, SCRAPBOOK ADHESIVES By 3L™, Heartfelt Creations and Elizabeth Crafts Designs.

Ok, just one more things---LOL! I took a few pictures of my oldest son this weekend for his senior pictures until we can decided for sure on which photographer we are going with.I have to tell you earlier this summer we were driving out in the country and I thought it would be really cool to have some pictures of my son with his drum set outside and I had to laugh when one day he said--hey mom do you think it would be possible to take some pictures with my drum set outside? I think that would be so cool!! He LOVES this one! *wink*Yes, those are real Texas Longhorns in the background! It was interesting working around them--LOL!Ok, taking this one kind of freaked me out!---LOL!
OMGosh I think this is the longest blog post ever--LOL!!! I just had a lot to share and thanks for letting share it with you!! Thanks so much for stopping by today and I guess I better get busy and create something! I hope you have a Wonderful Day!!

Hugs & Smiles,
Heidi

LinkWithin

Related Posts Plugin for WordPress, Blogger...