Tuesday, March 31, 2015

JustRite Papercraft April New Release - Day One - Hello Card

Hello everyone!  Today, is the first day of the  JustRite Papercraft April New Release and we are getting a little jump start on it going a day early.  :)


Here is the card I designed using the New CR-02172 Grand Handwritten Sentiments Clear Stamps, and CL-02169 Burlap Cheveron Background Cling Stamp.  The sentiment stamp set has a fun handwritten look to it with lots of great sentiments and the background stamp gives a great textured look to the chevrons.  For this card I embossed the CL-02169 Burlap Cheveron Background Cling Stamp using VersaMark Ink and white embossing powder.  Then I did a very simple watercolor wash using Spectrum Aqua Markers-Aquamarine, Teal, Kingfisher, Peacock Blue, Marine, Navy.  I started with the lightest color and worked my way to the darkest giving this a beautiful ombre look. 


I heat embossed the sentiment and then added watercolor to the background.  I used 484e MIXED RECTANGLE LAYERING DIE SET from  Tonic Studios to create the die cuts.  I added some 3D Foam Squares in between the layers from some dimension.  Then I added blue sequins, Wild Orchid Craft Pearl Stars, and ButterBeeScraps SS16 Aquamarine Flat Back Rhinestones.  


To finish off the card I added the background to a white mat and then to a aqua card base.


Just as a friendly reminder today (3/31/15) is the last day to get some great savings on Spellbinders die templates.


You can click HERE to see all of the Spellbinders dies.


Thanks so much for stopping by today and I hope you enjoyed day one of the April New Release!

Hugs & Smiles,
Heidi


Supplies
Stamps:  JustRite Papercraft CR-02172 Grand Handwritten Sentiments Clear Stamps, CL-02169 Burlap Cheveron Background Cling Stamp
Paper:  Strathmore Watercolor Paper, Cardstcok-White, Aqua
Ink/Markers:  ImagineCrafts/Tsukineko VersaMark Ink, Spectrum Aqua Markers-Aquamarine, Teal, Kingfisher, Peacock Blue, Marine, Navy
Dies:  Tonic Studios-484e MIXED RECTANGLE LAYERING DIE SET
Accessories:  Wild Orchid Craft Pearl Stars, ButterBeeScraps SS16 Aquamarine Flat Back Rhinestones, Blue Sequins, Ranger Multi Medium Matte, Scrapbook Adhesives by 3L 3D Foam Squares, E-Z Runner Permanent Strips-Refillable Dispenser 49', White Embossing Powder, Heat Tool, Paint Brush

Monday, March 30, 2015

Timeless Beauty ButterBeeScraps and ICE Resin Bezel Necklace

Hello everyone!  Today, I have another jewelry piece to share with you.  I have to say I have really been enjoying creating jewelry lately.  Sometimes I wish I had more hours in a day.  I have so many ideas and sketches of jewelry pieces I would love to make--it's kind of like cards lol.


Here is a necklace I designed.  I started with a Mixed Metal Hobnail Square Bezel, Antique Bronze and then I added a beautiful digital collage image with a lady, script, flowers and a clock.  The image is a digital download from ArtCult on Etsy.  I love this Etsy shop!  She has so many beautiful images to choose from.  I filled the bezel with ICE Resin and also sprinkled a tiny bit of German Glass Glitter in the resin.  Once the resin was cured and hardened then I added some fun bits and pieces to embellish it.


I edged the bezel with  SS8 Crystal Rhinestone Chain Trim.  For the brass filigree piece I used Brass Filigree Embellishment (Item #001-G).  I cut the filigree piece in half and then I filed it to smooth the edges.  I applied a very thin layer of Luminere-Pearl Magenta Paint to the brass filigree piece to pick up some of the pink from the roses in the image and then I sealed the piece.  Next I added a couple Resin Flower Embellishments - White (Item #RES003-WH).


Next I filled in some of the spaces with SS10SS12SS16 Vitrail AB Flat Back Glass Rhinestones.  These rhinestones are so pretty and the colors change with movement going from a pink, rose, purple, golden yellow and green.  I just love all the colors they pick up and they can be used with so many jewelry pieces.


Here you can see a close up of the rhinestones.


To finish off the bezel I created three beaded dangles.  I used Bronze Ball End Head Pins8x12mm Faceted Glass Teardrop Beads - Clear AB4x6mm Faceted Glass Abacus Beads - Clear AB Bronze Filigree Bead Cap CAP114-B, and Bronze Filigree Bead Caps (Item #CAP052-B) all from ButterBeeScraps.  The pink and green beads are from my stash.


I hope you like this jewelry piece.  If you have any questions about jewelry making please feel free to leave your question in the comments.  Also be sure to leave an email address or a link back to a blog so I can answer your question.

Thanks so much for stopping by today!

Hugs & Smiles,
Heidi


Supplies
ButterBeeScraps:  SS8 Crystal Rhinestone Chain TrimSS10, SS12, SS16 Vitrail AB Flat Back Glass RhinestonesBrass Filigree Embellishment (Item #001-G)Resin Flower Embellishments - White (Item #RES003-WH), Bronze Filigree Bead Cap CAP114-BBronze Filigree Bead Caps (Item #CAP052-B), Bronze Ball End Head Pins8x12mm Faceted Glass Teardrop Beads - Clear AB4x6mm Faceted Glass Abacus Beads - Clear AB
Other Supplies:  ICE Resin, Mixed Metal Hobnail Square Bezel, Antique Bronze, Digital Image from ArtCult on Etsy, German Glass Glitter, Pink Bead, Green Bead, Luminere-Pearl Magenta Paint

Ken Oliver Crafts & Stencil Girl Blog Hop Winners!

Hello everyone!  Thank you all so much for the wonderful comments about my mixed media canvas from the Ken Oliver Crafts and Stencil Girl Blog Hop that was last week!  What a fabulous blog hop filled with so much creative inspiration!


Today, I get to announce the Winners from my blog.  Each person will receive 1 Pack Ken Oliver Crafts 6x6 Papers(24 pieces).  There will also be grand prizes announced on Ken Oliver's Blog and also the Stencil Girl Blog so be sure to check those out and see if you are a winner!

I used Random.org number generator to pick all of the Winners.

Winner #1
SuprFoxDesigns said...
This is such a pretty piece and thanks for the step by step- gorgeous work!
March 23, 2015 at 10:26 AM 

Winner #2
PK Sews said...
Heidi, your creation is gorgeous! I love the delicate red flowers especially. Thanks for sharing!
March 23, 2015 at 5:27 PM

Winner #3
Jean Bullock said...
this is gorgeous, Heidi. Thanks for the great tutorial. So good to know that Stick It works on canvas too. The gilding looks fab.
March 25, 2015 at 11:12 PM

Winner #4
Such a stunning work of art, Heidi! Love that crackle paste so much ;)
March 29, 2015 at 8:47 PM

Winner #5
Karen Hasheck said...
Gorgeous project- loving the colors and the stencils! Can't wait to play with your techniques!
March 23, 2015 at 12:08 PM

Winner #6
Dottie said...
What a fun product...Color Burst Inks. They look like so much fun to play with. And the stencils are really so versatile especially the Nosegay. Thanks for sharing your delightful creation.
March 25, 2015 at 5:41 AM 

A HUGE CONGRATS to all of the Winners!!
If you see your name listed here please email me at Floralfantasy@charter(dot)net so I can get your contact information and have your prize sent out.

If you missed the blog hop but would still like to check out the artwork you can click HERE to see my blog post and you can click HERE for a complete link list of all the Designers and Style Contributors who participated.

Thanks so much for stopping by today!
I hope you all have a wonderful and creative day!

Hugs & Smiles,
Heidi


Friday, March 27, 2015

The Stamp Simply Ribbon Store - All Boy Card Set

Hello everyone! Today, is my day to post for The Stamp Simply Ribbon Store and I have three CAS (Clean And Simple) and quick and easy boy cards to share with you.


Here is a look at the three cards I designed using the SW-04540 All Boy Clear Stamps from JustRite Papercraft.  This is a great stamp set for all the little guys in your life--son or grandson or maybe even a neighbor.  The set this filled with sentiments and images you guys--big and little.


Here is the first card in the set.  For this one I used several of the sentiments in the stamp set and then I used three colors of ink--Momento Bahama Blue, Dandelion, Cottage Ivy.  I overlapped each color of ink just a little bit to blend the colors.  


Here is a very quick ans easy way to do cards with several sentiments.  Simply lay the stamps out on top of you paper in the way you would like them to look.  Once you have them all laid out carefully place a large acrylic block on top of the stamps.  Now you are ready to ink up the stamps.


Here is a look at the second card in the set.  I used all of the same inks and papers for the cards.  For quick and easy layering I used Spellbinders SCD-012 Celebrations Die - Pierced Rectangles die templates.  I love the pierced edge around these dies.


Here is the third and final card in the set.  I used 3D Foan Squares to add a little dimension and then for a simple embellishment I added a few My Mind's Eye Enamel Dots - Record It! Pretty Things.

I hope you enjoyed the cards today and thank you so much for stopping by!

Please be sure to check out The Stamp Simply Ribbon Store for all of the fantastic paper crafting products and the Blog for inspiration from the Design Team.

Hope you have a great weekend!

Hugs & Smiles,
Heidi


Supplies
Stamps:  JustRite Papercraft SW-04540 All Boy Clear Stamps
Paper:  White, Blue, Yellow, Green
Ink:  Momento Bahama Blue, Dandelion, Cottage Ivy
Dies:  Spellbinders SCD-012 Celebrations Die - Pierced Rectangles
Accessories:  My Mind's Eye Enamel Dots - Record It! Pretty Things, Scrapbook Adhesives by 3L 3D Foan Squares, E-Z Runner Permanent Strips-Refillable Dispenser 49'

Thursday, March 26, 2015

ButterBeeScraps Crystal and Patina Flower Filigree Bracelet

Hello everyone!  Today, I have a beautiful new piece of jewelry to share with you.  This is one of those pieces that I just love and I am sure I will be making a few more.


Here is a bracelet that I designed using some of the pretty filigree pieces and crystals from ButterBeeScraps.  


The  Dimensional Bronze Filigree Flower (Item #7635) and Bronze Filigree Embellishment (Item #316-B) are two separate pieces.  I shaped the Bronze Filigree Embellishment (Item #316-B) to curve and fit nicely around the wrist.  Then I added the flower on top.  I used a Patine finish on both of the pieces.  I think the Patina is such a pretty mix with the bronze metal.


Then I added the SS16 Vitrail AB Flat Back Glass Rhinestone to the center of the flower and the smaller  SS12 Vitrail AB Flat Back Glass Rhinestones around the outer part of the center.  I have to tell you these rhinestones are so gorgeous!!  They change colors when the lights hit them from a green to pink and then kind of a purple color.  So, so pretty!


I used bronze chain and jump rings from my own stash for the bottom side of the bracelet.


Here you can see some of the chain and then I added a Antique Bronze Toggle Clasps (Item #CL071-B) on the side.


I hope you like this newest jewelry piece and maybe you will be inspired to create some jewelry.  If you are interested I am going to be making a few more of these and adding them to my Zibbet store.  I will do an update once they are loaded in to the store.

Thanks so much for stopping by today!

Hugs & Smiles,
Heidi


Supplies
ButterBeeScraps:  Dimensional Bronze Filigree Flower (Item #7635)Bronze Filigree Embellishment (Item #316-B)Antique Bronze Toggle Clasps (Item #CL071-B)SS16 Vitrail AB Flat Back Glass RhinestonesSS12 Vitrail AB Flat Back Glass Rhinestones

Tuesday, March 24, 2015

JustRite Papercraft Tutorial Tuesday - Spectrum Aqua Markers

Hello everyone!  Today, is my day to post for the Tuesday Tutorial for JustRite Papercraft.  I have a fun watercolor You Tube video tutorial and step-by-step tutorial to share with you over on the JustRite Inspiration Blog using the new  Spectrum Aqua Markers.


If you like the look of watercolor the  Spectrum Aqua Markers are very easy to use and create projects with.  Here is a close of the floral image from the CL-02138 Sweet Posies Cling Stamps from  JustRite Papercraft.


After I was done watercoloring the image then I used Ranger Multi Medium Matte to adhere the paper to the frame and then the frame and paper to the 6 x 6 canvas to create a fun DIY home decor piece.


Starting today and going through midnight (EST) March 31st, 2015 the Spectrum Aqua Markers are on sale for 25% Off at JustRite Papercraft.

Click HERE to hop on over to the JustRite Inspiration Blog and check out the tutorial.  You can also clich HERE to watch the YouTube video.  There is a Fantastic Giveaway this week too!  A $50.00 Gift Certificate!!

Thanks so much for stopping by today!

Hugs & Smiles,
Heidi


Supplies
Stamps:  JustRite Papercraft CL-02138 Sweet Posies Cling Stamps
Paper:  Strathmore Watercolor Paper
Ink:  Imagine Crafts/Tsukineko StazOn Jet Black Ink
Markers:  Spectrum Aqua Markers - Wildflower, Purple, Sunflower Moss, Aquamarine, Teal, Peacock Blue, Black
Accessories:  6 x 6 Canvas, White Gesso or Acrylic Paint, Wood Frame, Black Acrylic or Spray Paint, Paint Brushes, Ranger Multi Medium Matte

Sunday, March 22, 2015

Day One Stencil Girl and Ken Oliver Crafts Blog Hop


Hello everyone!  Today, is the first day of the Stencil Girl and Ken Oliver Crafts Blog Hop.  Designers and Style Contributors from both teams have come together to create some fabulous projects using products from both companies.  We hope to inspire you!


For my project I designed a 8 x 10 mixed media canvas board and I have a tutorial to share with you.


First I applied a layer of white gesso to the canvas.  Once that was dry then I used the 6 x 6 Rembrandt's Words Small Stencil and added a layer of the crackle texture paste.


Once the crackle texture paste was dry then I misted the entire canvas with water and sprinkled a little bit of the Ultramarine Blue Color Burst on to the canvas.  Here you can see the Color Burst already starting to activate with the water.


I used a large watercolor brush and kept adding more water to move the Color Burst around the canvas until I achieved a look I liked.  If you get more than you would like in one spot you can use a paper towel to lift up a little of the color.  Set this aside to dry or you can use a heat tool.


Sorry, I know it's a little hard to see exactly what I am doing in this picture from all of the texture paste lol.  Here I am using the 9 x 12 Nosegay Stencil and adding a layer of the crackle texture paste.


After the crackle texture paste was dry then I started to watercolor the flowers using Color Burst.  I used Alizarin Crimson for the flowers.  Here you can see a close up of the Color Burst as soon as I applied it to the crackle texture paste.  I love how it fills in all the little cracks and makes the flowers really pop.  I mixed a few colors of the Color Burst to create a darker green.  I used Pthalo Green, Alizarin Crimson, Ultramarine Blue, and Lemon Yellow.


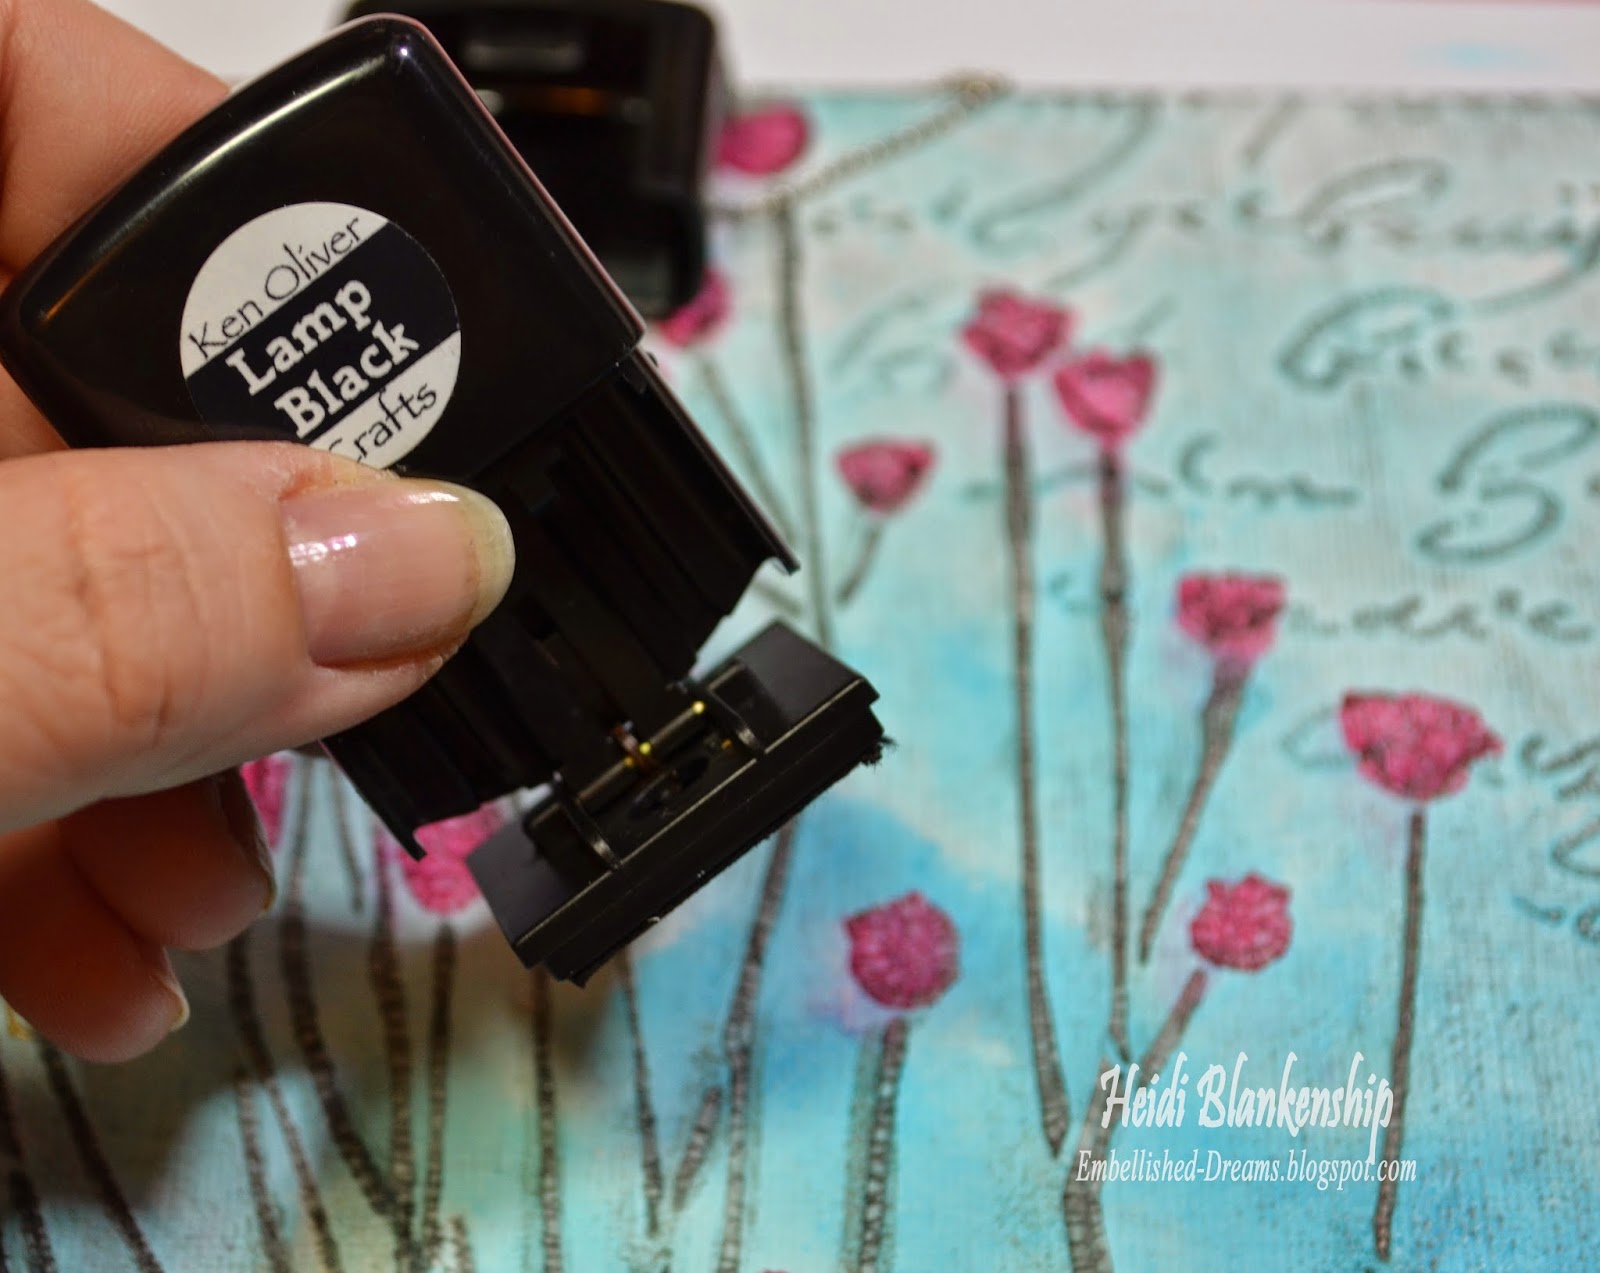
Next I used the Lamp Black Click It Ink to go over the entire canvas board.  Doing this really adds a lot of depth and dimension to the canvas and it picks up all of the little cracks in the texture paste.


To finish off the canvas I created some die cuts using Stick It and the die template from Tonic Studios.  I removed the backing on the Stick It and applied it to the canvas.  Then I added the gold foil on top of the adhesive and rubbed it to to transfer the foil.  I thought this would add a nice decorative element and gold foil it very hot right now.
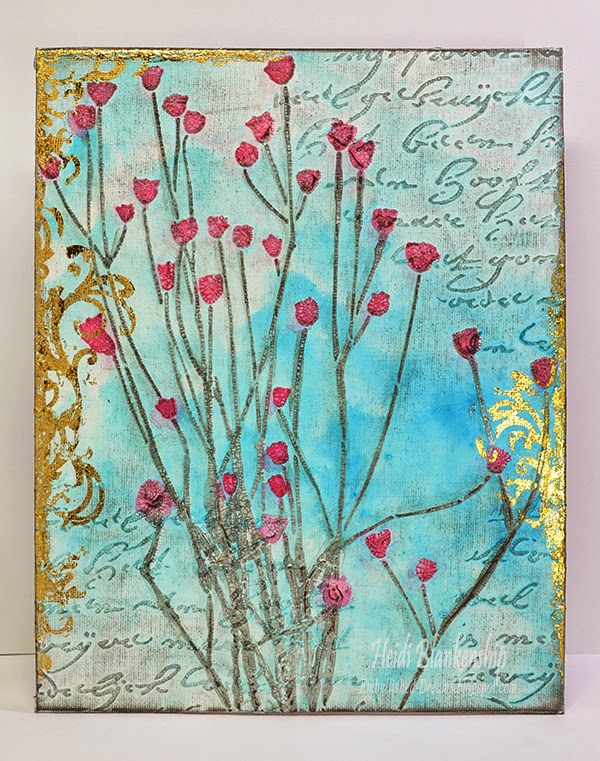

Here is a close up of some of the flowers with the gold foil along the edge.


I added a few bits of the gold foil along the edges of the canvas.


I hope you enjoyed the tutorial.  Please be sure to visit the blogs listed below to see what the Designers and Style Contributors have created to share with you.

Heidi Blankenship-You are here :)

Thank you so much for visiting our blogs today and I hope that you'll be inspired to create something with Stencil Girl Products and Ken Oliver Crafts! We have a crafty haul of prizes from Ken Oliver up for grabs, just leave a comment below and you'll be eligible to win!

Winners will be randomly selected from our blogs, just leave a comment to become eligible for a prize. It's that easy!

We'll list the daily winners in the comments sections of our respective blogs so watch for the winners names.  

Here's what we're giving away!
12 Daily Prizes - 1 Pack Ken Oliver Crafts 6x6 Papers(24 pieces).
2 Grand Prizes on Friday- 1 Complete Set of Color Burst (6 Colors); 1 Complete Set of Click It Ink Pads (6 Colors); 1 Set Pegz Alphabet Stamp Set;
Leave a comment on each StencilGirl Talk post and the team members posts to be entered to win a $50 gift certificate from Stencil Girl!
Join us every day this week, you can enter every day...

Thank you again and

GOOD LUCK!  

Hugs & Smiles,
Heidi


Friday, March 20, 2015

The Stamp Simply Ribbon Store - Romantic Wild Rose Thank You Card

Hello everyone!  Happy First Day of Spring!!  Today, is my day to post for The Stamp Simply Ribbon Store and I have a quick and easy card to share with you using the new JustRite Papercraft CR-02162 Romantic Wild Roses Clear Stamps and Spellbinders GLD-016 Baby Buntings die templates.


With the Romantic Wild Roses Clear Stamps and a few different colors of ink you can quickly create a very pretty card.  I started by die cutting the banner shape using Spellbinders GLD-016 Baby Buntings die.  Then I used Angel Pink, Rose Bud, Bamboo Leaves, and Olive Garden Memento inks to stamp the roses and leaves.  For the sentiment I used Memento Tuxedo Black ink and the CR-02119 Extra Grand Sentiments Clear Stamps.


Here is a close up of the banner.  I added some Wink of Stella Clear Glitter Pen to the flowers and leaves for a little bit of sparkle.  Then I added some  May Arts Pink Sheer Ribbon and a flower from the Petaloo Botanica Collection Pink Minis to the top of the banner.  I used 3D Foam Squares on the back of the banner to add a little dimension.


To finish off the card I added the banner to two layers of pink mats and then a pink card base.

Please be sure to check out The Stamp Simply Ribbon Store for all of the fantastic paper crafting products and the Blog for inspiration from the Design Team.

Thanks so much for stopping by today!
I hope you have a great weekend!

Hugs & Smiles,
Heidi


Stamps:  JustRite Papercraft CR-02162 Romantic Wild Roses Clear StampsCR-02119 Extra Grand Sentiments Clear Stamps
Paper:  White, Pink, Rose
Ink:  Memento Tuxedo Black, Angel Pink, Rose Bud, Bamboo Leaves, Olive Garden
Dies:  Spellbinders GLD-016 Baby Buntings
Ribbon:  May Arts Pink Sheer Ribbon
Accessories:  Wink of Stella Clear Glitter Pen, Petaloo Botanica Collection Pink Minis, Scrapbook Adhesives by 3L 3D Foam Squares, E-Z Runner Permanent Strips-Refillable Dispenser 49'

Thursday, March 19, 2015

Athena Owl Necklaces - ButterBeeScraps

Hello everyone!  Today, I have a couple of fun jewelry pieces to share with you.  I know so many people love owls and as soon as I saw the new Owl Filigree Embellishment 644-B from ButterBeeScraps I knew exactly what I wanted to do with them--create some jewelry!  I designed two necklaces using some of the new items in the store.


Here is the first necklace I designed.  I just love these pretty filigree owls!  There is so much detail to them.  I added SS16 Clear Pointy Back Rhinestones for the eyes and then I added three of the White Resin Flowers RES003-WH down the center of the owl. 


Next I created three beaded and wire wrapped dangles for the bottom of the owl.  I used Bronze Ball End Head PinsBronze Bead Cap CAP052-B, and Bronze 6mm Rondelle BD006-B/CL from ButterBeeScraps.  I also used  Clear 4mm Bicone Crystals,  Clear 6mm Bicone Crystals, and Bronze 4mm Glass Pearls from my own stash.  


I also made a small bead dangle to hang up at the top of the owl's head.


On one side of the chain I created three wire wrapped bead links and alternated with with the chain.  I used the same beads, rondelles, and bead caps as I did for the beaded dangles.


I love how the beaded dangles give some movement to the necklace.


For the second owl necklace I added a little bit of color with the beads and a Patina finish on the filigree.  


I think the Patina finish is so pretty on the bronze metal.  On this necklace I added SS20 Aquamarine Flat Back Crystals for the eyes.  Then I added small bits of chain across the center and a Rhinestone Charms to the center of each chain.  At the bottom of the owl I added a few more Rhinestone Charms and then a larger wire wrapped and beaded dangle.  To create the dangle I used a Bronze Ball End Head PinsBronze 6mm Rondelle BD006-B/CL, and a Bronze Filigree Bead Cap CAP114-B all from ButterBeeScraps.  The Aqua Jesse James Glass Teardrop Bead and Two-Tone Aqua Blue Round Glass Beads are both from my stash.


I added another Rhinestone Charms at the top of the owl's head.  


I created wire wrapped bead links for each side of the necklace.  The  Bronze 6mm Rondelle BD006-B/CLBronze 8mm Rondelle BD008-B/CL are from ButterBeeScraps.   The bronze wire, Aqua Jesse James Large Glass Round Beads, and Two-Tone Aqua Blue Round Glass Beads were from my stash.  I alternated the bead links and then chain on both sides of the necklace.


Here is another close up look at the owl.


Over the past couple of months I have sold a lot of my jewelry piece that I have posted here on my blog.  Most of them are sold before I even have a chance to upload them to my Zibbet store.  I have also been doing some custom jewelry orders.  So I am going to start uploading the jewelry pieces to the store at the same time I post them on my blog.  If you are interested in either of the owl necklaces I uploaded both of them to my Zibbet store.  You can click HERE if you would like to check it out.

Thanks so much for stopping by today!

Hugs & Smiles,
Heidi


Supplies
ButterBeeScraps:  Owl Filigree Embellishment 644-B, White Resin Flowers RES003-WH, SS16 Clear Pointy Back Rhinestones, Bronze Ball End Head Pins, Bronze Bead Cap CAP052-B, Bronze 6mm Rondelle BD006-B/CL, Bronze 8mm Rondelle BD008-B/CL, Bronze Chain CH206-B,SS20 Aquamarine Flat Back Crystals, Rhinestone Charms, Bronze Filigree Bead Cap CAP114-B
Other Supplies:  Clear 4mm Bicone Crystals,  Clear 6mm Bicone Crystals, Clear 8mm Bicone Crystals, Aqua Jesse James Glass Teardrop Bead, Aqua Jesse James Large Glass Round Beads, Two-Tone Aqua Blue Round Glass Beads, Bronze 4mm Glass Pearls, Bronze Jump Rings, Bronze Wire, Bronze Clasp, Glossy Accents, E6000, Bronze Chain, Patina

LinkWithin

Related Posts Plugin for WordPress, Blogger...