Showing posts with label Christmas. Show all posts

Friday, December 15, 2017

The Stamp Simply Ribbon Store - Poinsettia Tea Cup Card

Hello everyone and happy Friday!  Today, I have a card to share with you using the NEW Stamp Simply Clear Stamp - Coffee or Tea? SS-023.  You might have seen a sneak peek of this card on the Stamp Simply Blog when Sharon announced the new releases.


Here is the card I designed.  This card could be used for Christmas or just as a thinking of you card through the winter months.  The stamp set is filled with several sentiments and verses.  The die set is a really fun one because it allows you to be able to build you cup.  There are two different sizes of the cups with matching handles, two little steam swirls, the words coffee and tea, and a tiny tag.  Some of the sentiments in the stamp set fit perfectly with the tiny tag.


To create the cup I die cut the cup two times.  Once using Wild Rose Studios - Birds & Berries and for the second one I used Gold Mirror Cardstock.  I also die cut the handle with the gold mirror cardstock.


I have a beautiful tea cup collection that was my Great Grandma's.  Several of the cups are edged in gold and I wanted to create the same look for my cup.  I cut the top and bottom of the gold die cut piece and then offset them and adhered them to the back of the pattern paper.


Here is a look at the cup once it was assembled.  I just love the gold accents and it reminds me of my Great Grandma's tea cup collection.


I die cut three of the little steam swirls from Vellum.  I adhered two to the back of the cup and then added the third swirl at the top.  I used glossy accents to adhere the steam swirls.  Since almost all adhesives show through vellum I added some Wink of Stella Clear Glitter Brush Pen on top of the swirls and then added White Pearls to each of them to help cover up where the adhesive was showing.


Here is a close up of the cup.  I also added some of the Wink of Stella Clear Glitter Brush Pen to the flowers on the pattern paper.  I added more white pearls along the top of the cup.  I die cut one of the tiny tags using white cardstock and then stamped the sentiment using Tuxedo Black Ink.  I used a piece of May Arts Gold Metallic String to attach the tag to the handle on the cup.


The card is a white A2 top folding card base.  I used a couple more pieces of the pattern paper from the same collection to layer in the background.  Then I used Foam Tape to attach the cup to the front of the card.

Thanks so much for stopping by today and I hope you enjoyed the card share.  If you would like to see more card inspiration I encourage you to check out the Stamp Simply Blog.  All of the supplies to create the card are listed and linked below and can be found at The Stamp Simply Ribbon Store.

I hope you have a wonderful weekend and Happy Holidays!

Heidi


Supplies
Stamps:  Stamp Simply Clear Stamp - Coffee or Tea? SS-023
Paper:  Wild Rose Studios - Birds & Berries, Gold Mirror Cardstock, Vellum, Cardstock - White
Ink:  Tuxedo Black Ink
Dies:  Stamp Simply Steel Dies - Coffee or Tea? SS-DIE011
Ribbon:  May Arts Gold Metallic String
Accessories:  Melissa Frances White Pearls, Wink of Stella Clear Glitter Brush Pen, Scrapbook Adhesives by 3L EZ Runner, Foam Tape

Thursday, December 22, 2016

Curating Christmas 2016-17 - "Share your heART" - Jill Norwood/Greenwood Girl Cards

Hello everyone!  I am so excited to share with you that I am participating in Curating Christmas 2016-17 - "Share your heART".  For the past few year Jill Norwood from Greenwood Girl Cards Blog has been doing Curating for Christmas.  Basically you take a space in your studio, craft room, table, or wherever your creative space is and create an area with all kinds of Christmas crafting goodies.  You can set it up however you would like.  You can add in finished projects, cards, things other people have gifted you and basically anything that will inspire you.  This is my first year doing this and I had a lot of fun creating my space.  I will say it has been very inspirational and I do find myself using a lot more supplies because they are all in one space.  If you aren't familiar with Jill Norwoood, I encourage you to check out her YouTube Channel and also her Blog.  Jill is one of the sweetest ladies and she is beyond talented!!  Every year Jill has a tradition.  She makes many beautiful Christmas tags that she share with her family and friends.  You can click HERE to visit Jill's YT channel and click HERE to visit her blog.  If you would like to see Jill's Curating Christmas video you can click HERE.  A good majority of the people who participate in Curating Christmas are Jill's subscribers and friends on YouTube and a lot of them have done video responses to share what they have done.  If you go on YT and type Curating Christmas 2016-2017 in the search bar it should pull up a whole bunch of videos for you to check out.  You can also type #curatingchristmas2016-2017.


Here is a overall look at my Curating Christmas space.  I had so much fun creating this space!  I don't have all of my Christmas stuff out just because I wouldn't have room for everything. Also, since I design for a few different companies I have all of those supplies in other areas. You can click on any of the images to enlarge them and see more details.


Here I have some wooden spools, jingle bells, flowers and some bottle brush trees.  I also have a wood box in the back that is filled with vintage salt and pepper shakers to create some snowmen.  You can also have a peek at a Christmas canvas that I just finished and it will be on the Tonic Studios Blog soon.


This is a little dish with some vintage buttons and a sweet little vintage ballerina. 


This is a little pine cone Christmas tree.


Here is a vintage muffin tin with some fun embellishments.


In this picture there is a little Christmas treat bag I created for Tonic Studios.  Then I have some tiny ornaments that I made using bottle brush trees, vintage spools and some vintage sheet music. I have a snowman figurine and another ballerina with some tiny faux peppermint candies made from melting perler beads. 


Here is a close up of one of the tiny bottle brush tree ornaments.


These are a couple of ornaments I made using vintage tart tin and more tiny bottle brush trees.


This is a Christmas tree made with a vintage wooden spool, strips of material, and ribbons.


In this picture I have some Christmas picks, glass glitter, a container with some washi tape, and a basket full of different kinds of snowflakes.  I also have some felt mitten ornaments that I made.


Here is a close up of the mail box.  My sweet friend Tammy gave me that last year and it was filled with all kinds of yummy goodies.  


These are some Christmas tags that I made last year and I have a few left.


This is a Christmas ornament that I made using ICE Resin and also lots of pearls and crystals from ButterBeeScraps.


Here I have a basket filled with ribbon, twine, flowers and a few other supplies.  The snowman wreath tag is something that my aunt Gail designed and gave to me last year.  It's so cute!  Then I have another basket with some of the Christmas cards I have made this year.


In this picture I have some felt ice skate ornaments and some punches.


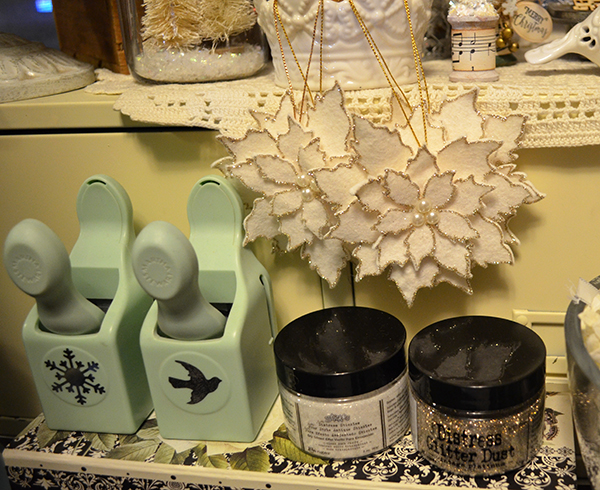
Here I have a couple more punches, glitter and some felt poinsettia ornaments.


Here is my last picture with a close up of the Christmas tree.

Jill also asked if we had any Christmas traditions or fun stories to share.  Our family (extended family) started a newer tradition just a couple of years ago.  We decided instead of buying Christmas presents for each other would would take the money we would have spent on the presents and do something good with the money.  It was up to each of us--we could donate to a charity, buy presents for the angel tree, toys for tots, teddy bear toss, or maybe a buy food or presents for a family in need.  I think it's a wonderful tradition that we will carry on for many years to come.  It always feels good when you do good.

I hope you enjoyed all if the pictures and hearing about our family tradition.  I want to say a Huge Thank You to Jill for all of her inspiration throughout the year, her friendship and inspiring so many to do the Curating Christmas!!  Hugs to you my sweet friend!! 

Wishing you all a very Merry Christmas!!!

Hugs & Smiles,
Heidi

Friday, December 25, 2015

Merry Christmas!!

From our house to yours we wish you a very 
Merry Christmas!!!


Love, Peace, Joy, and Many Blessing to you all!!!

Hugs & Smiles,
Heidi

Saturday, December 12, 2015

Exciting News To Share!! Tonic Studios USA Blog Ambassador and Christmas Star Shaker Tag

Hello blogging friends!  Today, I have some exciting news that I can finally share!  If you follow me on Facebook then you already know but I also wanted to share the news here on my blog.  I am so very excited to share that I am a Tonic Studios USA Blog Ambassador!!  I am so honored to be able to design for Tonic Studios!  They are a fantastic company and have so many beautiful products including--dies, punches, tools and cutters (the Tim Holtz tools!), glitters, paints and so much more!!

You can click HERE to check out the official announcement.  :)


I also have a project to share with you using some of the fabulous Tonic Studio dies.  I designed a star shaker tag using the 643E Star Bauble Die Set .  You might have seen this posted on the Tonic Gold Blog but I also wanted to share it here.  I know this tag might look like a lot of work but honestly the dies do most of the work for you lol.  It just a matter of making the die cuts and then layering the pieces together.

1.  Die cut the large fancy star with the center inset star die from gold foil paper.
2.  Die cut the straight edge star with acetate.
3.  Die cut the star ornament piece twice–once from gold foil paper and once from white craft foam.        Then fussy cut and make a couple of snips to remove the center stars from the ornament pieces             leaving just the frame of the largest star.
4.  To assemble use Craft-Tacky Glue–start by gluing the acetate to the back of the gold ornament             piece.  Then adhere the white craft foam ornament piece.  Set aside and let glue dry.
5.  Add sequins.  Use the star die cut that was the drop out piece from the fancy star (gold foil star),          flip to the backside (white) and adhere to the back of the shaker.  Set aside and let glue dry before      shaking the sequins.
6.  To finish adhere fancy star die cut to the front.
7.  Add red seam binding and gold metallic string to attach to gift bag.  This could also be used as a          Christmas ornament!


Here is a look at the shaker tag on the gift bag.  It really dresses up a simple kraft paper gift bag!  I also added some Lipstick Red Seam Binding and May Arts - Metallic Gold String.  I used the 419E Craft Tacky Glue 120ml to adhere all of the pieces together.  I have to tell you on the bottle of glue it says--extra fine precision tip--it really truly is!  There is a tiny pin hole in the tip and it is prefect for adding glue to very detailed die cuts.  Also, I have been using this glue for a while now and I haven't had any problems with the tip getting clogged up so that is another plus!  I used a mix of sequins from Cartwright Sequins to fill the star shaker.  One key thing to making shaker tags or cards -- don't overfill with sequins.  If you add too many sequins they won't be able to move around and when you go to shake the tag or card you won't have any movement.  Sometimes less is more.  :)


Thanks so much for stopping by today!  I hope you have a fantastic weekend!

Hugs & Smiles,
Heidi

Supplies:
Paper:  DCWV - Gold Foil Paper
Accessories: Tonic Studios - 419E Craft Tacky Glue 120ml, Craft Foam, Acetate, Cartwright Sequins, Kraft Gift Bag


Wednesday, November 11, 2015

Warm Wishes CAS Christmas Card and Tis The Season Christmas Card - Tonic Studios

Hello everyone!  Now that Halloween has passed and Thanksgiving will be here in just a couple of weeks I am in full swing for making Christmas cards, ornaments and presents.  I have a sale coming up November 28th (more information to come) so I have been busy designing a lot of jewelry too.  I am so excited to be a Guest Blogger for Tonic Studios today!  I have a couple of Christmas cards to share with you.  One of the cards is pretty CAS (Clean And Simple) and the other card has a lot of sparkle and detail.


Lets start with the CAS card first.  To create this card I started with a piece of white cardstock cut to 3-1/2 x 5.  Then lay the die template across the top (5 in side), tape in place and die cut.   I used 598E Header Fold Die Set Christmas Wishes from Tonic Studios.  After die cutting trim down sides to fit card and adhere to a light blue mat.  I stamped the Winter Wishes sentiment from Simon Says Stamps Hand Lettered Winter Wishes stamp set with VersaMark ink and heat embossed with Ranger Super Fine Detailed Gold Embossing Powder and a Heat Tool.  Next I added a layering mat with pink cardstock.  I used 422E Funky Tape Runner and 419E Craft Tacky Glue 120ml to adhere all the layers.


Save the drop out pieces to add stars and snowflakes to the top (sky part) of the card.  I used 419E Craft Tacky Glue 120ml to adhere all the tiny pieces.  Then I added Nuvo Crystal Drops - 660N Wedgewood Blue to the stars and snowflakes and 666N Gloss Carnation Pink on the tree to look like little lights or ornaments.


To finish off the card I added some May Arts Sheer Gold Sparkle ribbon and adhered everything to a light blue A2 card.


My second card is a lot more detailed, full of sparkle and I am using black for a non-traditional color.  I have to tell you I absolutely love the frame die cut on this card!  I used 641E Christmas Wreath Die Set 'Tis The Season from Tonic Studios.  Now I know this die set is in the Christmas collection but you could really use the frame die template year round.  I love all the flourishes.  To start I die cut the white frame using the 641E Christmas Wreath Die Set 'Tis The Season.  I added 3D Foam squares to the back of the frame to pop it up and add a little dimension.  I added the frame die cut to a black 5.5 x 5.5 card.  Then I applied 422E Funky Tape Runner to the white drop out piece and added it to the center of the frame.  


Next I die cut the Tis The Season sentiment using Gold Mirror cardstock.  Here is a **TIP** Gold foil or gold mirror paper will show any little imperfections like the cut lines in the mats used for die cutting. To avoid this lay down a scrap piece of paper on your mat and then add gold foil or mirror paper and die on top--results--no imperfections.  I used 419E Craft Tacky Glue 120ml to adhere the sentiment.  I really like the detailed tip on the glue bottle--it has such a tiny hole and it is fantastic for gluing the detailed die cuts.


To create the poinsettias I used 80E Rococo Poinsettia Strip Die from Tonic Studios.  I die cut the poinsettias three times--once with green cardstock and twice with red cardstock.  On both red die cuts fussy cut out the flowers.  On the green die cut use the Nuvo 203 Glue Pen Medium to quickly go over the leaf and vine areas and then I added Nuvo Pure Sheen Glitter 701N Green.  Then I used the Nuvo 203 Glue Pen Medium on the red poinsettias and then add Nuvo Pure Sheen Glitter 700N Ruby Red.  Tap off excess glitter and use 419E Craft Tacky Glue 120ml to adhere the red poinsettia pieces on top of the green poinsettia die cut piece.  Use 3D foam squares on the flowers to add some dimension to the card.  To finish off the poinsettias I added Nuvo Crystal Drops 653N Bright Gold to the flower centers.


I also added some Nuvo Crystal Drops 653N Bright Gold to a couple of the corners on the card.

I hope you enjoyed both of the cards I shared today.  I am loving the Christmas die collection from Tonic Studios!  

Did you know that Tonic Studios US now has a blog and website?  If you haven't already been over there you can click HERE to check it out.  While you are there take a look around.  They have a beautiful collection of dies, a variety of tool and some fabulous new Nuvo Pure Sheen Glitter and Nuvo Crystal Drops.  

Tonic Studios also announced last week they are having a 
TONIC US AMBASSADOR DESIGNER CALL!  
You can click HERE for all of the information.

Would you love to win some fabulous crafty goodies from Tonic Studios USA? During this season of gratitude and Thanksgiving Tonic Studios will be having some amazing giveaways.  
You can click HERE to visit the Tonic Studios USA Facebook Page and find out the details on how you could win!

Thanks so much for stopping by today and I hope you have a beautiful day!

Hugs & Smiles,
Heidi

Warm Wishes Card
Tonic Dies:  Tonic Studios - 598E Header Fold Die Set Christmas Wishes
Tonic Accessories:  Nuvo Crystal Drops - 660N Wedgewood Blue666N Gloss Carnation Pink422E Funky Tape Runner419E Craft Tacky Glue 120ml
Paper:  Cardstock - White, Lt. Blue, Pink
Stamps:  Simon Says Stamps Hand Lettered Winter Wishes
Ink:  Versa Mark
Ribbon:  May Arts Sheer Gold Sparkle
Accessories:  Ranger Super Fine Detailed Gold Embossing Powder, Heat Tool

Tis The Season Card
Tonic Dies:  Tonic Studios641E Christmas Wreath Die Set 'Tis The Season , 80E Rococo Poinsettia Strip Die
Tonic Accessories:  Nuvo Pure Sheen Glitter - 700N Ruby Red, 701N Green, Nuvo Crystal Drops - 653N Bright Gold, Nuvo 203 Glue Pen Medium, 422E Funky Tape Runner, 419E Craft Tacky Glue 120ml
Paper:   Cardstock - Gold Mirror, Black, White, Green, Red,
Accessories:  3D Foam Squares


Friday, November 6, 2015

The Stamp Simply Ribbon Store - Silver Bells Merry Little Christmas Card

Hello blogging friends!  Today, is my day to post for The Stamp Simply Ribbon Store.  I have another CAS (Clean And Simple) Christmas card to share with you.  Over on the Stamp Simply Blog we are celebrating the 12 Days of Christmas with CAS cards.  Today, is day 5 and if you are looking for inspiration to create some CAS cards then be sure to hop on over to the Stamp Simply Blog and check it out!


Here is the card that I designed.  I used the KaiserCraft Silver Bells 6-1/2'' Paper Pad to create this card.  This paper pad is filled with beautiful pastel Christmas images.  It also includes some foiled papers and die cuts in the paper pad. I just love these colors for Christmas.


Here is a close up of the beautiful vintage image of Santa.  I used some light blue pattern paper from the paper pad to add a mat layer behind the image.  The label shape with the sentiment is also from the paper pad.  I added a couple of Therm-O-Web 3D Square to pop the die cut shape up.  Then I added some May Arts - Pink Silk Ribbon and Melissa Frances White Pearls.


The card base is light blue cardstock and this is an A2 top folding card.


Thank you so much for stopping by!

Please be sure to check out The Stamp Simply Ribbon Store for all of the fantastic paper crafting products and the Blog for inspiration from the Design Team.

I hope you have a wonderful weekend!

Hugs & Smiles,
Heidi


Supplies
Paper:  KaiserCraft Silver Bells 6-1/2'' Paper Pad, Cardstock - Light Blue
Ribbon:  May Arts - Pink Silk Ribbon
Accessories:  Melissa Frances White Pearls, Scor-Tape, Therm-O-Web 3D Square

Wednesday, October 14, 2015

Vintage Christmas Angel Ornament - ButterBeeScraps and ICE Resin

Hello everyone!  I can't believe on Sunday it was 84 degrees here in Minnesota but today we are back down to the more normal Autumn temps -- it's in the 30's this morning!  Brrrr  LOL!  Today, I have another Christmas ornament to share with you.  I am going to be doing a show in November for Small Business Saturday (more information to come) so I have been busy creating--Christmas ornaments, lots of jewelry, home decor and small gift items.


Here is a look at the Christmas ornament.  I started with a Hobnail Circle Bezel and added the Christmas Angel Image.  The bezel is filled with ICE Resin and then I sprinkled in a little Silver German Glass Glitter.  I added 4 mm Rhinestone Chain around the outer edge of the bezel and then I added a piece of Bronze Metal Filigree Embellishment (#020-B).  I spray painted the filigree with Krylon White Flat Spray Paint, buffed it with steel wool and then sealed it with Krylon Crystal Clear Sealer.  I also added little clusters of SS12 Clear Flat Back Glass Rhinestones and white flat back pearls around the metal filigree piece.


Here is a close up of the embellished bezel.  I just love the image of this little angel! 


To create the beaded chandelier dangle I used some bronze wire and wire wrapped the Clear GLASS Chandelier Drop Pendants (#GL1437-CL) and then I added Bronze Filigree Bead Caps (#CAP629-B) (Lg Bead Cap).  Next I added some pearls from my stash and a Bronze Filigree Bead Caps (#CAP052-B) (Sm Bead Cap) with a couple of Clear Rhinestone and Bronze Rondelle Spacer Beads – 8mm (#BD008-B/CL) and Clear Rhinestone and Bronze Rondelle Spacer Beads – 6mm (#BD006-B/CL).  Then I connected the dangle to the bezel and wire wrapped the loop.  To finish off the bezel I added some seam binding for the hanger.


Thanks so much for stopping by today!

Don't forget to hop on over to ButterBeeScraps and check out all of the metal filigrees, bling and jewelry findings--there is something for everyone!

Hope you have a beautiful day!

Hugs,
Heidi

Supplies
ButterBeeScraps
Bronze Metal Filigree Embellishment (#020-B)
Clear GLASS Chandelier Drop Pendants (#GL1437-CL)
Clear Rhinestone and Bronze Rondelle Spacer Beads – 8mm (#BD008-B/CL)
Clear Rhinestone and Bronze Rondelle Spacer Beads – 6mm (#BD006-B/CL)
SS12 Clear Flat Back Glass Rhinestones
Bronze Filigree Bead Caps (#CAP629-B) (Lg Bead Caps)
Bronze Filigree Bead Caps (#CAP052-B) (Sm Bead Cap)

Other Supplies
Krylon White Flat Spray Paint
Krylon Crystal Clear Sealer
E6000
Steel Wool
Bronze Wire
Pearls
Flat Back Pearls
4 mm Rhinestone Chain
Hobnail Circle Bezel
ICE Resin
Silver German Glass Glitter
Christmas Angel Image
Seam Binding
Round Nose Pliers
Bent Nose Pliers
Flush Cutter
Mod Podge
Ranger Multi Medium Matte

Saturday, October 10, 2015

DIY Snowflake Christmas Ornament Tutorial with ButterBeeScraps and Krylon Paint

Hello everyone!  Today, I have a quick and easy Christmas project to share with you.  Halloween is right around the corner and before with know it we will be celebrating Thanksgiving and then Christmas.  I love decorating for the holiday but some of the home decor and decoration can be a little spendy so I love doing DIY projects.  Especially if I find something really inexpensive like items from the dollar store and I can put a creative spin on it to create something beautiful for the home.  Today, I am going to share with you how I used snowflakes from the dollar store and added some embellishment to make some beautiful ornaments for the tree.


Here is the snowflake from the dollar store.  It's just a simple plastic glittery snowflake.  Pretty on it's own and full of sparkle when the lights from the tree hit all the glitter.  But think of all the ways these snowflakes can be embellished.


Check out the snowflake after I added some metal filigree pieces and a bit of bling.  It totally changes the look of the snowflake.  I just love how these turned out!  So beautiful and elegant.  To look at the snowflake now you would never think it came from the dollar store.


All of the metal filigree pieces and bling that I used are from ButterBeeScraps.  All of the metal filigree pieces were bronze and I used Krylon Flat White spray paint on all of the pieces.  Then I buffed them using steel wool to reveal some of the metal.  You can see in the photo the oblong metal filigree piece Bronze Metal Filigree Embellishment (#683-B).  I used four of these filigree pieces and cut them in half for a total of eight pieces.  I also used two of the Bronze Snowflake Metal Filigree Embellishment (#203-B).  I left one of the snowflakes flat and the other one I bent the tips for some added dimension.


Here you can see how I started to add the metal filigree pieces.  I used Ranger - Multi Medium Matte with a fine tip of the bottle to glue everything in place.  This is a great adhesive--it's very strong just like glossy accents but it drys with a matte finish so if you have any adhesive the seeps out from under the embellishments you don't see it.


Here I added the second layer of the filigree pieces.  After I had all of these pieces glued in place then I layered the two snowflakes and added a Bling Center RES823-CL.  I also added some SS20 Clear AB Flat Back Crystal Rhinestones for a little more sparkle.


Here is a close up of the snowflakes in the center.


I hope you enjoyed this quick and easy DIY tutorial!  I know I will be making a few more of these snowflakes--I think they will look beautiful on the tree!

Thanks so much for stopping by today!

Don't forget to hop on over to ButterBeeScraps and check out all of the metal filigrees, bling and jewelry findings--there is something for everyone!

Hope you have a fantastic weekend!

Hugs,
Heidi


Supplies
ButterBeeScraps:  Bronze Snowflake Metal Filigree Embellishment (#203-B)Bronze Metal Filigree Embellishment (#683-B)SS20 Clear AB Flat Back Crystal Rhinestones, Bling Center RES823-CL

Other Supplies:  Krylon White Spray Paint, Steel Wool, Ranger - Multi Medium Matte

LinkWithin

Related Posts Plugin for WordPress, Blogger...