Hello and Happy Monday! Wow--I can't believe how fast this month has gone by--Thanksgiving is only a few days away! We don't have much snow on the ground but it has gotten very cold here in MN.
Today, I have a little Christmas ensemble and a tutorial that I designed for The Stamp Simply Ribbon Store to share with you.
Look at the beautiful pattern paper from Webster's Pages A Christmas Story 6 x 6 Paper Pad Collection. I love the red and green with a touch of pink. I created a card, a double pocket candy holder and used a mini craft bag to for a gift card holder.
Here is the card that I designed. I used the same pattern paper from the Webster's Pages A Christmas Story 6 x 6 Paper Pad Collection on all of the projects. I also used some pink and green cardstock. For the card I used the S2-057 Holly Wreath, S5-131 A2 Matting Basics A and S5-132 A2 Matting Basics B die templates from Spellbinders Creative Arts®. I created the two mats and then added the wreath on top of the pattern paper. I used 3D Foam Squares for a little added dimension on the wreath. Then I layered Cluny Lace 1/8" - Antique White, the green lace trim from the Webster's Pages A Christmas Story Designer Trims and May Arts 1/8'' Red Velvet ribbon. I added a Maya Road Velvet Pleats Red with two of the Prima Flowers Abbey-Pink in the center. To add a little sparkle to the flowers I used Tombow Mono Multi Liquid Glue and Tim Holtz Distress Glitter - Clear Rock Candy. To finish off the card I added a few Kaiser Craft Light Pink Rhinestones.
To create the gift card holder I used one of the Webster's Pages Mini Craft Bags. I used the same ribbons, trims and flowers as the card. I added a bow to the top and a few rhinestones.
For the double pocket candy holder I used the Webster's Pages A Christmas Story 6 x 6 Paper Pad Collection, Webster's Pages A Christmas Story Designer Trims, May Arts 1/8'' Red Velvet and added another velvet pleat with flowers to the center.
I have a tutorial to share with you on how I created the double pocket holder. This is not my original design idea and unfortunately I can't remember where I first saw this but I think it was a few years back from
Stampin' Up. This is also know as the double tea bag holder.
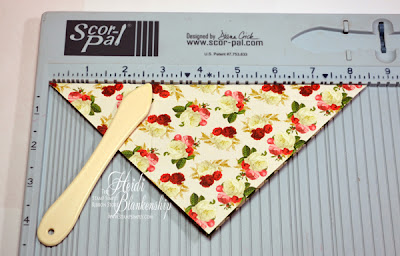
Start with a piece of 6 x 6 pattern paper. Double sided paper is the best for prettier results but not a must. Fold the paper so two points meet to create a triangle. Then on the long side score at 1/2'', turn the paper over and score again at 1/2''.
Now place the long side of the paper at the top of the score board. Score at 2-3/4'' and then turn over and score at 2-3/4'' again.
Now open the paper. Then fold one of the sides with the score marks towards the center as shown in the photo.
Take the other side and fold over. Your paper should look like the photo above.
Now turn the paper over. Then fold on the center score line. Next fold backwards on the two outer score lines to create a W shape.
Bring the two outer points together.
Here is a side view of what this should look like and there will be two little pockets--one on each side. Punch a hole at the top and add some ribbon to hold in place. I also like to add a little bit of hot glue to the bottom and where the papers cross to make the pockets. Doing this helps hold everything together and makes it a little more sturdy. Like I said this is also known as the double tea bag hold but you can put several different things into the little pockets--tea bags, candy (the individual Ghiradelli Chocolates work great), a pair of earring on a card and gift cards just to name a few things. I think these are great for the holidays--when you need a little something.
Please be sure to check out The Stamp Simply Ribbon Store for all of the fantastic products and the Blog for inspiration from the Design Team.
Thank you so much for stopping by today! I hope you like the Christmas ensemble and the tutorial for the double pocket holder.
I hope you have a creative day!
Hugs & Smiles,
Heidi
Supplies
Paper: Webster's Pages A Christmas Story 6 x 6 Paper Pad Collection - The Stamp Simply Ribbon Store; Cardstock Pink, GreenDies: Spellbinders Creative Arts® Grand Calibur® Machine, S5-131 A2 Matting Basics A, S5-132 A2 Matting Basics B, S2-057 Holly Wreath
NOTE: You can also find Spellbinders® products at The Stamp Simply Ribbon Store
Ribbon/Lace: Webster's Pages A Christmas Story Designer Trims, May Arts 1/8'' Red Velvet, Cluny Lace 1/8" - Antique White - 3 yard Bundle - The Stamp Simply Ribbon Store
Accessories: Webster's Pages Mini Craft Bags, Maya Road Velvet Pleats Red, Prima Flowers Abbey-Pink, Prima Leaves Florella Light Green, Kaiser Craft Light Pink Rhinestones, Tombow Mono Multi Liquid Glue, Tim Holtz Distress Glitter - Clear Rock Candy, Scrapbook Adhesives by 3L® 3D Foam Squares, EZ Runner® Permanent Strips-Refillable Dispensers 49', - The Stamp Simply Ribbon Store; Ghiradelli Chocolates
NOTE: You can also find Scrapbook Adhesives by 3L® products at The Stamp Simply Ribbon Store


AMAZING!!! I LOVE the papers and the use of pink and green make it so much more interesting. Velvet ribbon adds an air of luxury. TFS.
ReplyDeletethanks for sharing. that paper is amazing.
ReplyDeletegreat project. Do you think a gift card would fit in one pocket?
ReplyDelete