Tuesday, September 29, 2015

JustRite Papercraft Tutorial Tuesday - Prima Water Soluble Oil Pastels with Multi-Step Stamping

Hello everyone!  
I am so happy to be back sharing the JustRite Papercraft Tutorial Tuesday with all of you!  


Today, in the tutorial I am featuring the Prima Water Soluble Oil Pastels.  Love these!!  I also used the CR-02187 Multi-Step Poinsettia Clear Stamp from  JustRite Papercraft along with some beautiful dies from  Tonic Studios.


Here is the card that I designed for the tutorial.  The Prima Water Soluble Oil Pastels are so easy to work with and they blend beautifully.


Here is the second card that I designed.  For this card I did  generation stamping to get the different looks using the same pastel color.  All of the details for this are listed on the JustRite Inspiration Blog and also in the Prima Water Soluble Oil Pastels with Multi-Step Stamping YouTube video.  You can click HERE to see the blog post and click HERE for the video.


Here is the third card that I designed.  I love the non-traditional Christmas colors!

Hop on over to the JustRite Inspiration Blog for a full step-by-step tutorial (written and video).  Lots of photos and all of the details.  There is also a Giveaway! :)

I hope you enjoy the tutorial and projects!  Thanks so much for stopping by today!

Hugs,
Heidi


Supplies
Card #1 Wishing You Christmas Card (Tutorial) 5.5 x 5.5 square card
Stamps:  JustRite Papercraft CR-02187 Multi-Step Poinsettia Clear Stamp
Paper:  Strathmore Mixed Media, Cardstock - Red, Brown
Pastels/Ink:  Prima Water Soluble Oil Pastels, Memento - Rhubarb Stalk
Dies:  Tonic Studios 480E Square Layering Die Set
Accessories:  Sequins - Gold 4mm, Tea Rose 4mm, Pearl Satin 3mm, Quick Stick, Ranger Multi Medium Matte, White Kraft Foam, ATG, Heat Tool, Paint Brush Round 8, 16

Card #2 Merry Christmas Card A2 Top Folding Card
Stamps:  JustRite Papercraft CR-02187 Multi-Step Poinsettia Clear Stamp
Paper:  Strathmore Mixed Media, Cardstock -White, Kraft
Pastels/Ink:  Prima Water Soluble Oil Pastels, Memento - Rich Cocoa
Dies:  Tonic Studio 489E Trellis Circle Base Die Set
Accessories:  May Arts Gold Metallic String, Zig Wink of Stella Clear Glitter Brush Pen, White Pearls, Foam Tape, Ranger Multi Medium Matte, Glossy Accents, Hot Glue, ATG, Heat Tool, Paint Brush Round 8, 16

Card #3 Peace Christmas Card 4.5 x 6.5 Card
Stamps:  JustRite Papercraft CR-02187 Multi-Step Poinsettia Clear Stamp
Paper:  Strathmore Mixed Media, Cardstock -White, Aqua, Lavender
Pastels/Ink:  Prima Water Soluble Oil Pastels, Memento - Teal Zeal, LuLu Lavender
Dies/Folder:  Tonic Studio 484E Mixed Scalloped and Straight Rectangles Layering Die Set, 639E Keepsake Royal Frame & Butterfly Insert Die Set, A4 Embossing Folder - Annabel
Accessories:  Aqua Bling, Ranger Multi Medium Matte, ATG, Craft Foam, Heat Tool, Paint Brush Round 8, 16

Saturday, September 26, 2015

ButterBeeScraps - Monthly New Release Projects - Beaded Dangle Bookmakr, Earrings, and Vintage Altered Key

Hello everyone!  Today, I have three quick and easy projects to share with you.  Every month around the 15th Monique, owner of ButterBeeScraps shares the New Releases for the month.  Each month the Design Team members will create some new projects with the new monthly release products for some inspiration.  Each designer is sent different products so you will see a nice variety of projects with the new releases.


Here is my first project.  These ANTIQUE BRONZE CUSTOMIZABLE BOOKMARKS (#M038-B) are new this month and I added a beaded dangle to the bookmark.


Here is a close up of the beaded dangle.  I used the GOLD FILIGREE BEAD CAPS (#CAP857-G) which are also a new release.  You can use these as bead caps or you can flatten, layer and shape them to create tiny flowers, use as flower centers or embellishments.  I also used BRONZE FILIGREE BEAD CAPS (#CAP052-B) and CLEAR RHINESTONE AND BRONZE RONDELLE SPACER BEADS – 6MM (#BD006-B/CL)  from ButterBeeScraps.  The beads, chain, jump rings and headpins are from my stash.


These bookmarks are quick and easy to create.  They would make great gifts for the upcoming holidays.  Christmas will be here before we know it lol.


For my second project I designed these pretty and dainty earrings using the GOLD METAL FILIGREE EMBELLISHMENTS (#558-G).  I love how tiny these are!  All of the other supplies are from my stash.


Thank you so much for stopping by today and I hope you will hop on over to ButterBeeScraps and check out the new releases for this month and all of the other goodies in the store!

Hope you have a wonderful weekend!

Hugs,
Heidi

Supplies ButterBeeScraps:
ANTIQUE BRONZE CUSTOMIZABLE BOOKMARKS (#M038-B)
GOLD FILIGREE BEAD CAPS (#CAP857-G)
GOLD METAL FILIGREE EMBELLISHMENTS (#558-G)
SS12 AQUAMARINE FLAT BACK GLASS RHINESTONES
SS16 AQUAMARINE FLAT BACK GLASS RHINESTONES
BRONZE FILIGREE BEAD CAPS (#CAP052-B)
CLEAR RHINESTONE AND BRONZE RONDELLE SPACER BEADS – 6MM (#BD006-B/CL) 

Friday, September 25, 2015

The Stamp Simply Ribbon Store - Warm Wishes Autumn Card - Watercolor with Distress Inks

Hello blogging friends!  Today, is my day to post for The Stamp Simply Ribbon Store.  I have a beautiful Autumn watercolor card to share with you using an emboss resist technique and Tim Holtz Distress Inks.  I also have a couple of step-by-step photos so you can see the process.


Here is the card I designed using A2 Garden View Background and Extra Grand Holiday Sentiments stamp sets from JustRite Papercraft.  I used Tim Holtz Distress Inks to create the beautiful colors for the background.  This card is one that could very easily be replicated several times over.


To start  I stamped the A2 Garden View Background on to  Ranger Watercolor Paper.
I heat embossed the background using Lightening Black Brilliance Pigment Ink with Ranger Super Fine Embossing Powder - Clear.  Then I used Tim Holtz Distress Inks - Worn LipstickWild HoneyPeeled Paint, Gathered Twigs to create the watercolors.  Here you can see in the photo I added the ink to the (pink) craft mat and then added water to activate the inks.  Then I took a clean brush (this isn't shown in the photo) and applied water to the entire piece of  Ranger Watercolor Paper.  Then I started to add the color.  I started at the top of the paper adding Worn Lipstick and then Wild Honey.  I was adding the color at an angle.  Then I added Peeled Paint and Gathered Twigs.  I was blending a little in between the colors.  After I had the watercolor in the area I wanted then I used a heat tool to dry the paper.  I went in again and added a second layer of colors, blending in between.  Adding the layers of color will add depth to the background.  Then I heat set the paper again.  In the bottom corner I purposely over heated the embossed area an it gives it a mottled look which I will show a close up of in another picture.  


After the paper was dry then I added water droplets.  Let the water sit on the paper for a few seconds and then blot with a paper towel.  You can do as many layers of the water droplets as you would like.  I think on this card I did three layers.  Be sure to heat set your paper in between so the paper is dry each time you add more water.


Here you can see what the paper looks like when the water droplets are removed.  Pretty cool effect!


Earlier I mentioned over heating the embossing to create a mottled effect and here is a close up.  I think this kind of neat and it gives it a different look and feel.


To finish off the card I added the sentiment and heat embossed it.  I also stamped the word warm on to ivory cardstock and fussy cut a little flag.  Then I added a couple of Petaloo Botanica Sugared Minis - Burgundy flowers.

I hope you enjoy today's card and tutorial.
Thank you so much for stopping by!

Please be sure to check out The Stamp Simply Ribbon Store for all of the fantastic paper crafting products and the Blog for inspiration from the Design Team.

I hope you have a wonderful weekend!

Hugs & Smiles,
Heidi


Supplies
Stamps:  JustRite Papercraft A2 Garden View BackgroundExtra Grand Holiday Sentiments
Paper:  Ranger Watercolor Paper, Cardstock - Black, Ivory
Ink:  Tim Holtz Distress Inks - Worn Lipstick, Wild Honey, Peeled Paint, Gathered Twigs; StazOn - Jet Black, Brilliance Pigments Inks - Graphite Black, Lightening Black
Accessories:  Ranger Super Fine Embossing Powder - Clear, Petaloo Botanica Sugared Minis - Burgundy, 3D Foam Squares, Scor-Tape, Heat Tool, Paint Brush (Round 16)

Wednesday, September 23, 2015

ButterBeeScraps - Spooky Vintage Halloween Couple - Home Decor

Hello everyone!  It's almost the end of September so Halloween will be here before we know it.  So I figured I better get started on my Halloween crafts.  Today, I have a fun Halloween home decor piece to share with you.  I used some charms, filigree, resin flowers, and rhinestones from 
ButterBeeScraps to create my projects and then I used some bits and pieces from my own stash too.


I had a couple of small 4 x 4 black frames and I thought these would be great for some framed Halloween home decor pieces.  The background paper and the images of the man and woman are from the Tim Holtz Regions Beyond 8 x 8 Paper Pad.  I also used some black cardstock.  To create the oval die cut shapes I used  Spellbinders Classic Ovals Small and Large.  Then I added all the bits and pieces to embellish each frame.


I wanted to use charms from both the PARISIAN TIBETAN CHARMS COLLECTION (candles) and HAUNTED HALLOWS TIBETAN CHARMS COLLECTION (spiderweb).  One was silver and one bronze.  Anything with gold is so on trend right now and I wanted to accent the frames with gold so I decided to spray paint both of the charms.


For the most part I usually buy Krylon spray paint (it's just a personal fave) but I picked up this Metallic Gold from Rust-Oleum because out of all the bottles of gold metallic spray paint this was the only one that said bright gold on the label and that is exactly what I was looking for.


Here is a closer look at the frame with the man.  I love the images of the vintage photos in the paper pad--they are great for creating small home decor pieces like this.


Here is a close up of the spider on the web.  This charm is from the HAUNTED HALLOWS TIBETAN CHARMS COLLECTION.  I added a SS12 SIAM FLAT BACK GLASS RHINESTONES for the body of the spider.  Then I used a black safety pin to attach the charm to the gold metallic bow.


I added BRASS VINE FLOURISH METAL FILIGREE EMBELLISHMENT (#006-G) to accent to ovals and the vintage photo.  Then I added SS16 JET FLAT BACK GLASS RHINESTONES to the center of each piece.  I used Ranger Multi Medium Matte to adhere all of the bling and metal pieces.


Here is a close up of the frame with the woman.  The frames are basically the same except for the images and the charms.


Here is a close up of the candles.  This charm is part of the PARISIAN TIBETAN CHARMS COLLECTION.  I added a SS20 SIAM FLAT BACK GLASS RHINESTONES to the center of the candles.  Then I added a black safety pin to attach the charm to the gold metallic bow.  I used May Arts Gold Metallic String to create the bows.  To finish the piece off I added a black RESIN FLOWER CABOCHONS (#RES612-BK) to the center of the bow.


Then I added the  BRASS VINE FLOURISH METAL FILIGREE EMBELLISHMENT (#006-G) around the photos and added SS16 JET FLAT BACK GLASS RHINESTONES to the center of the filigree pieces.

I hope you enjoyed this fun framed Halloween home decor piece.  These are so quick and easy to make for the holiday.

Don't forget to check out ButterBeeScraps Online Store and Blog!

Thank you so much for stopping by today!  

Hugs,
Heidi


ButterBeeScraps Supplies
Charms - PARISIAN TIBETAN CHARMS COLLECTION (candles), HAUNTED HALLOWS TIBETAN CHARMS COLLECTION (spiderweb)
Gold Filigree - BRASS VINE FLOURISH METAL FILIGREE EMBELLISHMENT (#006-G)
Resin Flower - RESIN FLOWER CABOCHONS (#RES612-BK)
Black Safety Pin
Flat Back Rhinestones - SS16 JET FLAT BACK GLASS RHINESTONES,  SS12 SIAM FLAT BACK GLASS RHINESTONESSS20 SIAM FLAT BACK GLASS RHINESTONES
Other Supplies
4 x 4 Black Frames
Paper - Tim Holtz Regions Beyond 8 x 8 Paper Pad, Black Cardstock
Dies - Spellbinders Classic Ovals Small and Large
Paint - Metallic Gold Spray Paint
May Arts Metallic Gold String
Ranger Multi Medium Matte
Foam Tape
Hot Glue

Sunday, September 20, 2015

JustRite Papercraft - Day Six Christmas Release - Merry Christmas Card

Hello everyone and welcome to the last day of the JustRite Papercraft Christmas Release.  I don't know about you but I love this release!  So many beautiful stamp sets to create Christmas card, paper crafting, gift giving and home decor.


Here is the CR-02188 Festive Grand Sentiments clear stamp set.  I love the larger sentiments.  These are also prefect for a emboss resist watercolor technique.


I also used the CL-02189 Grand Elegance Background Stamp on my card.  I really like how this stamp has the look of burlap in the background.


Here is the card I designed using both the CR-02188 Festive Grand Sentiments and CL-02189 Grand Elegance Background Stamp from JustRite Papercraft.  I stamped the background on to white cardstock using  Rhubarb Stalk Memento ink.  Then I inked around the outside edges with Vintage Photo Distress ink.  I also lightly added some of the same ink going in towards the center of the image.  Doing thing gives the card a vintage look and it added some depth with the layers of color.  Then I used one of the small holly leaf stamps and Olive Grove Memento ink and stamped the holly image in the corners towards the center of the background image.  


I stamped the sentiment using Olive Grove Memento ink on to Kraft cardstock.  Then I used the Spellbinders Labels Forty-One to die cut the label shape.  Next I inked around the edges with Vintage Photo Distress ink.


I added some Siam Flat Back Rhinestones SS12 next to the images of holly.  Then to finish off the card I added some twine with a couple of jingle bells and a bow charm.  The bells and bow charm are from the Jingle Bells Charm Kit from ButterBeeScraps.

Please be sure to visit the other Design Team Members in the link list below so you can see what they have created to share with you.

Thanks so much for stopping by today and enjoy your Sunday!

Hugs,
Heidi


Supplies
Stamps:  JustRite Papercraft CR-02188 Festive Grand Sentiments, CL-02189 Grand Elegance Background Stamp
Paper:  White, Red, Kraft, Brown
Ink:  Memento - Rhubarb Stalk, Olive Grove, Distress Ink - Vintage Photo
Dies:  Spellbinders Labels Forty-One
Accessories:  twine, ButterBeeScraps - Jingle Bells Charm Kit (bow and bells), Siam Flat Back Rhinestones SS12, Foam Tape, ATG, Ranger Multi Medium Matte

Saturday, September 19, 2015

JustRite Papercraft - Day Five New Christmas Release - Peace and Joy Card

Hello everyone and happy Saturday!  I am back with day five of the JustRite Papercraft New Christmas release.  Today, I have a quick and easy Christmas card to share with you.


I designed the card using this new Christmas stamp set CR-02177 Peace and Joy.  I used the three snowflake images to create the background and then I used one of the sentiments.


Here is a look at the card I designed.  I love all of the gold in this card--the gold foil on the pattern paper, gold mirror carstock and gold embossing.  


For the sentiment I used VersaMark ink and gold embossing powder and then used a heat tool to set the embossing.  To create the die cuts I used Spellbinders Labels Thirty-Four with white and gold mirror cardstock.  I used foam tape in between the layers for a little added dimension.  Then I added some tiny snowflakes and white flat back pearls.  The snowflakes were buttons and I cut the shanks off the back so they would be flush and added a dab of glue to hold them in place.


Here is a close up of the background paper.  I used one paper that was white with a gold foil stripe and the second paper had a white background with snowflakes in a kraft color.  I over stamped on the pattern paper with the three snowflake images using VersaMark ink and then I embossed them in gold.  I love how the gold snowflakes just pop on the pattern paper!


I hope you enjoyed today's quick and easy Christmas card.

Please be sure to visit all of the Design Team Members in the link list below to see what they have created to share with you.

Thanks so much for stopping by today and I hope you have a great weekend!  See you tomorrow for the last day of the JustRite Papercraft Christmas Release.

Hugs,
Heidi

Supplies
Paper:  The Paper Studio - Gifts of Gold 6 x 6 Collection, Cardstock - Gold Mirror, White
Ink:  VersaMark Ink
Dies:  Spellbinders Labels Thirty-Four
Accessories:  Snowflake Buttons, White Pearls, Gold Embossing Powder, Heat Tool, Foam Tape, ATG

Friday, September 18, 2015

The Stamp Simply Ribbon Store - I AM So Thankful Shaker Card

Hello blogging friends!  Today, is my day to post for The Stamp Simply Ribbon Store.  I have a fun shaker card to share with you using some of the pretty papers from Simple Stories I AM collection.  This is such a fun little paper pad filled with cut outs and inspiration.  All of the sweet little sentiments go with I AM--I AM Thankful, I AM Blessed, I AM Beautiful, I AM Inspired--just a few examples.  It's a great paper pad for fussy cutting or also for quick and easy cards.


Here is the shaker card that I designed.  I love the fun colors in the paper too.  This was actually very quick and easy to create.  I used two of the die templates from the Spellbinders Celebrations Die - Pierced Rectangles and taped them down on my paper creating the frame shape and die cut.  Then I used the largest of the two dies to die cut Hot Off The Press Heat Resistant Acetate.  Lastly I used that same die to cut the background piece.  I used Scor-Tape to adhere the die cut frame and the Acetate together.  Then I added 3D Foam Squares all along the backside of the frame.  You could also use foam tape or craft foam for this.  Next I added some 5mm Gold Sequins and Webster's Pages Party Time Sequin Collection.  Then I fussy cut the I AM image and adhered that to the piece I die cut for the background.  To finish off the shaker box I adhered the die cut background piece to the back of the frame with the 3D Foam Squares and sealed up the box.


Here is a close up of the shaker box.


I used more Scor-Tape to adhere the shaker box to the front of the card.  I fussy cut the heart and the so thankful banner from the same paper pad.  I added tails on the banner and for a bit of sparkle I added Zig Wink of Stella Clear Glitter Brush Pen to the heart.  I added both of the cut out pieces to the front and popped them up with 3D Foam Squares.


I hope you enjoy today's card.
Thank you so much for stopping by!


Please be sure to check out The Stamp Simply Ribbon Store for all of the fantastic paper crafting products and the Blog for inspiration from the Design Team.

I hope you have a wonderful weekend!

Hugs & Smiles,
Heidi


Supplies
Paper/Acetate:  Simple Stories I AM 6 x 6 Paper Pad, Hot Off The Press Heat Resistant Acetate, Cardstock - Black
Dies:  Spellbinders Celebrations Die - Pierced Rectangles
Accessories:  5mm Gold Sequins, Webster's Pages Party Time Sequin Collection, Scrapbook Adhesives by 3L 3D Foam Squares, Scor-Tape, Zig Wink of Stella Clear Glitter Brush Pen

Thursday, September 17, 2015

JustRite Papercraft - Day Three Christmas Release - Christmas Blessings Card

Hello everyone!  Are you ready for day three of the JustRite Papercraft Christmas Release?  Today, I will be sharing a beautiful Christmas stamp set and a New Background Stamp.


Here is a at the beautiful stamp set CR-02178 Great Joy Clear Stamps.  Wonderful Christmas sentiments and I love the image of the angel.


This is the background stamp that I used CL-02191 Ornamental Background Stamp.  You will see in the photos that I stamped the background and then fussy cut part of the image out.


Here is the card that I designed using both the CR-02178 Great Joy Clear Stamps and CL-02191 Ornamental Background Stamp from JustRite Papercraft.  I stamped the image of the angel on to white cardstock using Memento Angel Pink ink.  Then I used VersaMark ink and gold embossing powder for the sentiment.  I created a couple of die cuts using Classic Ovals Large for the sentiment and Oval Floral dies from Spellbinders.  I used pink cardstock for the layering die cut.  Next I stamped the background image using VersaMark ink and gold embossing powder to heat emboss.  I fussy cut the background removing some of the image.  Then I added a white doily behind the background and layered all of the pieces.


Here is a close up of the sentiment and you can see the image of the angel in the background.  Then I added a few WOC flowers.


Here is a close up of the gold embossed background.  I also added some Lt Rose Flat Back Rhinestones SS12, SS16, SS20 from ButterBeeScraps.


This was a quick and easy card to create.  I hope you enjoy the card and the new stamps for today!

Please be sure to visit the Design Team Members listed in the link list below to see what they have created to share with you.


Thank you so much for stopping by today!

I won't be posting tomorrow for the release since it is my day to post for The Stamp Simply Ribbon Store but please be sure to hop on over to the JustRite Blog tomorrow to check the new release!

Hugs,
Heidi


Supplies
Stamps:  JustRite Papercraft CR-02178 Great Joy Clear Stamps, CL-02191 Ornamental Background Stamp
Paper:  Cardstock - White, Pink
Ink:  VersaMark Ink, Memento Angel Pink
Dies:  Spellbinders - Classic Ovals Large, Oval Floral
Accessories:  White Paper Doily, Gold Embossing Powder, ButterBeeScraps - Lt Rose Flat Back Rhinestones SS12, SS16, SS20, WOC Flowers, Foam Tape, ATG, Heat Tool

Wednesday, September 16, 2015

JustRite Papercraft - Day Two Christmas Release - Gift of Faith Watercolor Card with Tutorial

Hello everyone!  It's day two of the JustRite Papercraft New Christmas Release!  Today, I have a stamp set, a card, and a tutorial to share with you--including how to cover up a mistake.  :)


Here is a look at the CR-02179 Gift of Faith Sentiments Clear Stamps from JustRite Papercraft.  I love all of the beautiful sentiments in this stamp set.


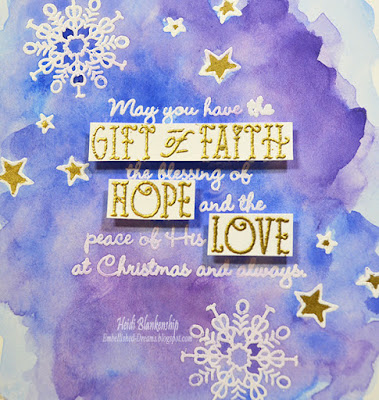
This is the card I designed using CR-02179 Gift of Faith Sentiments Clear Stamps.  I used Kuretake Gansai Tambi Watercolor with an emboss resist technique.


These are the supplies I used for the watercolor and embossing--Kuretake Gansai Tambi Watercolor, Paint Brushes -  Round 8, Round 16, Strathmore Mixed Media Paper, VersaMark Ink, White Embossing Powder, Gold Embossing Powder and a Heat Tool (not pictured).


To start I stamped the sentiment, snowflakes and stars on to Strathmore Mixed Media Paper using VersaMark Ink.  I applied white embossing powder and used my heat tool to heat set it.  The areas where there is embossing will create a resist when the watercolor is applied to the paper.


Using the Round 16 paint brush I applied water over the sentiment and snowflake and I carefully went around the stars.  Then I started adding color using  No. 61 Cornflower Blue, No.64 Blue from the Kuretake Gansai Tambi Watercolor set.  I used the heat tool to dry the paper in between the colors.  Doing this will add the look of layers and depth.


Next, still using the Round 16 brush I added more layers of color using No, 62 Cobalt Blue, No. 139 Purple.  I went back and forth between the watercolor paints and adding water letting the colors blend.  I used a heat tool to dry the paper in between the colors.  *Note when using a heat tool to dry paper that has already been embossed don't hold the heat tool in one place or over the embossed area for too long.  If the embossed area gets too hot it could burn or it might melt too much and not be raised enough anymore to create the resist.  Once the background was done then I applied No. 91 Bluish Gold to the stars.


Do you remember the mistake I mentioned earlier?  Here is a close up of the sentiment.  Do you see how think the embossing is on the word Faith?  When I was drying the card with the heat tool I held it in one place for too long and I pretty much melted the embossing powder (this was near the end of the card).  So I thought I would use my VersaMark marker and lightly go over the word, add more embossing powder, heat set and it would be fix.  Nope it didn't work as planned.  The marker doesn't have a fine enough tip to be able to do this.  So I was left with a big chunky word--it probably would have been ok and most people probably wouldn't have even noticed--but I noticed LOL!  Plus this was the second attempt on this card--I loved how the background turned out and I didn't want to just toss it in the trash.


So here is a close up of my quick fix and covering up my mistake.  I stamped the sentiment again on to white cardstock using VersaMark ink and then I used gold embossing powder and heat set it.  Then I cut cut some of the words and added foam tape to make them pop and add some dimension.  It was a quick fix and nobody know--you'll keep my secret, right?  LOL!  I just wanted to show you that even if you have a little mistake on a card or project try to think outside the box to see if you can do a quick little fix.  :)


For a little bit of sparkle I added some sequins--Gold 2.5mm, 4mm, Lt. Duck Wing Blue 2mm, 4mm, Lt. Purple 4mm, Lt. Purple Satin 3mm.  I used Ranger Multi Medium Matte to adhere the sequins.


I used purple cardstock for the base and the card is a A2 top folding card.

I hope you enjoyed the tutorial and the quick fix on a mistake. :)

Please be sure to visit all of the Design Team Members in the link list below to see the projects they have to share with you.


Thanks so much for stopping by today!

Hugs,
Heidi


Supplies
Stamps:  JustRite Papercraft CR-02179 Gift of Faith Sentiments Clear Stamps
Paper:  Strathmore Mixed Media Paper, Cardstock - White, Purple
Ink/Paint:  VersaMark Ink; Kuretake Gansai Tambi Watercolor - No. 61 Cornflower Blue, No.64 Blue, No, 62 Cobalt Blue, No. 139 Purple, No. 91 Bluish Gold
Accessories:  Paint Brushes -  Round 8, Round 16; White Embossing Powder, Gold Embossing Powder, Cartwright Sequins - Gold 2.5mm, 4mm, Lt. Duck Wing Blue 2mm, 4mm, Lt. Purple 4mm, Lt. Purple Satin 3mm; Ranger Multi Medium Matte, Foam Tape, White Craft Foam (fun foam), Scor-Tape, ATG, Heat Tool

LinkWithin

Related Posts Plugin for WordPress, Blogger...