Showing posts with label The Rubber Cafe. Show all posts

Sunday, May 25, 2014

Guest Designer on the Spellbinders Blog and a Sweet Giveaway!

Hello everyone!  I am very excited to tell you I am the Guest Designer over on the Spellbinder Blog today!  I have a card with a full step-by-step tutorial to share with you.  When you are done checking out the tutorial I hope you will hop on over to the Spellbinders Blog and check out the post--you will have a chance to Win all of the die templates I used to create my project!  Be sure to click on the contest link at the bottom of their blog post.  There is even a little Q & A interview!


Here is the card that I designed using some of the die templates, an M-bossailities folder, and one of the gorgeous metal pieces from A Gilded Life by Spellbinder Paper Arts®.


To start I carefully applied Versa Mark™ ink to the heart shape on the GL2-010 Love Wings – Gold metal piece.  Then I added Stampendous Fran-tage Shabby Pink Pastel Embossing Powder and heat set with a heat tool.  I love this embossing powder for this technique because it has a few different colors, fine and very chunky embossing powders and glitter.  Once the metal piece was completely cooled I applied glossy accents.


Here is a close up.  I also added some Clear SS8 Pointy Back Crystal Rhinestones and  Pink Flat Back Rhinestones from ButterBeeScraps.  I used glossy accents to adhere the rhinestones.  I also added a word block (not shown in this picture) that I typed up using an old typewriter font and then fussy cut and added more glossy accents on top.


Next I created the mat that will be embossed for the background of the card.  I used S6-001 5 x 7 Matting Basics A die template to cut the shape and then I lightly misted the front and back of the paper with water.  Doing this will break down the fibers in the paper and result in a very crisp embossed image.


I used Spun Sugar Distress ink and applied it to the flat surface of the folder.  Then place the die cut mat piece inside the folder and embossing using the Grand Calibur® Machine.  Doing this technique will result in a letterpress effect.


Here is the paper after it was embossed.  I also lightly inked around the edges with the Spun Sugar ink.


Next I used one of the die templates from the S5-218 A2 Devine Eloquence to create a die cut with simply smooth white cardstock.  Before removing the paper I used the Spun Sugar in to stencil through the die template.


These are the two die cuts I created using S4-425 Elegant Ovals and S5-218 A2 Devine Eloquence die templates.


To remove all of the little paper bits I used the New T-001 Tool N’ One.  This is a handy little tool for removing all of the tiny paper bits from the die templates.


Once the mat and all of the die cuts were complete I assembled the card using pink lemonade cardstock for the base of the card.  Then I layered the die cuts.  I used 3D Foam SquaresE-Z Runner® Permanent Strips-Refillable Dispenser 49' from Scrapbook Adhesives by 3L™ to adhere all of the pieces.  I used the Zig Wink of Stella Clear Glitter Brush Pen to add some sparkle to the embossed areas on the mat.


Here is a close up of the of the beautiful embossed metal piece once it was added to the card front.  I also tied on a small piece of Pink Seam Binding from  The Stamp Simply Ribbon Store.  I love the aged, shabby, vintage look of the metal piece with the embossing powder and the rhinestones!


Here is another look at the finished card.  I hope you enjoyed the tutorial and the techniques.

Don't forget to hop on over the the Spellbinders Blog and enter the giveaway!

Thanks so much for stopping by today and I hope you have a wonderful holiday weekend!

Hugs & Smiles,
Heidi

Supplies
Spellbinders Paper Arts®: Grand Calibur® Machine, S6-001 5 x 7 Matting Basics A, S4-425 Elegant Ovals, S5-218 A2 Devine Eloquence, E3D-018 European Tapestry M-bossabilities, GL2-010 Love Wings – Gold, T-001 Tool N’ One
Paper:  Simply Smooth White, Pink Lemonade, Small Paper with Blessed Word--Old Typewriter Font
Ink:  Ranger Distress Ink Spun Sugar, Imagine Crafts/Tsukineko Versa Mark™
Ribbon:  The Stamp Simply Ribbon Store Pink Seam Binding
Accessories:  ButterBeeScraps Clear SS8 Pointy Back Crystal Rhinestones, Pink Flat Back Rhinestones, The Rubber Cafe-Stampendous Fran-tage Shabby Pink Pastel Embossing Powder, Ranger-Glossy Accents, Pearls,Wink of Stella-Zig Wink of Stella Clear Glitter Brush Pen , Scrapbook Adhesives by 3L™ 3D Foam Squares, E-Z Runner® Permanent Strips-Refillable Dispenser 49', Heat Tool, Glue Gun


Saturday, March 29, 2014

Today - Retirement Card

Hello everyone!  Today, I have a card to share with you that I made for one of my husband's coworkers who recently retired.


I used milk chocolate cardstock for the base of the card and then I added a black mat with distressed edges.  I took a 5x7 piece of the milk chocolate and embossed it with the E3D-017 Oval Accent M-bossabilities Folder.  Then I rubbed Imagine Crafts/Tuskineko Versa Mark Ink around the outer edges and applied Stampendous Aged Ivory Embossing Enamel and heat set it with a heat tool.  I love using this embossing enamel--it has a great texture and gives projects that aged and distressed look.  I found the sentiment on the internet, typed it up and printed it.  Then I used S4-110 Classic Ovals LG to die cut the sentiment.  I used Ranger Distress Ink Antique Linen to ink the outer edges of the die cut.  I also die cut another shape using one of the die templates from the S5-216 A2 Tranquil Moments set.  You can see it peeking out behind the sentiment.  I popped the sentiment up using 3D Foam Squares and then I added some handmade enamel dots using Glossy Accents.  


Here is a close up of the sentiment.


To create the decorative bezel I used an image from The Paper Studio Vintage Bottle Cap Sticker Pack and die cut it using the GLD-005 Iron Cross Dies.  I placed the die cut inside the GLSB-005 Iron Cross Bezel and added a clear acrylic circle sticker to the center.  Then I used some brown jute to attach the bezel to the card.

Thanks so much for stopping by today!

Hugs & Smiles,
Heidi


Paper:  Simply Smooth Ivory, Milk Chocolate, Black
Ink:  Ranger Distress Ink Antique Linen; Imagine Crafts/Tuskineko Versa Mark
Dies/Folders:  Spellbinders Paper Arts® E3D-017 Oval Accent M-bossabilities Folder, GLD-005 Iron Cross Dies, GLSB-005 Iron Cross Bezel, S5-216 A2 Tranquil Moments, S4-110 Classic Ovals LG
Accessories:  The Rubber Cafe`-Stampendous Aged Ivory Embossing Enamel, Brown Jute, The Paper Studio Vintage Bottle Cap Sticker Pack (image in bezel), Handmade Enamel Dots, Scrapbook Adhesives by 3L™ 3D Foam Squares, E-Z Runner® Permanent Strips-Refillable Dispenser, Heat Tool, Glossy Accents

Saturday, October 5, 2013

Bundle of Joy Vintage Labels Five Clear Stamps - JustRite Papercraft October New Release

Hello everyone and Happy World Card Making Day!
Today, I have another New Release from JustRite® Papercraft to share with you. 


But before I do that I want to let you know JustRite® Papercraft has a New Website!!  You will have to hop on over and check it out!  The New Website is Gorgeous and very easy to navigate.  While you are there be sure to log in to your account and reset your password to activate your 


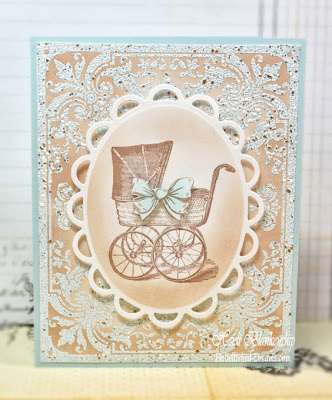
Here is the New CR-04810 Bundle of Joy Vintage Labels Five Clear Stamps.  I love these adorable images and they have a touch of vintage style to them.  JustRite® Papercraft has two new baby stamp sets in the October Release.  To see the Special Delivery Clear Stamps and find out how Sharon Johnson helped to inspire these two new baby stamp sets click HERE.


For my baby card I also used CL-04800 Lavish Corners Background Cling Stamp.  This background stamp is part of the October New Release.


Here is the baby card I designed using CR-04810 Bundle of Joy Vintage Labels Five Clear Stamps and  CL-04800 Lavish Corners Background Cling Stamp from JustRite® Papercraft.  I just love how this card turned out--I wish I knew someone who was having a baby boy--LOL!  


Check out this chunky embossing--Love it!  I stamped the CL-04800 Lavish Corners Background Cling Stamp using white pigment ink.  Then I used the Shabby Blue embossing enamel from the Stampendous FREK01 Fran•táge Embossing Kit.  I love how the embossing powder is a mix of blue, white and gold.


I inked around the embossing using Memento Toffee Crunch ink.


Here is a close up.


Next I colored the bow using Copic Marker B000 Pale Porcelain Blue.  I stamped and colored the bow twice and fussy cut one of the bows to layer on top.


Then I used S4-314 Lacey Ovals die template from Spellbinders Creative Arts® to die cut the shape.  I used 3D Foam Squares to add some dimension to the bow and the die cut oval.  


Please be sure to visit the JustRite® Papercraft Design Team Members in the link list below to see what they have created to share with you.


Thank you so much for stopping by today!

Hugs & Smiles,
Heidi


Supplies
Stamps:  JustRite® Papercraft CR-04810 Bundle of Joy Vintage Labels Five Clear Stamps, CL-04800 Lavish Corners Background Cling Stamp
Paper:  DiscountCardstock.com Simply Smooth White, Sno Cone
Ink:  Imagine Crafts/Tsukineko Memento Rich Cocoa, Toffee Crunch; White Pigment Ink; Copic Marker B000 Pale Porcelain Blue
Dies:  Spellbinders Creative Arts® S4-314 Lacey Ovals
Accessories:  The Rubber Cafe` Stampendous FREK01 Fran•táge Embossing Kit-Shabby Blue; Scrapbook Adhesives by 3L® 3D Foam Squares, EZ Runner Permanent Strips-Refillable Dispenser 49'

Friday, July 26, 2013

Paris Trinket Box

Hello blogging friends!  How are you all doing?  It sure has cooled off in MN the past couple of days, but I'm not complaining lol!  The cooler weather is a nice change, as long as we don't all of a sudden jump into Fall.  This next week is going to be a busy one!  Our youngest son is going to be in his first play and they have two performances everyday.  It's pretty exciting as this is his first play and he had a lead roll.  Plus we have the County Fair and when your from a small town that's a pretty big thing lol!  Besides the 4th of July it's probably the biggest event of the summer.  ;-)  It's going to be busy week on my blog too with a New JustRite Papercraft Release--starting on Sunday!

Today, I have a beautiful altered box to share with you.


This is the view of the top of the box.  I painted the wood box with an antique white paint.  Then I used Liquitex Light Modeling Paste with some Antique Linen Ink Refill to tint the modeling paste and stencils for the top and sides of the box.  I added lace around the heart and then I created the banners for the top.  To create the banners I used SW-04415 Bunting and Buttons Dies from JustRite Papercrft and  Premium Craft Foil from Spellbinders Paper Arts®.  I stamped the word Paris with metal stamps on the craft foil banner die cuts.  I also used felt to create the scalloped banner die cuts.  I added gesso, pearls, Champagne Crushed Glass GlitterPssst! Sheer Shimmer Spritz Gold and White Seam Binding (tea dyed).  The vintage image is one that I found online and printed off.


Here is a close up of the banner.  I also added a metal crown and rhinestones.


I created a cameo and flower cluster down in the bottom corner.  The Small Pink CameoSmall Bronze Cameo FrameClear SS10 Pointy Back Crystal Rhinestones and Leaf Filigrees are all from ButterBeeScraps.  For the roses I brushed on Pssst! Sheer Shimmer Spritz Gold and I love how they shimmer!!  I also lightly misted the entire box with the spritz.  


Going all around the box I added Venise Lace.  I used four different styles of the lace trim.  To finish it off I added a beautiful and fluffy bow made with tea dyed Seam Binding and a large gem.

I had so much fun create this decorative box and I love how it turned out!

Thanks so much for stopping by today!

Hugs & Smiles,
Heidi


Supplies
JustRite Papercrft:  SW-04415 Bunting and Buttons Dies
Spellbinders Paper Arts®:  Premium Craft Foil
Really Reasonable Ribbon:  White Seam Binding (tea dyed)
The Rubber Cafe:  Liquitex Light Modeling Paste, Champagne Crushed Glass Glitter
ButterBeeScraps:  Leaf Filigrees, Small Pink Cameos (#CAM35-PK), Small Bronze Cameo Frame (#F835-B), Clear SS10 Pointy Back Crystal Rhinestones
Imagine Crafts/Tsukineko:  Pssst! Sheer Shimmer Spritz Gold
Ranger:  Antique Linen Ink Refill
Simply Paveena:  Venise Lace
Stencils, Pearls, Felt, Metal Crown, Large Crystal, Metal Stamps, Wood Box, Printed Image

Friday, July 12, 2013

Really Reasonable Ribbon July Blog Hop - One Day Early for Me!


Hello blogging friends!  Important--PLEASE READ--Tomorrow (7/13), is the Really Reasonable Ribbon Blog Hop for the month of July.  Due to some other commitments I won't be able to post during the Blog Hop so Bonnie was sweet enough to let me post my project a day early.  But please be sure to check back tomorrow (7/13) when the Blog Hop will go live at 7:30 AM EST.  The RRR Design Team Members and Special Events Design Team Members will be showcasing the Monthly Ribbon Club.


This month is all about the Citrus colors with a fabulous assortment of orange, yellow, green and white ribbons included in the July Ribbon Club.   This ribbon assortment is prefect for all of your fun summer projects!  Click HERE for more details on how you can sign up for the Monthly Ribbon Club.

If you are following the order of the blog hop (tomorrow 7/13) you should have just come from Judy's Blog. If not and you just happened to pop in for a visit please click HERE to start the blog hop at the Really Reasonable Ribbon's Ramblings! Blog.


For my project I used four of the ribbons in the Really Reasonable Ribbon July Ribbon Club to create this fun and bright card--perfect for the summer!  For the base of the card I used Vulcan Green and layered Posh Yellow Crepe and Neenah Solar White.  I used the EL-020 Awesome Blossoms M-bossabilities™ folder to emboss the floral design in the Neenah Solar White paper.  


Using three of the ribbons from Really Reasonable Ribbon July Ribbon Club I created a pretty ribbon border going across the middle of the card.  Then I added a couple of label with a sentiment.  To create the labels I used Vulcan Green and Neenah Solar White paper along with S5-019 Labels EightS5-148 Decorative Labels Eight die templates from Spellbinders Paper Arts®.  I used a stamp from the J-1095 Fabulus Phrases stamp set from The Rubber Cafe`.   Then I added the yellow bow.


I also added a little yellow butterfly.  To create the butterfly I used Posh Yellow Crepe paper and S4-395 Les Papillion Two die template. To finish of the card I added a few orange flowers, stickles to the flowers and butterfly and some bling.  To assemble the card I used 3D Foam Squares, E-Z Runner® Permanent Strips - Refillable Dispenser - 49' from Scrapbook Adhesives by 3L®.  


I hope you enjoy the RRR Blog Hop (tomorrow 7/13)--I know you will find all kinds of inspiration!

Now to continue in the Blog Hop you need to hop on over to Jenn's Blog and check out her fantastic project!

Thank you so much for stopping by today!! Don't forget to visit the RRR Store and check out all of the beautiful ribbons, lace and trims!

I hope you have a wonderful and creative day!

Hugs & Smiles,
Heidi

Supplies
Really Reasonable Ribbon July Ribbon Club


Sunday, June 2, 2013

JustRite Papercraft New Release - Booti-ful Cameos

Hello blogging friends!  Today, I have a card to share with you using the New Release SW-04600 Booti-ful Cameos  stamp set designed by Samantha Walker for JustRite Papercraft.


I think this stamp set is so cute for Halloween and I love that you can create different styles of the 
Booti-ful cameos!  


Here is the card that I designed using the SW-04600 Booti-ful Cameos stamp set.  I actually made a little cameo using one of the bezels from the Spellbinders Paper Arts® Media Mixáge Collection.


To start I stamped the image of the witch VersaMagic Midnight Black ink on to Simply Smooth White paper and then I used the MD1-001 Ovals One Die to cut the oval shape.  Then I used Copic marker G14 Apple Green to airbrush the green color on to the oval.


Next I glued the die cut oval into the MB1-001S Susan Lenart Kazmer for Spellbinders® Media Mixáge™ Ovals One Bezel and I added Silver Crushed Glass Glitter around the inside edge of the bezel.  Then I used the brush tip of the 100 Black Copic marker to airbrush some black speckles on to the image and tone down the green a little.


Here is a close up of the bezel.  I used a combination of VersaMagic Pretty Petunia and Memento Grape Jelly to get the color for the frame,  Then I die cut the image using S4-356 Floral Ovals.  I airbrushed with the 100 Black Copic marker to create the speckled effect and then I inked the edges with VersaMagic Midnight Black.  For a little sparkle I edged the die cut with diamond stickles.


I used 3D Foam Squares in between the layers to add some dimension to the card and I used E-Z Runner® Permanent Strips - Refillable Dispenser - 49' to adhere the other pieces of the card together.  Both adhesives are from Scrapbook Adhesives by 3L®.  I also added a Lilac Seam Binding bow, stick pins, a key and some bling.


I also used S6-001 5 x 7 Matting Basics A and S6-003 5 x 7 Enchanted Labels Twenty-Eight die templates from Spellbinders Paper Arts® to create the mats for the card.

I had so much fun creating this cute Halloween card!  Please be sure to check out the link list below to see what the other JustRite Papercraft Design Team Members have created to share with you.


Thanks so much for stopping by today!

Hugs & Smiles,
Heidi

Supplies
Stamps:  JustRite Papercraft SW-04600 Booti-ful Cameos 
Paper:  DiscountCardstock.com Simply Smooth White, Black Licorice, Violet Sorbet
Ink:  Imagine Crafts/Tsukienko VersaMagic Midnight Black, Pretty Petunia, Memento Grape Jelly; Copic Markers 100 Black, G14 Apple Green
Dies/Bezels: Spellbinders Paper Arts® Grand Calibur® MachineS6-001 5 x 7 Matting Basics AS6-003 
5 x 7 Enchanted Labels Twenty-Eight, S4-356 Floral Ovals, MB1-001S Susan Lenart Kazmer for Spellbinders® Media Mixáge™ Ovals One Bezel, MD1-001 Ovals One Die
Accessories:  Really Reasonable Ribbon Lilac Seam BindingScrapbook Adhesives by 3L® 3D Foam SquaresE-Z Runner® Permanent Strips - Refillable Dispenser - 49'; The Rubber Cafe' Silver Crushed Glass Glitter;Stick Pins, Key, Bling, Diamond Stickles

Monday, April 29, 2013

Picture Perfect Card

Hello everyone!  Today, is going to be a quick post with a fun and easy card to create.


For the cute little camera image and the sentiment I used the D-504 Picture Perfect stamp set from The Rubber Cafe`.  The card came together really quick and easy with a few layers of paper (all cardstock from DiscountCardstock.com listed below), stamps and die cuts.  I used S5-149 SnapshotS4-399 Charmed I'm Sure and S4-398 Say What die templates from Spellbinders Creative Arts™.  I used Royal & Langnickel Silver Engraving Art Foil for the camera die cut and lightly sanded the paper to reveal the silver foil.  I love how the camera turned out!  The only coloring that I did was to add a little sparkle to the stamped image of the camera using a Spica Silver Glitter Pen.


Here is a close up of the camera.  Love the sparkle!


For the snapshot and little word block I used letter press technique (or maybe you have heard it called Reverse Stencil) with Versa Magic Midnight Black in from Imagine Craft/Tsukineko.  If you have never done the letter press technique it is really easy--put the die template on a piece of scratch paper with the cut side (ridges) face up, press the ink pad in to the die template giving it a good coverage of ink.  Then carefully pick up the die template and place it face down on the paper you want to cut and then die cut the image.  The ink can get a little messy so I usually put a sheet of printer paper down on my mat, then the die template and cardstock and then fold over the printer paper.  When you do this both sides of  the die template will be covered and you won't get ink on your mats.  Once you are done you can use a baby wipe to remove the ink or wash it with soap and water.  The best ink to use for this technique is a craft ink--like a pigment or chalk ink--something that won't dry too quick.  To finish off the card I added a few Holly Berry Red Jellie Dots from The Rubber Cafe`.

Just a friendly reminder click HERE to sign up for my Big Giveaway!!

Thank you so much for stopping by today!

Hugs & Smiles,
Heidi


Supplies
Stamps:  The Rubber Cafe` D-504 Picture Perfect
Paper:  DiscountCardstock.com Simply Smooth White, Kraft, Really Red; Royal & Langnickel Silver Engraving Art Foil
Ink:  Imagine Craft/Tsukineko Memento Tuxedo Black, Versa Magic Midnight Black; Copic Spica Silver Glitter Pen
Dies:  Spellbinders Creative Arts™ Grand Calibur™ Machine, S5-149 Snapshot, S4-399 Charmed I'm Sure, S4-398 Say What
Accessories:  The Rubber Cafe` Holly Berry Red Jellie Dots, Scrap Happy Sheer Glue, Stick "EM" Up Tool; Really Reasonable Ribbon Silver Metallic String; Scrapbook Adhesives by 3L 3D Foam Squares; Sanding Block


LinkWithin

Related Posts Plugin for WordPress, Blogger...