Thursday, March 31, 2011

Spellbinders and Want2Scrap Layout with Graphic 45 Steampunk Debutant

Good morning! Wow, where did the time go? I can't believe it's the end of the month already!! It seems like March just flew by! Oh well just another day closer to nicer weather. ;-) Today, I have a scrapbook layout to share with you. The designer paper is Steampunk Debutant from Graphic 45 and I used several die templates from Spellbinders™. One of the ladies in the photo was a relative to my grandpa and her name was Lily. I love this photo! I used the S5-048 Sprightly Sprockets die templates from Spellbinders™ to tie in the Steampunk look. I used the Grand Calibur™ to cut/emboss the die templates and I used Simply Smooth Ivory, Milk Chocolate cardstock from Discount Cardstock. I inked the edges with Tuxedo Black and Rich Cocoa ink. I also used Copper Engraving Art Foil and sanded the edges to reveal the copper foil. Then I added Black Rhinestones from Want2Scrap and a gear from Tim Holtz for embellishments.I used old book pages and the Grand Calibur™ along with S5-050 Rose Creations to cut the roses. I used ivory paint to do a dry brush paint over the flowers and then I inked them with Spun Sugar and edged them with Fired Brick. Then I crinkled, shaped and layered the flowers. I used Zip Dry from Beacon Adhesives to glue all of the layers together. For the leaves I used S4-328 Foliage with Posh Green Crepe paper and then inked the leaf die cuts with Peeled Paint Distress Ink from Ranger.
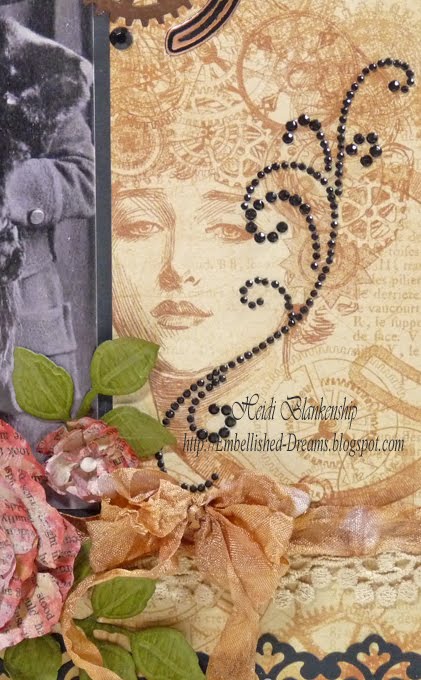
I love the picture of the lady on the Steampunk Debutant paper from Graphic 45. I wanted to showcase the image so I used the natural curve of the Black Finesse Rhinestone Swirls from Want2Scrap. I used the border from the S5-034 Parisian Accents from Spellbinders™ and White Baby Pearls from Want2Scrap to edge the layout. I used Zip Dry from Beacon Adhesives to adhere the borders. Zip Dry works great for small detailed pieces because if there is a little glue that comes out from the edges you can just rub it off. Love that! I used chipboard letters from My Mind's Eye and inked them with Tuxedo Black Ink.
Supplies
Paper: Discount Cardstock Simply Smooth Ivory, Black Prismatic, Posh Green Crepe; Graphic 45 Steampunk Debutant; Copper Engraving Art Foil; Old Book Pages
Ink: Tsukineko Memento Tuxedo Black, Rich Cocoa; Ranger Distress Inks Antique Linen, Spun Sugar, Fired Brick, Peeled Paint
Dies: Spellbinders™ Grand Calibur™, S4-328 Foliage, S5-034 Parisian Accents, S5-048 Sprightly Sprockets, S5-050 Rose Creations
Accessories: Want2Scrap White Baby Pearls, Black Rhinestones, Black Finesse Swirls; My Mind's Eye Chipboard Letters Lush Line; Prima Lace Trim; Tim Holtz Metal Gears; Beacon Adhesives™ Zip Dry™; SCRAPBOOK ADHESIVES By 3L™ 3D Foam Squares, Ivory Paint, Sanding Block

Thank you so much for stopping by today! I hope you are having a Fantastic Week!!

Hugs & Smiles,
Heidi

Wednesday, March 30, 2011

Crafty Secrets - Simple Blessings

Good morning! Now I know you might being looking at this card thinking is this a Simply Sunday card? The answer is no, even though it could be a card for Simply Sunday it's not LOL! I think the image is so beautiful and I wanted to showcase it so I didn't add much to it. The image is from Crafty Secrets Little Blessings Creative Scraps. I added a little Diamond Stickles to the roses.I kept the embellishment pretty simple too. I added some LeCreme Baby Pearls from Want2Scrap, Hand Tinted Seam Binding, and a couple of trinket pins from Maya Road. Like I said the card is very simple but the image is so beautiful I love how the card turned out!

Supplies
Paper: Crafty Secrets Little Blessings Creative Scraps (Bird image); Discount Cardstock Simply Smooth Ivory, Pink
Dies: Spellbinders™ Grand Calibur™, S4-318 Fleur de Lis Squares #4
Accessories: Want2Scrap LeCreme Baby Pearls; Maya Road Gem, Pink Pearl Flower Trinket Pins; Ranger Diamond Stickles; Hand Tinted Seam Binding; SCRAPBOOK ADHESIVES By 3L™ 3D Foam Squares

Thank you so much for stopping by today! I hope you have a creative day!!

Hugs & Smiles,
Heidi

Tuesday, March 29, 2011

Skipping Stones Design - SSD#70 - Guest Sketch Artist Week 5

**Edit** Sorry for the delay on the post!! I was gone all yesterday and had this scheduled to post but didn't realize it never posted!

Good morning! Today, is my fifth and final week as Guest Sketch Artist for Skipping Stones Design. I want to say a Huge Thank You!!! I have really enjoyed creating the sketches and the cards and being able to see how the other designers use the sketches to design their cards. I am very excited to share my card and sketch with you today!
Here is the card that I designed for the sketch. I used Birthday Purses stamp set from Skipping Stones Design and paper piecing with My Mind's Eye Paper. Here is the sketch for this week.
Supplies
Stamps: Skipping Stones Design Birthday Purses
Paper: Discount Cardstock Simply Smooth White; My Mind's Eye Hazel
Ink: Tsukineko Memento Tuxedo Black
Dies: Spellbinders™ Grand Calibur™, S5-034 Parisian Accents
Accessories: Want2Scrap White Baby Pearls, My Mind's Eye Brads

Thank you so much for all of the wonderful comments over the past few weeks!! I have really enjoyed being a Guest Sketch Artist for Skipping Stones Designs!!! Thank you so much for stopping by today!!

Hugs & Smiles,
Heidi

Sunday, March 27, 2011

Simply Sunday - You Inspire Me

Good morning and Welcome to Simply Sunday! To find out all of the details about Simply Sunday please see my sidebar.Supplies
Stamps: JustRite Stampers CL-02075 You Inspire Me
Paper: Discount CardStock Simply Smooth Ivory, Posh Milk Chocolate Felt 80#
Ink: Tsukineko Memento Rich Cocoa, ClearSnap
Dies: Spellbinders™ Grand Calibur™, S5-035 Parisian Motifs (reverse stencil technique--click HERE to see a tutorial)
Accessories: Joann's Brown Rhinestones, Ivory Ribbon; SCRAPBOOK ADHESIVES By 3L 3D Foam Squares

On a more personal note I want to say a HUGE Thank You for all of the Fabulous comments on the Spellbinders Bunny Blog Hop!!! I read each and every comment and I want you to know I appreciate all of your kind words so much!!! THANK YOU!!!!!

Hugs & Smiles,
Heidi

Tuesday, March 22, 2011

Spellbinders Bunny Hop

NOTE: Comments eligible for blog candy end at #731. Thank you so much for all of your wonderful comments about my project!! I appreciate it so very much!!!

Spellbinders Bunny Hop


Welcome to the third day of the Spellbinders™ Bunny Hop! In honor of National Craft Month and spring, we’re showcasing our spring themed die templates. We have ten talented designers – two each day for five days – ready to usher in spring with creative projects and fabulous prizes!

The Bunny Hop is from March 21-25, each contest is midnight to midnight EST (that’s 24 hours only). Be sure to mark your calendar! Each day the Spellbinders Blog will direct you to the participating blogs.

It’s so easy to win! Simply visit each blog and leave a comment! We will randomly draw one lucky winner from each blog to win that blog’s featured die templates. Winners will be announced on the Spellbinders Blog! Winners must respond within 48 hours of their names being posted to claim prizes.

Spellbinders Bunny Hop Schedule:

March 21

Linda Duke

Holly Simoni

March 22

Becca Feeken

Debbie Olson

March 23

Heidi Blankenship

Kazan Clark

March 24

Sherry Cheever

Beth Pingry

March 25

Julie Overby

Jerri Jimenez


Hello! Welcome to the Spellbinders Bunny Blog Hop! Remember, to be eligible to win the prize you must leave a comment here on my blog. You will have until Midnight on March 23nd (a full 24 hours). I’ll use random.org to select a winner and the winner will have 48 hours to claim their prize. The winner will be announced on my blog as well as the Spellbinders Blog.

Here are the die templates you can win for blog candy.S4-307 Reverse Wonky Rectangles S4-237 Easter Border Petites

**Edit** Before you continue on I have to apologize to all of you. You know when you get that feeling in the pit of your stomach, I think we've all been there at some point--LOL! Well tonight was one of those nights!! My blog post was all ready to go except for adding the links and as I was adding the links to my surprise (and horror!!) I discovered I had used one of the wrong die templates on my project!!! The Pollyanna in me has to find an upside to all of this and the upside is that now you get to see two tutorials--one with the correct die templates (S4-307 Reverse Wonky Rectangles) and one just for fun! ;-) Actually even though the S4-307 Reverse Wonky Rectangles and S4-306 Wonky Rectangles are different shapes you can do similar techniques with them. So with that being said I hope you enjoy both cards. I am sorry for any confusion and thanks for your understanding!! ~Heidi

Here is my card that I created using the S4-307 Reverse Wonky Rectangles, S4-237 Easter Border Petites. I also used S5-043 Fleur de Lis Motifs for accent pieces.To start I cut/embossed S4-237 Easter Border Petites. To make sure that I have perfect placement of the die template I tape the edges and then use the Grand Calbiur™ to cut/emboss the border.Look at this cute little border with a decorative edge! Now I know this is an Easter die template but I will show you if add a little something in front of the egg you can also use this die template to create fun borders for some pretty Springtime card. I love it when I can get double duty out of my favorite products! I lightly inked the edges and over the embossed area to really make all the small details in the embossing pop. Here is a close up of the border. By adding a bow made with hand tinted seam binding I have kind of camouflaged the little egg. So now instead of looking like an Easter only border you can use this for Springtime cards and I think it would be a really cute border for baby cards too!
Next I used a JustRite stamp from the JB-09270 Beautiful Day stamp set for my sentiment. I used Simply Smooth White cardstock and Rich Cocoa ink. Then I taped die template #3 from the S4-307 Reverse Wonky Rectangles for perfect placement and used the Grand Calibur™ to cut/emboss the die cut shape.Before removing the paper from the die template I inked the inside edges using the die template as a stencil. Doing this will give you a crisp white edge.Next I used the S4-307 Reverse Wonky Rectangles #4 and S5-043 Fleur de Lis Motifs to create a pretty framed like mat for the sentiment. Here is a close up of the sentiment.For a finishing touch I added some White Baby Pearls from Want2Scrap. Supplies
Dies: SpellbindersGrand Calibur™, S4-307 Reverse Wonky Rectangles, S4-237 Easter Border Petites, S5-043 Fleur de Lis Motifs
Stamps: JustRite Stampers JB-09270 Beautiful Day
Paper: Discount Cardstock Chamois Cascata Felt, Simply Smooth White; My Mind's Eye Stella and Rose Mabel Collection
Ink: Tsukineko Memento Rich Cocoa; Ranger Dried Marigold Distress Ink
Accessories: Want2Scrap White Baby Pearls; Hand Tinted Seam Binding; Beacon Adhesives™ Zip Dry™; SCRAPBOOK ADHESIVES By 3L™ 3D Foam Squares


Here is the 2nd card that is now just for fun with a step-by-step tutorial to share with you. *wink* I started with the butterfly and tulip border from the S4-237 Easter Border Petites die template set. I already had my background paper picked out for the card and I wanted to do the Reverse Stencil technique with the border so I could match the color to the paper. To do the Reverse Stencil technique apply ink directly to the inside of the die template as shown in the photo. This technique works best if you use a chalk or pigment base ink, an ink that is a little thicker and doesn't have a quick drying time. I used Lime Pastel, Ocean and Dusk Blue inks. Then I used the Grand Calibur™ and place a piece of Simply Smooth White cardstock on top of the die template and cut/emboss the die cut shapes. As you can see from the photo the ink that was applied to the die template was pressed into the paper creating a reverse stencil. Also you don't have to use several colors of ink to do the Reverse Stencil technique, you can just use one color if you would like. I used three colors of ink to match the different colors in the designer paper. Before adding the border I inked the edges of the Prima paper from the Madeline Collection using Dusk Blue and Rich Cocoa. Next I used Zip Dry™ from Beacon Adhesives™ to adhere the border. I used Lime Pastel, Dusk Blue and Rich Cocoa to ink up the butterflies and then I added White Baby Pearls from Want2Scrap for the body of the butterflies.Here is a close up of the border on the card. I used 3D Foam Squares from SCRAPBOOK ADHESIVES By3L™ to add some dimension to the butterflies and tulip. Then I added Lime Green Stickles to the edges for the butterflies and tulip for a little sparkle.It is so easy to create frames with Spellbinders die templates! I used S4-306 Wonky Rectangles #4 and #5. Once I had them lined up I added a couple pieces of tape to hold the die templates in place and then used the Grand Calibur™ to cut/emboss the frame.For the sentiment I used CL-02075 You Inspire Me stamp set from JustRite Stampers. I used Rich Cocoa ink for the sentiment. For the frame I used Ocean and Dusk Blue ink. Then I used Lime Pastel ink and the Reverse Stencil Technique. I used S4-306 Wonky Rectangles #3 and the Grand Calibur™ to cut/emboss the shape.Here is a close up of the frame and sentiment. I added a bow made with hand tinted crinkle seam binding and a couple of Leaf trinket Pins from Maya Road.I used S5-051 Fanciful Flight die template set to create the butterfly die cut, added Lime Green Stickles and White Baby Pearls for the body.

Thank You Spellbinders Paper Arts for sponsoring the Bunny Hop and the prizes today. For questions about this contest, please email blogcontest@spellbinders.us .

Please leave a comment to be eligible to win the Spellbinders die templates I featured today! Then check the Spellbinders Blog tomorrow to see if you are the winner!

For more information on Spellbinders, please visit these links:

Spellbinders Paper Arts

Spellbinders Blog

Spellbinders on Facebook

Spellbinders Newsletter

Spellbinders Videos


Supplies
Dies: SpellbindersGrand Calibur™, S4-306 Wonky Rectangles #3, #4, #5, S4-237 Easter Border Petites, S5-051 Fanciful Flight
Stamps: JustRite Stampers Cling CL-02075 You Inspire Me
Paper: Discount Cardstock Simply Smooth White, Posh Chocolate Felt; Core'dinations Turquoise
Ink: Tsukineko Memento Rich Cocoa; Clearsnap ColorBox Lime Pastel Chalk Ink; Martha Stewart Ocean, Dusk Blue
Accessories: Want2Scrap White Baby Pearls, Turquoise Baby Bling; Ranger Lime Green Stickles; Maya Road Leaf Trinket Pins; Beacon Adhesives™ Zip Dry™; Hand Tinted Crinkle Seam Binding; SCRAPBOOK ADHESIVES By 3L™ 3D Foam Squares; Sanding Block

Thank you so much for stopping by today! I hope you enjoy the blog hop!!

Hugs & Smiles,
Heidi

Skipping Stones Design - SSD#69 - Guest Sketch Artist Week 4

Good morning! Today, is my fourth week as Guest Sketch Artist for Skipping Stones Design and I am very excited to share my second card and sketch with you.
Here is the card I designed for this weeks sketch. I used the Heartsong stamp set from Skipping Stones Design to design my card. I used the music border to create a background and then I inked and distressed the edges.Here is this week's sketch for Skipping Stones Design. SSD#69

Here is a close up of the sentiment in the upper corner.Here is a close up of the sweet little bird image. I stamped the image of the bird three times, once onto the label, then the oval and also on another piece of paper. I colored the bird with Copic markers and then hand cut the image, added 3D Foam Squares and layered the images.To make the diecuts I used the Grand Calibur™ and S5-027 Labels Twenty-One, S4-110 Classic Ovals Large and S4-328 Foliage die templates from Spellbinders™ to cut/emboss the shapes.I added some Black and Baby Blue Rhinestones from Want2Scrap for corner accents around the label and a Prima Rose.

Supplies
Stamps: Skipping Stones Design Heartsong
Paper: Discount Cardstock Simply Smooth White, Posh Green Crepe 65#, Posh Sky Blue Crepe 65#
Ink: Tsukineko Memento Tuxedo Black; Ranger Vintage Photo, Antique Linen Distress Inks; Copic Marker E15, E25, E31, B000, B02, B21
Dies: Spellbinders™ Grand Calibur™, S5-027 Labels Twenty-One, S4-110 Classic Ovals Large, S4-328 Foliage
Accessories: Want2Scrap Black Rhinestones, Baby Blue Rhinestones; Prima Rose; Beacon Adhesives™ 3-in-1 Advanced Craft Glue™; SCRAPBOOK ADHESIVES By 3L™ 3D Foam Squares; Distress Tool

Thank you so much for stopping by today and I hope you have a Terrific Tuesday!!

Hugs & Smiles,
Heidi

Monday, March 21, 2011

JustRite & Stamper's Dream Design Team March Release Blog Hop

Good morning! Today JustRite and Stamper's Dream are teaming up for a Design Team March Blog Hop! Along the hop we have 3 great blog candy prizes hidden!! No one knows where the blog candy is! For your chance to win one of these three prizes simply leave a comment on each blog. Blog comments will remain open until 8 pm CST - Tuesday March 22nd. The 3 winners will be announced on the Stamper's Dream Blog and the JustRite Blog on Wednesday March 23rd. Here is what you have a chance to win - 4 JustRite Stamps sets of your Choice, A $50.00 Prize package from Stamper's Dream (as shown in the photo below) or a $50.00 Shopping Spree to the JustRite Webstore. Sounds like some Fabulous prizes to me!! I will have a link list with all of the Designers at the bottom of this post so you can visit each blog, leave a comment and have a chance to win the hidden blog candy!!For today's blog hop I created a card to share with you using JB-09855 Heart to Heart and CL-02105 Elegant Frames stamp sets from JustRite Stampers. This is the JB-09855 Heart to Heart stamp set with included 4 Center Sentiments and 4 Interchangeable borders.This is the CL-02105 Elegant Frames stamp set with includes 2 Large Decorative Frames, 1 Smaller Frame, 2 Accents and 6 Sentiments for a total of 11 stamps! JustRite offers the Original Ribbed stamps and Cling stamp sets that can be mixed and matched offering endless possibilities for customizing your stamps and design work. To start I stamped the larger frame from the CL-02105 Elegant Frames unto Simply Smooth White Cardstock from DCS using Rose Bud ink. Then I taped the largest rectangle die template from the JustRite Custom Dies JB-08950 Nested Frame Dies for perfect placement on the frame. Next I stamped the border and the sentiment from JB-09855 Heart to Heart unto Simply Smooth White Cardstock from DCS using Rich Cocoa ink. I used the S4-110 Classic Oval Large #4 from Spellbinders on the butterfly border and the tag die template from the JustRite Custom Dies JB-08950 Nested Frame Dies. Then I used the Grand Calibur from Spellbinders to cut/emboss the die cut shapes. Before taping the die templates in place I inked the inside edges with Clearsnap Color Box Chestnut Roan Chalk Ink. This technique is called Reverse Stenciling and the results will be a nice crisp inked edge to match the project. Here you can see in the photo the pretty chocolate brown edges, this is from the Reverse Stenciling technique. For the larger frame I inked the edges with Antique Linen Distress Ink from Ranger. For the tag I used Antique Linen Distress Ink and Rose Bud Ink from Tsukineko. I colored the butterflies on the border with Copic markers and then inked the edges with Antique Linen Distress Ink.The background paper is from Prima, the Madeline Collection. I inked the edges with Chestnut Roan ink and edged all of the flowers and leaves with Diamond Stickles from Ranger.Here is a close up of the front of the card. I added Diamond Stickles to the flourishes in the large frame, the butterflies in border and the edges of the tag. To create the Fleur de Lis accents I used S5-043 Fleur de Lis Doily Motifs and the Grand Calibur from Spellbinders to cut/emboss the die cut shapes. I also added little bits of Turquoise Baby Bling from Want2Scrap.In this photo you can see all the sparkle from the Diamond Stickles.I used Zip Dry™ from Beacon Adhesives™ to adhere the Fleur de Lis accent pieces. Zip Dry™ is the perfect glue for attaching small elements, if you get a little glue that seeps out from under the small pieces you can just gently rub the glue off! How cool is that? It's totally fail safe! The turquoise cardstock used for the card base and mat is from Core'dinations. The yummy Posh Milk Chocolate Felt cardstock is from DCS. I added 3D Foam Squares from SCRAPBOOK ADHESIVES By 3L™ to the border and the tag. To finish the card off I added a few more pieces of Turquoise Baby Bling from Want2Scrap to the upper and lower corners.

Supplies
Stamps: JustRite Stampers Originals JB-09855 Heart to Heart, Cling CL-02105 Elegant Frames
Paper: Discount Cardstock Posh Milk Chocolate Felt, Simply Smooth White; Core'dinations Turquoise, Prima Madeline Collection
Ink: Tsukineko Memento Rich Cocoa, Rose Bud; Ranger Distress Ink Antique Linen; Clearsnap Color Box Chestnut Roan Chalk Ink; Copic Markers B000, B02, BG72
Dies: JustRite Custom Dies JB-08950 Nested Frame Dies; SpellbindersGrand CaliburS4-110 Classic Oval Large #4; S5-043 Fleur de Lis Doily Motifs
Accessories: Ranger Diamond Stickles; Want2Scrap Turquoise Baby Bling; Beacon AdhesivesZip Dry™; SCRAPBOOK ADHESIVES By 3L™ 3D Foam Squares

Please be sure to visit each of the Design Team Members and leave a comment on each blog for a chance to win some hidden blog candy!!

JustRite Inspiration Blog

Becca Feeken

Michelle Rodgers

Debbie Olson

Amy Sheffer

Kazan Clark

Cindy Lawrence

Heidi Blankenship

Kellie Fortin

Tosh Leyendekker

Barb Schram

Arlene Cuevas

Michele Kovack

Teresa Kline

Kathy Jones

Mariana Grigsby

Sankari Wegman

Christina Fischer

Angela Barkhouse

Lea Lawson

Eva Dobilas

Kim Teasdale


Thank you so much for stopping by today! I hope you enjoy the blog hop and it inspires you to have some fun and create!!

Hugs & Smiles,
Heidi

LinkWithin

Related Posts Plugin for WordPress, Blogger...