Tuesday, March 30, 2010

JustRite Stampers - My Garden - Morning Glories & Glimmer Mist

Hello! How is your week going? Mine is good, just busy. It's the end of the month so that means working on lots of projects. Today I created another quick card to share with you.I started by creating the background. I used a piece of white cardstock and two colors of Glimmer Mist, Timeless Lilac and Caribbean Blue from Tattered Angels. After the background piece was dry (you can use a heat tool to speed up the drying time) then I stamped the image of the morning glories down the left side with gold ink and then heat embossed with gold embossing powder. The morning glories are from the My Garden stamp set from JustRite Stampers. This set includes 4 Beautiful Floral Centers and 4 Interchangeable Borders and works with the 3-1/4'' Round Stamper. I stamped the center and border three times with gold ink and then heat embossed with a heat tool and gold embossing powder. For the first piece I cut/embossed the largest circle piece using Standard Circles Small S4-116 Die #7. To cut/emboss the center piece I used the Standard Circles Large S4-114 Die #4 from Spellbinders™. For the third piece I colored the morning glories with Glimmer Mist Honey Dew Mist and Timeless Lilac Glimmer Mist and then I cut out some of the flowers and leaves and layered then with foam tape. I added a ribbon and a little bling to match the card. Now I know this isn't a 5 minute card but it did come together pretty quickly and as far as painting with the glimmer mist it was very quick and simple--nothing too detailed.

Supplies~
Stamps~JustRite Stampers-My Garden, 3-1/4'' Round Stamper
Paper~The Paper Company-White, Lavender
Ink~ClearSnap-ColorBox Gold Pigment Ink
Other~Spellbinders™-Wizard™, Standard Circles Large S4-114 Die #4, Standard Circles Small S4-116 Die #7; Tattered Angels-Honey Dew Mist, Timeless Lilac, Caribbean Blue Glimmer Mist; Joann's-Gold Embossing Powder, Rhinestones, Ribbon; Beacon Adhesive-Gem-Tac, 3M-Scotch Foam Mounting Tape; Heating Tool, Paint Brush

Thank you so much for stopping by today and I hope you have a Wonderful Day!!

Hugs & Smiles,
Heidi

Monday, March 29, 2010

Crafty Secrets Design Team Spring Fling Challenge

Good morning! I hope you all had a Wonderful weekend!! Today is Crafty Secrets Challenge Day. Our Design Team Coordinator, Vicki Chrisman gave us a challenge this month to create a card or project with a Spring or Easter theme. I created an Easter Card for the challenge and I can't wait to see what the other ladies on the Crafty Secrets Design Team have created! I will have a link list at the bottom of this post so you can visit each of the blogs.Here is the card I created. I absolutely love the Angel image!! It is so Beautiful and perfect for Easter. I started with the base of the card, the designer paper is from the Crafty Secrets Classic Paper Pad and I stamped flourishes on it using gold ink and gold embossing powder. The flourish stamp is from the Crafty Secrets Cherubs stamp set. The flowers that I added are actually stickers from the Crafty Secrets Heartwarming Vintage Stickers Greetings & Sentiments sticker sheet. I used a Sakura Gelly Roll Clear Star glitter pen to add some sparkle to the floral images. I wanted to add some dimension to the sticker but before doing so I needed to remove the stickiness from the backside. I used a paintbrush to dust over the stickers with baby powder. Doing this will take away to stickiness and then I added foam mounting tape to the backside. The image of the angel is from the Crafty Secrets Seasonal Images & Journal Notes booklet and I added some sparkle to the angel using the Sakura Gelly Roll Clear Star glitter pen. To diecut the angel image and the background mat I used the Wizard™ and Labels Four S4-190 die templates from Spellbinders™.I made this diecut cross for an embellishment on the card. To create the cross I used the Wizard™ and the Cross Collection S4-265 die templates from Spellbinders™. I also used Sakura Gelly Roll Clear Star glitter pen & Metallic Gold pen to accent and add sparkle to the cross. For a finishing touch I added a few rhinestones from My Mind's Eye and lavender ribbon. Supplies~
Stamps~Crafty Secrets-Cherubs (flourish)
Paper~Crafty Secrets-Classic Paper Pad; The Paper Company-White, Blue
Ink~ClearSnap-ColorBox Gold Pigment Ink
Other~Crafty Secrets-Seasonal Images & Journal Notes (Angel), Heartwarming Vintage Stickers Greetings & Sentiments; Spellbinders™-Wizard™, Labels Four S4-190, Cross Collection S4-265; My Mind's Eye-Lush Brown Rhinestones; Sakura-Gelly Roll Clear Star & Metallic Gold; Joann's-Lavender Sheer Ribbon, Gold Embossing Powder; 3M-Mounting Tape; Heating Tool

Please be sure to visit each of the Crafty Secrets Design Team Members and see what they created! Here is a link list to each of the blogs.


Thank you so much for stopping by today and I hope you have a Marvelous Monday!!

Hugs & Smiles,
Heidi

Saturday, March 27, 2010

Birthday Card - Cherry Blossoms & Birds

Hello and Happy Saturday! I hope you are having a wonderful weekend! Today I have a pretty Spring card to share with you. I made this card for my aunt who will be celebrating her 85th birthday tomorrow! The floral stamped images are from My Garden stamp set from JustRite Stampers. I used the cherry blossom center stamp. I love all of the beautiful floral images in this set! The set includes a cherry blossom, daisy, morning glory and sweet pea and the My Garden stamp set fits the 3-1/4'' Round Stamper. I started by stamping the cherry blossoms twice onto white paper using gold pigment ink and then heat embossing with gold embossing powder. Next I started to watercolor the images using Twinkling H2O's. I started with the flower center using Dreamsicle and Lemongrass.Next I painted all of the blossoms using Blushing Rose. Once all of the blossoms were painted then I added the green using Lemongrass. I also added a little bit of darker green, Green Tea. I am sorry I forgot to take a picture of the darker green but you can see it in the finished piece.Next I cut out the images and then I layered a few of them just to add a little dimension to the card.I cut/embossed a label diecut using the Wizard™ and Labels Four S4-190 die template from Spellbinders™. I left the paper in the die template and used it as a stencil to airbrush with the Copic airbrush system.Next I inked the label with Distress Ink Antique Linen and then I edges both diecuts with a Gelly Roll Metallic Gold Pen from Sakura. To create the oval diecut I used the Wizard™ and Big Scalloped Ovals Large S4-251 die templates from Spellbinders™. The image on the oval diecut is from Crafty Secrets Birds and Blossoms Creative Scraps.Here is another close-up of the cherry blossoms. I also added a couple of accent diecut pieces. To create the accent pieces I used the Wizard™ and Floral Accents S4-199 die templates from Spellbinders™. I inked the accent pieces with Antique Linen ink and then edged them in gold. Here is a close up of the image with the birds and the nest. I added a little sparkle to the birds and the flowers using a Gelly Roll Clear Star Pen from Sakura. I tried to pick up some of the sparkle in the picture.Supplies~
Stamps~JustRite Stamper-My Garden, 3-1/4'' Round Stamper
Paper~The Paper Company-White; Daisy Bucket-Shabby Green Door Songbird
Ink~Tsukineko-Memento Rich Cocoa; Ranger-Distress Ink Antique Linen; Clearsnap-ColorBox Gold Pigment Ink
Other~Spellbinders™-Wizard™, Big Scalloped Ovals Large S4-251 Die #3, Labels Four S4-190 Die #5, Floral Accents S4-199; Crafty Secrets-Birds and Blossoms Creative Scraps; Copic-Airbrush System, B21; Twinkling H2O's-Dreamsicle, Lemongrass, Blushing Rose, Green Tea; Joann's-Gold Embossing Powder, Blue Rhinestones; Sakura-Gelly Roll Metallic Gold Pen, Gelly Roll Clear Star Pen; Beacon Adhesives-Gem-Tac; 3M Scotch-Foam Mounting Tape; Heating Tool

Thank you so much for stopping by today! I hope you are having a Fantastic weekend!!

Hugs & Smiles,
Heidi

Friday, March 26, 2010

JustRite Friday Challenge 011- Sympathy/Get Well

The JustRite challenge for this week is #011 Sympathy/Get Well cards. All you have to do is create a sympathy or a get well card using JustRite stamps and you could have a chance to win some fantastic prizes!
This week's prize packages are:
Winner: $50 JustRite Gift Certificate
Honorable Mentions: $15 JustRite Gift Certificate

For all of the details click here---> The JustRite Blog

Here is the sympathy card that I created for this week's JustRite challenge.


For my card I used the Thinking of You stamp set from JustRite Stampers. The Thinking of You stamp set contains 6 Centers with images and sentiments and 6 Interchangeable Borders and it fits the 2-1/4'' x 3-1/16'' Oval Stamper.
Here is a picture of the stamp. As you can see from the picture I cut apart my centers and for this stamp I have taken a sentiment from one center and an image from another center to custom create this stamp.I stamped the image/sentiment from Thinking of You onto white cardstock with brown ink and then colored with Copic markers. Here I colored the pansy.Next I used two colors for the pink flower, two colors for the leaves and a pale yellow for the little flowers.For the vine I used two colors of green and a pale yellow for the little dot flowers in the vine. After all of the coloring was done I made a diecut using the Wizard™, and Labels Eleven S4-246 die templates from Spellbinders™,. These are all of the Copic markers I used to color the floral image and border.I made two accent pieces for the sides of the label diecut using the Wizard™, and Floral Accents S4-199 die templates from Spellbinders™,. I used foam mounting tape on the back side of the label and the accent pieces to add some dimension to the card.The designer paper is from K & Company-Brenda Walton Madeline. I also added some beautiful rose colored velvet ribbon from sei and some rhinestone. I used clear rhinestones and airbrushed then with a Copic marker to perfectly match the card. I used two of my favorite adhesives Fabri-Tac to adhere the velvet ribbon and Gem-Tac to adhere the rhinestones. Both adhesives are from Beacon Adhesives.

Supplies~
Stamps~JustRite Stampers-Thinking of You, 2-1/4'' x 3-1/16'' Oval Stamper
Paper~Neenah Solar White; K & Company-Brenda Walton Madeline
Ink~Tsukineko-Memento Rich Cocoa
Other~Spellbinders™,-Wizard™,, Labels Eleven S4-246, Floral Accents S4-199; Copic-Airbrush System, Markers (as shown in the picture); sei-Rose Velvet Ribbon; Joann's-Clear Rhinestones; Beacon Adhesives-Fabri-Tac, Gem-Tac; 3M Scotch-Foam Mounting Tape

Thank you so much for stopping by today and don't forget you still have time to join in on a chance for some amazing prizes from the Mega March Blog Hop!! For more details you can click HERE or see the post below this one.

Also a HUGE THANK YOU for ALL of the Wonderful comments on the Mega March Blog Hop--for my altered tin and the tutorial!!!!! I am so happy you all loved the tutorial so much!!! I know several people left comments that they wish the altered tin could be one of the prizes and maybe sometime I will be able to make another one for blog candy but I gave this one to my mom and she loved it!! Thanks again for all of your wonderful comments and I hope you have a Fabulous weekend!!!

Hugs & Smiles,
Heidi

Thursday, March 25, 2010

Mega March Blog Hop Day 3 - $600 in Giveaways!!

Good morning and Welcome to Day 3 of the March Mega Blog Hop!!

30 designers, FIVE shopping sprees each day. No one knows where the prizes will be! Each day of the hop JustRite will have five Mystery Blog Candy Prizes hidden along the hop with a total retail value of $600. JustRite will randomly select five mystery blogs each day of the hop and randomly allocate each of the shopping sprees. For your chance to win, simply leave a little love (a comment) on each designer’s blog including the JustRite blog. The more designers you leave comments with, the better your chances of winning. Each day’s comments will remain open for three days. A winner from each of the mystery blogs’ comments will be randomly chosen using Random.org. Consult the listing of designers at the JustRite blog each day (each day’s designers will be different) and start out on your way! Beginning Friday, March 26, summaries of all the winners will be posted on the JustRite blog. Good luck to everyone and enjoy all the JustRite eye candy along the hop!

Today during the JustRite Mega March Blog Hop (Day Three) JustRite and its sponsors will be giving away the following five prizes:

· $200 JustRite Shopping Spree
· $100 Spellbinders Shopping Spree
· $100 Copic Prize Package, and
· Two additional $100 JustRite Shopping Sprees!

Blog comments for Day Three will be open until Saturday at 6pm EST. On Sunday, JustRite will announce on their blog which five blogs have the mystery candy for Day Three. You will need to go to the JustRite blog to determine where you need to go to find out if you are one of the five lucky winners.

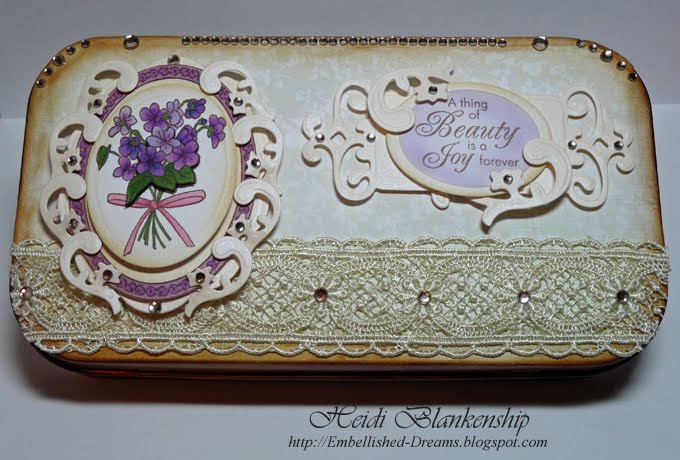
Here is the project that I created to share with you. I altered a large Altoids tin and gave it a beautiful vintage look.

Here is what the tin looked like before I altered it. It's a 10 oz. Altoids tin so it's not a little purse size one.The first thing I did was to apply foam mounting tape on the lid. I didn't add mounting tape to the word Altoids because it is already raised up and once the mounting tape is on the word and the tape are about at the same level. I traced the tin onto some designer paper from Daisy Bucket, the paper is from the new line Shabby Green Door. I applied the paper to the top of the tin with the foam mounting tape but to seal the edges I used Fabri-Tac from Beacon Adhesives. Although Fabri-Tac is for fabric, ribbon and lace it also works wonderfully with paper. Next I sanded and inked the edges of the paper.Then I airbrushed the tin a pretty brown. Now this part was kind of an afterthought and if I was going to do this again I would airbrush and then apply the paper. *wink*After the airbrushing was done I added a darker brown ink the the edges of the paper and then I set the tin aside while I worked on the embellishments for the top.
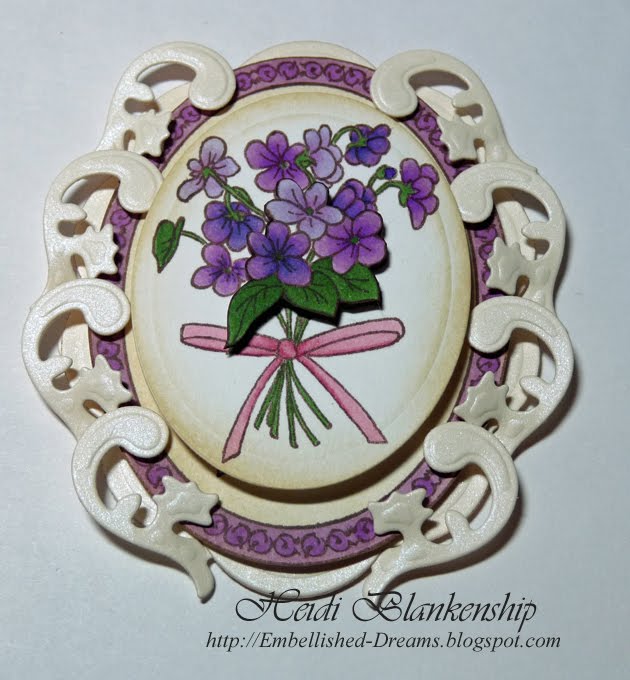
The stamped image I used is from the Breath of Spring Stamp Set from JustRite Stampers. This set includes 4 Beautiful Floral Images including Violets, Lily of the Valley, Daffodils and Tulips and 4 Interchangeable Borders and it fits the 2-1/4'' x 3-1/16'' Oval Stamper. These are the Copic markers I used to colors the violets.Next I added the green to the stems and leaves.I added pinks for the bow.After the floral image was colored the I used the Wizard™ and Classic Ovals Large S4-110 Die #3 from Spellbinders™ to cut/emboss the oval. I stamped the floral image twice and cut out a few of the flowers and the leaves and used foam tape to adhere the flowers and add some dimension and I also inked the outside of the oval with Antique Linen Ink.I stamped the image again and colored the border with Copic markers, cut out the oval and then inked the edges with Antique Linen Ink.Next I cut/embossed four accent pieces using the Wizard™ and Floral Accents S4-199 die templates from Spellbinders™. I also cut/embossed a scalloped oval using the Big Scalloped Ovals Large S4-251 Die #4 die templates. I cut all of the accent pieces in half.Once I had all of the piece cut/embossed I layered them. The scalloped oval is on the bottom and then the oval with the border is the second layer and then I added all of the accent piece and the small oval with the violets is the top layer. In between each layer is foam tape with gives it this great dimension.Then I worked on the tag. The sentiment is from Joyful Hearts from JustRite Stampers and it contains 6 Wonderful Sentiments with 6 Interchangeable Borders and it fits the 1-3/4'' x 2-5/16'' Oval Stamper. I stamped the sentiment and then made an oval diecut using the Wizard™ and Classic Ovals Small S4-112 Die #3 from Spellbinders™. Before removing the oval I airbrushed with a Copic marker.Here are all of the piece for the tag. I made a tag and accent diecuts using the Wizard™ and Fancy Tags S4-235, Floral Accents S4-199 die templates. Here is the layered and finished tag. These are all of the Copic markers I used for this project.For a finishing touch I added some lace trim and rhinestones.

Supplies~
Stamps~JustRite Stampers-Breath of Spring, Joyful Hearts, 2-1/4'' x 3-1/16'' Oval Stamper, 1-3/4'' x 2-5/16'' Oval Stamper
Paper~Neenah Solar White; Curious Iridescent Poison Ivory; Daisy Bucket Shabby Green Door-Songbird
Ink~Tsukineko-Memento Rich Cocoa; Ranger-Distress Inks Antique Linen, Vintage Photo
Other~Spellbinders-™Wizard™, Classic Ovals Large S4-110 Die #3, Classic Ovals Small S4-112 Die #3, Big Scalloped Ovals Large S4-251 Die #4, Fancy Tags S4-235, Floral Accents S4-199; Copic-Airbrush System, Markers as shown in the picture; My Mind's Eye-Lush Brown Rhinestones; Webster's Pages-Lace Trim; Beacon Adhesives-Fabri-Tac; 3M Scotch-Foam Mounting Tape; 10oz. Altoids TinThank you so much for stopping by today! I hope you are enjoying the March Mega Blog Hop and don't forget to visit each of the designers and leave them a little love (comment). Good Luck with the contest! I hope you have a Wonderful Wednesday!!

Hugs & Smiles,
Heidi

LinkWithin

Related Posts Plugin for WordPress, Blogger...