Tuesday, May 25, 2010

JustRite Blog Hop with Sneak Peeks from the NEW 2010 Catalog & Idea Book!!

How do you like all those gorgeous NEW Christmas images on the cover -- THAT should help get you thinking about Christmas! The 2010 Catalog & Idea Books are available for pre-order beginning today and will ship at the beginning of June. <= Just cick on the purple link to preorder it! The catalog is 84 pages and it includes all our current stamp sets as well as the next four months worth of releases!

It will quickly become your JustRite Reference & Inspiration Book: You can check off the stamps sets you have and the catalog becomes an easy reference guide to what you own in your personal JustRite collection. And you can also make your JustRite wish list from this handy reference guide! Inside, you will find over 127 project ideas from our very talented design team, including complete supply lists for over 75 projects! The 2010 Catalog & Idea Book retails for $6.95.

We will be introducing NINE new Christmas/Holiday stamp sets and over 37 new products! And what's that on the lower left side of the cover? JustRite will begin introducing CLEAR STAMP BLOCKS beginning with our release on June 1st! These blocks are the same great design as our wood blocks but make positioning your images a breeze. We will have more information about the clear stampers next week, when we reveal our June 1 release!

Today we are doing a Blog Hop so you will get a little sneak peek of some of the beautiful project samples in the NEW 2010 Catalog & Idea Book!!

Here is a link list for all of the designers.

JustRite Inspiration Blog
Becca Feeken
Debbie Olson
Michelle Wooderson
Stephanie Kraft
Sharon Johnson
Sharon Harnist
Kazan Clark
Kellie Fortin
Heidi Blankenship
Barb Schram
Kathy Jones
Michele Kovack
Angela Barkhouse
Sankari Wegman

I also want to say a warm Welcome to Stephanie Kraft she is our newest Design Team Member!!

Here is a picture of one of the cards I created for the catalog.

Here is a close-up of the sentiment.

Thank you so much for stopping by today and I hope you enjoy the Blog Hop!!

Hugs & Smiles,
Heidi

Monday, May 24, 2010

Heartfelt Creations - Majestic Rose Mill Card

Hello! Sorry it has been so long in between posts, I have been busy working on projects and trying to play catch up. But be sure to check back often as I will be posting several times over the next week.The card I am sharing with you today is a sample card for Heartfelt Creations. I love the image of the old mill surrounded by roses! As you can see I didn't add a lot of embellishments on the card. I wanted the main focus to be on the beautiful stamped image.I started by stamping the Majestic Rose Mill 510K image from Heartfelt Creations onto white cardstock with brown ink. In this picture I colored the sky, trees and land with the Copic markers shown in the picture.Next I colored the water.Then I colored all of the roses using two colors of Copic markers to give the flowers some depth.I used three different colors of green to do the leaves.Next I colored the outer frame of the image and the lattice with the banner.The last little bit of coloring was done on the mill and the fence.After all of the coloring was done I used the Wizard™ and Labels Eight S5-019 die template from Spellbinders™ to make a label diecut.Here is a close-up of the sentiment. The sentiment stamp is from the Mini Message Cursive Set 1189S
After the card was all assembled I added a bit of sparkle using a Clear Star Gelly Roll Glitter Pen from Sakura and some tiny pearls for embellishments.Here is another picture with some sparkle.I also made some diecuts using Lattice S4-218 and Lattice Pendants S4-210 die templates from Spellbinders™ to add as accents.

Supplies~
Stamps~Heartfelt Creations-Majestic Rose Mill 510K, Mini Message Cursive Set 1189S
Paper~Neenah-Solar White; WorldWin-Racy Raspberry; Core'dintaions-Pink
Ink~Tsukineko-Memento Rich Cocoa
Other~Spellbinders™-Wizard™, Labels Eight S5-019, Lattice S4-218, Lattice Pendants S4-210; Copic Markers-as shown in pictures; Sakura-Clear Star Gelly Roll Glitter Pen; Joann's-Pearls; SCRAPBOOK ADHESIVES By 3L™-3D Foam Squares

Thank you so much for stopping by and I hope you have a wonderful day!!

Hugs & Smiles,
Heidi

Saturday, May 15, 2010

Mint Motif Stamps - So Sweet Card

Good morning! Today I have another card to share with you using the Newly Releases Mint Motif stamps by Kimberly Crawford. Here is the card I designed using the Very Square and Very Square Sentiments from Mint Motif. I love the Very Square stamp set which includes 6 square stamps each with a unique background design. You can use the background stamps for so many different styles of cards and the stamps are clear so you can easily line up the stamp images to create a beautiful background. The Mint Motif stamp sets are sold exclusively at iheartpapers.com.For the pears I started by stamping one of the background images with Lemon Grass ink onto white cardstock. The I used the pear shape from the Assorted Fruit S4-266 die template set along with the Wizard™ from Spellbinders™ to cut/emboss this cute little pear shape.Then I added a little Peeled Paint ink along the edges of the diecut to give it a little more depth.Here is a close-up of the finished pears on the card. I love the detail the background stamp add to the pear diecuts. I also used a couple of 3D Foam Squares from SCRAPBOOK ADHESIVES By 3L™ to pop up one of the pears.For the sentiment I made a diecut using Labels One S4-161, Die #2 with white cardstock and then I inked up the background stamp with Peeled Paint ink and stamped one time onto a piece of scrap paper removing some of the ink and then I stamped the image onto the label diecut. Doing this will result in a lighter color of ink. Then I stamped the sentiment in the center with black ink and inked the edges with Peeled Paint ink. On the top half of the card I created the background using red ink and one of the background stamps from Very Square. I matched all of this up with a piece of designer paper from Basic Grey Nook & Pantry, added a few yellow pearls and a green bow.

Supplies~Thank You For Being So Sweet
Stamps~Mint Motif-Very Square #MMoo1, Very Square Sentiments #MMoo2
Paper~Basic Grey-Nook & Pantry; Georgia Pacific-White
Ink~Ranger-Distress Ink Peeled Paint (green); Tsukineko-Memento Tuxedo Black, Lady Bug (red); Clearsnap-ColorBox Lemon Grass
Other~Spellbinders™-Wizard™, Labels One S4-161 Die #2, Assorted Fruit S4-266 (pear); Joann's-Lime Green Pearls; SCRAPBOOK ADHESIVES by 3L™-3D Foam Squares, E-Z Runner® (33'); From My Stash-Green Ribbon

Hop on over to Kimberly's Blog-For The Love Of Paper to check out all of the wonderful card samples with Mint Motif stamps and while you are there check out the Mint Motif Design Team!

OMGosh I can't believe the sun is shinning today!! It has been so rainy, cold and gloomy here for the past week or so--we need the sunshine. Thanks so much for stopping by today and I hope you have a great weekend!!

Hugs & Smiles,
Heidi

Friday, May 14, 2010

Flourishes - Spellbinders - NEW Release Beauty Within Stamp Set

What do you get when you mix the beauty of stained glass images with the fabulous shapes of Spellbinders™ Nestabilities? A fabulous new set from Flourishes called Beauty Within. This stamp set was designed to take the guess work out of cutting and trimming an elegant shape. With the help of Labels 11 and Labels 13, you can color to your heart’s content and then trim your image perfectly with these beautiful dies. This set, designed by artist Becky Fleck, will be released first thing Friday morning and is available now for pre-order! Would you like to win this set? Simply leave a comment on the Flourishes Blog and you’ll be in the running! Winners will be announced Saturday at 12 PM CST on the Flourishes Blog.

Some of the Spellbinders’ Designers have teamed up the Flourishes Design Team to show you the beautiful potential of Beauty Within!

Here is a link list to all of the Designers.

Julie Koerber

Christine Okken

Cindy Lawrence

Danielle Kennedy

Dawn Burnworth

Laura Fredrickson

Leslie Miller

Stacy Morgan

Sharon Doolittle


Heidi Blankenship **You are here! :)

Spellbinders™ Paper Arts Blog

Here is the card that I designed using the NEW Release Beauty Within from Flourishes. Talk about an absolutely BEAUTIFUL stamp set!! The images of the roses and iris are so pretty and the sentiments are fantastic too! I started by stamping the image of the stained glass roses onto white cardstock using black ink. This image matches perfectly with Labels Eleven S4-246 (Die #5) die template from Spellbinders™. Then I lined up the die template with the stamped image and used some tape to hold the template in place. I cut/embossed with the Wizard™ creating an elegant diecut shape. Next I colored the image using Copic markers. In the picture you can see I didn't color and do all of the shading in the center of all of the roses. I left some of them because I stamped the image of the roses a couple more times, colored the centers and cut then out for layering. Once I had all of the piece colored and cut out then I layered them and applied Glossy Accents from Ranger.I used the Wizard™ and Labels Eleven S4-246 Die #6 from Spellbinders™ to create a black mat and Floral Accent S4-199 to create white flourishes along the sides and I also added some tiny pearls.I stamped the sentiment onto white cardstock and then cut/embossed using the Wizard™ and Fancy Tags S4-235 die template from Spellbinders™. I added some dimension to the tag using 3D Foam Squares from SCRAPBOOK ADHESIVES By 3L™ and then I added some pink velvet ribbon and pearls. I also stamped the image of the smaller rose from the Beauty Within stamp set, colored with Copics, cut out the image and added it to the tag.Here is a close-up of the roses. I love the look that is achieved by layering the rose petals.I also used the Flourish Impressabilities™ I2-1009 on the pink shimmer paper.

Supplies~
Stamps~Flourishes-Beauty Within
Paper~WorldWin-Black; Neenah-Solar White; The Paper Company-Pink Shimmer
Ink~Tsukineko-Memento Tuxedo Black
Other~Spellbinders™-Wizard™, Labels Eleven S4-246 Die #5, #6, Fancy Tags S4-235; Floral Accent S4-199, Flourish Impressabilities™ I2-1009; Copic Markers-Y00, Y15, Y38, YR04, R81, R85, G24, YG63; Ranger-Glossy Accents; Joann's-Pearls, Pink Velvet Ribbon; SCRAPBOOK ADHESIVES By 3L™-3D Foam Squares, E-Z Runner® (33')

Thank you so much for stopping by today! I would love to hear what you think about the NEW Beauty Within stamp set from Flourishes!! I hope you have a Fantastic Friday!!!

Hugs & Smiles,
Heidi

Tuesday, May 11, 2010

Mint Motif Stamps by Kimberly Crawford!!! Just Thinking of You Card

Good morning! I am very excited to share a NEW stamp line with you today!! My dear and sweet friend Kimberly Crawford who is an Amazing Designer just recently started her own clear stamp line, Mint Motif!!! I am so happy and excited for Kimberly!!!! Starting May 14th Mint Motif stamps will be sold exclusively at iheartpapers.com. Kimberly has designed two stamps sets for the month of May, Very Square and Very Square Sentiments and there will be more sets to come!!

Today I have a card to share with you that I created using Mint Motif Very Square and Very Square Sentiments.

I love the pretty and soft pastel colors of the paper and I distressed and inked the edges of the paper for a vintage look. The papers are from the American Crafts, I Do Collection.
For the sentiment I cut/embossed a square using the Wizard™ and Classic Squares Large S4-126 Die #4 from Spellbinders™ and then I stamped the background using one of the stamps from Very Square. I inked the stamp with Distress Ink Worn Lipstick and then I stamped off the ink once and then stamped onto white cardstock. The pattern on the stamp matches the paper perfectly! Then using one of the stamps from Very Square Sentiments I stamped the sentiment with Rich Cocoa ink and then inked the edges with Antique Linen ink. I added some tiny pearls across the top of the sentiment and 3D Foam Squares from SCRAPBOOK ADHESIVES by 3L™ to the backside and then applied to the tag. To create the tag I used the Fancy Tags S4-235 die template from Spellbinders™.

I also created a little flower for an embellishment using the Daisy Heads S4-058 die template from Spellbinders™. I used Copic markers to airbrush a little color onto the flowers and then I added glitter and a button to the center of the flower.

Supplies~
Stamps~Mint Motif-Very Square #MMoo1, Very Square Sentiments #MMoo2
Paper~American Crafts-I Do Collection Gerber Daisies, Orchid, Peonies; Georgia Pacific-White
Ink~Ranger-Distress Ink Antique Linen, Worn Lipstick; Tsukineko-Memento Rich Cocoa
Other~Spellbinders™-Wizard™, Classic Squares Large S4-126 Die #4, Fancy Tags S4-235, Daisy Heads S4-058; Copic Markers-RV11, R85; SCRAPBOOK ADHESIVES by 3L™-3D Foam Squares, E-Z Runner® (33'); Joann's-Buttons, Pearls, Glitter; From My Stash-Distressing Tool

Thank you so much for stopping by today!! Please check out Kimberly's Blog, For the Love of Paper to see many more sneak peeks for Mint Motif stamps!!

I hope you have a Fantastic Day!!

Hugs & Smiles,
Heidi

Monday, May 10, 2010

My Mom's Mother's Day Card

Good morning! I hope you all had a great weekend and a Wonderful Mother's Day!! Today is going to be a quick post but I do have a card to share with you. Before I get started with the card I want to say Thank You so much for all of the Fantastic comments, questions and emails about the Flower Pin made with the baby wipes!! I hope that you will give them a try and I can't wait to see what you create--so be sure to leave me a comment and a link so I can see your flowers! Here is the card that I made for my mom for Mother's Day. I love the soft pretty colors and the vintage image of the mother and child is so beautiful. The vintage image is from the Heartwarming Vintage Cuts Baby Memories from Crafty Secrets and the paper is American Crafts from the I Do Collection. I just picked up some of these papers over the weekend and I love the colors!I made a couple of diecut flourishes using the Wizard™ and Doodles Parts S4-121 die templates from Spellbinders™. I inked the diecuts and add a little sparkle to them using a Gelly Roll Clear Star Glitter Pen from Sakura. I also added some pretty buttons and some green rhinestones.Supplies~
Paper~American Crafts-I Do Paper Collection Iris, Peonies, Gerber Daisies; Georgia Pacific-White
Ink~Ranger-Antique Linen
Other~Crafty Secrets-Heartwarming Vintage Cuts Baby Memories; Spellbinders™-Wizard™, Doodles Parts S4-121, SCRAPBOOK ADHESIVES By 3L™-3D Foam Squares, E-Z Runner® (33'); Sakura-Gelly Roll Clear Star Glitter Pen; My Mind's Eye-Green Lush Rhinestones, Joann's-Buttons

Thank you so much for stopping by today and I hope you have a Fantastic Day!!

Hugs & Smiles,
Heidi

Saturday, May 8, 2010

Handmade Flower Pin & Flower Embellishments

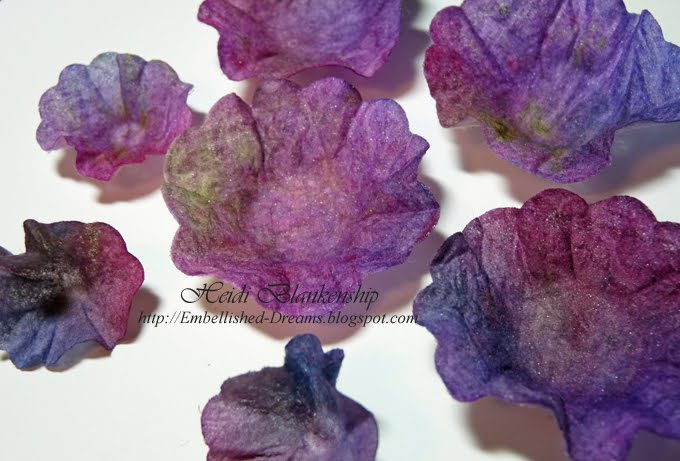
Good morning and Happy Saturday! I have a really fun tutorial to share with you today. I am very excited about it and I LOVE how the project turned out!! Handmade flower embellishments are all the rage right now and I have seen some beautiful paper and felt flowers out in blog land. Before I get started with the tutorial I want to show you the flower pin I created and I want you to look at it (now don't cheat and scroll down! *wink*) and see if you can guess what the flower is made of.Here it is. What do you think it's made of? If you leave a comment let me know what you first thought it was. It's not paper and it's not felt.Here is a picture of it before it was cut. Do you know what it is or are you still guessing? It's a dried baby wipe. After the baby wipe is dry it looks and feels like a very thin felt. Ok, on to the tutorial--I have a ton of step-by-step pictures for you! I know if you are looking at all of the pictures this technique might seem a little overwhelming but I have to tell you it's really not. The flowers are easy and fun to make. I just took a ton of pictures so you would be able to see every step along the way. ;-) To start I applied a dry baby wipe to an Adhesive Sheet from SCRAPBOOK ADHESIVES By 3L™ and then I used the Wizard™ and Big Scalloped Circles Large S4-249 Die #3 die templates from Spellbinders™ to cut two pieces of the baby wipe and one piece of a lightweight chipboard.Peel back the paper covering from the adhesive on the baby wipe pieces and adhere to both sided of the chipboard.I also cut out a leaf and a flourish using Sunflower Set Two S4-158 (leaf) and Doodle Parts S4-121 die templates from Spellbinders™ and covered them with the baby wipes.I started with the chipboard covered leaf and the flourish. I cut the flourish in half so I would have two little flourish pieces. I misted the leaf and the flourish with Crushed Shells and Honey Dew Mist Glimmer Mist from Tattered Angels and set aside to dry.Next I made two leaf diecuts using just the baby wipes. I misted them with the same Glimmer Mist as mentioned above. I used a heat tool to heat set the leaves and I also used a tweezers to pinch the centers of the leaves as they were drying. For the chipboard covered flower base I misted it with Tattered Rose and Timeless Lilac and then I sprayed some of the Timeless Lilac onto the craft mat and rolled the edges of the flower base in the Glimmer Mist.Using the Big Scalloped Circles Large S4-249 Die #3 die templates I made five scalloped circles diecuts from the baby wipes.I used a combination of Honey Dew Mist, Tattered Rose, Sweet Pea (not pictured), Spring Violet, Timeless Lilac Glimmer Mist on the diecut baby wipes.I used a heat tool to heat set each of the flower pieces. Once they were all dry I took each piece and put in the palm of my hand and used the cap from the Glimmer Mist bottles to push down in the center of the flower and then I closed my had to scrunch up the sides of each piece. This is what the flower piece should look like once it is shaped.Now you will repeat the same steps as mentioned above using the smaller die template, Big Scalloped Circles Small S4-250 Die #2. Cut five piece and spray with the same Glimmer Mist as the larger pieces. I used a Sharpie marker to shape the smaller flower pieces. These are all of the flower pieces.Here is a close-up. To assemble the flower you will start with a larger piece and apply two pieces of Crafty Power Tape from SCRAPBOOK ADHESIVES By 3L™ in the center on the backside of the flower.Pull the flower piece up around the cap from the Glimmer Mist bottle and push the flower piece down into the center of another flower piece. Repeat the step mentioned above layering the flower pieces. Once all of the larger pieces are done then layer the smaller pieces in the center of the flower.After all of the pieces are layered I added a pretty pearly button to the center using a 3D foam Square from SCRAPBOOK ADHESIVES By 3L™.Are you still with me? LOL! We are coming to the finish line--I promise! Once the covered chipboard piece are dry use a hot glue gun to assemble the pieces as shown in the picture. Apply hot glue to the back of the flower and place on top of the covered chipboard pieces. Then lightly mist Iridescent Gold Glimmer Mist of the entire piece. Once it is dry glue a jewelry pin to the backside.Here's a couple more flowers I created to use on cards. If you are not making a jewelry pin you can skip the steps with the chipboard. The covered chipboard just helps to make the jewelry pin more durable.

Supplies~
Spellbinders™~Wizard™, Big Scalloped Circles Large S4-249 Die #3, Big Scalloped Circles Small S4-250 Die #2, Doodle Parts S4-121, Sunflower Set Two S4-158 (leaf)
SCRAPBOOK ADHESIVES By 3L™~Crafty Power Tape, 3D Foam Squares, Adhesive Sheets
Tattered Angels~Glimmer Mist Crushed Shells, Honey Dew Mist, Tattered Rose, Sweet Pea, Spring Violet, Timeless Lilac, Iridescent Gold
From My Stash~Chipboard, Heat Tool, Tweezers, Glue Gun, Button, Jewelry Pin Back

Like I said when the baby wipes are dry they have the look and feel of very thin felt. I hope you enjoyed the tutorial! I would love to hear what you think of the flower and if you create any please leave a comment with a link--I would love to see your creations!!

Thank you so much for stopping by today! I hope you have a wonderful weekend and for all of the mothers out there or all of the ladies that are like a mother to someone I hope you all have a Beautiful and Happy Mother's Day!! To my Mom--I love you so much--Happy Mother's Day!!! XOXOXOXO

Hugs & Smiles,
Heidi

LinkWithin

Related Posts Plugin for WordPress, Blogger...