
 Here it is. What do you think it's made of? If you leave a comment let me know what you first thought it was. It's not paper and it's not felt.
 Here is a picture of it before it was cut. Do you know what it is or are you still guessing? It's a dried baby wipe. After the baby wipe is dry it looks and feels like a very thin felt.
  Ok, on to the tutorial--I have a ton of step-by-step pictures for you! I know if you are looking at all of the pictures this technique might seem a little overwhelming but I have to tell you it's really not. The flowers are easy and fun to make. I just took a ton of pictures so you would be able to see every step along the way. ;-) To start I applied a dry baby wipe to an Adhesive Sheet from SCRAPBOOK ADHESIVES By 3L™ and then I used the Wizard™ and Big Scalloped Circles Large S4-249 Die #3 die templates from Spellbinders™ to cut two pieces of the baby wipe and one piece of a lightweight chipboard.
 Peel back the paper covering from the adhesive on the baby wipe pieces and adhere to both sided of the chipboard.
 I also cut out a leaf and a flourish using Sunflower Set Two S4-158 (leaf) and Doodle Parts S4-121 die templates from Spellbinders™ and covered them with the baby wipes.
 I started with the chipboard covered leaf and the flourish. I cut the flourish in half so I would have two little flourish pieces. I misted the leaf and the flourish with Crushed Shells and Honey Dew Mist Glimmer Mist from Tattered Angels and set aside to dry.
 Next I made two leaf diecuts using just the baby wipes. I misted them with the same Glimmer Mist as mentioned above. I used a heat tool to heat set the leaves and I also used a tweezers to pinch the centers of the leaves as they were drying.
  For the chipboard covered flower base I misted it with Tattered Rose and Timeless Lilac and then I sprayed some of the Timeless Lilac onto the craft mat and rolled the edges of the flower base in the Glimmer Mist.
 Using the Big Scalloped Circles Large S4-249 Die #3 die templates I made five scalloped circles diecuts from the baby wipes.
 I used a combination of Honey Dew Mist, Tattered Rose, Sweet Pea (not pictured), Spring Violet, Timeless Lilac Glimmer Mist on the diecut baby wipes.
 I used a heat tool to heat set each of the flower pieces. Once they were all dry I took each piece and put in the palm of my hand and used the cap from the Glimmer Mist bottles to push down in the center of the flower and then I closed my had to scrunch up the sides of each piece.
  This is what the flower piece should look like once it is shaped.
 Now you will repeat the same steps as mentioned above using the smaller die template, Big Scalloped Circles Small S4-250 Die #2. Cut five piece and spray with the same Glimmer Mist as the larger pieces. I used a Sharpie marker to shape the smaller flower pieces.
  These are all of the flower pieces.
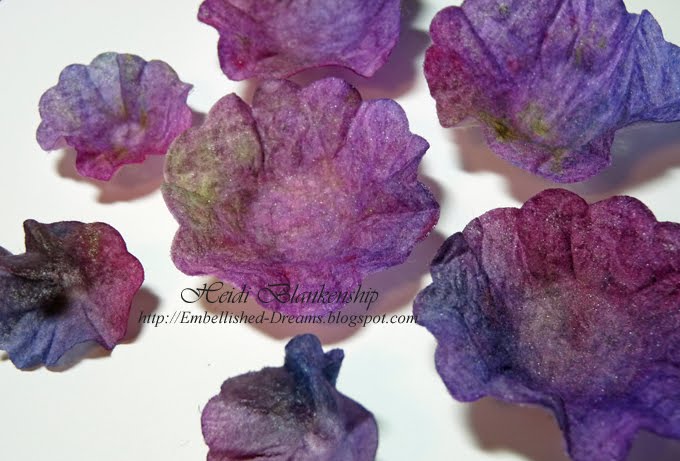 Here is a close-up.
  To assemble the flower you will start with a larger piece and apply two pieces of Crafty Power Tape from SCRAPBOOK ADHESIVES By 3L™ in the center on the backside of the flower.
 Pull the flower piece up around the cap from the Glimmer Mist bottle and push the flower piece down into the center of another flower piece.
  Repeat the step mentioned above layering the flower pieces. Once all of the larger pieces are done then layer the smaller pieces in the center of the flower.
 After all of the pieces are layered I added a pretty pearly button to the center using a 3D foam Square from SCRAPBOOK ADHESIVES By 3L™.
 Are you still with me? LOL! We are coming to the finish line--I promise! Once the covered chipboard piece are dry use a hot glue gun to assemble the pieces as shown in the picture.
  Apply hot glue to the back of the flower and place on top of the covered chipboard pieces. Then lightly mist Iridescent Gold Glimmer Mist of the entire piece. Once it is dry glue a jewelry pin to the backside.
 Here's a couple more flowers I created to use on cards. If you are not making a jewelry pin you can skip the steps with the chipboard. The covered chipboard just helps to make the jewelry pin more durable.
Supplies~
Spellbinders™~Wizard™, Big Scalloped Circles Large S4-249 Die #3, Big Scalloped Circles Small S4-250 Die #2, Doodle Parts S4-121, Sunflower Set Two S4-158 (leaf)
SCRAPBOOK ADHESIVES By 3L™~Crafty Power Tape, 3D Foam Squares, Adhesive Sheets
Tattered Angels~Glimmer Mist Crushed Shells, Honey Dew Mist, Tattered Rose, Sweet Pea, Spring Violet, Timeless Lilac, Iridescent Gold
From My Stash~Chipboard, Heat Tool, Tweezers, Glue Gun, Button, Jewelry Pin Back
Like I said when the baby wipes are dry they have the look and feel of very thin felt. I hope you enjoyed the tutorial! I would love to hear what you think of the flower and if you create any please leave a comment with a link--I would love to see your creations!!
Thank you so much for stopping by today! I hope you have a wonderful weekend and for all of the mothers out there or all of the ladies that are like a mother to someone I hope you all have a Beautiful and Happy Mother's Day!! To my Mom--I love you so much--Happy Mother's Day!!! XOXOXOXO
Hugs & Smiles,
Heidi

I was going to guess coffee filters! Very cool, Heidi!
ReplyDeleteSo fun Heidi! Thank you for the tutorial! Such a good idea!
ReplyDeleteThought it was paper towels! Great tut and love the end result :) xo
ReplyDeleteYou are so awesome! Love those flowers! They are fantastic!
ReplyDeleteFantastic idea :)
ReplyDeleteThis is completely brilliant. I thought it was tyvek...you know the paper envelopes that don't tear...
ReplyDeleteThanks for sharing...sooooo beautiful
magnifique
ReplyDeleteGood Grief!!! Amazingly beautiful...I have been following your blog for quite some time...and now I just had to comment...What an inspration you are...to all of our paper crafter friends...thank you for sharing...You have a gift that has certainly inspired me :)
ReplyDeleteI honestly thought it was some sort of thin felt. It is just stunning, I'll have to have a go at this one, thanks for sharing it with us
ReplyDeleteMy guess was used dryer sheets. Have plenty of those baby wipes around,too! These flowers are so beautiful and the tute is excellent! Thanks so much!!
ReplyDeleteWonderful flowers! TFS this idea. I didn't know what it was made from when I first looked at it, but knew I wanted to make some! Great tutorial and photos. Hugs!!
ReplyDeleteFabulous!! I am so impressed with the level of projects that you share on your blog. Also loved your sweet pea card! Thanks so much for sharing your dedication and talent.
ReplyDeleteLynn
Stunning!! Love your creativity! I have been trying used dryer sheets, very similar to your idea!
ReplyDeleteOh Heidi, this is outstandingly gorgeous. I thought it was tissue paper. WRONG! I would really like ot try this! I will try this. Awesome girl! You amaze me again and again!
ReplyDeleteThis is just gorgeous!!!! I love the colors on this also.
ReplyDeleteGreat tutorial. Thanks. I thought they were dryer sheets you were using. Close but no cigar!
ReplyDeleteThis is Gorgeous!
ReplyDeleteWhat a beautiful gift!
I was going to guess a paper towel.
Thank you so much for taking the time to do the tutorial...
I think I am going to give this a try this week...I have been making my own flowers useing paper bags and tissue paper and spraying with the glimmer mist, did one with velvet and tulle. Using the same dies. But surely didn't think of doing it this way!!
Happy Mothers day!
That is great! Can't wait to try it! Thanks for sharing all of your hard work!
ReplyDeleteFirst thought was a dry handiwipe (for hands). No kids, so I don't think of baby wipes. Beautiful beautiful flowers. I will be trying to make these. Thank you!
ReplyDeleteI am in awe! I just LOVE your creativity!
ReplyDeleteHow awesome is this? Such a cool tutorial!!!
ReplyDeleteOH MY GOSH ... this is amazing and absolutely BEAUTIFUL!! You should be excited ... this is fantastic (and my favorite color to boot!) ... aren't you the clever one! Thanks for sharing the "how to" with us!!
ReplyDeleteThese are gorgeous and the tutorial is fantastic. Thanks - can't wait to try this myself.
ReplyDeleteI am awestruck! I just found your blog and I am so excited to try this new idea! Who'da thought baby wipes!
ReplyDeleteThey are on my list, I try to recycle, but not this! Smiles, Cyndi
Hi!
ReplyDeleteToday I posted an entry on my blog with a link to this tutorial.
If that's not OK, would you please notify me?
Thanks,
Nancy Ward
http://paperfriendly.blogspot.com
Dear Heidi,
ReplyDeleteThese are divine flowers and I'd love to share your tutorial over at Going Green Crafters & Artists. If that's not okay, please let me know?
Cheers,
Rosie
So very clever and beautiful....thanks so much for sharing the tutorial.
ReplyDeletelove the baby wipe idea :) Great tutorial, too :)
ReplyDeleteAwesome tutorial and such brilliant flowers. Love the royal colours.
ReplyDeleteThanks for sharing,
Monica
Wow that is an awesome idea. I am going to give it a try and I'll send you a link to my blog to check it out. I'll also post a link to your site so other people can find out how to do it too. Please message me if this is not okay. Thanks for sharing!
ReplyDeletethank you very much.. this flower is awesome.
ReplyDeleteYou get a similar feel if you use bamboo dusters..not that ive used them to dust with of course.... lol but I stumbled on them as an alternative textile and when I accidentally washed one in the washing machine,it too went all felt like and started to tease apart wonderfully...........very like fine nuno felt........so theres another medium to play with! The hell with the dusting though lol Great flowers, loved them :)
ReplyDeleteThank you so much for the tutorial! I am a quilter and am going to try making some of these without the chipboard to add as embellishment to a crazy quilt block! If I get it to turn out I will defiinitely post a picture. Thank you again!!!
ReplyDeleteGorgeous flowers! I found this post today, through Stef at Ingenious Inkling. When I first saw the material, I thought it was a slightly wrinkled piece of a tyvek envelope. To think of all the baby wipes I've thrown away ... arrrggghhh! And, they were already inked up from cleaning stamps--I keep them in plastic bags by color. When say, the red one is saturated, I toss it. I could've added mist to those I've tossed and they would have been perfect to use to try to create these AWESOME flowers. Oh, well. At least now I'll have a GREAT use for them. THANKS a ZILLION for the tutorial. Oh, and if there isn't a video, I APPRECIATE a ton of pics! :)
ReplyDeleteBeautiful flower. I have done backgrounds with baby wipes and watercolors but never thought to use them this way.
ReplyDeleteGorgeous flower, Heidi! Thank you SO much for the great tutorial! I can't wait to try this! Plenty of baby wipes around as I became a grandmother 9 months ago! Fabulous project!
ReplyDeleteHeidi - this is AWESOME, do you mind if I take to tutorial to teach the ladies at Paper and Metal Scrapper in Payson, AZ?? We are always on the lookout for incredible doables for ou Thur. AM Coffee Clutch
ReplyDeleteThis is Awesome...fantastic tutorial...thanks so much for sharing!!
ReplyDeleteI really do love this. I have written a memoir from my childhood about old time box suppers. Thanks.
ReplyDelete