Friday, October 28, 2016

The Stamp Simply Ribbon Store - Harvest Shaker Card

Hello and Happy Autumn to everyone!  The temps are getting cooler here in Minnesota and the leaves on the trees are filled with beautiful colors.  I can't believe Halloween is in just a few days and the weatherman is calling for temps to get up in to the 60s!  That is pretty rare for us in Minnesota.  I remember taking the boys out trick-or-treating when they were little and a few times it was snowing.  So I thought this week would be perfect for an Autumn card.


Here is the card I designed.  I have used the Penny Black - Snow Dust 4102K wood mounted stamp to make winter and Christmas cards in the past but when I was looking at it I thought why couldn't it be used for a Fall/Autumn card.  Instead of snow dust blowing we can pretend it's leaves blowing in the wind.  I love it when you can get multiple uses out of stamps.  You could even used this stamp in the Spring and change the colors for an apple or cherry tree and the dust part can be blossoms blowing in the wind.  I have a tutorial with a few pictures on how I colored and stamped the background for the card.  Oh, and it's a shaker card with something a little different than sequins.


For the background I stamped the image of the trees on to ivory cardstock using Tim Holtz Distress Ink - Antique Linen.  I used the antique linen ink because I wanted a very light impression of the image just so I could have an idea of where to add all of the colors of ink on the trees.


I used Tim Holtz Distress Inks - Antique Linen, Vintage Photo, Gathered Twigs, Fired Brick, Spiced Marmalade, Twisted Citron, Ripe Persimmon to add the color to the image.  I just used a small portion of a cotton ball working in a circular motion to apply the ink.  You could also use a sponge or a distress ink applicator to apply the ink--use whatever you are the most comfortable working with.  If you are worried about using too big of a sponge or applicator you could also use Q-tips to apply the ink.  Once all of the ink was applied then I used a paint brush and flicked water on to the paper.  I'm not using watercolor paper but the paper will be ok since it will just be a few flicks of water.  Then use a paper towel to blot up the water.  You can repeat this until you achieve the desired look but make sure you use a heat tool to dry the paper in between for the best results.  I added the water two times on this background.


Once I made sure that paper was good and dry then I used Versamark ink to stamp the image of the trees.  I inked up the dust part of the image and stamped that a few times at the bottom of the trees and on the left side at the top.  To stamp just the dust part you can either ink up just that area on the stamp or you can lay a piece of paper down as a mask so the images of the trees don't stamp.  I added Ranger - Super Fine Detail Gold Embossing Powder and used my heat tool to melt and heat set the embossing powder.  One thing I wanted to add--I'm sure someone might be thinking why not just heat emboss and then add the inks for color.  The reason I chose to do the technique the way I did is because sometimes if you heat emboss with a metallic color and then add ink on top of it, it can dull the metallic color.  So that is why I did the inking on the background and then heat embossed.


Here you can see the shaker bits in the card.  You can also click on all of the images to enlarge them and see more of the details.  Instead of using sequins I thought it would be fun to use some of the Stampendous - Frantage Gold Lux Mix Micas & Glitter.  The colors of the mica and glitter are perfect for a Fall/Autumn card.  To create the frame for the card I used brown cardstock and then die cut the frame using Spellbinders - Branching Out and Card Creator 5 x 7 Matting Basics B dies.  I inked the edges of the frame with Versamark and then heat embossed using Ranger - Super Fine Detail Gold Embossing Powder.


Here is a close up of the trees.  Sorry for the little bit of glare in the photo.  Sometimes shaker cards can be a little hard to get a photo of with out a glare from the acetate.  I used a piece of the Hot Off The Press Heat Resistant Acetate for the window in the card.  I used Scor-Tape to adhere the acetate to the frame and then I added Therm-O-Web Foam on the backside of the frame to add dimension and it will also allow the pieces of mica and glitter to move when someone shakes the card.  I added some of the Stampendous - Frantage Gold Lux Mix Micas & Glitter inside the frame and then carefully lined up and added the background piece.


I stamped the word Autumn from the Stamp Simply Clear Stamps - Harvest SS-010 set on to a smaller piece of the rust colored cardstock with Versamark and heat embossed with Ranger - Super Fine Detail Gold Embossing Powder.  Then I fussy cut the little notch to make it like a banner.  Next I added some May Arts Gold Metallic String Ribbon.  I made a bow and frayed the ends.  To finish off the card I added a few flowers from the Petaloo - Botanica Collection Sugared Minis Mocha.


I hope you enjoyed today's card and the tutorial. 

Please be sure to visit The Stamp Simply Ribbon Store for all of your paper crafting goodies and also the Stamp Simply Blog for more inspiration and card making ideas from the design team.

Thanks so much for stopping by today and I hope you have a happy Friday!

Hugs & Smiles,
Heidi


Supplies
Stamps:  Stamp Simply Clear Stamps - Harvest SS-010, Penny Black - Snow Dust 4102K
Paper:  Hot Off The Press Heat Resistant Acetate, Cardstock - Ivory, Brown, Rust
Ink:  Versamark, Tim Holtz Distress Inks - Antique Linen, Vintage Photo, Gathered Twigs, Fired Brick, Spiced Marmalade, Twisted Citron, Ripe Persimmon
Dies:  Spellbinders - Branching Out, Card Creator 5 x 7 Matting Basics B
Ribbon:  May Arts Gold Metallic String Ribbon
Accessories:  Stampendous - Frantage Gold Lux Mix Micas & Glitter, Ranger - Super Fine Detail Gold Embossing Powder, Petaloo - Botanica Collection Sugared Minis Mocha, Therm-O-Web Foam, Scor-Tape, Heat Tool, Paint Brush, Water, Paper Towel 

Monday, October 24, 2016

WINNER!! The Stamp Simply Ribbon Store - The 12 Days of Christmas

Hello everyone!  Sorry, I know I said I was going to post the winner over the weekend and I totally forgot--my bad!  I used Random(dot)Org to pick the winner.  She has been notified and I have heard back from her--she's pretty excited!

The WINNER of The 12 Days of Christmas is...

Beautiful card. I like how you dressed up this piece of paper.  Yes, I make about 50 Christmas cards.


Huge Congrats to Sue!!

Thank you to everyone who participated in The 12 Days of Christmas!  I hope you were inspired to start creating your Christmas cards.  October has flown by and Christmas will be here before we know if.  :)

Thanks so much for stopping by today!

Hugs & Smiles,
Heidi

Friday, October 21, 2016

The Stamp Simply Ribbon Store - The Twelve Days of Christmas - Day 12

Hello everyone!  
Welcome, to day 12 of the The Twelve Days of Christmas for The Stamp Simply Ribbon Store.  There is still a little bit of time to enter the Blog Candy and the details will be listed below.  If you would like to check out all of the beautiful cards for The Twelve Days of Christmas you can click HERE to visit The Stamp Simply Blog.


Here is the Christmas cards I designed.  
This card is a wonderful combination of metallic copper and gold with some cream.  


To create the background piece I used the Darice Embossing Folder - Pine Branches in Corner and inked the embossing folder with Delicata Celestial Copper ink.  I used a heavier hand when inking the top and bottom of the embossing folder so the middle of the folder had very little ink.  The Delicata inks are great to use for this technique because they leave a very soft shimmer and don't tend to leave harsh lines.  Then I carefully added my cardstock and ran the embossing folder through the die cutting machine.  As you can see from the photo doing this technique leaves the flatter areas with ink and the embossed areas are still the cream colored cardstock.


Here is a close up of the top part of the card.


Here you can see the middle and bottom of the card.  I used one of the stamps from the Stamp Simply Clear Stamps - SS-013 Jesus stamp set.  I used Delicata Celestial Copper ink and Ranger -  Copper Supper Fine Detail Embossing Powder to stamp and emboss the sentiment.  Then I went over the word Savior with a Zig Wink of Stella Gold pen and I also added some splatter droplets on the paper using the Wink of Stella pen.  Next I added some Glossy Accents on top of the word Savior for some added dimension.


To finish off the card I added some May Arts Metallic Wired Iridescent Cord - Copper around the bottom half of the card and I curled the ends.  I also added a few Melissa Frances Cream Pearls.  I layered the background piece on to a piece of Bazzill Luxury Pearlescent Metallic 105# Copper and then added that to an A2 top folding cream card base.

As I mentioned above there is still some time to get your name in 
for a chance at winning some blog candy.

Blog Candy
*Please Read*

The 12 Days of Christmas runs for 12 consecutive days. There is a total of 6 designers participating, so each designer has 2 days.  Each designer will offer BLOG CANDY on ONE of her days, her choice.  So be sure to visit all of the blogs.  I am doing my BLOG CANDY starting today (10/14/16).  You will have until 11:59 PM (CST) Friday, October 21st, 2016 click HERE to leave a comment on the blog post from last week and the winner will be announced Saturday, October 22nd, 2016

Leave a comment and let me know if you make Christmas cards and if you do how many do you send or give to family and friends OR tell me if your family has any Christmas traditions--it's your choice.

What will you win?
Your choice of one of the NEW Christmas Stamp Simply Clear Stamp Sets.
*If you have already purchased the Christmas sets, you are then welcome to choose from ANY of the Stamp Simply Clear Stamp Sets.


Please be sure to visit The Stamp Simply Ribbon Store for all of your paper crafting goodies and also the Stamp Simply Blog for lots of inspiration from the design team.

Thanks so much for stopping by today! 

Hugs & Smiles,
Heidi


Supplies
Stamps:  Stamp Simply Clear Stamps - SS-013 Jesus
Paper:  Bazzill Luxury Pearlescent Metallic 105# Copper, Cardstock - Ivory
Ink:  Delicata Celestial Copper
Ribbon:  May Arts Metallic Wired Iridescent Cord - Copper 
Accessories:  Darice Embossing Folder - Pine Branches in Corner, Ranger -  Copper Supper Fine Detail Embossing Powder, Glossy Accents, Melissa Frances Cream Pearls, Zig Wink of Stella Gold, Scor-Tape, Heat Tool

Friday, October 14, 2016

The Stamp Simply Ribbon Store - The 12 Days of Christmas - Day 5

Hello everyone! Welcome to the annual event, The 12 Days of Christmas from The Stamp Simply Ribbon Store and Design Team Members.  Today, is day five (5) for The 12 Days of Christmas.  If you missed the previous days you can click HERE to visit the blog and check out all of the other beautiful Christmas cards.  
Be sure to check out all of the blogs because there is also some Blog Candy!


Here is the Christmas card I designed.  This card is full of sparkle and it came together in very quickly.  I used a piece of pattern paper from the My Mind's Eye - Sugar Plum 6 x 6 Paper Pad.  I love this wonderful winter scene on the paper and for the most part I let the paper do the work for me.  If you are using pattern paper and it has a scene like this or some other beautiful images let those image stand out and be a great focal point of your card.


Here is a close up look at the pattern paper.  I used Glossy Accents to cover the snow (dots) and then I sprinkled some Stampendous - Multi Ultra Fine Crystal Glitter on top of the glossy accents.  I also added glitter to the snow drifts, trees, and buildings.  So this card has lots of sparkle!


The sentiment is from the Stamp Simply Clear Stamps - SS-012 Christmas Blessings.  I used VersaMark Ink to stamp the sentiment on to a piece of ivory cardstock and then I added Ranger - Super Fine Detail Gold Embossing Powder and used my heat tool to heat set and melt the embossing powders.  I think sentiments always look so beautiful when they are embossed with metallic colors.  I used the Spellbinders - Labels Thirty-Nine to die cut the sentiment.  I also used the same die set to cut another label for layering.  I used the Bazzill - Gold Mirror cardstock for the second label shape.  I layered the two labels and used Therm-O-Web Foam Squares to add some dimension in between the layers.  


Here is a look at the bottom of the card with the winter scene.  Here you can see where I added more of the glitter.


I layered the pattern paper on to a piece of the Bazzill - Gold Mirror cardstock.  Than I added some  May Arts - 3/8" Metallic Velvet Gold Ribbon.  The card base is an ivory 5.5 x 5.5 top folding card.  To finish off the card I added some Prima Flowers - Lady Godivas Raspberry Ice and Kaiser Craft - Mini Paper Blooms Fuchsia.


I hope you enjoyed today's card share.  October is about half over and Christmas will be here before we know it so it's time to get started on the Christmas cards.

Blog Candy
*Please Read*

The 12 Days of Christmas runs for 12 consecutive days. There is a total of 6 designers participating, so each designer has 2 days.  Each designer will offer BLOG CANDY on ONE of her days, her choice.  So be sure to visit all of the blogs.  I am doing my BLOG CANDY starting today (10/14/16).  You will have until 11:59 PM (CST) Friday, October 21st, 2016 to leave a comment on this blog post and the winner will be announced Saturday, October 22nd, 2016

Leave a comment and let me know if you make Christmas cards and if you do how many do you send or give to family and friends OR tell me if your family has any Christmas traditions--it's your choice.

What will you win?
Your choice of one of the NEW Christmas Stamp Simply Clear Stamp Sets.
*If you have already purchased the Christmas sets, you are then welcome to choose from ANY of the Stamp Simply Clear Stamp Sets.


Please be sure to visit The Stamp Simply Ribbon Store for all of your paper crafting goodies and also the Stamp Simply Blog for lots of inspiration from the design team.

Thanks so much for stopping by today! 

Hugs & Smiles,
Heidi


Supplies
Stamps:  Stamp Simply Clear Stamps - SS-012 Christmas Blessings
Paper:  My Mind's Eye - Sugar Plum 6 x 6 Paper Pad, Bazzill - Gold Mirror, Cardstock - Ivory
Ink:  VersaMark Ink
Dies:  Spellbinders - Labels Thirty-Nine
Ribbon:  May Arts - 3/8" Metallic Velvet Gold Ribbon
Accessories:  Prima Flowers - Lady Godivas Raspberry Ice, Kaiser Craft - Mini Paper Blooms Fuchsia, Ranger - Super Fine Detail Gold Embossing Powder, Stampendous - Multi Ultra Fine Crystal Glitter, Ranger - Glossy Accents, Scor-Tape, Therm-O-Web Foam Squares

Friday, October 7, 2016

The Stamp Simply Ribbon Store - Altenew Bamboo Rose Watercolor Card with LOTS of Shimmer and Sparkle!

Hello everyone!  Today, I have a beautiful and easy watercolor card to share with you using the Altenew - Bamboo Rose Clear Stamps.  This card is full of lots of shimmer and sparkle too!


Here is the card I designed.  I stamped the roses using VersaMark Ink and then I applied Super Fine Detail Gold Embossing Powder from Ranger.  Then I used a heat tool to melt and heat set the powder.  Next I added the inks from the Altenew - Red Cosmos and Green Fields to my craft mat and then I added water to the inks to be able to use them to watercolor the stamped images.  The Altenew inks are a dye base ink and they work nicely for doing watercolor, however I have found that I have the best results when I add water to the paper and then add the color.  I have noticed sometimes if I don't add water or forget to the ink just soaks right into the paper and doesn't blend as well so I always try to remember to add water first.  The watercolor is very loose and I purposely went outside the lines.


After I was done doing the watercolor then I added water droplets and sprinkled some of the gold embossing powder on the water droplets.  Then I used a heat tool to melt and heat set the powder.  Next I squeezed out some of the shimmer from the Zig - Wink of Stella Clear Glitter Brush Pen and added a bunch of tiny little shimmery droplets over the entire watercolor panel.  I used the flashlight on my phone when I took this picture so you could see some of the shimmer.


Here is a close up of the roses on the top of the card.  I added some Glossy Accents on the roses and leaves and then I sprinkled some Floracraft Diamond Dust on top of the Glossy Accents and then I set the piece aside to dry.


Here is a close up of the roses on the bottom of the card.  This card is SO full of shimmer and sparkle!


I stamped the sentiment from the same stamp set on to a piece of Quartz Shimmer Paper using VersaMark Ink and then I embossed it using Super Fine Detail Gold Embossing Powder.  I added the strip to the shimmer paper to the front of the card and then I also added two thin strips of black cardstock.  To finish the card off I added Therm-O-Web Foam Squares to the back of the card front and then added that to an A2 top folding black card base.  I also added a few 5mm Crystal Sequins and 10mm Crystal Sequins.


I hope you enjoyed today's card share!

Please be sure to visit The Stamp Simply Ribbon Store for all of your paper crafting goodies and also visit the Stamp Simply Blog for more inspiration from the design team.

Thanks so much for stopping by and I hope you have a wonderful day!

Hugs & Smiles,
Heidi


Supplies
Stamps:  Altenew - Bamboo Rose Clear Stamps
Paper:  Ranger Watercolor Paper, Quartz Shimmer Paper, Cardstock - Black
Ink: Altenew - Red Cosmos - (Frosty Pink, Coral Berry, Ruby Red), Green Fields - (Frayed Leaf, Forest Glades), VersaMark Ink
Accessories:  Ranger - Glossy Accents, Super Fine Detail Gold Embossing Powder, Floracraft Diamond Dust, Zig - Wink of Stella Clear Glitter Brush Pen, 5mm Crystal Sequins, 10mm Crystal Sequins, Therm-O-Web Foam Squares, Scor-Tape, Paint Brush, Heat Tool

Friday, September 30, 2016

The Stamp Simply Ribbon Store - Deck the Halls Christmas Shaker Card with a Watercolor Background and Tutorial

Hello everyone!  Today, I have a fun and different twist on creating shaker cards.  


Here is the card that I designed.  For the stamps I used the New SS-012 Christmas Blessings from Stamp Simply Clear Stamps.  I love the wonderful sentiments and the pretty holly and berries image in this stamp set.  For the background piece I used Ranger - Watercolor Paper.  I stamped the images using VersaMark ink and then I added Ranger - Super Fine Detail Gold Embossing Powder and used my heat tool to melt and heat set the powder.  I used Tim Holtz Distress Inks - Squeezed Lemonade, Cracked Pistachio, Mowed Lawn, Festive Berries, Fired Brick, Chipped Sapphire, Vintage Photo with some water and a paint brush to watercolor the background.  Then I added red paint splatters using the Festive Berries Tim Holtz Distress Ink.  Once the paint splatters were dry I added a little bit of water to the splatters to soften them.


To create the sentiment I stamped the sentiment on to white cardstock and embossed it with the same gold embossing color.  You will notice the sentiment is lined up a little different than the stamp in the set.  I actually cut my clear stamp making it more versatile for stacking the sentiment.  This is a great trick to do with clear stamps and it gives you more options.  Plus you can always line it back up on a stamping block so it is just like how it originally came in the stamp set.  Now I realize not everyone is comfortable with cutting their stamps.  So another alternative is to use a post-it-note to cover parts on the sentiment when inking it up.  Then remove the post-it-note and stamp the sentiment.  To create the shake I used one of the Crystal Clear Bags/Card Sleeves - A2.  I slipped the cardstock down in to one corner and then I trimmed off the excess.


Then I added a few sequins from the Prima Say It In Crystals A Victorian Christmas Sequins collection (red), 5mm Gold Sequins, and 5mm Crystal Sequins.  I also added some Scor-Tape to the top and right side on the piece of cardstock and then pressed down to hold in place and trim off any access.  These are great to make if you are mailing the card because they aren't as bulky as a standard shaker card.  Also when making shakers like this don't put too many sequins in because if the cello bag is too full the sequins might not move around as much.


Next I cut a frame using some Bazzill Gold Mirror paper and Labels Twenty-Nine dies from Spellbinders.  I added some Therm-O-Web Foam Squares to the back of the frame for a little bit of dimension.  If you wanted a flatter card you could just put Scor-Tape on the back of the frame.


Here is a close up once the shaker is adhered to the card.  You can see I stamped, embossed and colored another holly leaf and then I fussy cut it.  I added the extra image on top of the frame.


I added some Zig - Wink of Stella Clear Glitter Brush Pen to the holly leaf on top of the frame and then I added Glossy Accents on the entire image.  I also added Glossy Accents on the berries on the background piece.


I hope you like today's card and mini tutorial and I hope you will give these shaker cards a try.  I do want to say this in not my original idea. I have seen this idea and other similar ones on Pinterest and YouTube and wanted to give it a try.

Thank you so much for stopping by today!  Please be sure to visit The Stamp Simply Ribbon Store for all of you paper crafting needs and also visit the Stamp Simply Blog for more inspiration from the design team.

Hope you have a Happy Friday and Wonderful Weekend!

Hugs & Smiles,
Heidi


Supplies
Stamps:  Stamp Simply Clear Stamps - SS-012 Christmas Blessings
Paper:  Ranger - Watercolor Paper, Bazzill Gold Mirror, Cardstock - White
Ink:  VersaMark, Tim Holtz Distress Inks - Squeezed Lemonade, Cracked Pistachio, Mowed Lawn, Festive Berries, Fired Brick, Chipped Sapphire, Vintage Photo
Dies:  Spellbinders - Labels Twenty-Nine
Accessories:  Crystal Clear Bags/Card Sleeves - A2, Prima Say It In Crystals A Victorian Christmas Sequins (red), 5mm Gold Sequins, 5mm Crystal Sequins, Ranger - Super Fine Detail Gold Embossing Powder, Glossy Accents, Zig - Wink of Stella Clear Glitter Brush Pen, Scor-Tape, Therm-O-Web Foam Squares, Paint Brush, Heat Tool

Wednesday, September 28, 2016

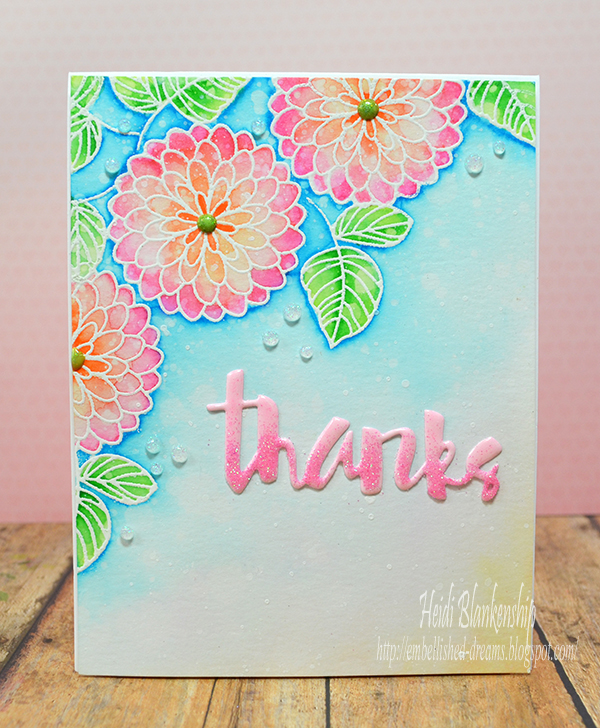
Simon Says Stamp - Handwritten Floral Greetings Watercolor Card

Hello everyone!  Today, I have a floral watercolor card to share with you using one of the stamp sets from a Simon Says Stamp Card Kit of the Month.  The kits are so much fun to receive and they are filled with all kinds of crafty goodness.  The kits always have a stamp set, pattern paper, and cardstock and then they have extra goodies such as dies, embellishments, and inks just to name a few.  There is also an inspiration sheet with colored photos of cards made using the kit.  The card kits are also very reasonably priced and you have the option to sign up for a subscription or check them out each month.  But I can tell you this--a lot of times the kits sell out so if its something you want don't wait lol.  I started getting the kits for something fun and different to do and now I look forward to them every month.


I stamped the flowers and leaves from the 101627 Handwritten Floral Greetings clear stamp set from Simon Says Stamp onto Strathmore Mixed Media paper using VersaMark Ink.  The I added NUVO Embossing Powder - 602N Glacier White from Tonic Studios and used my heat gun to melt the powders and emboss the images.  


Here is a close up of the flowers.  I used Zig Clean Color Real Brush Pens to watercolor the images.  I think these pens are so fun and easy to use and you can use them with or without water.  For this card I blended the colors with water.  On the background I started with a blue in the upped left corner and then I added a very light yellow and pink to the bottom right corner.  The closer I got to the middle of the card the more water I used to blend and achieve the very light colors.  If you are new to watercolor you might want to start out with embossed images as they can be easier to work with. The raised embossed areas help to keep the color in the lines (if that is the look you want) and also the embossed areas resist the watercolor.  After I was done with the watercolor I took a paint brush and added clean water droplets over the entire piece.  I let the water sit for a few seconds and then I used a paper towel to blot off the water.  Doing this removes some of the watercolor.  It also adds texture and interest to the background piece.


I also used some watered down wicker white acrylic paint and added little paint splatter on the background.  


To create the pretty pink die cut thanks I used a piece of white cardstock and I applied VersaMark Ink directly to the paper.  Then I added NUVO Embossing Powder - 605N Ballerina Pink and used a heat gun to melt the powders and emboss the paper.  Next I used the Painted Thanks Wafer Die from Simon Says Stamp and die cut the word using the Tangerine Die Cutting Machine from Tonic Studios.  Then I added more of the VersaMark Ink and embossing powder and heat set the word die.  I repeated this step one more time to build up the embossing powder.  Doing this adds dimension to the die cut.  I keep the embossed paper to use on another project.


Here is another look at the die cut word.  I really like the added dimension from the embossing powder.  To finish off the die cut I added Glossy Accents from Ranger on to the die cut and then I added NUVO Pure Sheen Glitter 711N Candy Pink on the bottom half.  I set the piece aside to dry.  Once the Glossy Accents was dry then I used Multi Medium Matte Adhesive from Ranger to adhere the die cut to the card front.


Using Scor-Tape I added a piece of white craft foam to the back of the watercolor panel and adhered that to an A2 top folding card base.  To finish off the card I added NUVO Crystal Drops - 669N Gloss Apple Green to the center of the flowers and  NUVO Glitter Drops - 758N White Blizzard for little accents.  The crystal and glitter drops dry pretty quickly but you want to make sure you don't lay anything on top of the card for 24 hours so the drops can cure and harden.  If you love the look of enamel dots the crystal and glitter drops are a fun alternative for your projects.

Thank you so much for stopping by today!
I hope you have a wonderful day!

Hugs & Smiles,
Heidi


Are you interested in the products I used?  I have all of the supplies listed and linked below.
Compensated affiliate links are used when possible.  Products with an asterisk (*) were provided by a store or the manufacturer.
The Stamp Simply Ribbon Store = TSSRS
Tonic Studios = TS
Simon Says Stamp = SSS
Amazon = AZ

Supplies
Stamps:
Simon Says Stamp - 101627 Handwritten Floral Greetings
Paper:
Strathmore - Mixed Media (AZ)
Cardstock - White Hammermill Color Copy Digital Cover, 80 lb (AZ)
Ink/Markers:
VersaMark Ink (TSSRS) (SSS) (AZ)
Zig Clean Color Real Brush Pens (SSS) (AZ)
Dies:
Simon Says Stamp - Painted Thanks Wafer Die SSSD111546
Accessories:  
*Tonic Studios NUVO Embossing Powder - 602N Glacier White (SSS) (AZ) (TS)
*Tonic Studios NUVO Embossing Powder - 605N Ballerina Pink (SSS) (AZ) (TS)
*Tonic Studios NUVO Pure Sheen Glitter 711N Candy Pink (AZ) (TS)
*Tonic Studios NUVO Crystal Drops - 669N Gloss Apple Green (SSS) (AZ) (TS)
*Tonic Studios NUVO Glitter Drops - 758N White Blizzard (SSS) (AZ) (TS)
*Tonic Studios Tim Holtz Tonic Guillotine Comfort Paper Trimmer 160E (SSS) (AZ) (TS)
*Tonic Studios Tangerine Die Cutting Machine (TS)
Ranger Multi Medium Matte Adhesive (SSS) (AZ)
Ranger Glossy Accents (AZ) (TSSRS) (SSS)
Quilled Creations Precion Tip Empty Applicator Bottle 317 (SSS) (AZ)
Scor-Tape (SSS) (AZ) (TSSRS)
Wagner Heat Gun (AZ)
White Craft Foam (SSS) (AZ)
FolkArt Wicker White Acrylic Paint (AZ)
Paint Brush


LinkWithin

Related Posts Plugin for WordPress, Blogger...