Sunday, October 21, 2012

A Little bit of This & That.

Hello blogging friends!  For today's blog post I have a little bit of this and that to share with you.  I have some beautiful artwork to share with you--but it's not mine.  I have some artwork from my aunt Gail to share with you!  Gail doesn't have a blog and she doesn't do FB either so I am very excited to be able to share some of her work with all of you.  


Here is a little wedding ensemble that Gail made.  I think this is so Gorgeous!!  The sweet little set includes the amazing little high heeled and pearl embellished shoes, the gift box and enclosure card.


Here is a close up of the shoes so you can see all of the details.


The little shoes and card fit just perfectly in the gift box.


Look at this beautiful little sun bonnet!  I tell ya, Gail is just amazing!!  She stopped by one day to show me a little prototype of this bonnet and it wasn't long when she stopped back to show me what she had whipped up.  I LOVE these flowers!!  And look at the gorgeous, deep and crisp embossing detail!!  She used a plastic doily and the Grand Calibur to achieve the embossing.  
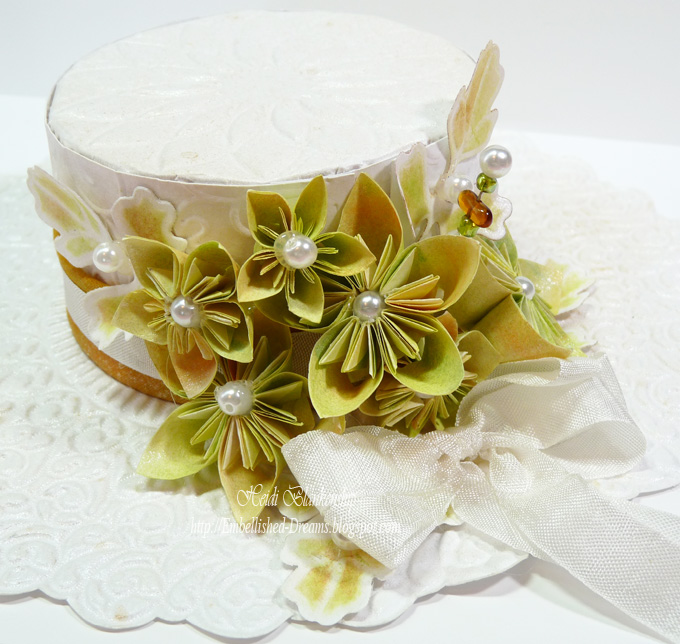

Here is a close up of the beautiful flowers.  Love the pearl centers and the pretty stickpin!


Gail also misted the entire bonnet with pearl glimmer mist.  It was so pretty and shimmery!


Ok, now I have a couple of things to share.  ;-) 


I am happy to share that I had a card published in the October 2012 issue of Crafts 'N Thing.  
Spread Your Wings page 36


I also have a card that was published in the November 2012 issue of CardMaker.
Give Thanks page 38

I have one last thing to share with you today.  About a month ago Gail and I went to a couple of garage sales and let me tell you we totally scored at one of the sales!!


Look at all of this gorgeous lace!!!  Some of it was newer but most of it was vintage lace and trims.  We bought it ALL and then we came back here to my place and split it up.  This picture is my half!!  We were both so excited--just like two little girls in a candy shop!!  LOL!!

Well, I guess that's it for today.  I am so happy to be able to share some of Gail's artwork here on my blog and I hope you enjoy seeing it.  Thanks so much for stopping by today!!

Hugs & Smiles,
Heidi

Saturday, October 20, 2012

Amazing Paper Grace November Kit #3 - A New Day

Hello blogging friends!  Sorry I haven't been around for a few days, I was a little under the weather again.  But I think *knocking on wood* that I am finally over it after being sick for three weeks and believe me I am ready to be over it!!

Have you seen the NEW Amazing Paper Grace November Kit #3?  Becca out does herself every month with a beautiful collection!  


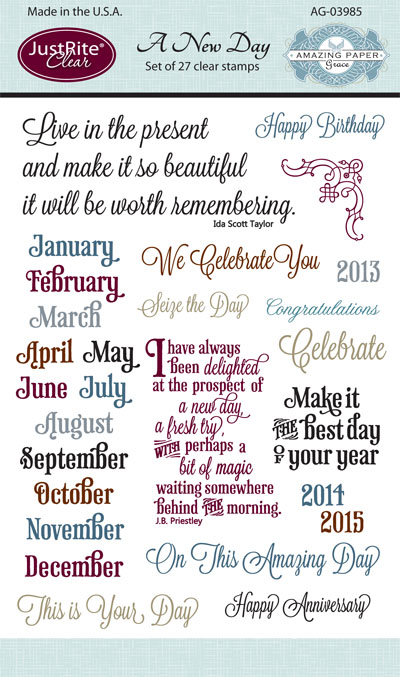
This is the stamp set  AG-03985 A New Day for the Amazing Paper Grace November Kit #3.  I love the different fonts and the wonderful sentiments.  


Look at these beautiful dies!!  These are the AG-03950 Filigree Corner Dies for the Amazing Paper Grace November Kit #3. 


Here is the card that I designed using the AG-03985 A New Day stamp set and AG-03950 Filigree Corner Dies die set from Becca's Amazing Paper Grace November Kit #3.  I used Prima Romance Novel Collection 6 x 6 Paper Stack for the pattern paper and for the solid color cardstock I used Simply Smooth Ivory, Azalea Metallic, Black Licorice from Discount Cardstock.


I die cut two of the filigree corners and placed them at the top of the card and for the sentiment I used S5-128 Fancy Framed Tags Two die templates from Spellbinders.  Then I added Black and Summer Rose seam binding to create the bow.  To finish off the card I added a filigree bead cap with some tiny pink roses and attached it to the bow using a garment pin and then I added some bling.


Please be sure to visit all of the designers in the link list below to se what they have designed using Becca's NEW Amazing Paper Grace November Kit #3.


Thank you so much for stopping by today and I hope you have a great weekend!!

Hugs & Smiles,
Heidi

Supplies
JustRite Papercraft:  Amazing Paper Grace November Kit #3 Stamps:  AG-03985 A New Day, Dies:  AG-03950 Filigree Corner Dies
Paper:  Discount Cardstock Simply Smooth Ivory, Azalea Metallic, Black Licorice; Prima Romance Novel Collection 6 x 6 Paper Stack
Ink:  Tsukineko Memento Tuxedo Black
Dies:  Spellbinders S5-128 Fancy Framed Tags Two
Accessories:  Really Reasonable Ribbon Black Seam Binding, Summer Rose Seam Binding; Recollections Bling; Bead Landing Filigree Bead Cap; Making Memories Garment Pin; I am Roses Tiny Pink Roses; Scrapbook Adhesives by 3L 3D Foam Squares; Hot Glue

Saturday, October 13, 2012

Really Reasonable Ribbon Blog Hop - October Ribbon Club


Good morning blogging friends!  Today, is the Really Reasonable Ribbon Blog Hop for the month of October.  The RRR Design Team Members and Special Events Design Team Members will be showcasing the Monthly Ribbon Club. 


This month there is a wonderful assortment of Red, Green, White and Printed  ribbons included in the October Ribbon Club.   These are perfect for Christmas!  Click HERE for more details.

If you are following the order of the blog hop you should have just come from Bonnie's Blog. If not and you just happened to pop in for a visit please click HERE to start the blog hop at the Really Reasonable Ribbon's Ramblings! Blog.


For my project I designed some Christmas ornament tags to use for gift giving.  The tags would be perfect with a bottle of wine, on packages or gift bags and you could also use them as ornaments for the tree.  To create the tags I used Premium Craft Foils and the Spellbinders Christmas ornament dies--S5-116 2012 Heirloom Ornament, S4-334 2011 Heirloom Ornament, 2010 Heirloom Ornament (retired).  I cut the ornament shapes and then I embossed each ornament using EL-014 Holiday Magic M-Bossabilities Folder. Next I lightly sanded the embossed area, doing this removed the top layer of colored paint to reveal the silver foil.  I used a few different ribbons from the October Ribbon of the Month Club collection to embellish each of the ornaments.


For the first ornament I used the green ribbon and the white crochet lace trim.  Then I added diamond stickles to the foil and some bling.


For the second ornament I used hot glue and create a ruffle look with the crochet lace trim, added the printed ribbon, stickles and bling.


For the last ornament tag (I think this one is my favorite!) I used a needle and thread to gather up some of the white crochet lace trim to create a rosette and then I added an Acrylic Ribbon Buckle and Large Flat Back Pearl to the center.  I also added some of the red ribbon, stickles and bling.

I punched a small hole in the top of each ornament and added some white crochet thread for a hanger.


Now to continue in the blog hop you need to hop on over to Patti's Blog and check out her fantastic project!

Thank you so much for stopping by today and I hope you enjoy the Really Reasonable Blog Hop!! Don't forget to visit the RRR Store and check out all of the beautiful ribbons, lace and trims!

I hope you have a wonderful and creative day!


Hugs & Smiles,
Heidi 


Supplies
Really Reasonable Ribbon:  October Ribbon of the Month Club
Spellbinders:  Grand Calibur, S5-116 2012 Heirloom Ornament, S4-334 2011 Heirloom Ornament, 2010 Heirloom Ornament (retired), EL-014 Holiday Magic , Premium Craft Foils
Accessories:  Ranger Diamond Stickles; Recollections Bling; Beady Bom Bom Acrylic Ribbon Buckle, Large Flat Back Pearl; Thread, Hot Glue

Friday, October 12, 2012

JustRite Papercraft - Friends Antique Labels One

Hello!  Today, I have another card to share with you using the New Release stamp set CL-03940 Friends Antique Labels One from JustRite Papercraft.


This stamp set includes a beautiful collection of labels and sentiments and it coordinates with the JB-03830 Antique Labels One Dies.


Here is the card that I designed using CL-03940 Friends Antique Labels One and JB-03830 Antique Labels One Dies both from JustRite Papercraft.  I used Really Red for the card base and layered it with a piece of pattern paper from the Bo Bunny Serenade Collection.  


Next I created the different layers of the labels.  I used Donna Salazar Mix'd Media Inx for all of the stamping.  On the larger label I used Antique then for the medium label I used Schoolhouse and for the smallest label I used Black.  I layered the labels using 3D Foam Squares from Scrapbook Adhesives by 3L. Then I added 5/8'' Light Celery Crochet Lace Trim and Black Seam Bindling from Really Reasonable Ribbon and Red Forget Me Nots from Petaloo.  I thought the flowers were a perfect match to the pattern paper.  I also added some Recollections bling.


Please be sure to visit each of the JustRite Papercraft Designers in the link list below to see the fantastic projects they have to share with you.


Thank you so much for stopping by today!

Hugs & Smiles,
Heidi


Stamps: JustRite Papercraft  CL-03940 Friends Antique Labels One
Paper:  Discount Cardstock Simply Smooth Ivory, Really Red, Chamois; Bo Bunny Serenade Collection
Ink:  Donna Salazar Mix'd Media Inx Antique, Schoolhouse, Black
Dies:  JustRite Papercraft JB-03830 Antique Labels One Dies
Accessories:  Really Reasonable Ribbon 5/8'' Light Celery Crochet Lace Trim, Black Seam Bindling;  Petaloo Red Forget Me Nots; Recollections Bling; Scrapbook Adhesives by 3L 3D Foam Squares

Thursday, October 11, 2012

JustRite Papercraft - Holiday Cheer Ornaments Stamp Set

Hello blogging friends!  Today, I have a Christmas card to share with you using the New Release CL-03925 Holiday Cheer Ornaments stamp set from JustRite Papercraft.  


This is a beautiful stamp set including three Christmas ornaments, ornament topper and sentiments.


Here is the card that I designed using CL-03925 Holiday Cheer Ornaments.  I used Simply Smooth Ivory and Sno Cone paper from Discount Cardstock and for the pattern paper I used My Mind's Eye All is Bright 6 x 6 paper pad.  I stamped the ornament with gold pigment ink and then used gold embossing powder and heat set the image.  Then I used S5-116 2012 Heirloom Ornaments to cut/emboss the ornament shape.


Here is a close up of the ornament.  I used Aqua Seam Binding from Really Reasonable Ribbon and embellished the ornament with a ribbon buckle and pearls.  The Acrylic Ribbon Buckle and Large Flat Back Pearl are both from Beady Bom Bom and the smaller pearls are from Recollections.  I also added a Chandelier Charm at the bottom of the ornament.


I stamped the sentiment using gold pigment ink and embossed it with gold embossing powder.  I used S5-128 Fancy Framed Tags Two to create the die cut tag.  


I used S5-131 A2 Matting Basics A, S5-132 A2 Matting Basics B to create the beautiful embossed edge mats for the card.  I also used 3D Foam Squares from Scrapbook Adhesives by 3L to layer the die cuts.


Please be sure to visit each of the JustRite Papercraft Designers in the link list below to see what they have created to share with you.


Thank you so much for stopping by today!

Hugs & Smiles,
Heidi


Supplies
Stamps:  JustRite Papercraft CL-03925 Holiday Cheer Ornaments
Paper:  Discount Cardstock Simply Smooth Ivory, Sno Cone; My Mind's Eye All is Bright 6 x 6 paper pad
Ink:  Color Box Gold Pigment Ink
Dies:  Spellbinders Grand Calibur, S5-116 2012 Heirloom Ornaments, S5-131 A2 Matting Basics A, S5-132 A2 Matting Basics B, S5-128 Fancy Framed Tags Two
Accessories:  Really Reasonable Ribbon Aqua Seam Binding; Beady Bom Bom Acrylic Ribbon Buckles, Large Flat Back Pearl; Recollections Pearls; Plaid Holiday Glitz Chandelier Charm; Gold Embossing Powder; Heat Tool; Scrapbook Adhesives by 3L 3D Foam Squares

Wednesday, October 10, 2012

Vintage Street Market - Halloween Treat Bag & Thinking of You Card

**Edit--Sorry this post is coming up a little late.  I had it scheduled and didn't realize it didn't post--not sure what happened.

Hello and Happy Wednesday!  Today, is my post day over at the Vintage Street Market Blog.  I have a Halloween treat bag and a Thinking of You card to share with you today using some of the fantastic Vintage Street Market products.


This is the fun little Halloween treat bag that I made.  Check out the old fashion button candy.


For my second project I made a pretty Thinking of You card.  The base of the card is ivory and then I used some of the pink pattern paper from the Paper Sheets & Tags Dimestore Vogue Collection.

To see more pictures and find out all of the details please click HERE to visit the
Vintage Street Market Blog.


Hugs,
Heidi

Halloween Treat Bag
Vintage Street Market:  Crafty Secrets Halloween Treats Sticker Sheet; Ranger Diamond Stickles
Paper:  Discount Cardstock Soot, Gray Cloud, Banana Split; Paper Bag; Black Crepe Ink:  Tuxedo Black
Dies:  Spellbinders Grand Calibur, S4-114 Standard Circles Lg, S4-330 Nested Tombstones, S5-053 Pumpkin Accents (vines)
Accessories:  Scrapbook Adhesives by 3L 3D Foam Squares  

Always Card
Vintage Street Market:  Paper Sheets & Tags Dimestore Vogue, Pink Twirly Twine, Melissa Frances Mini Flashcards, May Arts Ribbon, Ranger Diamond Stickles
Paper:  Discount Cardstock Simply Smooth Ivory; Paper Doily
Ink:  Antique Linen
Accessories:  Shabby Scraps Pink Acrylic Flower, Key Charm; I Am Roses Flowers & Leaves; Recollection Pearls; Scrapbook Adhesives by 3L 3D Foam Squares

Friday, October 5, 2012

Halloween Blog Candy Winner!!

Hello!  I just have a quick blog post today to announce the Winner of the Halloween Blog Candy!!
I would have posted sooner but my little helper was gone tonight at a church activity.  ;-)

So are you ready to find out who won all these Halloween goodies???


Before I tell you who the lucky winner is I want to say Thank You for leaving so many wonderful comments and sharing your favorite parts about Halloween.  I had so much fun reading all of the comments--some were funny, some were about favorite costumes, memories from childhood or memories of your children and some really great traditions.  I have been sick most of this past week so all of your comments helped to cheer me up.  I am starting to feel a little better today so I hope I am on the upswing of this. ;-)


I printed out all of the comments, cut them into strips, folded them up and then my little helper picked out a winner. 


Anonymous Anonymous said...
(already a blog follower) My favorite halloween "thing" is actually remembering when my kids were little. i made costumes from things around the house. or sewed them myself. it was so much fun. i don't think i ever purchased a costume for any of the 3 kids. now i'll have to try my ideas out on the grandkids.
gail
robinson.gail@hotmaildotcom
October 2, 2012 2:48 PM


Congratulations Gail!!!

I sent Gail an email and I will be getting a package out to her in the next couple of days.

Again, thank you so much for playing along!  I hope you all have a wonderful weekend.  Tomorrow is World Card Making Day so I hope you can all find some time to have fun and be creative.  

Hugs & Smiles,
Heidi

Wednesday, October 3, 2012

Shabby Chic Key to my Heart Trinket Box

Hello!  Today, is my day to post for Julianna C. Hudgins Design Team over on her blog Positively Me.  I have an altered trinket box to share with you using S5-099 Jewel Keys and LF-013 Jewel Goddess (Hearts) from Julianna's Positively Me Collections from Spellbinders.


The S5-099 Jewel Keys die template set is one of my favorites and I thought it would work wonderfully with the two little hearts from the LF-013 Jewel Goddess die template set to create this shabby chic trinket box.  To see more pictures and find out all of the details please click HERE to see my blog post.


Thank you so much for stopping by today!  I hope you have a wonderful and creative day!

Hugs,
Heidi

Supplies Spellbinders:  S5-099 Jewel Keys, LF-013 Jewel Goddess (Hearts), S5-129 Foliage Two, S4-384 Exquisite Circles, Grand Calibur Other Supplies Paper:  Discount Cardstock Simply Smooth Ivory; Prima Tea-Thyme Collection; Accessories:  Really Reasonable Ribbon Pink Seam Binding, Ivory Mini Pom-Poms, Penelope Crochet Lace Trim; Pro 31 Designs White Curly Roses, Circle Pearl Spray; Ranger Diamond Stickles; Homemade Vintage Pink Mist; Tulle, Hot Glue

Tuesday, October 2, 2012

Breast Cancer Awareness Blog Hop - Really Reasonable Ribbon and Hampton Art - Choose HOPE ♥


Hello blogging friends!  Today, is the Really Reasonable Ribbon and Hampton Art Blog Hop for Breast Cancer Awareness.   The RRR Design Team Members and Special Events Design Team Members will be joining the Hampton Art Design Team Members showcasing the beautiful ribbons and trims from RRR and fantastic stamps from Hampton Art.  

Both RRR and Hampton Art will be offering prizes for the blog hop!  RRR will be offering a $20.00 gift certificate and Hampton Art will have a prize pack with a stamp set and  some ink pads with an approximate value of $20.00 so please be sure to leave a comment on each blog along the way to be eligible to win one of the prizes.  

If you are following the order of the blog hop you should have just come from Adora's Blog. If not and you just happened to pop in for a visit please click HERE to start the blog hop at the Hampton Art Blog.  If you happen to get lost along the way please visit the Hampton Art Blog or the Really Reasonable Ribbon's Rambling! Blog for a complete list of the blog hop.


For my project I altered a journal using Pink Satin w/ Scalloed Edge ribbon from Really Reasonable Ribbon and SC0038 Blooming Memories Stamp Set (Page 50 2012 eCatalog) from Hampton Arts.  I also used some inks from Hampton Arts, die templates from  Spellbinders and paper from Discount Cardstock.


To start I die cut a fancy label shape using S5-148 Decorative Labels Eight and Simply Smooth White cardstock.  Then I stamped the floral branch, bird image and sentiment using Color Box Chalk Ink Pink, Olive Pastel, Blue Lagoon, Black.  For the pink cardstock mat I used S5-131 A2 Matting Basics A die template.  I layered the paper pieces using 3D Foam Squares and then glued the Pink Satin w/ Scalloed Edge ribbon to the backside and attached the piece to the front of the journal.  


To add multiple colors of ink to a solid image I use Q-tips to apply the ink.  Here is a picture of the humming bird.


When I was attaching the ribbon to the paper I cut the strips of ribbon a little longer and then I cut in from each end towards the corner to create nice crisp corners on the ribbon.  I added a little bit of hot glue to the backside to hold the ribbons in place.


I stamped the ribbon from the KN2456 Think Pink Stamp and fussy cut it and added 3D Foam Squares to pop it up.  I added Pearls from The Rubber Cafe' to the flower centers.


I created a little ribbon and flower cluster down in the bottom corner.  I used the same Pink Satin w/ Scalloed Edge ribbon and then I added a Pink Acrylic Flower from Shabby Scraps and a couple of Pink/White Roses from I am Roses.  The Lg Flat Back Pearl for the flower center is from Beady Bom Bom. Then I added some leaves and diamond stickles.  To create the leaves I used S5-129 Foliage Two die template from Spellbinders.


I took a piece of the Pink Satin w/ Scalloed Edge and added three Round Acrylic Ribbon Buckles and then I glued this to the spine of the journal.


Once I had the ribbon glued in place then I added Lg Flat Back Pearls to the center of each buckle.


Now to continue in the blog hop you need to hop on over to Wendy's Blog and check out her fantastic project!

Thank you so much for stopping by today and I hope you enjoy the Really Reasonable Ribbon and Hampton Art Breast Cancer Awareness Blog Hop!! Don't forget to visit the Really Reasonable Ribbon's Rambling! Blog and  Hampton Art Blog for all your ribbon and papercrafting  inspiration!

I hope you have a wonderful and creative day!

Hugs & Smiles,
Heidi 


Supplies
Really Reasonable Ribbon:  Pink Satin w/ Scalloed Edge
Hampton Arts:  SC0038 Blooming Memories Stamp Set (Page 50 2012 eCatalog) , KN2456 Think Pink Stamp, Color Box Chalk Ink Pink, Olive Pastel, Blue Lagoon, Black
Paper:  Discount Cardstock Simply Smooth White, Cotton Candy
Dies:  Spellbinders Grand Calibur, S5-131 A2 Matting Basics A, S5-148 Decorative Labels Eight, S5-129 Foliage Two
Accessories:  The Rubber Cafe' Pearls, Scrap Happy Sheer Glue, Stick "EM" Up Tool;  Shabby Scraps Pink Acrylic Flower; Beady Bom Bom Round Acrylic Ribbon Buckles, Lg Flat Back Pearl; I am Roses Pink/White Roses; Ranger Diamond Stickles; Scrapbook Adhesives by 3L 3D Foam Squares; Hot Glue, Journal

Monday, October 1, 2012

Halloween Blog Candy

Hello blogging friends!  Happy October 1st!!  As many of you know Halloween is one of my favorite holidays.  I love to to decorate for it, love to create fun Halloween home decor pieces, love the costumes and we can't forget the candy--LOL!  So I thought this would be a fun time to offer up some Blog Candy--Halloween Style!

So what do you think?  Are you ready for some fun Halloween Blog Candy?

Check out these yummy goodies.


This is what is included in the Halloween Blog Candy

Cardstock-4 sheets of each color Purple, Black, Green, Orange
2 Brown Paper Bags
2 White Doilies
2 Sm. Glassine Bags
2 Tags
2 Mini Clear Halloween Stamp Sets (Candy/Skull-Potion)
1 Clear Acrylic Block
2 Wood Mounted Halloween Stamps (Pumpkin/Witch Boots)
1 Mini Bat Punch
1 Package Halloween Flair Buttons
1 Package Bakery Twine (Orange/Purple)
2 Packages Adhesive Gems (Green/Orange)
2 yds Ric-Rac Trim (Orange/Purple)
1 yds Black Mini Pom-Pom Trim
1 yd Black Lace
2 yds Black Crepe
1 Glitter Glue (Lt. Yellow)
2 Ink Pads (Orange/Black)
3 Leaf Trinket Pins
6 Garment Pins
2 Memo Pins
3 Charms
Assorted Buttons (Yellow/Orange/Green/Purple)


RULES
1.  Subscribe to my blog.
2.  Leave a comment telling me what you love about Halloween or any fun family traditions.

***You have to do both of the rules to be entered into the drawing.

***Please be sure to have a link back to a blog or an email so I can contact you if you win!!

The Halloween Blog Candy post will be open from today (10/1/12) until midnight (CST) Thursday, October 4th, 2012.  Winner will be announced Friday, October 5th, 2012.

Thank you so much for stopping by today and Good Luck!!

Hugs & Smiles,
Heidi


LinkWithin

Related Posts Plugin for WordPress, Blogger...