Wednesday, November 5, 2014

Sentimental Flowers Clear Stamps - Happy Birthday Card - JustRite Papercraft Day One November New Release

Hello everyone!  Today, is the first day of the November New Release for JustRite® Papercraft and I have a beautiful floral stamp set to share with you and a coordinating SVG cut file.


Here is the card that I designed using CR-02146 Sentimental Flowers Clear Stamps and SVG Sentimental Flowers Digital Cut File Download for CR-02146.  The cut files allow you to do and offset cut and exact cut.  For this card I used the exact cut file.  


I stamped the floral images using Memento Tuxedo Black ink.  Then I used Spectrum Noir® markers to color the images.  All of the colors are listed below in the supplies.


Here is a close up of the flowers.  I used my Zig Wink of Stella Clear Glitter Brush Pen to add a little bit of sparkle and shimmer to the card,


I used Spellbinders Paper Arts® S4-475 Fleur de Elegance die to create the die cuts.  I stamped the sentiment (from the same stamp set) using Tuxedo Black ink and then I layered the die cuts using 3D Foam Squares and then I layered the floral cut outs.


I layered the die cuts on to a white mat and then a yellow card base.  To finish off the card I added a few white pearls.


Please be sure to visit each of the Design Team Members listed in the link list below to see what they have created to share with you.


Thank you so much for stopping by today!

Hugs & Smiles,
Heidi


Supplies:
Stamps:  JustRite® Papercraft  CR-02146 Sentimental Flowers Clear Stamps
Paper:  White, Pink, Pale Yellow
Ink/Markers:  ImagineCraft/Tsukineko Memento Tuxedo Black; Spectrum Noir® PP1, PP2, LY1, LY2, OR1, LG1, DG2; Zig Wink of Stella Clear Glitter Brush Pen
SVG/Dies:  SVG Sentimental Flowers Digital Cut File Download for CR-02146 (EXACT); Spellbinders Paper Arts® S4-475 Fleur de Elegance die
Accessories:  White Pearls, Scrapbook Adhesives by 3L® 3D Foam Squares, E-Z Runner® Permanent Strips-Refillable Dispenser 49'

Tuesday, November 4, 2014

Tutorial Tuesday for JustRite Papercraft - DIY Distress Spray Stains Autumn Centerpiece

Hello everyone!  It is time for another Tutorial Tuesday with JustRite® Papercraft and today I have a beautiful DIY Autumn Centerpiece to share with you.


To create this centerpiece I used three background stamps from JustRite® Papercraft - JustRite® Papercraft CL-02027 Burlap Cling Background StampCL-02127 Crackle Cling Background Stamp, CL-04430 Floral Flourishes Cling Background Stamp.  I also used the  JustRite® SVG-03850 Shabby Chic Autumn Leaves EXACT File and  Distress Spray Stains.  This is a very quick, easy and inexpensive way create a centerpiece for the upcoming holiday.


If you would like to see the full step-by-step tutorial you can click HERE or if you would like to watch the video click HERE.

~~~~~~~~~~~~~~~~~~~~~~~~~~~~~~~~~~~~~~~~~~~~~~~~~~~~~~~~~~~~~~~~~~~~~~~~~

GIVEAWAY 
*ON THE JUSTRITE INSPIRATION BLOG!*
Please Read

For this week's Tutorial Tuesday Giveaway one lucky winner will receive a $50.00 Gift Card to the JustRite Store. 


Simply tell us what your Thanksgiving/Fall Family Traditions are--*ON THE JUSTRITE BLOG!* What is your favorite Fall Holiday Food and does the celebration include any handmade projects or homemade treats? 

Remember that you can double your chances of winning by leaving comments on the JustRite Blog and on Heidi's Video. Don't forget to show Heidi a little love when you watch her video - give her a thumbs up.

~~~~~~~~~~~~~~~~~~~~~~~~~~~~~~~~~~~~~~~~~~~~~~~~~~~~~~~~~~~~~~~~~~~~~~~~~

Thank you so much for stopping by today!

Hugs & Smiles,
Heidi


Supplies
Stamps:  JustRite® Papercraft CL-02027 Burlap Cling Background Stamp, CL-02127 Crackle Cling Background Stamp, CL-04430 Floral Flourishes Cling Background Stamp
Paper:  Ivory Cardstock
Ink/Sprays:  Imagine/Crafts Tsukineko Memento Espresso Truffle; Distress Spray Stain-Mustard Seed, Spiced Marmalade, Peeled Paint, Fired Brick, Rusty Hinge, Vintage Photo
SVG Cut Files:  JustRite® SVG-03850 Shabby Chic Autumn Leaves EXACT File
Accessories:  Silhouette Cameo, Grapevine Basket, Filler Flower, Acorns, Hydrangea Flowers, Votive Cup, Votive Candle, Hot Glue, Heat Tool

Monday, November 3, 2014

8 x 8 Mixed Media Canvas with Hometown Craft Papers by Ken Oliver

Hello everyone!  I hope you all had a Happy Halloween and a wonderful weekend.  Our youngest son (12 yrs old) was really on the fence about going trick-or-treating this year.  He decided he wasn't going to go and then at the last minute (which I figured would happen) he changed his mind LOL.  So he threw a costume together really quick with some part from other costumes we have used in the past.  


Here is a picture collage I shared on FB over the weekend.  I think through the years this chopped off arm has been a favorite with my husband and the boys--they have all used it at one point in time.  My husband made this a few years ago after going to a Halloween party and seeing one the a friend had made.  It is fun but kinda creepy and freaks people out when you move your fingers but it's all in good fun LOL!

This weekend I also had a little bit of fun creative time just for me--I have to remind myself to just play and have fun sometimes just for the sake of doing it.  Love getting my fingers all inky!


If you follow me on Facebook then you saw the little sneak peek of this canvas that I shared yesterday.  This is a 8 x 8 canvas and I had SO much fun creating it!!  


Here is a quick look at the original sheet of paper.


To start I sprayed the sides and edges of the canvas with  Distress Spray Stain-Vintage Photo, Peacock Feathers, and Picket Fence until I achieved a look I liked.  Then I added the main image from the paper.  I cut the lower left portion of the paper to a 7.5 x 7.5 square.  I inked the edges with Tim Holtz Distress Ink Walnut Stain and then I used Plaid® Mod Podge® Matte to adhere that paper to the canvas and I added a layer of Plaid® Mod Podge® Matte on top of the paper.  


Then I used a stencil with some Liquitex® Light Modeling Paste to add some interest and texture to the canvas.  After the modeling paste was dry I went over it with Mod Podge.  Next I went over the textures areas with Folk Art Vintage White Acrylic Paint just rubbing it on with my fingers.  


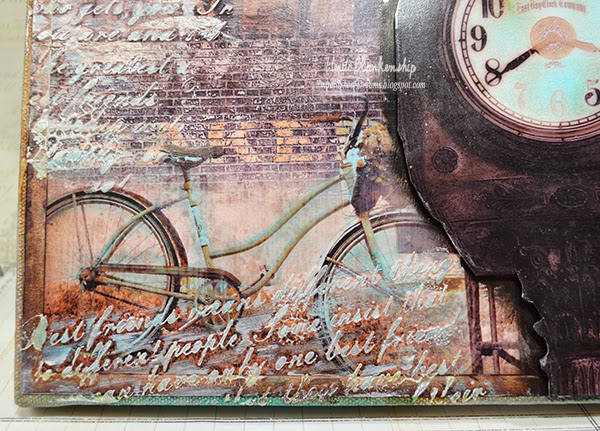
Next I added some color to the script texture and the bike using  Faber-Castell PITT Big Brush Pens-Light Cobalt Blue Turquoise.  For the bike I colored directly on the image (in small sections) and rubbed with my fingers to blend the ink before it dried.  On the script texture I added some of the color to my finger and then gently rubber over the top of the text.  I wanted to add a little shimmer too so I used some of the Brushed Pewter Distress Spray Stain and rubbed that on top of the text too.


Here you can see a close up of some of the shimmer.


I fussy cut the image of the clock and added a little color using Tim Holtz Distress Inks-Peacock FeathersWalnut Stain.  Then I laid the clock on top of the canvas and traced around it with a sharpie marker.  I went around the outline for the clock using Faber-Castell PITT Big Brush Pen in Black and blended the color with my fingers before the ink was dry.


I added some dimension to the clock by adding 3D Foam Squares and then since this is a home decor piece I added some hot glue to the foam just to make sure it wouldn't pop off of the canvas.


I love working with the Hometown Craft Papers by Ken Oliver.  They are great for mixed media because inks blend really well and they hold up to the sprays, mod podge and texture paste!

Thanks so much for stopping by today!

Hugs & Smiles,
Heidi


Paper:  Hometown Craft Papers by Ken Oliver
Inks/Sprays/Markers:  Tim Holtz Distress Inks-Peacock Feathers, Walnut Stain, Distress Spray Stain-Vintage Photo, Peacock Feathers, Picket Fence, Brushed Pewter; Faber-Castell PITT Big Brush Pens-Light Cobalt Blue Turquoise, Black
Accessories:  Folk Art Vintage White Acrylic Paint, Plaid® Mod Podge® Matte, Krylon® Clear Satin Spray, Liquitex® Light Modeling Paste, Friendship Stencil, 8 x 8 Canvas, Heat Tool, Scrapbook Adhesives by 3L™ 3D Foam Squares, Hot Glue

Friday, October 31, 2014

The Stamp Simply Ribbon Store - Season's Greetings Christmas Card

Hello everyone and Happy Halloween!  Today, is my day to post for The Stamp Simply Ribbon Store and I have a quick and easy Christmas card to share with you.  I used a few stamps to create my own custom background.


Here is the card that I designed.  I used white cardstock for the base and then added a piece of pattern paper from the BoBunny Candy Cane Lane 6 x 6 Collection for a layer in the background.  Next I used stamps from CR-02144 Bokeh Time Clear Stamps and CL-02053 JustRite Small Cling - Snowflakes along with Memento Teal Zeal andVersa Magic Sea Breeze inks to create the background.  I know these are non-traditional Christmas colors but I just love the aqua blues at Christmas.


I used CR-02133 JustRite Clear Stamp - Extra Grand Holiday Sentiments and  Teal Zeal ink to stamp the sentiment.  Then I used S6-015 Snowflakes View die from Spellbinders Paper Arts® to create the die cut.  For a little added sparkle I used the Zig Wink of Stella Clear Glitter Brush Pen on the sentiment and around the edges of the frame.


Here is a close up.  Love all the sparkle!


I also added a little sparkle on the star images.


To finish off the card I added May Arts 1.5" Sheer Wrinkled Edge-White and created a bow.  Then I added a KaiserCraft Crystal Sparklets to the center of the bow.

Using your stamps to create backgrounds can be a lot of fun!

As always you can click on all the photos to enlarge them and all of the supplies are listed below with links.

Also, there is a fantastic sale going on right now!!

Treat Box Special
Purchase a Treat Box –  It will be filled with $100 worth of product (retail value) for only $50.00!!
Click HERE to find of all of the details.


Please be sure to check out The Stamp Simply Ribbon Store for all of the fantastic paper crafting products and the Blog for inspiration from the Design Team.

Thanks so much for stopping by today! 

Hugs & Smiles,
Heidi


Supplies
Stamps:  JustRite® Papercraft CR-02144 Bokeh Time Clear StampsCR-02133 JustRite Clear Stamp - Extra Grand Holiday SentimentsCL-02053 JustRite Small Cling - Snowflakes-The Stamp Simply Ribbon Store
Paper:  BoBunny Candy Cane Lane 6 x 6 Collection-The Stamp Simply Ribbon Store; Cardstock-White
Ink:  ImagineCrafts/Tsukineko Memento Teal Zeal, Versa Magic Sea Breeze
Dies:  Spellbinders Paper Arts® S6-015 Snowflakes View
NOTE:  You can also find Spellbinders® products at The Stamp Simply Ribbon Store
Ribbon:  May Arts 1.5" Sheer Wrinkled Edge-White-The Stamp Simply Ribbon Store;
Accessories:  Zig Wink of Stella Clear Glitter Brush Pen, KaiserCraft Crystal Sparklets-The Stamp Simply Ribbon Store,  Scrapbook Adhesives by 3L® 3D Foam SquaresEZ Runner® Permanent Strips-Refillable Dispenser 49'
NOTE:  You can also find Scrapbook Adhesives by 3L® products at The Stamp Simply Ribbon Store

Wednesday, October 29, 2014

ButterBeeScraps - Beautiful Dangle Earrings

Hello everyone!  Today, I have a couple of ButterBeeScraps jewelry projects to share with you.  I designed a couple pairs of earrings using some of the new products.


Here is the first pair of earrings that I designed.  I am so happy with how these turned out!  The bronze and champagne pearls look so beautiful together.  


Here is a close up of the gorgeous bead caps.


I used Champagne Pearls, Bronze Ball End Head Pins, and Bronze Chain (Item #CH783-B) to create the dangles.  Then I added the Bronze Filigree Bead Caps (Item #CAP629-B)Clear Rhinestone Rondelle Spacer Beads - 8mm (Item #BD008-B/CL), and another Champagne Pearl.


I used the Bronze Ball End Head Pins to create the french earring hooks.


This is the second pair of earrings that I designed.  I used the a lot of the same supplies but on these earrings I used the smaller Clear Rhinestone Rondelle Spacer Beads - 6mm (Item #BD006-B/CL) and the two different styles of pink acrylic flower bead caps.  I also used some tiny pink crystal beads.


I had a lot of fun designing these earrings.  If you like to create jewelry or use metal embellishments, charms and crystals in your projects please check out ButterBeeScraps.  

Monique is having a BLOW OUT SALE on select items in the store with a savings up to 60% OFF while supplies last!  So be sure to check it out!  You can click HERE to visit the store. 

Thanks so much for stopping by today!

Hugs & Smiles,
Heidi 


Supplies
ButterBeeScraps:  Clear Rhinestone Rondelle Spacer Beads - 8mm (Item #BD008-B/CL)--bronze/pearl earrings, Clear Rhinestone Rondelle Spacer Beads - 6mm (Item #BD006-B/CL)--bronze/pink earrings, Bronze Filigree Bead Caps (Item #CAP629-B)Bronze Filigree Bead Caps (Item #CAP052-B)Bronze Ball End Head PinsBronze Chain (Item #CH783-B), Pink Acrylic Flower Bead Caps
Other Supplies:  Larger Pink Flower Bead Cap, Pink Crystals, Champagne Pearls

Friday, October 24, 2014

The Stamp Simply Ribbon Store - Breast Cancer Awareness Week

Hello everyone!  Today, is my day to post for The Stamp Simply Ribbon Store and this week over at The Stamp Simply Ribbon Store Blog they are honoring 
Breast Cancer Awareness by showing PINK cards ALL week! 


Here is the card that I designed using mostly pink and a touch of white.  I used the AG-02108 A Flower For Your Thoughts Clear Stamps for the sentiment and to create a cluster of flowers.  For the flowers I used Rose Bud and Bamboo Leaves Memento inks.  To achieve the lighter colors I stamped the image a second time.  Then I used S4-418 Labels Thirty-six to create the die cut.  I inked the edges of the die with the Rose Bud ink and I also used Copic Marker YG69 Pea Green to add a little bit of grass at the bottom of the leaves.  


Here is a close up.  I created two more die cuts using S4-425 Elegant Ovals and S5-131 A2 Matting Basics A.  I used 3D Foam Squares in between the top two layers.  Then I I added some flowers from the Petaloo Botanica Collection Pink Minis and Kaisercraft Fairy Floss Pink Mini Paper Blooms.  I also added a few Melissa Frances White Pearls.


As always you can click on all the photos to enlarge them and all of the supplies are listed below with links.

Please be sure to check out The Stamp Simply Ribbon Store for all of the fantastic paper crafting products and the Blog for inspiration from the Design Team.

Thanks so much for stopping by today! 

Hugs & Smiles,
Heidi


Supplies
Stamps:  JustRite® Papercraft AG-02108 A Flower For Your Thoughts Clear Stamps-The Stamp Simply Ribbon Store
Paper:  Cardstock White, Pink
Ink:  ImagineCrafts/Tsukineko Memento Rose Bud, Bamboo Leaves; Copic Marker YG69 Pea Green
Dies:  Spellbinders Paper Arts® S5-131 A2 Matting Basics A, S4-425 Elegant Ovals, S4-418 Labels Thirty-six
NOTE:  You can also find Spellbinders® products at The Stamp Simply Ribbon Store
Accessories:  Melissa Frances White Pearls, Petaloo Botanica Collection Pink Minis, Kaisercraft Fairy Floss Pink Mini Paper Blooms-The Stamp Simply Ribbon Store,  Scrapbook Adhesives by 3L® 3D Foam SquaresEZ Runner® Permanent Strips-Refillable Dispenser 49'
NOTE:  You can also find Scrapbook Adhesives by 3L® products at The Stamp Simply Ribbon Store

Tuesday, October 21, 2014

JustRite Papercraft - Tutorial Tuesday - Christmas Card Chalkboard Tutorial

Hello everyone!  It's time for another Tuesday Tutorial with JustRite® Papercraft.  For this weeks tutorial I share how to create some fun, quick and easy Christmas cards with the Chalkboard Technique.  The chalkboard look is so popular right now and with just a few supplies you can very easily achieve that look with your papercrafts.


Here is a look at the three cards I designed.  


To see more pictures and find out all of the details you can click HERE to hop on over to the JustRite® Inspiration Blog.  You can also click HERE to see the video.

~~~~~~~~~~~~~~~~~~~~~~~~~~~~~~~~~~~~~~~~~~~~~~~~~~~~~~~~~~~~~~~~~~~~~~~~~

GIVEAWAY ON THE JUSTRITE® INSPIRATION BLOG!!

For this week's Tutorial Tuesday Giveaway one lucky winner will receive 
a $25.00 Gift Card to the JustRite Store. 


Simply tell us if you have used the Chalkboard Technique yet to create a project? 
**Leave your comment on the JustRite Blog**

Remember that you can double your chances of winning by leaving comments on the JustRite Blog and on Heidi's Video. Don't forget to show Heidi a little love when you watch her video - give her a thumbs up.

~~~~~~~~~~~~~~~~~~~~~~~~~~~~~~~~~~~~~~~~~~~~~~~~~~~~~~~~~~~~~~~~~~~~~~~~~


Thank you so much for stopping by today!

Hugs & Smiles,
Heidi


Saturday, October 18, 2014

My Favorite Things - Product Review - MIX-ables STENCILS

Hello everyone!  Today, I am very excited to share a product review with you featuring My Favorite Things (MFT) MIX-ables STENCILS!  Not too long ago My Favorite Things contacted me to see if I would do a product review and I happily said yes.


I was able to pick out some of the MIX-ables STENCILS that I wanted to play with so the past couple of days I have been doing just that--getting inky and breaking out the Gansai Tambi 36 Colours Set Watercolors.  


It's  always a lot of fun to play with new products and I really enjoyed working with the stencils.  The stencils are 6 x 6 which I love.  This is a perfect size for A2 cards and all of the square cards.  Also several of the stencils are designed with a continuous pattern so if you wanted to stencil a larger area you could carefully move the stencil and line it up perfectly.

I have three cards to share with you today using MIX-ables STENCILS LJD Wildflowers Mini Chicken WireLJD Spring Flowers.


Here is the first card I designed using the MIX-ables STENCILS LJD Wildflowers.  I used painters tape to mark off part of the stencil and then I used VersaMark ink directly on top of the stencil to get the images of the flowers.  Then I added white embossing powder and heat set.


Here you can see the embossing before I added the watercolor.  You can also see the stencil in the background with the painters tape.


Here is a close up of the watercolor.  I used Gansai Tambi 36 Colours Set Watercolors.  I added a few blue sequins and then I stamped a sentiment using CS-25 More Essential Sentiments stamp set.


I used the MIX-ables STENCILS  Mini Chicken Wire and Gansai Tambi 36 Colours Set Watercolors to create a fun watercolor background for this Halloween card.


Here you can see a close up of the background.  I used several of the watercolors to create the look of night time and then I laid the  MIX-ables STENCILS Mini Chicken Wire on top of the watercolor paper and lightly misted with water.  The water pools up under the stencil creating this fun effect.  I left the stencil in place until the paper and paint were dry.  Once the background was dry I used some of the stamps from the LJD-Primitive Pumpkins Stamp Set to stamp the stars and sentiment.


I also used the Die-namics LJD Primitive Pumpkin Trio and the pumpkin stamps from the LJD-Primitive Pumpkins Stamp Set to create this fun little set of pumpkins.  I used  Rich Cocoa, Tangelo, Peanut Brittle, Potters Clay, Olive Grove Momento inks for the pumpkins.  Then I added orange shimmer for a layered mat and a black card base with a black mess bow.  I also used my Zig Wink of Stella Clear Glitter Brush Pen to add a little sparkle to the stars and pumpkins.


For my third and final card I just did basic stenciling but I used three different colors of ink--Rose Bud, Tangelo, and Cantaloupe Memento inks.  I used the MIX-ables STENCILS LJD Spring Flowers to create the background.


Here is a look at the stencil with the inks before I removed it from the paper.


I added some orange sheer ribbon to create a bow and then some WOC Flowers.  I also added a few pearls at the top of the card.  I used one of the sentiments from the CS-25 More Essential Sentiments stamp set.  I added the background to a pink card base.

I had a lot of fun working with the stencils and I wanted to add they clean up very nicely too!  I will be sharing a couple more projects using the MFT Stamps MIX-ables STENCILS next week.  I hope you enjoyed the projects and the product review--I give the stencils a big thumbs up! :) 

Thanks so much for stopping by today and I hope everyone has a wonderful weekend!!

Hugs & Smiles,
Heidi


Supplies
Paper:  Strathmore Watercolor Paper, Cardstock-White, Orange Shimmer, Black, Pink
Ink/Paint/Marker:  ImagineCrafts/Tsukineko VersaMark,Memento Tuxedo Black, Rich Cocoa, Tangelo, Peanut Brittle, Potters Clay, Olive Grove, Cantaloupe, Rose Bud; Gansai Tambi 36 Colours Set Watercolors; Zig Wink of Stella Clear Glitter Brush Pen
Accessories:  Blue Sequins, White Embossing Powder, Black Mesh Ribbon, Orange Sheer Ribbon, WOC Flowers, Pearls, Scrapbook Adhesives by 3L™ 3D Foam Squares, E-Z Runner® Permanent Strips-Refillable Dispenser 49'

LinkWithin

Related Posts Plugin for WordPress, Blogger...